Transcription
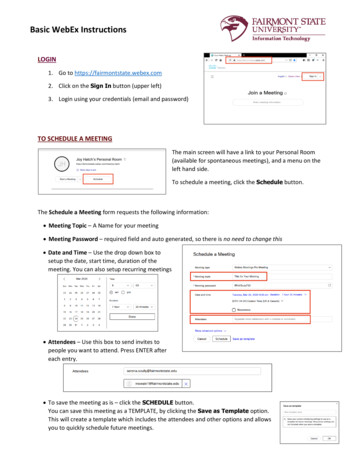
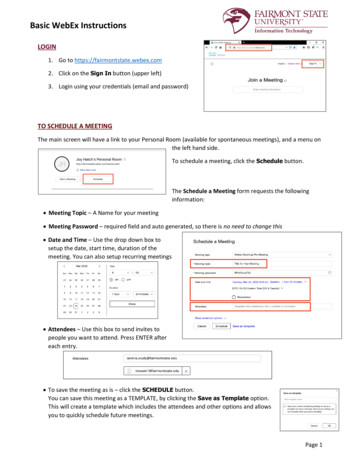
Basic WebEx InstructionsLOGIN1. Go to https://fairmontstate.webex.com2. Click on the Sign In button (upper left)3. Login using your credentials (email and password)TO SCHEDULE A MEETINGThe main screen will have a link to your Personal Room (available for spontaneous meetings), and a menu onthe left hand side.To schedule a meeting, click the Schedule button.The Schedule a Meeting form requests the followinginformation: Meeting Topic – A Name for your meeting Meeting Password – required field and auto generated, so there is no need to change this Date and Time – Use the drop down box tosetup the date, start time, duration of themeeting. You can also setup recurring meetings Attendees – Use this box to send invites topeople you want to attend. Press ENTER aftereach entry. To save the meeting as is – click the SCHEDULE button.You can save this meeting as a TEMPLATE, by clicking the Save as Template option.This will create a template which includes the attendees and other options and allowsyou to quickly schedule future meetings.Page 1
Basic WebEx InstructionsOnce your meeting is scheduled, you will see a screen that shows you the information for your meeting, whois invited and more. From this screen you can add additional attendees by adding their email into the Who isinvited? area (indicated by the red arrow).You can also perform that the following tasks using the icons:Copy the MeetingDelete MeetingEdit Your MeetingAdd to CalendarNote: Thisoption is notavailable ifmeeting wasscheduled inOutlookJOINING OR STARTING MEETINGSTo start a meeting, click on HOME or MEETINGS from the menu, and you will find a list of your meetings.1. If you are the host, you will need to START the meeting.You will see a button with START next to each meeting you are the host for, and you can click STARTto begin the meeting.2. If you are not the host, you may see a button with JOIN, which you can click to join the meeting.Page 2
Basic WebEx InstructionsNAVIGTION BASICSOn the left side of all operations is the menu, which will help you navigate around WebEx. HOME - takes you to the main screen which shows your personal meeting room,along with the next few meetings you have scheduled. MEETINGS - is a list of meetings you have scheduled or been invited to. RECORDINGS - would show your recordings, if they are available. PREFERENCES - allows you to customize your WebEx. INSIGHTS - provides analytical information about meetings you have hosted. SUPPORT - provides access to support DOWNLOADS - provides apps that you can download on your computers andmobile devices. Here are some that might be of interest:o Meetings Desktop App - control center for your desktopo Productivity Tools - adds options inside Outlook to schedule WebEx meetings.You will need to restart Outlook if you install thiso Mobile App - provides access to apps for your mobile devicesAfter starting or joining a meeting you will see a navigation bar at the bottom of your screen.AUDIO OPTIONS Options to MUTE and UNMUTE your audio Configure your audio options, and select your speaker and microphonesVIDEO OPTIONS Options for your video playback. Click this button to START or STOP your video. Allows you to change the virtual background Allows you to change your camera (if needed)SHARE – Share content from your computer Select SCREEN (sometimes maybe SCREEN 1 or SCREEN 2 with multiplemonitors). This option shares everything on your computer. Select the specific APPLICATION or CONTENT you have open. This will onlyshare that content, not the entire screen.RECORD - Options for recording your WebEx meeting. Recordings can be stored in theWebEx cloud, or on your local computer.BREAKOUT SESSION – Options to control Breakout roomsMORE OPTIONS - Helps you manage additional meetings options, including the abilityto lock the meeting, invite others, and switch your audio.END/LEAVE MEETING END the meeting for all participants – if you are the host LEAVE the meeting if you are not the hostPARTICIPANTS - Click to shows the list of participants in the call.CHAT - Click to show the chat box. Participants can send a chat to everyoneor an individual.Page 3
Basic WebEx InstructionsSHARE YOUR SCREEN OR CONTENTScreen sharing is enabled for the host and participants. To share content:1. Click on the SHARE icon.2. Select the content/screen you want to share:a. Screen 1 (or sometimes Screen 1 and Screen 2) are your desktops and will showeverything on the screen.b. The other options include single applications, such as web browsers, files or anyapplication that appears in the list of applications you have open.c. Hover over the icon with your content, then click on Share.TO SHARE VIDEO - Click on the drop down at the top of the share screen and select the OPTIMIZE FOR VIDEO.This will greatly aid the video playback, but also play the sound through the WebEx system.Once you start sharing, you will see a solid line around thescreen or application you are sharing. There will also be abanner across the top of your screen that reminds youthat You’re sharing your screen.If you hover over that banner, it will bring up a toolbar, which includes many of the options on the originaltoolbar, along with the following options that will be of interest: STOP SHARING - stops sharing your contentPAUSE – pauses sharing. Remember to resume sharing!ASSIGN – allows you to pass control to another participantANNOTATE – brings up a menu that allows you draw on content that is being shared.Page 4
Basic WebEx InstructionsBREAKOUT SESSIONSBreakout sessions are available to everyone – but will need to be enabled. These can be enabled duringscheduling, or after the meeting begins.When scheduling the meeting (using WebEx online)1. Click on SHOW ADVANCED OPTIONS2. Click on SCHEDULING OPTIONS3. Locate the Breakout sessions options – andclick ENABLE BREAKOUT SESSIONSOnce the meeting starts:1. From the MENU at the top of the screen,select BREAKOUT2. Click on ENABLE BREAKOUT SESSIONSThe BREAKOUT SESSIONS button will appear on your toolbar, indicating thatbreakout sessions are available. To start the breakout sessions:1. Click on the BREAKOUT SESSIONS button2. Select The number of breakout sessions you would like have3. Assign participants. This can be done in two ways: AUTOMATICALLY – system selects the number of participants ineach session MANUALLY – you select the participants for each session4. Once the assignments are completed, click CREATE ASSIGNMENTSThe Breakout Sessions screen will have two main parts: Left side shows the list of all personnel NOT ASSIGNED to a group. If you opted tomanually assign participants to a group, this will include everyone in the meeting.Page 5
Basic WebEx Instructions The right side shows the individual breakout sessions, and providesyou the ability to add a sessionIf you hover over the list of breakouts already assigned, you canRENAME, DELETE or ASSIGNTo manually assign members to a breakout session:1. Click ASSIGN while hovering over the breakout session2. A list of participants will appear. CHECK those you want to add tothe breakout session.3. The individuals will be added to the breakout group4. Continue until everyone is assigned.You can also assign members to a group by clicking their name in the leftpane, then clicking the MOVE TO SESSION option at the bottom of thatpane. This is especially handy when participants arrive after breakoutsessions have started.Once everything is configured, you can start the breakout session by clicking theSTART BREAKOUT SESSIONS button.There are also a few configuration settings to help you control the breakout sessions. To find these, click theSETTINGS button (lower left) in the Breakout Sessions panel.Options include: Leave or Join Session – As the host you can force participantsto join or leave when you decide it is time, or you can allowthem to move between breakout sessions. Note: Hosts and cohosts can freely move in and out of sessions without thesesetting enabled. Time Limit for Session – You can pre-determine a set lengthfor the breakout session, or manually start and stop thesessions Countdown Warning – Provides a warning to the attendeesthat the session will be ending. This is particularly useful whenpre-setting the time length for a session.NOTE: Clicking the RESET button will reset all your configurations and attendee selections. It will also allowyou to move from manually creating breakouts to the automatic mode.Once your breakout sessions begin, you will see a timer at the top of the breakout session room.To end breakout sessions, click the END ALL BREAKOUT SESSIONS button. .Page 6
Basic WebEx InstructionsREMOTE CONTROL FOR ANOTHER COMPUTERThe remote-control option will allow you to see content on another participant’s computer, and also takecontrol of their computer. The participant will be asked to approve your request, so this control cannot occurwithout consent.To start a controlling another computer:1. Have the participant SHARE their Screen.2. Once their screen is shared, you will see a small toolbar on the left side of thescreena. The top icon allows you to ANNOTATEb. The second icon allows you to request CONTROL3. Click the CONTROL icon, and you will see a screen telling you that you are aboutto request remote control. Click REQUEST.4. A request will be sent to the participant who is sharing their screen, they will needto click APPROVE to provide the access.5. Request has now been granted. Youwill receive a message to confirmthis. Click TAKE CONTROL and youwill be able to control their screen.Page 7
Basic WebEx InstructionsCHANGE WHAT YOU SEEThere are three different video layouts within WebEx: Active Speaker and Thumbnail View – shows the person speaking in a large window, and everyoneelse in thumbnails below or aboveActive Speaker View – shows the active speaker, and is the default when content is being shared (likea presentation)Grid View – shows everyone on the call, with videos if enabled or blank screens, and then telephoneicons for those on the phone. In this view the active speaker has a highlight around their video.To change your layout:1. Look for these two icons in the upper right-hand cornerof the WebEx screen once you are in the conference.2. Click on the icon on the left, and you will see the layout options. Click on the one you want, or try allthree to find the one you like best!ADD A TOOLBAR TO OUTLOOKUsing the WebEx productivity tool you can add WebEx options directly into your Outlook calendar. This willallow you to use Outlook to schedule meetings (in addition to the web browser).To find the Productivity Tools:1. From the main page in the webbrowser, find the DOWNLOADSoption in the menu on the left2. Scroll down to find the CiscoWebEx Productivity Tools.3. Download the file and install it.4. Close Outlook and restart it, and the WebEx toolbar will appear.Note – the Meet Now opens up your Personal Room. Once this isstarted you can invite others to join you.Page 8
Basic WebEx InstructionsTROUBLESHOOTING TIPSSome of the major problems with WebEx occur with sound (you are not able to hear a person, or they cannothear you) and video (camera not working or is blank). These steps will help you troubleshoot these problems.Both the SOUND and VIDEO buttons on the bottom toolbar have a drop-down menu option ( v ) thatprovide additional options. Clicking either one will bring up a list of the audio or video options for yourcomputer.SOUND SETTINGSClicking on the dropdown arrow ( v ) will bring up the sound menu. There will beseparate options for Speaker and Microphone and the option selected will be showwith a check-mark – to change that, click on another setting. If you are havingproblems, continue to try various settings to get the one that will work for you.Clicking on SETTINGS will bring up a second screen with more options.You can use the drop-down menu to select different settings and also clickthe TEST button to test the options selected.NOTE: For the microphone, there is an INPUT VOLUME slider that can beadjusted higher IF you are told your volume is low.VIDEO SETTINGSSimilar to the sound options, clicking on the dropdown arrow ( v ) willbring up the video menu and show a check-mark next to the optioncurrently selected. To change webcams, click on another setting. If you arehaving problems, continue to try various settings to get the one that willwork for you.Clicking on SETTINGS will bring up the second screen with more optionsand show you a preview of the camera. You can use the drop-downmenu to select different settings.NOTE: There is an option to add/change the virtual background, whichwill give you the ability to change how the background looks, and addyour own background. It will also show in the preview.Page 9
Basic WebEx InstructionsSUPPLEMENTAL MATERIALS - QUICK START GUIDES FROM CISCO Get Started with Cisco Webex Meetings for ted-with-Cisco-Webex-Meetings-for-Hosts Get Started with Cisco Webex Meetings for Started-with-Cisco-Webex-Meetings-for-Attendees Cisco Webex Meetings Video -Webex-Meetings-Video-TutorialsPage 10
Basic WebEx Instructions REMOTE CONTROL FOR ANOTHER COMPUTER The remote-control option will allow you to see content on another participant’s computer, and also take control of their computer. The participant will be asked to approve your request, so this control cannot occur wit