Transcription
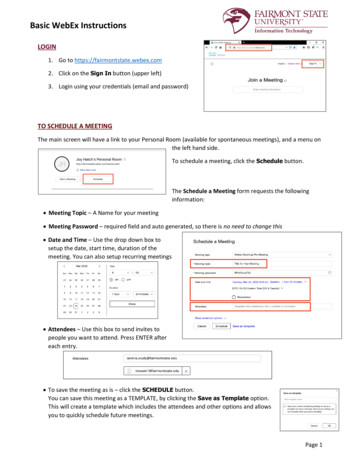
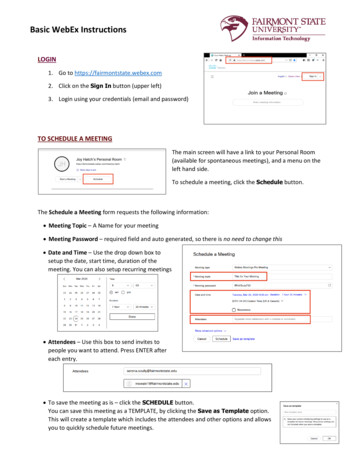
Basic WebEx InstructionsLOGIN1. Go to https://fairmontstate.webex.com2. Click on the Sign In button (upper left)3. Login using your credentials (email and password)TO SCHEDULE A MEETINGThe main screen will have a link to your Personal Room(available for spontaneous meetings), and a menu on theleft hand side.To schedule a meeting, click the Schedule button.The Schedule a Meeting form requests the following information: Meeting Topic – A Name for your meeting Meeting Password – required field and auto generated, so there is no need to change this Date and Time – Use the drop down box tosetup the date, start time, duration of themeeting. You can also setup recurring meetings Attendees – Use this box to send invites topeople you want to attend. Press ENTER aftereach entry. To save the meeting as is – click the SCHEDULE button.You can save this meeting as a TEMPLATE, by clicking the Save as Template option.This will create a template which includes the attendees and other options and allowsyou to quickly schedule future meetings.Page 1
Basic WebEx InstructionsOnce your meeting is scheduled, you will see a screen that shows you the information for your meeting, whois invited and more. From this screen you can add additional attendees by adding their email into the Who isinvited? area (indicated by the red arrow).You can also perform that the following tasks using the icons:Copy the MeetingDelete MeetingEdit Your MeetingAdd to CalendarJOINING OR STARTING MEETINGSTo start a meeting, click on HOME or MEETINGS from the menu, and you will find a list of your meetings.1. If you are the host, you will need to START the meeting.You will see a button with START next to each meeting you are the host for, and you can click STARTto begin the meeting.2. If you are not the host, you will see a button with JOIN, which you can click to join the meeting.Page 2
Basic WebEx InstructionsNAVIGTION BASICSOn the left side of all operations is the menu, which will help you navigate around WebEx. HOME - takes you to the main screen which shows your personal meetingroom, along with the next few meetings you have scheduled. MEETINGS - is a list of meetings you have scheduled or been invited to. RECORDINGS - would show your recordings, if they are available. PREFERENCES - allows you to customize your WebEx. INSIGHTS - provides analytical information about meetings you have hosted. SUPPORT - provides access to support DOWNLOADS - provides apps that you can download on your computersand mobile devices. Here are some that might be of interest:o Meetings Desktop App - control center for your desktopo Productivity Tools - adds options inside Outlook to schedule WebExmeetings. You will need to restart Outlook if you install thiso Mobile App - provides access to apps for your mobile devicesAfter starting or joining a meeting you will see a navigation bar at the bottom of your screen.AUDIO - Options for audio If you are connected to audio, this button will MUTE and UNMUTE your audio If you are not connected to audio, it will bring provide you options for connecting toaudio (use computer or call in)VIDEO – Options for your video playback. Click this button to START or STOP your video.SHARE – Share content from your computer Select SCREEN (sometimes maybe SCREEN 1 or SCREEN 2 with multiple monitors). Thisoption shares everything on your computer. Select the specific APPLICATION or CONTENT you have open. This will only share thatcontent, not the entire screen.RECORD - Options for recording your WebEx meeting. Recordings can be stored in the WebExcloud, or on your local computer.PARTICIPANTS - Click to shows the list of participants in the call.CHAT - Click to show the chat box. Participants can send a chat to everyone or an individual.MORE OPTIONS - Helps you manage additional options, including the ability to manage youraudio, video, and device settings.END/LEAVE MEETING If you are hosting the meeting, you will be able to END the meeting for all participants Click here to LEAVE the meeting if you are not the hostPage 3
Basic WebEx InstructionsSHARE YOUR SCREEN OR CONTENTScreen sharing is enabled for the host and participants. To share content:1.Click on the SHARE icon.2.Select the content/screen you want to share:a. Screen 1 (or sometimes Screen 1 and Screen 2) are your desktops and will showeverything on the screen.b. The other options include single applications, such as web browsers, files or anyapplication that appears in the list of applications you have open.c. Hover over the icon with your content, then click on Share.Once you start sharing, you will see a solid line around the screen or application you are sharing. There willalso be a banner across the top of your screen thatreminds you that You’re sharing your screen.If you hover over that banner, it will bring up a toolbar, which includes many of the options on the originaltoolbar, along with the following options that will be of interest: STOP SHARING - stops sharing your contentPAUSE – pauses sharing. Remember to resume sharing!ASSIGN – allows you to pass control to another participantANNOTATE – brings up a menu that allows you draw on content that is being shared.Page 4
Basic WebEx InstructionsREMOTE CONTROL FOR ANOTHER COMPUTERThe remote control option will allow you to see content on another participant’s computer, and also takecontrol of their computer. The participant will be asked to approve your request, so this control cannot occurwithout consent.To start a controlling another computer:1. Have the participant SHARE their Screen.2. Once their screen is shared, you will see a small toolbar on the left side of thescreena. The top icon allows you to ANNOTATEb. The second icon allows you to request CONTROL3. Click the CONTROL icon, and you will see a screen telling you that you areabout to request remote control. Click REQUEST.4. A request will be sent to the participant who is sharing their screen, they will need to clickAPPROVE to provide the access.5. Request has now been granted. Youwill receive a message to confirmthis. Click TAKE CONTROL and youwill be able to control their screen.Page 5
Basic WebEx InstructionsCHANGE WHAT YOU SEEThere are three different video layouts within WebEx: Active Speaker and Thumbnail View – shows the person speaking in a large window, and everyoneelse in thumbnails below or aboveActive Speaker View – shows the active speaker, and is the default when content is being shared (likea presentation)Grid View – shows everyone on the call, with videos if enabled or blank screens, and then telephoneicons for those on the phone. In this view the active speaker has a highlight around their video.To change your layout:1. Look for these two icons in the upper right-hand cornerof the WebEx screen once you are in the conference.2. Click on the icon on the left, and you will see the layout options. Click on the one you want, or try allthree to find the one you like best!SUPPLEMENTAL MATERIALS - QUICK START GUIDES FROM CISCO Get Started with Cisco Webex Meetings for ted-with-Cisco-Webex-Meetings-for-Hosts Get Started with Cisco Webex Meetings for Started-with-Cisco-Webex-Meetings-for-Attendees Cisco Webex Meetings Video -Webex-Meetings-Video-TutorialsPage 6
Basic WebEx Instructions LOGIN 1. Go to https://fairmontstate.webex.com 2. . o Meetings Desktop App - control center for your desktop . The remote control option will allow you to see