Transcription
ZTE WIRELESS HOME PHONE BASEUSER GUIDE
Thank you for choosing Consumer Cellular!We know you’re excited to use your new ZTE Wireless Home Phone Base,and this user guide will help you get familiar with it, so you can start usingit as soon as possible. Each section includes instructions and pictures tomake it easy to start using your device. If you would like to learn more, turnto the back of this guide, where you’ll find the CONTACT US section.We’re always happy to help you!TABLE OF CONTENTSGETTING STARTED.3GETTING TO KNOW YOUR DEVICE.3INSTALLING THE BATTERY.5INSTALLING THE nano-SIM CARD.6CHARGING THE BATTERY.7STATUS INDICATORS.8Need More Information?Visit our website at ConsumerCellular.com/HelpCall us at (800) 686-4460DEVICE INSTALLATION. 10USING YOUR DEVICE.11POWERING ON/OFF.11CONNECTING TO A PHONE.11PHONE CALLS. 12ADJUSTING VOLUME. 12MANAGING YOUR VOICEMAIL. 13SETTING UP A CONFERENCE CALL. 14USING CALL WAITING. 15FORWARDING INCOMING CALLS. 15TTY MODE.17PIN LOCK. 181
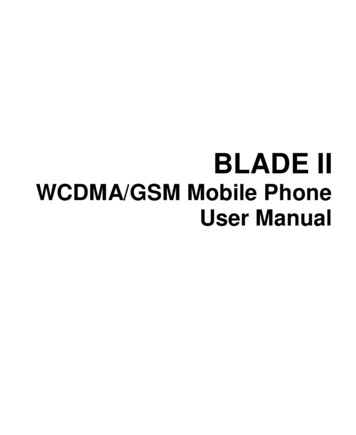
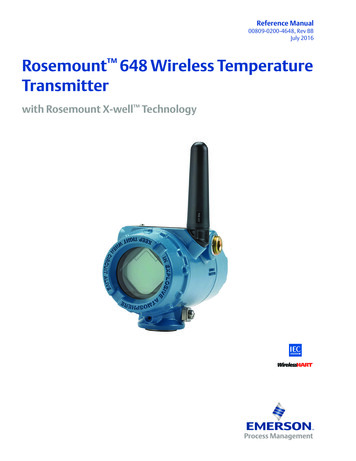
TABLE OF CONTENTS continuedGETTING STARTEDSPECIFICATIONS. 19GETTING TO KNOW YOUR DEVICEDEVICE SPECIFICATIONS. 19BATTERY SPECIFICATIONS. 19TROUBLESHOOTING. 20Your wireless home phone base enables you to make calls with yourwireless service provider’s cellular network.Top ViewREGULATORY AND SAFETY INFORMATION. 21SAFETY PRECAUTIONS. 21CLEANING AND MAINTENANCE.22AntennaAntennaFCC COMPLIANCE. 23RF EXPOSURE. 24CTIA REQUIREMENTS. 24WARRANTY. 26CONTACT US. 27micro-USBjack*PowerVoicemailBatterySignal strengthInformation* For use by manufacturer.23
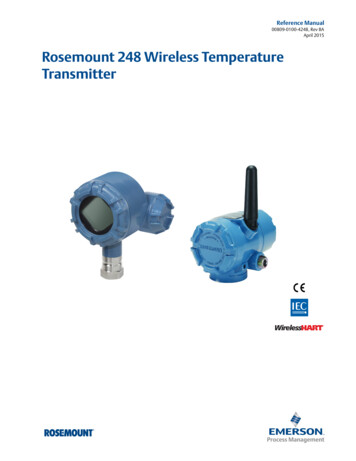
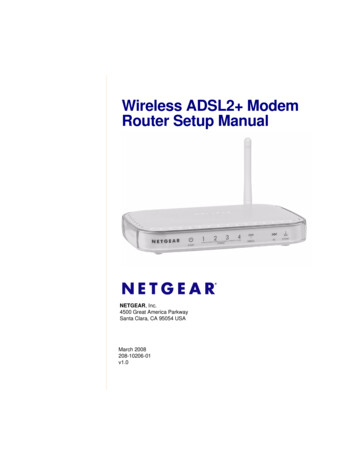
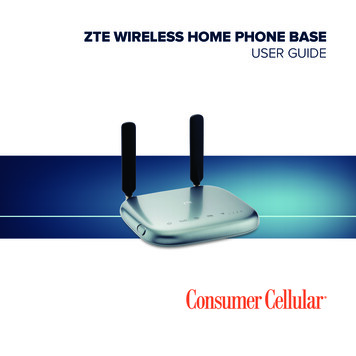
GETTING STARTEDGETTING STARTEDINSTALLING THE BATTERYBack View1. With the back cover facing upright, sandwich the device between yourhands. Slide your top hand down to remove the back cover.Power socketTelephone portsPower switch2. Insert the battery by aligning the golden contacts on the battery withthe contacts in the battery compartment. Gently push down on thebattery until it clicks into place.Bottom ViewBack cover3. Replace the back cover.45
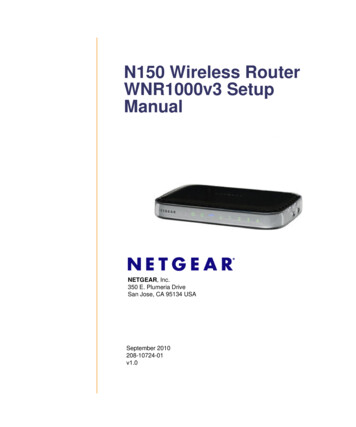
GETTING STARTEDGETTING STARTEDINSTALLING THE nano-SIM CARDCHARGING THE BATTERY1. With the back cover removed, hold your nano-SIM card with the metalcontacts facing down and slide it into the nano-SIM card slot.1. Connect the adapter to the power socket on the device. Do not forcethe connector into the power socket.2. Connect the charger to a standard AC power outlet.2. Replace the back cover.WARNING! Your device only supports a nano-SIM card. To avoiddamaging the device, please only use the card that is provided byyour service provider.3. Disconnect the charger when the battery is fully charged.67
GETTING STARTEDGETTING STARTEDSTATUS INDICATORSIndicatorIndicatorStatusGreen solidGreen blinkingPowerOffGreen blinkingVoicemailInformationDescriptionPowered onShutting downPowered offNo new voicemail messageGreen solidSoftware update in processGreen rapid blinking(2 second interval)Ready to updateGreen slow blinking(10 second interval)Software update successfulRed blinking(10 second interval)Update failedBattery8High (battery in use) or fullychargedGreen blinkingHigh(charging) or PIN entryneededYellow blinkingRed solidRed blinkingOffNetwork SignalStrengthDescriptionGreen solidYellow solidNew voicemail messageOffStatusMedium (battery in use)Medium (charging) or PUKentry neededLow (battery in use)Low (charging)No battery installedGreen solid (icon andbars)Signal strength (low to high)Red solid (icon), Off(bars)Limited or no service,searching for service, ornetwork registration failednano-SIM card error, noRed blinking (icon andnano-SIM card, or otherbars)issues9
GETTING STARTEDDEVICE INSTALLATIONYour device works with your wireless service provider’s cellular networkinstead of your home’s phone jacks.Place your device in an area where there is a strong signal from a signaltower, typically near a window or wall.USING YOUR DEVICELearn how to make calls with your device or configure the call settings.POWERING ON/OFF Slide the Power Switch to the On position to turn on your device. To power off, slide the Power Switch to the Off position.CONNECTING TO A PHONE1. Unplug your phone from the home phone wall jack.2. Plug your phone into the PHONE 1 port on the device through aphone cable.NOTE: The PHONE 2 port can be used to connect an additional phone,or cordless base station. All telephones connected to the device will usethe same telephone number.1011
USING YOUR DEVICEPHONE CALLSPlacing a Call by Dialing1. Pick up the handset of the connected home phone.2. Dial the phone number.3. Wait 4 to 8 seconds for the call to be connected automatically.NOTE: You will need to dial 10 digits even for local numbers.Answering a CallWhen the phone rings, pick up the handset to answer it. If the telephonehas hands-free function, you can answer the call by pressing the handsfree button.Ending a CallDuring a call, hang up your home phone by pressing the hands-freebutton or returning the phone receiver to its base.ADJUSTING VOLUMEYou can adjust call volume using the volume controls of any connectedphone or the device’s Volume Setting Mode.1. While on a call, quickly press ** or ## to enter Volume Setting Mode.2. Press * to turn the volume down or # to turn the volume up.3. To exit Volume Setting Mode, press any other key or wait 5 seconds.12USING YOUR DEVICENOTES: There are five settings, volume levels 1–5; level 4 is the default. Whenyou’re at the highest level 5 or lowest level 1, you can’t adjust thevolume anymore and will hear the indication sound. If your home phone(s) have volume controls, they are independent ofthe device’s Volume Setting Mode.MANAGING YOUR VOICEMAILYour device can divert calls to voicemail, so callers can leave voicemailmessages when they cannot reach you.When a voicemail message is waiting, the voicemail indicator on thedevice flashes, and you can hear an intermittent dial tone when you pickup any connected phone handset.Checking Your Voicemail Messages1. Dial 1 or *86 on the connected home phone. Wait 4 to 8 seconds toconnect to your voicemail box.2. If prompted, enter your voicemail password.3. Follow the prompts to listen to and manage your voicemail messages.Setting Voicemail Options1. Call voicemail, as explained above.2. Follow the system prompts to set options such as a password andvoice recording.NOTE: For detailed information, please contact the service provider.13
USING YOUR DEVICEUSING YOUR DEVICESETTING UP A CONFERENCE CALLUSING CALL WAITINGWhen the call waiting and three-way call features are available, you canswitch between two calls or set up a conference call. With this feature,you can talk to two people at the same time.NOTE: The call waiting and three-way call features need network supportand may result in additional charges. Please contact your service providerfor more information.1. Place the first call.2. Once you have established the connection, press the Flash (or Talk)key on your phone.3. When you hear a dial tone, dial the second number.4. When you’re connected to the second party, press the 3 key andFlash (or Talk) key to complete the three-way connection.5. To end the conference call, hang up your home phone or return thephone receiver to its base.If one of the people you called hangs up during your call, you and theremaining caller stay connected. If you initiated the call and are thefirst to hang up, all callers are disconnected.NOTE: If your phone does not have a Flash (or Talk) key, use the off-hookmechanism supported by your phone instead.Call waiting allows you to be notified of incoming calls while on a call.Press *43# or #43# to enable or disable the call waiting feature.When you’re on a call and another call comes in, you will hear two tones. Press the Flash (or Talk) key to hold the current call and accept thewaiting call. You can press the Flash (or Talk) key again to switch backand forth between calls. Press 1 and the Flash (or Talk) key to end the current call and acceptthe waiting call. Press 0 and the Flash (or Talk) key to reject the waiting call.NOTE: Your device comes with standard three-way calling and callwaiting support. Operation of these features will vary depending on yourhome phone equipment.14FORWARDING INCOMING CALLSThe call forwarding feature allows you to forward your incoming calls toanother phone number, such as your mobile phone or office number—even when your phone is turned off. You can continue to make calls fromyour phone when you have activated call forwarding.Always forward1. Press **21* on your connected phone.2. Dial the 10-digit number to which you wish to forward your calls.15
USING YOUR DEVICE3. Press #.(Example: **21*1234567890# forwards your calls to the phone number123-456-7890)4. Wait for 3 seconds and until you hear a confirmation tone for theforwarding to complete before hanging up.NOTE: To un-forward calls, press ##21#. Please wait for 3 seconds anduntil you hear a confirmation tone for the un-forwarding to completebefore hanging up.Forward when busy1. Press **67* on your connected phone.2. Dial the 10-digit number to which you wish to forward your calls.3. Press #.4. Wait for 3 seconds and until you hear a confirmation tone for theforwarding to complete before hanging up.NOTE: Press ##67# to un-forward calls.Forward when unanswered1. Press **61* on your connected phone.2. Dial the 10-digit number to which you wish to forward your calls.3. Press #. Or press **[DelaySec]#.NOTE: [DelaySec] represents the duration of no answer. (Example:**61*1234567890**10# forwards your calls to the phone number 123456-7890, if you don’t answer the calls in 10 seconds.)16USING YOUR DEVICE4. Wait for 3 seconds and until you hear a confirmation tone for theforwarding to complete before hanging up.NOTE: Press ##61# to un-forward calls.Forward when unreachable1. Press **62* on your connected phone.2. Dial the 10-digit number to which you wish to forward your calls.3. Press #.4. Wait for 3 seconds and until you hear a confirmation tone for theforwarding to complete before hanging up.NOTE: Press ##62# to un-forward calls.TTY MODEYour device is TTY compatible. A TTY device can allow people who havehearing or speech disabilities to communicate by telephone.To set the TTY mode or turn TTY support off, dial *983*889*n# on yourconnected phone, replacing n with one of the following numbers: Replace n with 0 for TTY Off mode. Users who can hear and talk candisable TTY support. Replace n with 1 for TTY Full mode. Users who cannot talk or hearmay use this mode to send and receive text messages through a TTYdevice.17
USING YOUR DEVICE Replace n with 2 for VCO mode. Users who can talk, but cannot hear,may use this mode to talk through the phone and receive responsesvia text messages. Replace n with 3 for HCO mode. Users who can hear, but cannot talk,may use this mode to listen to conversation of the other party andrespond via text messages.PIN LOCKRefer to the following table to check your nano-SIM card status, andperform the corresponding action.nano-SIM StatusPIN LockedPUK lockedBattery IndicatorGreen blinkingYellow blinkingActionEnter PIN code and then the“#” key.Enter PUK code, the “*” key,new PIN, the “*” key again,new PIN again, and then the“#” key.NOTE: When you enter a wrong PIN code 3 times, the nano-SIM card willbe PUK locked; when you enter a wrong PUK code 10 times, the nanoSIM card will be permanently locked.18SPECIFICATIONSDEVICE SPECIFICATIONSItemModel NameDimensionsWeightFrequencyTechnology BandsSupportedDescriptionWF723CC1.11 x 6.30 x 5.51 inApprox.385 g1.1 GHzFDD LTE: Band2/Band4/Band5/Band12(with MFBI)/Band13BATTERY SPECIFICATIONSItemLimited Charge VoltageTypeCapacityContinuous Talk TimeContinuous Standby TimeDescription4.4 VLithium-ion2800 mAhApprox. 3 hoursApprox. 12 hours19
TROUBLESHOOTINGSymptomsThere is no dial tone.The connection soundsdistorted/noisy.There is a rapidengaged tone when thephone is removed fromthe receiver.After dialing, there is notone.20Possible Problems/ Solutions Please wait for 1 to 2 minutes after yourdevice is turned on. If signal reception is poor, move to wheresignal reception is good. Remove any electrical appliance which istoo close to the phone or your device. The cable or phone set might be damaged.Try using a different cable or phone, orcontact the dealer.Place the phone back on the receiver and tryagain.After dialing, wait 4 to 8 seconds for the call toconnect.REGULATORY AND SAFETY INFORMATIONSAFETY PRECAUTIONS Some electronic devices may be susceptible to electromagneticinterference. Place your device away from the TV set, radio and otherelectronic equipment to avoid electromagnetic interference. Your device may interfere with medical devices like hearing aids andpacemakers. Consult a physician or the manufacturer of the medicaldevice before using this device. Please keep yourself at least 8 inches (20 centimeters) away from thedevice. Do not use your device in dangerous environments such as oilterminals or chemical factories where there are explosive gases orexplosive products being processed. Please use original accessories or accessories that are authorized byZTE. Unauthorized accessories may affect your device’s performance,damage it, or cause danger to you. Do not attempt to dismantle your device. There are no userserviceable parts. Do not allow your device or its accessories to come into contact withliquid or moisture at any time. Do not immerse your device in anyliquid.21
REGULATORY AND SAFETY INFORMATION Do not place objects on top of your device. This may lead tooverheating of the device. The device must be placed in a well-ventilated area while in use. Do not expose your device to direct sunlight or store it in hot areas.High temperature can shorten the life of electronic devices. Do not allow children to play with your device or its charger. Keep the length of the cable between your device and the phone lessthan 33 feet (10 meters). Your device is for indoor use only. Do not use it outside. Do notconnect telephone extensions which run outside of the building.These can result in lightning damage to your unit.CLEANING AND MAINTENANCE Use an antistatic cloth to clean your device. Do not use chemical orabrasive cleanser as these could damage the plastic case. Turn offyour device before you clean it. Use your device within the temperature range of 14 F–131 F(-10 C– 55 C), and the storage temperature range is -40 F–158 F(-40 C– 70 C). The humidity range is 5%–95%. Do not take out your nano-SIM card unnecessarily. The nano-SIM cardmay be easily lost or it can be damaged by static electricity.22REGULATORY AND SAFETY INFORMATIONFCC COMPLIANCEThis device complies with part 15 of the FCC Rules. Operation is subjectto the following two conditions: (1) This device may not cause harmfulinterference, and (2) this device must accept any interference received,including interference that may cause undesired operation.CAUTION: Changes or modifications not expressly approved by themanufacturer could void the user’s authority to operate the equipment.NOTE: This equipment has been tested and found to comply withthe limits for a Class B digital device, pursuant to part 15 of the FCCRules. These limits are designed to provide reasonable protectionagainst harmful interference in a residential installation. This equipmentgenerates, uses and can radiate radio frequency energy and, if notinstalled and used in accordance with the instructions, may cause harmfulinterference to radio communications. However, there is no guaranteethat interference will not occur in a particular installation. If this equipmentdoes cause harmful interference to radio or television reception, whichcan be determined by turning the equipment off and on, the user isencouraged to try to correct the interference by one or more of thefollowing measures: Reorient or relocate the receiving antenna. Increase the separation between the equipment and receiver. Connect the equipment into an outlet on a circuit different from that towhich the receiver is connected. Consult the dealer or an experienced radio/TV technician for help.23
REGULATORY AND SAFETY INFORMATIONRF EXPOSUREThis device complies with FCC radiation exposure limits set forth for anuncontrolled environment. In order to avoid the possibility of exceedingthe FCC radiation exposure limits, human proximity to the antenna shallnot be less than 20 cm (8 inches) during normal operation.The FCC grant can be found under the Display Grant section of http://www.fcc.gov/oet/fccid after searching on FCC ID: SRQ-Z723EL.CTIA REQUIREMENTS Do not disassemble or open; crush, bend or deform; puncture or shredthe battery. Do not modify or remanufacture, attempt to insert foreign objects intothe battery, immerse or expose to water or other liquids, expose tofire, explosion or other hazards. Only use the battery for the system for which it is specified. Only use the battery with a charging system that has been qualifiedwith the system per CTIA Certification Requirements for BatterySystem Compliance to IEEE 1725. Use of an unqualified batteryor charger may present a risk of fire, explosion, leakage, or otherhazards.24REGULATORY AND SAFETY INFORMATION Do not short-circuit a battery or allow metallic conductive objects tocontact battery terminals. Replace the battery only with another battery that has been qualifiedwith the system per this standard, IEEE-Std-1725. Use of an unqualifiedbattery may present a risk of fire, explosion, leakage or other hazards. Promptly dispose of used batteries in accordance with localregulations. Battery usage by children should be supervised. Avoid dropping the phone or battery. If the phone or battery isdropped, especially on a hard surface, and the user suspects damage,take it to a service center for inspection. Improper battery use may result in a fire, explosion or other hazards. The phone shall only be connected to CTIA certified adapters,products that bear the USB-IF logo or products that have completedthe USB-IF compliance program.25
WARRANTYThis product is guaranteed for a period of 12 months from the date ofpurchase. In the unlikely event of a fault occurring during this period,please contact the place of purchase. Proof of purchase is required forany service or support needed during the guarantee period.CONTACT USFor assistance, please contact:Website: ConsumerCellular.com/HelpTelephone: (800) 686-4460This guarantee will not apply to a fault caused by an accident or a similarincident or damage, liquid ingress, negligence, abnormal usage, nonmaintenance or any other circumstances on the user’s part. Furthermore,this guarantee will not apply to any fault caused by a thunderstorm orany other voltage fluctuations. As a matter of precaution, we recommenddisconnecting the charger during a thunderstorm. Batteries areconsumables and are not included in any guarantee. This guaranteedoes not apply if batteries other than ZTE original batteries are used.2627
NOTES28
ConsumerCellular.com 2018 Consumer Cellular, Inc. Consumer Cellular and the Consumer Cellular logo aretrademarks of Consumer Cellular, Inc. ZTE and the ZTE logos are trademarks of ZTECorporation. Other trademarks and trade names are the property of their respective owners.No part of this publication may be quoted, reproduced, translated or used in any form orby any means, electronic or mechanical, including photocopying and microfilm, without theprior written permission of ZTE Corporation. ZTE Corporation reserves the right to makemodifications on print errors or update specifications in this guide without prior notice.
Thank you for choosing Consumer Cellular! We know you're excited to use your new ZTE Wireless Home Phone Base, and this user guide will help you get familiar with it, so you can start using it as soon as possible. Each section includes instructions and pictures to make it easy to start using your device. If you would like to learn more, turn