Transcription
CardioMessenger II-STransmitter for BIOTRONIK Home Monitoring 362454 D GA CM II-S US.indd 1Technical Manual17.04.08 16:28:16
by BIOTRONIK GmbH & Co. KGAll rights reserved. Specifications subject tomodification, revision and improvement.2008-D-05 CardioMessenger is a registered trademark ofBIOTRONIK GmbH & Co. KGBIOTRONIK GmbH & Co. KGWoermannkehre 112359 Berlin · GermanyTel 49 (0) 30 68905-0Fax 49 (0) 30 6852804BIOTRONIK, Inc.6024 SW Jean rd. Bldg. BLake Oswego, OR 97035Phone (800) 547-0394 (24-hr)Fax (503) 635-9936sales@biotronik.comwww.biotronik.com362454 D GA CM II-S US.indd 217.04.08 16:28:16
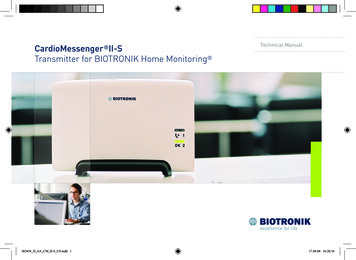
Call back light (yellow, page 14)Operating light (yellow/green, page 13)Slot for the brief instructions guide (page 12)Use only original power supply units (page 9)Connection for the power supply (page 9)362449 D GA CM II-S innen EN01.i1 129.04.08 16:08:35
CardioM essenger II-S en.book Page 1 Tuesday,M ay 6,2008 1:11 PMContentsIntroduction . . . . . . . . . . . . . . . . . . . . . . . . . 3Debugging . . . . . . . . . . . . . . . . . . . . . . . . . 16How Home Monitoring works . . . . . . . . . 3Cleaning, maintenance, and disposal . . . 19Check the completeness of the delivery . . 5Precautionary measures . . . . . . . . . . . . . 21Setup . . . . . . . . . . . . . . . . . . . . . . . . . . . . . . . 7Guidelines . . . . . . . . . . . . . . . . . . . . . . . . . 23Connection . . . . . . . . . . . . . . . . . . . . . . . . . . 9Technical data . . . . . . . . . . . . . . . . . . . . . . 27Self-test . . . . . . . . . . . . . . . . . . . . . . . . . 10Appendix . . . . . . . . . . . . . . . . . . . . . . . . . . 31Insert brief instructions guide . . . . . . . 12Index . . . . . . . . . . . . . . . . . . . . . . . . . . . . . 37Operate . . . . . . . . . . . . . . . . . . . . . . . . . . . . 13Check lights . . . . . . . . . . . . . . . . . . . . . . 13Call back function . . . . . . . . . . . . . . . . . 14Switch off the system . . . . . . . . . . . . . . 15CardioMessenger II-S1
CardioM essenger II-S en.book Page 2 Tuesday,M ay 6,2008 1:11 PM2
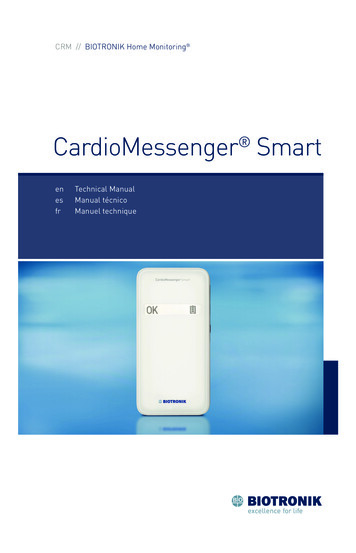
CardioM essenger II-S en.book Page 3 Tuesday,M ay 6,2008 1:11 PMIntroductionDear patient:How Home Monitoring worksYou have received a pacemaker or implantablecardioverter-defibrillator (ICD) with theadditional Home Monitoring function byBIOTRONIK. With Home Monitoring, the stateof your heart's health and your implant aresurveyed on a daily basis while you are athome. Your physician can catch up at regularintervals on how your heart is doing.Your implant is equipped with a specialtransmitter (1). Usually at night, thetransmitter sends daily information on yourheart to the patient device, yourCardioMessenger (2).The transmission power from your implant islow and does not impair your health in any way.Its limited transmission range, however,requires the use of the CardioMessenger.The CardioMessenger collects the informationreceived from the implant and automaticallyCardioMessenger II-SIntroduction3
CardioM essenger II-S en.book Page 4 Tuesday,M ay 6,2008 1:11 PMtransmits it to the BIOTRONIK Service Center(4) as encoded messages via a mobileconnection (3).Here, the messages are decoded and madeavailable for viewing by your physician (5) on aprotected web site.Based on the information received, yourphysician can decide if your implant is bestconfigured, or if the therapy needsadjustments. In this way, Home Monitoringserves as a practical diagnostic aid to yourphysician.4Introduction
CardioM essenger II-S en.book Page 5 Tuesday,M ay 6,2008 1:11 PMCheck the completeness of the deliveryCheck all components for visible damagebefore using them. Use only componentswhich are undamaged.The delivery includes the following:Technical manual with brief instructions guideCardioMessenger II-SPower supply unit with electricity cable and DCplugCardioMessenger II-SWarning!Use the CardioMessenger only if it isundamaged. Return a damagedCardioMessenger to your physician.Warning!Use only the original parts included (fordetails, see "Technical data", page 27).Other equipment may impair properfunctioning of the CardioMessenger andincrease the emitted interference and theCheck the completeness of the delivery5
CardioM essenger II-S en.book Page 6 Tuesday,M ay 6,2008 1:11 PMdevice's susceptibility to interference.The label on the back side of theCardioMessenger indicates the approvedpower supply units:6Check the completeness of the delivery
CardioM essenger II-S en.book Page 7 Tuesday,M ay 6,2008 1:11 PMSetupPlace the CardioMessenger on your bedsidetable. The bedside table is suitable because itusually meets the following conditions:2 The CardioMessenger is placed on a solidbase and cannot fall.2 The distance to the implant is less than 2meters so that regular data transmission atnight is assured.At the same time is the distance to theimplant more than 20 centimeters and theCardioMessenger has no influence on yourimplant.CardioMessenger II-SWarning!The distance between CardioMessenger andimplant has to be at least 20 centimeters.The CardioMessenger contains a mobilemodule ("Mobile"). In order to prevent anyinterferences of the implant, you have tokeep the prescribed minimum distancebetween implant and cellular phone also tothe CardioMessenger.Setup7
CardioM essenger II-S en.book Page 8 Tuesday,M ay 6,2008 1:11 PMPlease take the following also intoconsideration:2 Do not expose the CardioMessenger totemperatures lower than 10 C.2 Place the CardioMessenger in such a waythat the lights can easily be viewed duringthe day. If the lights disturb you in yoursleep, turn the CardioMessenger away fromyou. Do not place the CardioMessenger onthe floor, next to, or under your bed.2 Protect the CardioMessenger against waterand high humidity. Do not place it in thebathroom.2 Do not place the CardioMessenger next to atelevision set, microwave oven, or a similarsource of electromagnetic interference.NoteIf the CardioMessenger is too close to aloudspeaker (or a radio alarm or TV), youmay hear interference noises typical forcellular phones.2 Do not expose the CardioMessenger totemperatures exceeding 40 C. Do not put iton a place with direct sun light and do notplace it directly under a halogen spotlight.8Setup
CardioM essenger II-S en.book Page 9 Tuesday,M ay 6,2008 1:11 PMConnectionConnect the CardioMessenger to the powersupply. The outlet to be used has to be easilyaccessible. Use the supplied power supply unitwith electricity cable and DC plug.Warning!Use only the original parts included (fordetails, see "Technical data", page 27).Other equipment may impair properfunctioning of the CardioMessenger andincrease the emitted interference and thedevice's susceptibility to interference.The label on the back side of theCardioMessenger indicates the approvedpower supply units:CardioMessenger II-S1. Connect the DC plug at the end of theelectricity cable to the port on the left sideof the CardioMessenger.The connector port islabeled with the followingsymbol:Connection9
CardioM essenger II-S en.book Page 10 Tuesday,M ay 6,2008 1:11 PM2. Connect the power supply unit to the outlet.See that the outlet is not controlled by alight switch. This will prevent you fromturning off the CardioMessengeraccidentally.Self-testThe CardioMessenger automatically conductsa self-test after being connected.At first, bothlamps on thefront side of theCardioMessengerlight up yellow fora short while.After about 10 seconds, the call back light willturn off.Then theCardioMessenger checksthe connection to theBIOTRONIK ServiceCenter. Only theoperating lightilluminates yellow.10Connection
CardioM essenger II-S en.book Page 11 Tuesday,M ay 6,2008 1:11 PMThe connection check can take up to15 minutes.As soon as theconnection has beenchecked successfully,the operating lightilluminates green.The CardioMessenger is now ready for use.The CardioMessenger is intended forcontinuous operation. It should be connectedat all times, especially at night.NoteIt is a sign of malfunction if the operatinglight remains illuminated yellow for morethan 15 minutes or if it does not light up atall. Details on "Debugging" can be found onpage 16.CardioMessenger II-SConnection11
CardioM essenger II-S en.book Page 12 Tuesday,M ay 6,2008 1:11 PMInsert brief instructions guideAttached to the back cover of this technicalmanual is a removable instructions guide.3. Insert the brief instructions guide into theslot on the left side into the housing of theCardioMessenger.This guide helps to inform you quickly aboutthe function and colors of the lights.Additionally, you can list your physician'sphone number at the back cover of this guide.1. Remove the guide from this technicalmanual.2. Write your physician's or the clinic's nameand phone number on the back cover of thisguide.Now the brief instructions guide with yourphysician's phone number are ready at hand.Use it if the call back function of theCardioMessenger was activated by yourphysician. Details on "Call back function" canbe found on page 14.12Connection
CardioM essenger II-S en.book Page 13 Tuesday,M ay 6,2008 1:11 PMOperateThe CardioMessengerdoes not have an on/offswitch. After connecting it,it is ready for use as soonas the operating lightilluminates green.It is intended for continuous operation andshould remain connected at all times,especially at night.The CardioMessenger automatically receivesthe information from your implant andtransmits it to the BIOTRONIK Service Center.NoteIt indicates a malfunction if the operatinglight illuminates yellow or does not light upat all. Details on "Debugging" can be foundon page 16.CardioMessenger II-SCheck lightsCheck once a day whether either of the twolights is illuminated.Usually the operatinglight illuminates green.The call back light isnot illuminated.NoteThe functions of your implant are notaffected at any time by theCardioMessenger, irrespective of theillumination or blinking of the lights.See the next page for details on the subject"Call back function".Operate13
CardioM essenger II-S en.book Page 14 Tuesday,M ay 6,2008 1:11 PMCall back functionPerform call backWith the aid of the call back light, yourphysician can ask you to call him. Via mobilenetwork, he can turn the light on. The light willthen blink yellow for a maximum time of 3days.Call your physician as soon as you realize thatthe call back light is blinking.The call back light blinksif your physician expectsyour call.Your physician will let you know whether he orshe intends to use this function in general.14OperateNoteThe brief instructions guide with yourphysician's phone number is located in thehousing of the CardioMessenger (see"Insert brief instructions guide", page 12).
CardioM essenger II-S en.book Page 15 Tuesday,M ay 6,2008 1:11 PMTurn off the call back lightSwitch off the systemTo turn off the call back light, disconnect theCardioMessenger briefly from the main supply.The CardioMessenger does not have an on/offswitch. To turn off the CardioMessenger,disconnect it from the main supply.1. Pull the DC plug at the end of the electricitycable out of the port on the left side of theCardioMessenger.Both lights will turn off.2. Connect the DC plug to the port again.1. Remove the power plug from the walloutlet.The operating control lamp will turn out. TheCardioMessenger is switched off.The CardioMessenger performs the self-test.Afterwards, the operating light will illuminategreen and the call back light will no longer beblinking.NoteDetails on "Connection" can be found onpage 9.CardioMessenger II-SOperate15
CardioM essenger II-S en.book Page 16 Tuesday,M ay 6,2008 1:11 PMDebuggingYou can identify issues with your CardioMessenger by use of the lights on the front side.LightBehaviorOperating statusCall backlightOffNormal operation; no malfunctionYellow blinkingYour attending physician is asking for a call (Details on"Call back function" can be found on page 14.);no malfunctionYellow blinkingError type B (both lights blink yellow): Repeat the selftest, see next page for further detailsOffError type A: Check the power supply, see next pageGreen illuminationThe CardioMessenger is now ready for use;no malfunctionYellow blinkingError type B (both lights blink yellow): Repeat the selftest, see next page for further detailsYellow illuminationError type C (only this light illuminates): Check themobile connection, see next pageOperatinglight16Debugging
CardioM essenger II-S en.book Page 17 Tuesday,M ay 6,2008 1:11 PMError type ACheck the power supplyError type BRepeat the self-testThe operating light is off. CardioMessenger isnot ready for use.Both lights blink yellow. The CardioMessengerhas not concluded the self-test. It is not yetready for use.Check the power supply:2 Make sure that the DC plug of the electricalcord is plugged in tightly into the port on theleft side of the CardioMessenger.2 Make sure that the power supply unit isinserted properly into the wall outlet.2 Make sure that the outlet has current, forexample by temporarily connecting thebedside lamp to the outlet and by turningthe lamp on.If you do not find any errors, contact yourphysician.CardioMessenger II-S1. Remove the power supply unit from the walloutlet.2. Reconnect it.The CardioMessenger restarts and performsthe self-test. Both lights will illuminate yellow.The call back light will turn off once the selftest is complete. The operating light willremain illuminated yellow. Next, theCardioMessenger checks the connection to theBIOTRONIK Service Center. The operatinglight switches to green once the connectiontest is sucessful. The CardioMessenger is nowready for use.Debugging17
CardioM essenger II-S en.book Page 18 Tuesday,M ay 6,2008 1:11 PMIf both lights stay permanently illuminatedyellow, the CardioMessenger is defective.Return it to your physician.NoteThe connection check can take up to15 minutes.Error type CCheck the mobile connectionNoteThe connection check can take up to15 minutes.The operating light illuminates yellowcontinuously (longer than 15 minutes). The callback light is off. CardioMessenger cannotconnect to the BIOTRONIK Service Center.If near your bed is a place where theCardioMessenger cannot get a connection tothe BIOTRONIK Service Center in general, talkto your physician.1. Remove the power supply unit from the walloutlet.2. Put the CardioMessenger on a place withbetter mobile reception.Make sure that the distance to the implantis still less than two meters.3. Reconnect the CardioMessenger.18The CardioMessenger restarts and performsthe self-test. It checks the connection to theBIOTRONIK Service Center. The operatinglight switches to green once the connectiontest is sucessful. The CardioMessenger is nowready for use.Debugging
CardioM essenger II-S en.book Page 19 Tuesday,M ay 6,2008 1:11 PMCleaning, maintenance, and disposalCleaningMaintenance2 Keep the CardioMessenger clean and awayfrom dirty or dusty environments.The CardioMessenger is intended forcontinuous, automatic operation. Oncecorrectly installed, ongoing actions by you aretypically not required (e.g. no maintenance isrequired).2 Use a soft, lint-free cloth for cleaning.Caution!Disconnect the CardioMessenger from themain power supply before attempting toclean it with a moist cloth.In continuous operation, the longevity of thecontained button cell corresponds to thelongevity of the CardioMessenger.2 Use a cloth wetted with water for cleaning.However, avoid bringing theCardioMessenger into direct contact withwater or solvents.CardioMessenger II-SCleaning, maintenance, and disposal19
CardioM essenger II-S en.book Page 20 Tuesday,M ay 6,2008 1:11 PMDisposalDo not dispose the CardioMessenger in theusual household trash.CardioMessenger and the power supply unitcontain materials that must be correctlydisposed of in accordance with environmentalprotection regulations.If no longer required or if defective, pleasereturn the CardioMessenger and all othersupplied parts to the physician. Your physicianwill return all parts to BIOTRONIK.BIOTRONIK ensures the disposal inaccordance with the national design of theEuropean guideline 2002/96/EC on electric andelectronic used devices (WEE).20Cleaning, maintenance, and disposal
CardioM essenger II-S en.book Page 21 Tuesday,M ay 6,2008 1:11 PMPrecautionary measuresThe CardioMessenger is a medical device andtherefore complies with strict requirements fortheir development, manufacture and testing.Please take the following precautions:Warning!Do not operate the CardioMessenger insections where cellular phones are notpermitted for safety reasons (for examplein certain hospital sections).Warning!The distance between CardioMessenger andimplant has to be at least 20 centimeters.This regulatory recommendation applies forcellular phones as well as for theCardioMessenger. The minimum distanceassures that the CardioMessenger does notinfluence your implant.CardioMessenger II-SWarning!The device must be located outside thepatient's vicinity if the intended user is to beintroduced to the device in the hospital.These legal requirements apply for electricaldevices in hospitals and do not apply when theCardioMessenger is used at home.Warning!Use the CardioMessenger only if it isundamaged. Return a damagedCardioMessenger to your physician.Warning!Use only the original parts included (fordetails, see "Technical data", page 27).Other equipment may impair properfunctioning of the CardioMessenger andincrease the emitted interference and thedevice's susceptibility to interference.Precautionary measures21
CardioM essenger II-S en.book Page 22 Tuesday,M ay 6,2008 1:11 PMThe label on the back side of theCardioMessenger indicates the approvedpower supply units:Caution!Protect the CardioMessenger from:– Water and high humidity– Temperatures above 40 C (for examplefrom direct sunlight and strong halogenspotlights)– Temperatures below 10 C– Solvents, acids, detergents, and lyesCaution!The CardioMessenger may only be openedand repaired by authorized trainedpersonnel.22Precautionary measures
CardioM essenger II-S en.book Page 23 Tuesday,M ay 6,2008 1:11 PMGuidelinesUSAFCC RF exposure requirementsYour implant is equipped with a radiofrequency (RF) transceiver for wirelesscommunications to the CardioMessenger.These messages are transmitted via an RFassigned by the Federal CommunicationsCommission's (FCC) Medical ImplantCommunications Service (MICS)1).This device may not interfere with stationsoperating in the 400.150–406.000 MHz band inthe Meteorological Aids, MeteorologicalSatellite, and Earth Exploration SatelliteServices and must accept any interferencereceived, including interference that maycause undesired operation.This device complies with Part 15 of the FCCRules. Operation is subject to the following twoconditions: (1) this device may not cause harmful interference, and (2) this device mustaccept any interference received, includinginterference that may cause undesired operation.This transceiver shall be used only in accordance with the FCC rules governing the Medical Implant Communications Service.Analog and digital voice communications areprohibited. Although this transceiver has beenapproved by the Federal CommunicationsCommission, there is no guarantee that it willnot receive interference or that any particulartransmission from this transceiver will be freefrom interference.1) Federal Communications Commission for Medical Implant Communications ServiceCardioMessenger II-SGuidelines23
CardioM essenger II-S en.book Page 24 Tuesday,M ay 6,2008 1:11 PMThe FCC ID number for the CardioMessengeris QRICM08V-1.The FCC ID number for the GSM modem isIHDT56HQ1 for the CardioMessenger II-S/3and IHDT56FV1 for the CardioMessenger II-S/4.The integrated GSM module comply with theGrantees instructions for antenna configuration without having obtained a separate FCCequipment authorization for the module. Newantenna configuration for that device will beconsidered unauthorized equipment.Statemen
additional Home Monitoring function by BIOTRONIK. With Home Monitoring, the state of your heart's health and your implant are surveyed on a daily basis while you are at home. Your physician can catch up at regular intervals on how your heart is doing. How Home Monitoring works
![Merlin@home Transmitter [RF] [symbol update] [RED comp .](/img/10/7bd6c35e-42f6-4c21-be52-037b05000831.jpg)