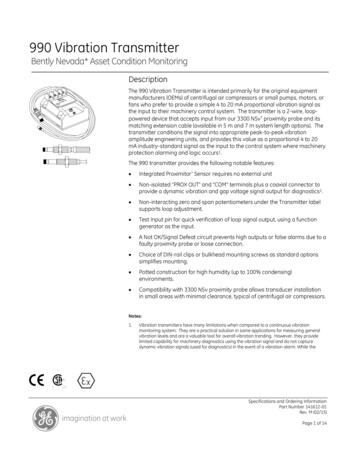
Transcription
CardioMessenger SmartTransmitter for BIOTRONIK Home Monitoring Technical ManualDoc. Id.: tbd AIndex 399229 ATechnical ManualCardioMessenger Smart
2
3Table of ContentsIntroduction. . . . . . . . . . . . . . . . . . . . . . . . . . . . . . . . . . . . . . . . . . . . . . . . . . . 4First Steps . . . . . . . . . . . . . . . . . . . . . . . . . . . . . . . . . . . . . . . . . . . . . . . . . . . . 5Check the completeness of the delivery. . . . . . . . . . . . . . . . . 5Where Do I Put the CardioMessenger? . . . . . . . . . . . . . . . . . 6How Do I Connect the CardioMessenger? . . . . . . . . . . . . . . . 7How Do I Use the CardioMessenger? . . . . . . . . . . . . . . . . . . . 7How Do I Turn Off the CardioMessenger? . . . . . . . . . . . . . . . 8Icons on the CardioMessenger . . . . . . . . . . . . . . . . . . . . . . . . . . . . . . . . . . . 9Functions. . . . . . . . . . . . . . . . . . . . . . . . . . . . . . . . . . . . . . . . . . . . . . . . . . . . 10Self-test . . . . . . . . . . . . . . . . . . . . . . . . . . . . . . . . . . . . . . . . . 10Call back function . . . . . . . . . . . . . . . . . . . . . . . . . . . . . . . . . 11Error Resolution. . . . . . . . . . . . . . . . . . . . . . . . . . . . . . . . . . . . . . . . . . . . . . 12Error type A: . . . . . . . . . . . . . . . . . . . . . . . . . . . . . . . . . . . . . . 12Error type B . . . . . . . . . . . . . . . . . . . . . . . . . . . . . . . . . . . . . . 13Error type C . . . . . . . . . . . . . . . . . . . . . . . . . . . . . . . . . . . . . . 13Handling . . . . . . . . . . . . . . . . . . . . . . . . . . . . . . . . . . . . . . . . . . . . . . . . . . . . 14Charging . . . . . . . . . . . . . . . . . . . . . . . . . . . . . . . . . . . . . . . . . 15Cleaning . . . . . . . . . . . . . . . . . . . . . . . . . . . . . . . . . . . . . . . . . 15Maintenance . . . . . . . . . . . . . . . . . . . . . . . . . . . . . . . . . . . . . . 16Disposal . . . . . . . . . . . . . . . . . . . . . . . . . . . . . . . . . . . . . . . . . 16Precautionary Measures . . . . . . . . . . . . . . . . . . . . . . . . . . . . . . . . . . . . . . . 17Guidelines . . . . . . . . . . . . . . . . . . . . . . . . . . . . . . . . . . . . . . . . . . . . . . . . . . . 18Technical Data . . . . . . . . . . . . . . . . . . . . . . . . . . . . . . . . . . . . . . . . . . . . . . . 19
41IntroductionIntroductionIntroduction1399229 ATechnical ManualCardioMessenger SmartDear Patient:You have received a device with the additional Home Monitoring function byBIOTRONIK.How Home Monitoring worksYour device (1) is equipped with a special transmitter. It sends information on yourheart to the transmitter, your CardioMessenger (2), usually at night.The transmission power from your device is low and does not impair your health inany way. Its limited transmission range, however, requires the use of the CardioMessenger.The CardioMessenger collects the information and transmits it to the BIOTRONIKService Center (4) as encoded messages via a mobile connection (3).Here, the messages are decoded and can be viewed by your physician (5) on aprotected web site.Based on the information received, your physician can decide if your device is optimally programmed or if the therapy needs adjustments. In this way, Home Monitoring serves as a practical diagnostic aid for your physician.
52First StepsFirst StepsFirst Steps2399229 ATechnical ManualCardioMessenger SmartCheck the completeness of the deliveryYour CardioMessenger is supplied ready for use, and you can operate it immediatelyby inserting the power plug into the wall outlet.However, prior to usage, check the CardioMessenger for any visible damage anduse only an undamaged CardioMessenger.Return a damaged CardioMessenger to your physician.Use only the provided original power supply brick (see the technical data).Other equipment may impair proper functioning of the CardioMessenger andincrease the emitted interference or decrease the CardioMessenger's resistance tointerference.The delivery includes the following:The CardioMessenger SmartThe power supply brick with power cord and power plugTechnical manual with quick reference guide
6First StepsWhere Do I Put the CardioMessenger?Your CardioMessenger has a battery so you can take it along as needed during theday.However, it should be placed close to your bed at night for the nightly data transferfrom the device to the CardioMessenger.The bedside table is therefore the best location for your CardioMessenger, as itusually meets the following conditions: The CardioMessenger is placed on a solid base and cannot fall. The distance to the device is less than 2 m (6 feet), so that regular data transmission from the device to the CardioMessenger at night is assured. On the bedside table, the icons on the CardioMessenger's display can be readwell so you can verify on a daily basis that it is ready for service.However, if the bedside table is made of metal, you should not place theCardioMessenger directly on the table. For example, place a stack of books toestablish a distance of approx. 5 cm between the two so that the metal does notinterfere with the device's data reception.Please take the following also into consideration: Do not place the CardioMessenger next to a television set, microwave oven, or asimilar source of electromagnetic interference.You may hear noises typical of cellular phones if you place the CardioMessengertoo close to a radio alarm or a television set, for example. Do not expose the CardioMessenger to temperatures exceeding 40 C (104 F).Do not put it in places where it is subjected to direct sunlight and do not put itdirectly under a halogen spotlight. Do not expose the CardioMessenger to temperatures below 0 C (32 F). Protect the CardioMessenger against water and high humidity.Do not place it in the bathroom.
7First StepsHow Do I Connect the CardioMessenger?Your CardioMessenger is already pre-installed and supplied ready for use. You canoperate it immediately by inserting the power plug into the wall outlet.Also consult the included quick reference guide.However, proceed as follows if the plug has disconnected during removal from thepackage or during shipping:1Connect the small plug (micro USB plug) on the right to theCardioMessenger.Make sure that the marking (white arrow) is on the upper side of theplug.The connector port is labeled with the following symbol:2Insert the power plug into the wall outlet.Make sure that the outlet is not connected to a light switch, in order to prevent theCardioMessenger from accidentally being turned off.The CardioMessenger now turns on automatically and performs a self-test.The CardioMessenger is ready for use once the self-test is complete and thefollowing icons are displayed:If this is not displayed, please refer to Error Resolution, p. 12How Do I Use the CardioMessenger?The CardioMessenger automatically receives the information from your device andtransmits it to the BIOTRONIK Service Center. Therefore, there are only a few pointsthat you need to consider.Check once a day whether your CardioMessenger is switched on and ready for use.This is indicated by the following icons:If you want to use the CardioMessenger in mobile operation, we recommend thatyou make a habit of charging it every night on the bedside table.
8First StepsHow Do I Turn Off the CardioMessenger?Since the CardioMessenger contains a mobile ("cellular") module, you may need toswitch off the CardioMessenger for safety reasons (e.g., in an airplane).The use of cellular phones is prohibited in some locations to provide quiet zones(e.g., in a theater or cinema). The CardioMessenger does not need to be turned offin such places because it produces no noise.Press the on/off key for approximately 5 seconds until the display turns off.The CardioMessenger is switched off.You can also switch off the CardioMessenger by disconnecting the plug of the powersupply brick from the wall outlet. Pull on the power plug, not the cable.Note: The functions of your device are not affected by the CardioMessenger at anytime.Your device remains fully functional even if the CardioMessenger is not ready foruse.
93Icons on the CardioMessengerIcons on the CardioMessengerIcons on the CardioMessenger3399229 ATechnical ManualCardioMessenger SmartThe CardioMessenger has the following icons:1Operation icon2Call back iconSee Call back function, p. 113Information iconSee Error Resolution, p. 124The battery icon is always displayed with 1-3 barsaccording to the charging status.When the CardioMessenger is charging, a battery iconwith a small power plug is displayed.
104FunctionsFunctionsFunctions4399229 ATechnical ManualCardioMessenger SmartSelf-testThe CardioMessenger automatically conducts a self-test after being connected.1All icons on the CardioMessenger are displayed.The CardioMessenger then checks the connection to the cellularphone network.2The operation icon flashes and the battery icon is displayed.The connection test can take up to 15 minutes.3Once the connection is established, the operation and battery iconremains permanently activated.The CardioMessenger is now ready for use.If the connection was not established, the information icon flashes.Additional information can be found under: Error Resolution, p. 12.
11FunctionsCall back functionWith the call back icon, your physician can request you to call him/her. Your physician can turn on the icon via the cellular phone network. It will then flash for amaximum of 3 days.The call back icon flashes if your physician wants you to call. Your physician will letyou know in advance whether he or she intends to use this function in general.Contact your physician during office hours as soon as you notice that the call backicon is flashing.Turning off the call backiconTo turn off the call back icon, briefly turn off the CardioMessenger.1Press the on/off key on the right of the CardioMessenger for approximately five seconds.2The operation icon turns off.3Press the on/off key again for approximately five seconds.The CardioMessenger performs a self-test.The operation and battery icon is then displayed and the call back icon stopsflashing.However, please do not forget to call your physician.
125Error ResolutionError ResolutionError Resolution5399229 ATechnical ManualCardioMessenger SmartIf your physician contacts you because device messages are not being received butyour CardioMessenger was ready for use during the period in question, you shouldremove possible sources of radio interference from the immediate vicinity of theCardioMessenger.Possible sources of interference can be communication devices such as wirelesshome network equipment, cellular phones, cordless phones, and their basestations.The standard IEC 60601-1-2: 2007 recommends a distance of 3.3 m.Malfunctions on the CardioMessenger are indicated by the icons.IconBehaviorOperational statusOffError type A: No power supplyConstantly onError type B: Self-test failedFlashingError type C: No mobile connectionError type A:No power supplyThe operation icon is not displayed. CardioMessenger is not ready for use. Make sure that the micro USB plug is properly inserted in the CardioMessenger. Make sure that the power plug is properly inserted into the wall outlet. Make sure that the outlet provides an electrical current, for example by temporarily connecting the bedside lamp to the outlet and turning the lamp on.If you do not find any errors, contact your physician.
13Error ResolutionError type BSelf-test failedThe information icon is displayed.Repeat the self-test because the CardioMessenger did not finish it.The CardioMessenger is not ready for use.1Press the on/off key on the right of the CardioMessenger for approximately five seconds.2Press the on/off key again for approximately five seconds.The CardioMessenger starts and automatically repeats the self-test. After the selftest has been completed, the CardioMessenger is ready for use.Note: The connection test can take up to 15 minutes.If the information icon continues to flash, the CardioMessenger is defective. Returnit to your physician.Error type CNo mobile connectionThe information icon flashes and the battery icon is displayed. Check the mobileconnection because the CardioMessenger cannot connect to the BIOTRONIKService Center.1Press the on/off key on the right of the CardioMessenger for approximately five seconds.2Put the CardioMessenger in a place with better mobile reception.Make sure that the distance to the device is still less than 2 m (6 feet).3Press the on/off key again for approximately five seconds.The CardioMessenger restarts and performs the self-test. It checks the connectionto the cellular phone network. The operation and battery icon is displayed once theconnection test is completed successfully. The CardioMessenger is now ready foruse.Note: The connection test can take up to 15 minutes.If the CardioMessenger generally cannot connect to the cellular phone networkfrom positions near your bed, contact your physician.
146HandlingHandlingHandling6399229 ATechnical ManualCardioMessenger SmartThe CardioMessenger is intended primarily for continuous operation at homebecause it receives information from your device once daily, usually at night, andforwards it to the BIOTRONIK Service Center.Make a habit of charging the CardioMessenger at night so that it can be used inmobile operation during the day.You can use the CardioMessenger while mobile for up to 48 hours, but note thefollowing: Protect the CardioMessenger from direct contact with water. For example, wearit under your coat or in a pocket when it rains. Do not carry the CardioMessenger inside the breast pocket of your shirt orjacket, and do not place it directly on your skin. Do not bring the CardioMessenger into the vicinity of fire. Do not expose the CardioMessenger to temperatures below minus 5 C (23 F).The battery longevity of the CardioMessenger may decrease at lower temperatures. Do not turn on the CardioMessenger if it was recently in a cold environment. Letit warm up slowly to room temperature, since the resulting condensed watermay harm the electronic circuit. Do not operate the CardioMessenger in areas where cellular phones areprohibited for safety reasons (for example in certain areas of the hospital or inairplanes).Note: The distance between the CardioMessenger and the device must be at least15 cm so that the CardioMessenger does not interfere with the device.The CardioMessenger contains a mobile ("cellular") module. In order to prevent anyinterference with your device, the prescribed minimum distance between the deviceand a cellular phone must also be maintained between the implanted device and theCardioMessenger.Unplug the power supply brick of the CardioMessenger during thunderstorms or ifyou will not use the CardioMessenger for an extended period of time.
15HandlingChargingNote: You should charge the CardioMessenger once before using it for the firsttime.It is also recommended that you operate the CardioMessenger with the powersupply brick on the bedside table to fully charge the battery.At the very latest, the CardioMessenger must be charged when the battery iconflashes.Proceed as follows:1Connect the CardioMessenger to the mains supply.During charging, the individual segments of the battery icon flash alternatingly anda small power plug is displayed.The three bars on the battery icon flash successively until the CardioMessenger isfully charged. Once it is fully charged, all three bars are completely filled. Chargingusually takes no longer than two hours.Note: The CardioMessenger can be used with the power supply brick if the batteryis defective.Even if the battery is completely discharged, the CardioMessenger can stilloperate using the power supply brick.If handled properly, the installed battery should supply the CardioMessenger with48 hours of power even after 500 charging cycles (which is at least two years).Cleaning Keep the CardioMessenger clean and away from dirty or dusty environments. Use a soft, lint-free cloth for cleaning.WARNING!Turn off the CardioMessenger before cleaning it with a damp cloth. Use a cloth wetted with water for cleaning. However, avoid bringing the CardioMessenger into direct contact with water or solvents. Protect the CardioMessenger from direct contact with water.
16HandlingMaintenanceThe CardioMessenger is intended for continuous, automatic operation. Oncecorrectly installed, ongoing maintenance is typically not required.DisposalEuropean Directive 2002/96/EC regarding waste electrical and electronic equipment (WEEE) applies to the CardioMessenger and associated power supply brick,because they contain materials that must be correctly disposed of for reasons ofenvironmental protection.If you no longer require the CardioMessenger or it is defective, please return it andall other supplied parts to your physician.You can also dispose of the CardioMessenger as electronic scrap according to theapplicable regulations.BIOTRONIK ensures disposal in accordance with the national versions of the European guideline 2002/96/EC on waste electrical and electronic equipment (WEEE).
177Precautionary MeasuresPrecautionary MeasuresPrecautionary Measures7399229 ATechnical ManualCardioMessenger SmartThe CardioMessenger is a medical product and therefore complies with the strictrequirements for the development, manufacturing, and testing of medical devices.Please take the following precautions:Statutory regulations for electrical devices in hospitals require that theCardioMessenger not be used in areas where cellular phones are prohibited.Such areas can be identified by the following or similar signs:Protect the CardioMessenger and the power supply brick from: Water and high humidity Temperatures above 40 C (104 F) (e.g., direct sunlight, strong halogen spotlights, fire) Temperatures below 0 C (32 F) Solvents, acids, detergents, and lyes Pressure below 700 hPa (corresponding to altitudes above 3000 m) Pressure above 1060 hPa (corresponding to altitudes below sea level) Violent shocks or other strong mechanical influences Intense light sources (direct sunlight, strong halogen spotlights)WARNING!Lay the power cord so that there is no risk of strangulation.WARNING!Keep the CardioMessenger away from children under three years old due toingestible small parts.
188GuidelinesGuidelinesGuidelines8399229 ATechnical ManualCardioMessenger SmartTelemetry data for the USAThis transmitter is authorized by rule under the Medical Device Radiocommunication Service (in part 95 of the FCC Rules) and must not cause harmful interferenceto stations operating in the 400.150-406.000 MHz band in the Meteorological Aids(i.e., transmitters and receivers used to communicate weather data), the Meteorological Satellite, or the Earth Exploration Satellite Services and must accept interference that may be caused by such stations, including interference that may causeundesired operation.This transmitter shall be used only in accordance with the FCC Rules governing theMedical Device Radiocommunication Service. Analog and digital voice communications are prohibited. Although this transmitter has been approved by the FederalCommunications Commission, there is no guarantee that it will not receive interference or that any particular transmission from this transmitter will be free frominterference.This device is registered with the Federal Communications Commission under thefollowing number: FCC ID: QRICMSMARTElectromagneticcompatibilityNote: The CardioMessenger is protected from disturbances resulting from electromagnetic interference, electrostatic discharges, and other sources – includinginterference induced by wiring. Interfering electromagnetic emissions from theCardioMessenger have been minimized. The CardioMessenger therefore meetsthe requirements of EN 60601-1-2 in every respect.Note: Other equipment, for example portable and mobile RF radioc
BIOTRONIK. How Home Monitoring works Your device (1) is equipped with a special transmitter. It sends information on your heart to the transmitter, your CardioMessenger (2), usually at night. The transmission power f

![Merlin@home Transmitter [RF] [symbol update] [RED comp .](/img/10/7bd6c35e-42f6-4c21-be52-037b05000831.jpg)