Transcription
Using SNMP Version 3 with CiscoWorksand Third-Party Tools ImplementationGuideVersion 8.3March 2010Americas HeadquartersCisco Systems, Inc.170 West Tasman DriveSan Jose, CA 95134-1706USAhttp://www.cisco.comTel: 408 526-4000800 553-NETS (6387)Fax: 408 527-0883Text Part Number: OL-19726-01
THE SPECIFICATIONS AND INFORMATION REGARDING THE PRODUCTS IN THIS MANUAL ARE SUBJECT TO CHANGE WITHOUT NOTICE. ALLSTATEMENTS, INFORMATION, AND RECOMMENDATIONS IN THIS MANUAL ARE BELIEVED TO BE ACCURATE BUT ARE PRESENTED WITHOUTWARRANTY OF ANY KIND, EXPRESS OR IMPLIED. USERS MUST TAKE FULL RESPONSIBILITY FOR THEIR APPLICATION OF ANY PRODUCTS.THE SOFTWARE LICENSE AND LIMITED WARRANTY FOR THE ACCOMPANYING PRODUCT ARE SET FORTH IN THE INFORMATION PACKET THATSHIPPED WITH THE PRODUCT AND ARE INCORPORATED HEREIN BY THIS REFERENCE. IF YOU ARE UNABLE TO LOCATE THE SOFTWARE LICENSEOR LIMITED WARRANTY, CONTACT YOUR CISCO REPRESENTATIVE FOR A COPY.The Cisco implementation of TCP header compression is an adaptation of a program developed by the University of California, Berkeley (UCB) as part of UCB’s publicdomain version of the UNIX operating system. All rights reserved. Copyright 1981, Regents of the University of California.NOTWITHSTANDING ANY OTHER WARRANTY HEREIN, ALL DOCUMENT FILES AND SOFTWARE OF THESE SUPPLIERS ARE PROVIDED “AS IS” WITHALL FAULTS. CISCO AND THE ABOVE-NAMED SUPPLIERS DISCLAIM ALL WARRANTIES, EXPRESSED OR IMPLIED, INCLUDING, WITHOUTLIMITATION, THOSE OF MERCHANTABILITY, FITNESS FOR A PARTICULAR PURPOSE AND NONINFRINGEMENT OR ARISING FROM A COURSE OFDEALING, USAGE, OR TRADE PRACTICE.IN NO EVENT SHALL CISCO OR ITS SUPPLIERS BE LIABLE FOR ANY INDIRECT, SPECIAL, CONSEQUENTIAL, OR INCIDENTAL DAMAGES, INCLUDING,WITHOUT LIMITATION, LOST PROFITS OR LOSS OR DAMAGE TO DATA ARISING OUT OF THE USE OR INABILITY TO USE THIS MANUAL, EVEN IF CISCOOR ITS SUPPLIERS HAVE BEEN ADVISED OF THE POSSIBILITY OF SUCH DAMAGES.CCDE, CCENT, CCSI, Cisco Eos, Cisco HealthPresence, Cisco IronPort, the Cisco logo, Cisco Nurse Connect, Cisco Pulse, Cisco SensorBase, Cisco StackPower,Cisco StadiumVision, Cisco TelePresence, Cisco Unified Computing System, Cisco WebEx, DCE, Flip Channels, Flip for Good, Flip Mino, Flipshare (Design), Flip Ultra,Flip Video, Flip Video (Design), Instant Broadband, and Welcome to the Human Network are trademarks; Changing the Way We Work, Live, Play, and Learn, Cisco Capital,Cisco Capital (Design), Cisco:Financed (Stylized), Cisco Store, Flip Gift Card, and One Million Acts of Green are service marks; and Access Registrar, Aironet, AllTouch,AsyncOS, Bringing the Meeting To You, Catalyst, CCDA, CCDP, CCIE, CCIP, CCNA, CCNP, CCSP, CCVP, Cisco, the Cisco Certified Internetwork Expert logo,Cisco IOS, Cisco Lumin, Cisco Nexus, Cisco Press, Cisco Systems, Cisco Systems Capital, the Cisco Systems logo, Cisco Unity, Collaboration Without Limitation,Continuum, EtherFast, EtherSwitch, Event Center, Explorer, Follow Me Browsing, GainMaker, iLYNX, IOS, iPhone, IronPort, the IronPort logo, Laser Link, LightStream,Linksys, MeetingPlace, MeetingPlace Chime Sound, MGX, Networkers, Networking Academy, PCNow, PIX, PowerKEY, PowerPanels, PowerTV, PowerTV (Design),PowerVu, Prisma, ProConnect, ROSA, SenderBase, SMARTnet, Spectrum Expert, StackWise, WebEx, and the WebEx logo are registered trademarks of Cisco Systems, Inc.and/or its affiliates in the United States and certain other countries.All other trademarks mentioned in this document or website are the property of their respective owners. The use of the word partner does not imply a partnership relationshipbetween Cisco and any other company. (0910R)Any Internet Protocol (IP) addresses and phone numbers used in this document are not intended to be actual addresses and phone numbers. Any examples, command displayoutput, network topology diagrams, and other figures included in the document are shown for illustrative purposes only. Any use of actual IP addresses or phone numbers inillustrative content is unintentional and coincidental.Using SNMP Version 3 with CiscoWorks and Third-Party Tools Implementation Guide 2010 Cisco Systems, Inc. All rights reserved.
CONTENTSPrefacevObtaining Documentation and Submitting a Service RequestObtaining Additional Tools Application DocumentationCHA PTER1OverviewNetwork Topology2v1-1Network Management ToolsCHA PTERv1-11-2Adaptive Security Appliance Setup1-2Using Network Management Tools2-1Net-SNMP 2-1Polling a MIB 2-1Sending a Trap 2-2SilverCreek SNMP Test Suite 2-3Running SilverCreek 2-3Setting Up an SNMP Version 3 Agent 2-5Loading and Deleting MIBs 2-7Running a Test Suite 2-8Enabling Debugging 2-9Testing MIBs 2-12Accessing the MIB Browser 2-13Receiving Notification Trap Messages 2-15Testing Performance 2-16Ipswitch WhatsUp Gold 2-17Starting Ipswitch WhatsUp Gold 2-17Adding a New SNMP Agent 2-18Adding SNMP Version 3 Credentials 2-19Using the WhatsUp Gold Web Interface 2-22Walking an SNMP MIB or an OID 2-23Configuring SNMP Traps 2-27HP OpenView Network Node ManagerInstalling NNM 2-31Starting the NNM 2-31Loading MIBs 2-322-30Using SNMP Version 3 with CiscoWorks and Third-Party Tools Implementation GuideOL-19726-01iii
ContentsAdding a Network to the Current Map 2-33Configuring Specific SNMP Version 3 Parameters 2-36Setting Global SNMP Version 3 Credentials 2-37Setting Specific SNMP Version 3 Credentials 2-37Viewing Node Information 2-38Configuring the NNM MIB Browser 2-39Configuring SNMP Version 3 No-auth/No-priv Connections 2-40Configuring SNMP Version 3 MD5 Auth/No-priv Connections 2-40Configuring SNMP Version 3 SHA Auth/No-priv Connections 2-40Configuring SNMP Version 3 MD5 Auth/Priv Connections 2-41Configuring SNMP Version 3 SHA Auth/Priv Connections 2-41Browsing a MIB 2-41Running a MIB Browser Packet Trace 2-42Using the NNM SNMP Version 3 Trap Viewer 2-43Using the HP OpenView NNM Web Application 2-44CiscoWorks 2-46Starting CiscoWorks 2-47Getting Started with the CiscoWorks LMS Portal 2-47Using the Device Center 2-48Performing an SNMP Walk 2-49Using the Management Station to Device Tool 2-54INDEXUsing SNMP Version 3 with CiscoWorks and Third-Party Tools Implementation GuideivOL-19726-01
PrefaceThis preface includes the following sections: Obtaining Documentation and Submitting a Service Request, page v Obtaining Additional Tools Application Documentation, page vObtaining Documentation and Submitting a Service RequestFor information on obtaining documentation, submitting a service request, and gathering additionalinformation, see the monthly What’s New in Cisco Product Documentation, which also lists all new andrevised Cisco technical documentation, w/whatsnew.htmlSubscribe to the What’s New in Cisco Product Documentation as a Really Simple Syndication (RSS) feedand set content to be delivered directly to your desktop using a reader application. The RSS feeds are a freeservice and Cisco currently supports RSS version 2.0.Obtaining Additional Tools Application DocumentationFor more tools application information, see the following list of documents: Net-SNMP Version 5.1.2 documentation and online help (Linux) IWL Silvercreek Test Suite tutorial and online help (most recent version) HP OpenView NNM SPI Version 7.53 documentation Ipswitch WhatsUp Gold Version 12.3 documentation and online help CiscoWorks for Windows LMS Version 3.1 online help and tutorialsUsing SNMP Version 3 with CiscoWorks and Third-Party Tools Implementation GuideOL-19726-01v
PrefaceUsing SNMP Version 3 with CiscoWorks and Third-Party Tools Implementation GuideviOL-19726-01
CH A P T E R1OverviewSNMP Version 3 provides secure communication of SNMP transactions with an SNMP agent byproviding authentication and privacy options through the User-based Security Model (USM) andView-based Access Control Model (VACM). SNMP Versions 1 and 2c have no knowledge of the userfor access control to MIBs, nor do they provide encrypted privacy options for authentication. VACMsupport has been deferred to a future release.This chapter describes the installation, configuration, and use of CiscoWorks and several third-partytools that can communicate with the adaptive security appliance through SNMP Version 3 on a devicerunning ASA 5500 series software Version 8.2(1) or higher.The chapter includes the following sections: Network Management Tools, page 1-1 Network Topology, page 1-2 Adaptive Security Appliance Setup, page 1-2Network Management ToolsThis document describes the following network management tools: Net-SNMP (CLI application) IWL SilverCreek, the SNMP Test Suite Ipswitch WhatsUp Gold HP OpenView NNM CiscoWorks for Windows LMSCisco has tested these tools for interoperability between the NMS and the adaptive security appliance.Using SNMP Version 3 with CiscoWorks and Third-Party Tools Implementation GuideOL-19726-011-1
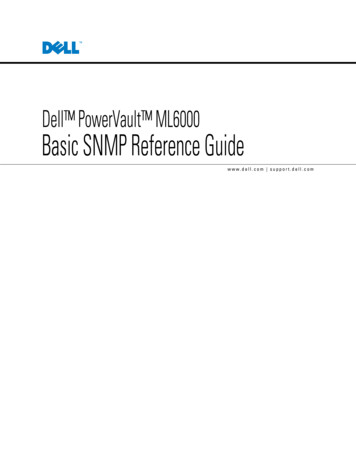
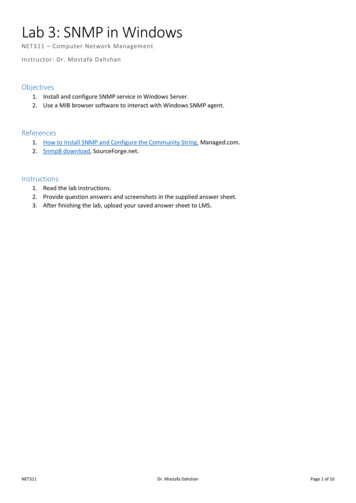
Chapter 1OverviewNetwork TopologyNetwork TopologyFigure 1-1 shows the network topology for implementing SNMP Version 3.Network Topology for SNMP Version 3 ImplementationHP OpenViewIBM TivoliCiscoWorksIpswitchASDMCSMCodenomiconAdaptive SecurityAppliance275366Figure 1-1Adaptive Security Appliance SetupThe adaptive security appliance requires that you configure the SNMP server group, the SNMP serveruser associated with the group, and the SNMP server host, which specifies the user for receiving SNMPtraps.To configure SNMP Version 3 operations, the required sequence of commands is as follows: snmp-server group snmp-server user snmp-server hostThe following shows an example adaptive security appliance configuration:hostname# snmp-server group authPriv v3 privhostname# snmp-server group authNoPriv v3 authhostname# snmp-server group noAuthNoPriv v3 noauthhostname# snmp-server user md5des authPriv v3 auth md5 mysecretpass priv des passphrasehostname# snmp-server user md5user authNoPriv v3 auth md5 mysecretpasshostname# snmp-server user noauthuser noAuthNoPriv v3hostname# snmp-server host mgmt 10.0.0.1 version 3 md5deshostname# snmp-server host mgmt 10.0.0.2 version 3 md5deshostname# snmp-server host mgmt 10.0.0.3 version 3 tion Anywhere, USAcontact admin@example.comenable traps snmp authentication linkup linkdown coldstartenable traps syslogenable traps ipsec start stopenable traps entity config-change fru-insert fru-removeenable traps remote-access session-threshold-exceededUsing SNMP Version 3 with CiscoWorks and Third-Party Tools Implementation Guide1-2OL-19726-01
CH A P T E R2Using Network Management ToolsThis chapter describes CiscoWorks and several third-party network management tools, and includes thefollowing sections: Net-SNMP, page 2-1 SilverCreek SNMP Test Suite, page 2-3 Ipswitch WhatsUp Gold, page 2-17 HP OpenView Network Node Manager, page 2-30 CiscoWorks, page 2-46Net-SNMPNet-SNMP Version 5.1.2 provides the following tools and libraries: An extensible agent An SNMP library Tools to request or set information from SNMP agents Tools to generate and handle SNMP trapsYou can download the Net-SNMP network management tool from the following URL:http://sourceforge.net/projects/net-snmp/This section includes the following topics: Polling a MIB, page 2-1 Sending a Trap, page 2-2Polling a MIBTo poll a MIB, after you have finished configuring the adaptive security appliance, run the snmpwalkcommand from the NMS to the adaptive security appliance:NoteNo specific configuration is required for Net-SNMP on Linux when you run the snmpwalk command.[root@iLinux2 ]# snmpwalk -v3 -u md5des -l authPriv -a MD5 -A mysecretpass –x des -Xpassphrase 10.31.8.254 1.3.6.1.2.1.1Using SNMP Version 3 with CiscoWorks and Third-Party Tools Implementation GuideOL-19726-012-1
Chapter 2Using Network Management ToolsNet-SNMPThe following is sample output from the snmpwalk command:SNMPv2-MIB::sysDescr.0 STRING: Cisco Adaptive Security Appliance Version 8.2(0)227SNMPv2-MIB::sysObjectID.0 OID: me.0 Timeticks: (486600) 1:21:06.00SNMPv2-MIB::sysContact.0 STRING: admin adminSNMPv2-MIB::sysName.0 STRING: ciscoasaSNMPv2-MIB::sysLocation.0 STRING: sjc - 190 W Tasman Drive, San Jose, CA 95134USASNMPv2-MIB::sysServices.0 INTEGER: 4Sending a TrapWhen the adaptive security appliance sends a trap, it is authoritative, which means that the user createdwithin the snmptrapd command must be associated with the EngineID sending the trap.To establish this association, perform the following steps:Step 1In the /var/net-snmp/snmptrapd.conf file, enter the following statement:createUser -e ENGINEID myuser authentication protocol “my authentication pass” AES “myprivacy pass”For this statement, define the listed parameters, which include the following:– ENGINEID—The EngineID of the application that is going to be sending the trap– myuser—The USM username that is going to be sending the trap– authentication protocol—The authentication type (SHA or MD5, with SHA the preferredsetting.)– “my authentication pass”—The authentication pass-phrase to use to generate the secretauthentication key. Enclose the pass-phrase in quotation marks if it includes spaces.– privacy protocol—The encryption type to use (AES or DES, with AES the preferred setting)– “my privacy pass”—The encryption pass-phrase to use to generate the secret encryption key.Enclose the pass-phrase in quotation marks if it includes spaces. If you do not enclose theencryption pass-phrase in quotation marks, it is set to the same value as the authenticationpass-phrase.Step 2In the /tmp/snmptrapd.conf file, enter the following statement:createUser -e 80000009fe8949e0b20319e2d175b93fe7dc24af0dff7db915 md5des MD5 mysecretpassDES passphraseStep 3Run the snmptrapd command, pointing to that file.NoteThis process runs in the foreground, uses only the specified configuration file, and logs messagesto the stderr file.[root@iLinux2 net-snmp]# snmptrapd -f -C -c /tmp/snmptrapd.conf -LeStep 4Run the snmptrap command from the adaptive security appliance to send a linkdown or linkup trap byentering the following commands:hostname (config)# int g3/1.391hostname (config-if)# shuthostname (config-if)# no shutUsing SNMP Version 3 with CiscoWorks and Third-Party Tools Implementation Guide2-2OL-19726-01
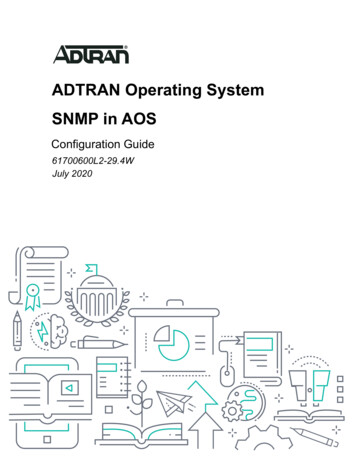
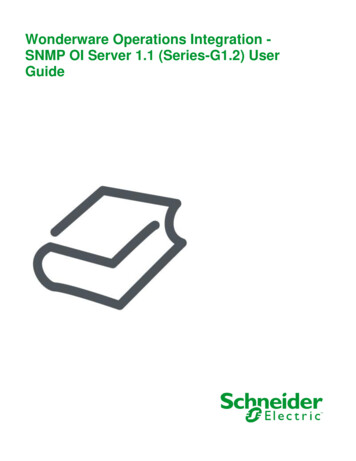
Chapter 2Using Network Management ToolsSilverCreek SNMP Test SuiteThe following is sample output from the snmptrap command:2009-03-18 23:52:06 NET-SNMP version 5.1.2 Started.2009-03-18 23:52:20 10.31.8.254 [10.31.8.254]:SNMPv2-MIB::sysUpTime.0 Timeticks: (938700) 2:36:27.00SNMPv2-MIB::snmpTrapOID.0 OID: IF-MIB::linkDownIF-MIB::ifIndex.1 INTEGER: 1 IF-MIB::ifAdminStatus.1 INTEGER: down(2)IF-MIB::ifOperStatus.1 INTEGER: down(2)2009-03-18 23:52:22 10.31.8.254 [10.31.8.254]:SNMPv2-MIB::sysUpTime.0 Timeticks: (939000) 2:36:30.00SNMPv2-MIB::snmpTrapOID.0 OID: IF-MIB::linkUp IF-MIB::ifIndex.1 INTEGER: 1 IF-MIB::ifAdminStatus.1 INTEGER: up(1)IF-MIB::ifOperStatus.1 INTEGER: up(1)SilverCreek SNMP Test SuiteThe SilverCreek SNMP test suite enables the detection of SNMP compliance problems andimplementation errors in private and standard MIBs. You can download a free version of the softwarefrom the following -trial.html?Itemid This section includes the following topics: Running SilverCreek, page 2-3 Setting Up an SNMP Version 3 Agent, page 2-5 Loading and Deleting MIBs, page 2-7 Running a Test Suite, page 2-8 Enabling Debugging, page 2-9 Testing MIBs, page 2-12 Receiving Notification Trap Messages, page 2-15 Testing Performance, page 2-16Running SilverCreekTo run the SilverCreek software, choose Start All Programs SilverCreekMx Evaluation RunTest Suite and Tools (Start Here).When the application starts, along with the SilverCreek main window (see Figure 2-1), a consolewindow (see Figure 2-2) appears that shows the following information: Logging messages Debugging messages Other message exchanges that occur between the NMS and the SNMP Version 3 agent MIBs that are loadedUsing SNMP Version 3 with CiscoWorks and Third-Party Tools Implementation GuideOL-19726-012-3
Chapter 2Using Network Management ToolsSilverCreek SNMP Test SuiteFigure 2-1SilverCreek Main WindowUsing SNMP Version 3 with CiscoWorks and Third-Party Tools Implementation Guide2-4OL-19726-01
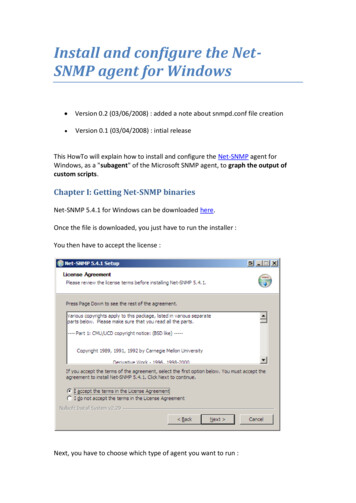
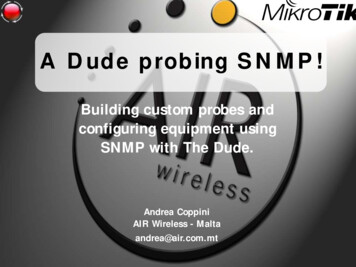
Chapter 2Using Network Management ToolsSilverCreek SNMP Test SuiteFigure 2-2SilverCreek Console WindowSetting Up an SNMP Version 3 AgentTo set up the SNMP Version 3 agent, perform the following steps:Step 1Choose File New Agent Setup.Using SNMP Version 3 with CiscoWorks and Third-Party Tools Implementation GuideOL-19726-012-5
Chapter 2Using Network Management ToolsSilverCreek SNMP Test SuiteFigure 2-3 shows how the new agent must be configured.Figure 2-3Step 2New Agent Setup Dialog BoxEnter the hostname or the IP address, port number, and SNMP Version 3 parameters.After the agent is connected, as shown in Figure 2-4, you can run SNMP test suites from the Test Suitestab in the left pane.Using SNMP Version 3 with CiscoWorks and Third-Party Tools Implementation Guide2-6OL-19726-01
Chapter 2Using Network Management ToolsSilverCreek SNMP Test SuiteFigure 2-4SilverCreek Main Window Showing Connected SNMP AgentLoading and Deleting MIBsTo load and delete MIBs, perform the following steps:Step 1To manually load and delete MIBs, choose MIB Load Delete MIBs.Step 2To view the loaded MIBs, click View Loaded Modules (see Figure 2-5).You can maintain all the MIB files in the default mibs directory, which is defined by the environmentvariable, MIB PATH.Using SNMP Version 3 with CiscoWorks and Third-Party Tools Implementation GuideOL-19726-012-7
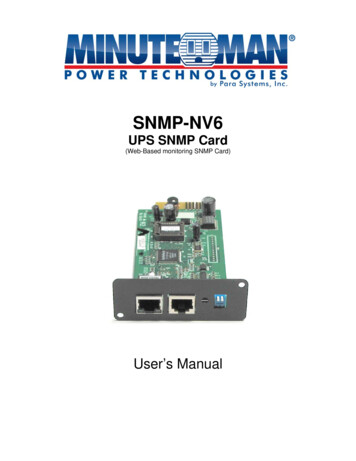
Chapter 2Using Network Management ToolsSilverCreek SNMP Test SuiteFigure 2-5Load and Delete MIBs Dialog BoxRunning a Test SuiteTo run a test suite, perform the following steps:Step 1In the main window, select a test category (for example, MIB-II tests) in the left pane (see Figure 2-6).The list of available tests for the selected test category appears in the right pane, and test details appearin the bottom pane.Step 2Select a single test or multiple tests, and click Run All or Selected Tests.The test status appears in the Status column. The total number of tests run, passed, failed, and so onappears at the bottom of the window.Using SNMP Version 3 with CiscoWorks and Third-Party Tools Implementation Guide2-8OL-19726-01
Chapter 2Using Network Management ToolsSilverCreek SNMP Test SuiteFigure 2-6SilverCreek Main Window Showing Selected TestsEnabling DebuggingTo enable debugging, choose Tools Options (see Figure 2-7).Using SNMP Version 3 with CiscoWorks and Third-Party Tools Implementation GuideOL-19726-012-9
Chapter 2Using Network Management ToolsSilverCreek SNMP Test SuiteFigure 2-7Debug Tab of the Options Dialog BoxFigure 2-8 shows the warning message that appears to indicate that the test runs more slowly withdebugging turned on.Using SNMP Version 3 with CiscoWorks and Third-Party Tools Implementation Guide2-10OL-19726-01
Chapter 2Using Network Management ToolsSilverCreek SNMP Test SuiteFigure 2-8Warning Notes Dialog BoxFigure 2-9 shows the console dialog box that lists the debugging messages, which appear when you runa test.Using SNMP Version 3 with CiscoWorks and Third-Party Tools Implementation GuideOL-19726-012-11
Chapter 2Using Network Management ToolsSilverCreek SNMP Test SuiteFigure 2-9Console Dialog Box Listing Debugging MessagesTesting MIBsTo test MIBs, perform the following steps:Step 1In the left pane of the main window, click the MIB Testing tab.All the MIB modules that are loaded and available for testing appear (see Figure 2-10).Step 2Click the radio buttons for the MIBs that need to be tested.Step 3In the right pane, select the tests that need to be run.The purpose and details of the tests appear in the bot
Net-SNMP Version 5.1.2 documentation and online help (Linux)† † IWL Silvercreek Test Suite tutorial and online help (most recent version) † HP OpenView NNM SPI Version 7.53 documentation † Ipswitch WhatsUp Gold Version 12.3 documentation and online help † CiscoWo