Transcription
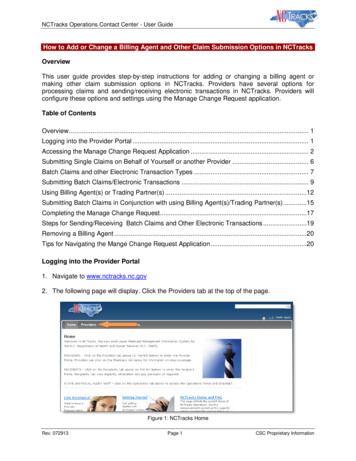
NCTracks Operations Contact Center - User GuideHow to Add or Change a Billing Agent and Other Claim Submission Options in NCTracksOverviewThis user guide provides step-by-step instructions for adding or changing a billing agent ormaking other claim submission options in NCTracks. Providers have several options forprocessing claims and sending/receiving electronic transactions in NCTracks. Providers willconfigure these options and settings using the Manage Change Request application.Table of ContentsOverview . 1Logging into the Provider Portal . 1Accessing the Manage Change Request Application . 2Submitting Single Claims on Behalf of Yourself or another Provider . 6Batch Claims and other Electronic Transaction Types . 7Submitting Batch Claims/Electronic Transactions . 9Using Billing Agent(s) or Trading Partner(s) .12Submitting Batch Claims in Conjunction with using Billing Agent(s)/Trading Partner(s) .15Completing the Manage Change Request.17Steps for Sending/Receiving Batch Claims and Other Electronic Transactions .19Removing a Billing Agent .20Tips for Navigating the Mange Change Request Application .20Logging into the Provider Portal1. Navigate to www.nctracks.nc.gov2. The following page will display. Click the Providers tab at the top of the page.Figure 1: NCTracks HomeRev. 072913Page 1CSC Proprietary Information
NCTracks Operations Contact Center - User Guide3. From the Providers page, click the NCTracks Secure Portal icon.Figure 2: Providers Page4. The following login screen will display. Enter the NCID and password and click the Log inbutton.Figure 3: Provider Portal LoginAccessing the Manage Change Request Application5. The following Providers page will display. Click the Status and Management button.Figure 4: Select Status and ManagementRev. 072913Page 2CSC Proprietary Information
NCTracks Operations Contact Center - User Guide6. The Status and Management screen will display. The screen is divided into 6 sections.Figure 5: Status and Management PageStatus and Management Sections1. Submitted Applications: Contains enrollment applications or change requests that havealready been submitted and are currently in process.2. Saved Applications: Contains enrollment applications or change requests that have beenstarted but not yet submitted. Please remember that your application must be submitted tothe State within 90 days of the date it was created. If not completed within 90 days, theincomplete application will be deleted.3. Re-enroll: This section will list provider accounts associated with the user’s NCID that havebeen terminated. The user can select the account to re-enroll, then click 'Submit'.4. Manage Change Request: This section will list provider accounts associated with the usersNCID that are active.Rev. 072913Page 3CSC Proprietary Information
NCTracks Operations Contact Center - User Guide5. Re-verification: This section allows the user to submit a required re-verificationapplication for a provider enrollment account.6. Maintain Eligibility: This section allows the user to submit a required maintain eligibilityapplication for a provider enrollment account.7. To begin a new Manage Change Request, under the Manage Change Request Section,click the radio button next to the NPI to be changed. Next, click the Update button.If the Manage Change Request section reads No Data to Display, it is possible that aManage Change Request has already been created and/or submitted, but not yetapproved. Check the Submitted Applications and Saved Applications sections for aManage Change Request/Enrollment that is already in process.Figure 6: Select Manage Change Request8. The Organization Basic Information screen will display. The left hand side menu willdisplay a list of topics.Do NOT click the menu options on the left hand side of the screen, as each pagemust be accessed/reviewed before the Manage Change Request can be submitted.Instead, to navigate to appropriate section, click the Next button on the bottom rightcorner of the screen until you reach the Addresses screen.Figure 7: Organization Basic Information PageRev. 072913Page 4CSC Proprietary Information
NCTracks Operations Contact Center - User Guide9. On the Terms and conditions page, to attest and accept Medicaid Terms and Agreements,click the check box and click the Next button.Figure 8: Attestation Statement10. Once you reach the Method of Claim and Electronic Transactions page, read thefollowing information carefully, as each menu option can dictate how electronic transactionsare sent and received.Figure 9: Method of Claim and Electronic TransactionsRev. 072913Page 5CSC Proprietary Information
NCTracks Operations Contact Center - User GuideSubmitting Single Claims on Behalf of Yourself or another ProviderIf you intend on submitting single, individual claims on behalf of yourself or another provider,select the first option titled “Submit a single claim via the NCTracks Provider Portal”.If you do not intend on sending or receiving batch claims or electronictransactions, do NOT select the Batch Claims or Billing Agent OptionsFigure 10: Select Single Claim Option OnlyClick here to view the steps for completing the Manage Change Request.Rev. 072913Page 6CSC Proprietary Information
NCTracks Operations Contact Center - User GuideBatch Claims and other Electronic Transaction TypesThe following electronic transactions and corresponding responses can submitted through theNCTracks Provider Portal.There are two main types of transactions:Inbound: Transactions sent from the billing agent/TP/provider into NCTracks are consideredInbound Transactions.Outbound: Transactions sent from NCTracks to the billing agent/TP/provider are consideredoutbound Inquiry request sent by the provider, billing agent ortrading partner to NCTracks to check eligibility benefits ofa recipient271OutboundResponse sent from NCTracks to the billing agent, tradingpartner or provider regarding recipient eligibility benefitsrequest when a 270 electronic inquiry has been received276InboundInquiry request sent to NCTracks to check claims status277OutboundResponse sent from NCTracks to a billing agent, tradingpartner or providers regarding the claim status requestwhen a 276 electronic inquiry has been received.820OutboundResponse from NCTracks to the billing agent/TP/providerregarding payroll deducted and other Group PremiumPayment for Insurance Products/payment remittanceadvise for 834 transaction.834InboundBenefit enrollment and maintenance835OutboundResponse sent from NCTracks to the billingagent/TP/provider regarding Health Care Claim Payment/Remittance Advice837PInboundElectronic Batch Claims (Professional) sent by the billingagent/TP/provider to NCTracks837IInboundElectronic Batch Claims (Institutional) sent by the billingagent/TP/provider to NCTracks837DInboundElectronic Batch Claims (Dental) sent by the billingagent/TP/provider to NCTracksRev. 072913DescriptionPage 7CSC Proprietary Information
NCTracks Operations Contact Center - User GuideTransaction#999Rev. 072913TransactionTypeOutboundDescriptionThe 999 is used to return functional acknowledgement forall electronic batch transactions submitted, including 837claims, 276 Claim Status Request, 270 Eligibility or BenefitInquiry, and 834 Benefit Enrollment and Maintenance filesubmissions. In addition, it reports X12 compliance errorsand whether the received transaction(s) were rejected oraccepted.Page 8CSC Proprietary Information
NCTracks Operations Contact Center - User GuideSubmitting Batch Claims/Electronic TransactionsIf you intend on submitting batch claims, or exchange other types of electronic transactions withNCTracks on behalf of yourself or other provider(s), there are several setup steps required.These steps are usually performed by the office administrator or user administrator.Please note that this process is still required even if you only intend onreceiving the 835 Health Care Claim Payment/ Remittance Advice1. User Provisioning and Mailbox Creation StepsIn order to access the X12 transactions, the OA will need to assign the appropriate user roleto each user that will need access to the 835 mailbox. In addition, these users must beassigned to at least one group.a. From the Home screen, click the User Maintenance button.Figure 11: Home - Select User Maintenanceb.c.d.e.The User Maintenance screen will display.In the Search Criteria window, enter the user’s last name in the Last Name field.Click the Search button.The search results will appear below the Search Criteria window. To open the Edit Userwindow, double click on the user ID hyperlink.f. Scroll down to locate the Access Rights window on the lower right hand side of thescreen.g. Availed roles to be added, will be listed in the Available Roles pane.h. To add user roles, highlight the applicable role and click the Add button to move the roleto the right side pane titled Assigned Roles. The following roles should be added:– Claims– Outbound-IND-4010-835– Outbound-IND-5010-835i. Click the Save button to save the changes.Rev. 072913Page 9CSC Proprietary Information
NCTracks Operations Contact Center - User Guide2. Complete the Manage Change Request - Trading Partner RegistrationTo register as a Trading Partner, you will need complete the Manage Change Requestprocess. On the Method of Claim and Electronic Transactions page, and click the optiontitled “Submit a batch claim via NCTracks”.Do NOT select the “Billing Agent” option if you do not use a billing agent. Forinstructions on using a billing agent click here.Figure 11: Select Single Claim and Batch Claim OptionsAt this time, the Transaction Supplier Number (TSN) is generated. Proceed to theend of the application. At the REVIEW screen, click the REVIEW APPLICATIONbutton to review the application so that you may write down the TSN number as itis needed for the next step.Click here to view the steps for completing the Manage Change Request.CONTINUED ON THE NEXT PAGERev. 072913Page 10CSC Proprietary Information
NCTracks Operations Contact Center - User Guide3. Complete and Submit the Trading Partner Contact DocumentThe MCR must be in an Approved status before the next step can be completed. Once theMCR is approved, complete the Trading Partner Contact Document, which can be accessfrom the NCTracks portal at the following s/public/doc/contactdocument072413.docxComplete all the fields on the form.Remember to include your TSN number on the form.For the type of sender, select from the following options:Type of –––Billing Service––––Sends/receives EDI transactions on behalf of their own organizationTransfers EDI transactions for a providerTranslates the provider data into the required formatAccepts multiple types of claims and sends them to various payers includingMedicareAccepts EDI transactions from payers for routing to and/or reformatting forprovidersPerforms general and payer-specific edits on claims, and usually handles allof the transactions for a given providerFrequently reformats data files to submit to various payers and manageresponse reports including acknowledgements, edit reports, and remittanceadvicesCollects the provider’s claim information and creates the electronic claim tobill to the appropriate insurance companies, including MedicareMay provide claims billing services only or provide full financial accountingand/or other servicesMay view beneficiary or provider data to perform their obligations to theprovider, if the provider designates them for that accessMust submit initial claims on the provider’s behalf in order to quality as abilling service.Select the type(s) of transactions that will be sent/received–––––––not required)Email the completed form to NCMMIS EDI Support@CSC.COMOnce the form is received, the EDI Team will update the provider record in the Operationsportal to enable the provider to receive the 835 transactions. No testing is required tocomplete this setup. Once the provider setup is complete, the EDI team will notify theprovider via email.Rev. 072913Page 11CSC Proprietary Information
NCTracks Operations Contact Center - User Guide4. Complete Transaction TestingIf you intend on submitting electronic transactions to NCTracks, you will need to submit testtransactions to ensure that the transactions are compliant with HIPAA standards. Planahead, as this can take some time. For detailed instructions regarding testing, pleasereference the companion guides located at the following oviders/provider-trading-partners.htmlThe NCTracks Trading Partner Connectivity Guide provides screen shots and steps forsubmitting batch claims. Reference the following link to view this ms/public/pdf/companionguides/NCTracks Trading Partner Connectivity Guide V3.pdfUsing Billing Agent(s) or Trading Partner(s)a. If you intend on using one or more billing agents or TPs to submit claims or send andreceive all electronic transactions, select the third option. It is recommended that you alsoselect the first option, to allow you to submit a single claim if needed.With this option, the billing agent/TP sends and receives all transaction typesFor this configuration, do NOT select the Batch Claim option. If you select this option,the billing agent/TP will NOT receive the outbound transactions such as the 835 HealthCare Claim Payment/ Remittance Advice). This option, by default routes the 835transaction to the provider in lieu of the billing agent/TP.Figure 12: Select Single Claim Option OnlyRev. 072913Page 12CSC Proprietary Information
NCTracks Operations Contact Center - User Guideb. The Associate Billing Agent page will display. To link the provider to a billing agent orclearinghouse, click the Yes radio button.Figure 13: Associate Billing Agentc. The Search window will display. Enter the Billing Agent ID, Last Name/First Name orOrganization name. Click the Search button to search for a billing agent.Figure 14: Billing Agent Informationd. The search results will display. Click the radio button next to the appropriate billing agent,and click the Add button to link the provider to the billing agent.Figure 15: Billing Agent Search ResultsRev. 072913Page 13CSC Proprietary Information
NCTracks Operations Contact Center - User Guidee. The Selected Authorized Billing Agents screen will display.If you are using multiple billing agents or TPs, you may specify that each billingagent/TP handle, manage or receive different types of electronic transactions.For example, you may designate one billing agent to process all professional claims(837P Transactions), while designating the other billing agent/TP to receive theremittance advices (835 transactions). Reference the attached screen shots toassign/designate different transaction types for multiple billing agents/TPs. Otherwise,click the Next button.Figure 16: Designate Transactions to Billing AgentClick here to view the steps for completing the Manage Change Request.CONTINUED ON THE NEXT PAGERev. 072913Page 14CSC Proprietary Information
NCTracks Operations Contact Center - User GuideSubmitting Batch Claims in Conjunction with using Billing Agent(s)/Trading Partner(s)Some providers select both the “Batch Claim” and “Billing Agent” options. The benefit of thisconfiguration is that the billing agents/TPs can be setup to submit the inbound transactions,such as batch claims into NCTracks, while the outbound transactions such the RemittanceAdvices can route directly to the provider.To complete this configuration, your provider will need to register as a trading partner andcomplete other steps. Click here for the complete process to register as a trading partner.For additional information on the Trading Partner/Provider registration and testing, pleasereference the companion guides located at the following oviders/provider-trading-partners.htmla. If you intend on using one or more billing agents/TPs to submit claims or send and receiveother electronic transactions but would also like to receive the batch outbound transactionssuch as the remittance advices, select all three options.Figure 17: Select Single Claim Batch Claim and Billing Agent Optionsb. The Associate Billing Agent page will display. To link the provider to a billing agent orclearinghouse, click the Yes radio button.Figure 18: Associate Billing AgentRev. 072913Page 15CSC Proprietary Information
NCTracks Operations Contact Center - User Guidec. If you selected Yes to add a billing agent, the Search window will display. Enter the BillingAgent ID, Last Name/First Name or Organization name. Click the Search button to searchfor a billing agent.Figure 19: Billing Agent Informationd. The search results will display. Click the radio button next to the appropriate billing agent,and click the Add button to link the provider to the billing agent.Figure 20: Billing Agent Search ResultsRev. 072913Page 16CSC Proprietary Information
NCTracks Operations Contact Center - User Guidef.The Selected Authorized Billing Agents screen will display.If you are using multiple billing agents or TPs, you may specify that each billingagent/TP handle, manage or receive different types of electronic transactions.For example, you may designate one billing agent to process all professional claims(837P Transactions), while designating the other billing agent/TP to receive theremittance advices (835 transactions). Reference the attached screen shots toassign/designate different transaction types for multiple billing agents/TPs. Otherwise,click the Next button.Figure 21: Designate Transactions to Billing AgentCompleting the Manage Change Request11. Continue to click the next button through the Change Request application until you reach theTerms and Conditions page.The Save Draft button will only save your progress and will not submit the ChangeRequest for processing.Figure 22: EFT Account Information Click NextRev. 072913Page 17CSC Proprietary Information
NCTracks Operations Contact Center - User Guide12. The Review Application screen will display. On the left hand margin, verify that allapplication pages have a green check mark next to each page. In addition, verify the contactemail address listed on the page. This can be updated on the Basic Information page.If you have selected the “Batch Claims” option, you must click the REVIEWAPPLICATION button so that you may write down the TSN number as it is neededto complete the Trading Partner Registration process.To review the application in Adobe PDF format, click the Review Application button. If youhave successfully completed all required information for your provider enrollment applicationand are satisfied the information is complete and accurate, Click the Next button to proceedto the Attachments/Submit Electronic Application page.Figure 23: EFT Review ApplicationRev. 072913Page 18CSC Proprietary Information
NCTracks Operations Contact Center - User Guide13. The Sign
NCTracks Operations Contact Center - User Guide Rev. 072913 Page 4 CSC Proprietary Information 5. Re-verification: This section allows the user to submit a required re-verification applic