Transcription
TOSHIBAOptimum BusinessTrunking and the Toshiba IPedge IP–PBX V1.1.3-06Configuration Guide
TOSHIBATable of Contents1. Overview32. SIP Trunk Adaptor Set-up Instructions33. Additional Set-up Information74. International Calling85. PBX Configuration92
TOSHIBA1 OverviewThe purpose of this configuration guide is to describe the steps needed toconfigure the Toshiba IPedge IP-PBX for proper operation Optimum Business SipTrunking.2 SIP Trunk Adaptor Set-up InstructionsThese instructions describe the steps needed to configure the LAN side of theOptimum Business SIP Trunk Adaptor.Step 1:Log on to the Optimum Business SIP Trunk Adaptor1. Connect a PC to port 4 of the Optimum Business SIP Trunk Adaptor,the silver device labeled Edgewater Networks, 4550 series.2. Open a Web browser and go to IP Addresshttp://10.10.200.1. A login box will appear.3. Enter login and password and click ‘OK’.Login: pbxinstallPassword: s1ptrunkStep 2:Click on the LAN Settings Link1. Assign an IP Address to the LAN interface of the SIP Trunk Adaptor.The IP address must be on the same subnet as the IP PBX. This changesthe address on port 1 of the Optimum Business SIP Trunk Adaptor.Note: This will become your local SIPproxy IP address. No other IP addresseswill be provided by Cablevision.2. Optional: Specify a VLAN for yourvoice traffic. Click the ‘Enable VoiceVLAN Tagging’ check box. The defaultVLAN ID is 100.Note: VLAN 200 should not be used.It is dedicated to port 4 for management.3
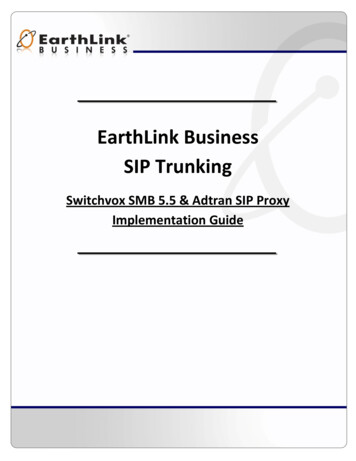
TOSHIBA3. Optional: Enable the DHCP server. This will allow the SIP Trunk Adaptor toact as a DHCP server, which will provide IP addresses to the voice network,and create a dedicated voice LAN, as per diagram 2.4. Click ‘Submit’.Diagram 1SIP Trunk Adaptor for IP-PBXsExample: Single LAN ConfigurationUsing a connection from the customer’s LAN, the SIP Trunk Adaptor’s address can bea statically assigned private IP address. It may not be assigned a Public IP address.Diagram 2SIP Trunk Adaptor for IP-PBXsExample: Separate Voice and Data Networks ConfigurationThe customer attaches their Voice Switch to the Ethernet LAN port 1 on theOptimum Business SIP Trunk Adaptor. The Optimum Business SIP Trunk Adaptorcan be enabled as a DHCP server to provide routing for the separate voice network.4
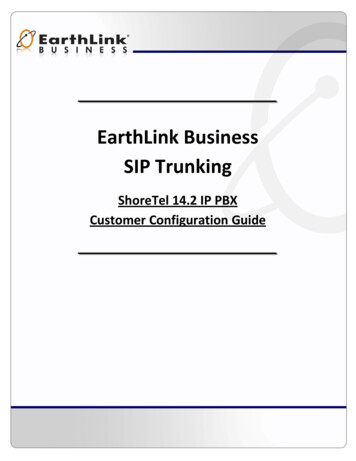
TOSHIBAStep 3:Click on the SIP Trunk Configuration Link1. Select your IP PBX makeand model from thedrop-down menu.2. Specify how the IP PBXwill register to theOptimum BusinessSIP Trunk Adaptor.3. The Cablevision networkonly supports Inband DTMF.Click on the check boxnext to “Convert InbandDTMF” if you cannotconfigure your IP PBX tosend out Inband DTMF. The DTMF tone duration generated by the phonesand/or PBX may need to be increased from their default setting. Somephones and/or PBX have a default setting between 180ms to 200ms. Thissetting is too low. The recommended setting is 600ms.4. Click ‘Submit’.Step 4:Diagnostics LinkYou can make a test call directlyfrom your phone or use the testcall application under theDiagnostics link.5
TOSHIBAStep 4 continuedFieldDescriptionOutbound Call TestTelephoneNumberSpecifies an outside phone number to which an outbound callwill be initiated. The pilot telephone number of the SIP Trunk willbe prepopulated.Pilot NumberDisplays the provisioned pilot number, which is used for outboundand inbound call tests.CallInitiates a call outbound to a telephone number entered or inboundto the pilot number displayed.Inbound Call Test(radio button)Indicates whether inbound test call will be enabled or disabled. Ifinbound test calls are enabled, calls made to the pilot number will beredirected to the test UA for fifteen minutes. When the pilot numberis dialed, you will hear a test message play.SubmitEnables or disables the inbound call test.IP Address to PingVerifies basic connectivity to a networking device. Successful pingtest results indicate that both physical and virtual path connectionsexist between the system and the test IP address.Ping ButtonSends a ping to the IP address specified in the field “IP Addressto Ping”.IP Addressto TraceTracks the progress of a packet through the network. The packet canbe tracked through the WAN or LAN interfaces of the adaptor.Interface(radio button)Indicates whether a packet will be tracked through the LAN orthe WAN.TracerouteButtonInitiates a traceroute to the specified IP address on either the LANor the WAN.ResetClears all fields and selections and allows you to enter new information.Reset applies to outbound call test, ping and traceroute.6
TOSHIBA3 Additional Set-up InformationSystemsFieldDescriptionPbxinstall LinkSelect to change the default password for the pbxinstall login ID.Only the password can be changed. The login ID cannot be changed.Password7
TOSHIBAFieldDescriptionUsernameSpecifies the username for which the password can be changed.Current PasswordSpecifies the current password.New PasswordSpecifies the new password.Confirm PasswordConfirms the new password.SubmitApplies the settings configured on this page.ResetClears all fields and selections and allows you to enter new information.4 International CallingOptimum Voice Business Trunking offers an optional International Calling Servicefor direct-dialed calls made from the Customer’s business or from any phone via theOptimum Voice International Calling remote access number to destinations outside ofthe United States, Puerto Rico, Canada and the U.S. Virgin Islands at per minute rates.The Customer must login to the Optimum Business Account Center and activate theservice on the Optimum Business Trunk Pilot telephone number to activate the serviceand manage the monthly International spending limit for the account.Activating International calling on the Pilot TN will enable International calling for allDirect Inward Dial (DIDs) telephone numbers as well. Blocking International calling forone or more DIDs is managed by the customer directly from the PBX phone systemconfiguration. To minimum the exposure to fraudulent calling, It is recommended tolimit International calling capability to those DID’s that require it and set up an accountspending limit that reflects what is necessary to run the business.It is the Customer (and/or the Customer Agent’s) responsibility to properly securethe customer’s PBX to prevent the PBX from being compromised and fraudulent callsfrom being made by unauthorized (internal or external) users. If fraudulent calls aredetected, Cablevision reserves the right to disable International Calling until thePBX is properly secured by the customer.8
ibaV 1.02321-OptBus-Toshiba IPedge.indd 194/18/13 3:56 PM
1. The Toshiba IPedge used in testing came with one Ethernet port, with the defaultLAN IP address set to 192.168.254.250/24. To use Optimum Business SIP Trunkservice with the Optimum Business SIP Trunk Adaptor, the Ethernet port andthe SIP Trunk Adaptor’s LAN port 1 must be in the same LAN segment and havebeen assigned with IP addresses of 192.168.254.1/24 and 192.168.254.250/24respectively. In the lab, the same LAN port is also connected to all the IP phonesvia a PoE switch.2. The IP phones by default will need IP address assignment. The IPedge PBX doesnot have a DHCP server, the Optimum Business SIP Trunk Adaptor should haveits DHCP server enabled. This is in step 2 of the Optimum Business SIP TrunkSet-Up Guide.3. To configure the IPedge PBX, connect your PC to the PBX’s LAN ports, launchthe browser from your PC and enter “http://192.168.254.250:8080/oamp”in the address bar to access the Enterprise Manager program, a Web browserbased Enterprise Manager application that resides on the IPedge server.Note: Enterprise Manager can be accessed using Microsoft Internet Explorerversion 7 or later, or Mozilla Fire Fox version 5 or later.a. From the login screen, enter “Administrator” in the “Username” field, enter“password” in the “Password” field, select the timeout value in the “SessionTimeout” field, check the “Remember me” checkbox (if you want theEnterprise Manager application to automatically log you in on your next visit)and click the “Submit” button.V 1.02321-OptBus-Toshiba IPedge.indd 2104/18/13 3:56 PM
b. The first screen after login is the System Summary. Click the “Edit” icon to enterinformation about your IPedge server.c. Enter the enterprise name, address, phone number and e-mail address for theIPedge server. Click the “OK” button.V 1.02321-OptBus-Toshiba IPedge.indd 3114/18/13 3:56 PM
d. The IPedge servers can have up to three configurations, depending on thehardware platform. Navigate to “Administration” “Enterprise” “Servers” tosee that this is an IPedge EP server (with only one LAN port), designed to serveup to 40 users.4. Navigate to “Trunk” “Trunk Groups” and click on the “New” icon to createSIP Trunk Groups for incoming and outgoing lines.V 1.02321-OptBus-Toshiba IPedge.indd 4124/18/13 3:56 PM
a. Select “Incoming and Outgoing” from the pull-down menu of the “Select GroupDirection” field. Click the “OK” button.b. In the “Common” tab, select a trunk group number (“8” in this example)in the “Group Number” field, select “SIP” in the “Group Type” field, leaveother fields as default and click the “Save” icon.V 1.02321-OptBus-Toshiba IPedge.indd 5134/18/13 3:56 PM
c. In the “Incoming” tab, select “DID” in the “CO Service Type” field, select “4” inthe “DID Digits” field; leave other fields as default and then click the “Save” icon.Note: The PBX will route the incoming call to an extension based on the last 4digits of the called number.d. In the “Outgoing” tab, leave all fields as default and click the “Save” icon.V 1.02321-OptBus-Toshiba IPedge.indd 6144/18/13 3:56 PM
5. Navigate to “Station” “Station Group” to create a hunt group for supportingvoicemail and Auto-Attendant.a. Select “Hunt Group” from the “Group Type” field’s drop-down list andclick on the “New” icon.b. Enter a 3-digit pilot number (“555” in this example) in the “Pilot Number”field, select “Distributed” from the drop-down list of the “Hunt Method” field,select “Enable” from the drop-down list of the “DHG Auto CampOn” field,leave other fields as default and then click the “Save” icon. Note: By default,the license will allow the hunt group to have a maximum of 4 ports forsimultaneous voicemail access.V 1.02321-OptBus-Toshiba IPedge.indd 7154/18/13 3:56 PM
c. Navigate to “Station” “Station Assignment” to create four, 3-digit numbers of“SIP VM” device type for supporting voicemail access. Click the “New” icon.d. Enter the first 3-digit number (“501” in this example) in the “Prime DN” field,select “SIP VM” from the drop-down list of the “Type” field, check the “CreateNew mailbox” checkbox, leave other fields as default and click the “Save” icon.Note that the VMID Code and voicemail password will be automatically generatedby the PBX after you get past entering the Prime DN.V 1.02321-OptBus-Toshiba IPedge.indd 8164/18/13 3:56 PM
e. After you have set up the four, 3-digit numbers of “SIP VM” device type forsupporting voicemail access, your Station Assignment screen should looklike the the screen above.f. Navigate to “Station” “Station Group” to add the four members to the huntgroup for supporting voicemail. Check the checkbox for the Hunt Group #1entry and then click the “Edit” icon.V 1.02321-OptBus-Toshiba IPedge.indd 9174/18/13 3:56 PM
g. Select the “Members” tab and click the “Add members” icon.h. Select all four numbers (501 to 504 in this example) and click the “OK” button.V 1.02321-OptBus-Toshiba IPedge.indd 10184/18/13 3:56 PM
i. Click the “Save” icon.6. Navigate to “Station” “Station Assignment” to create the 3-digitextensions for the phones.a. Click the “New” icon.V 1.02321-OptBus-Toshiba IPedge.indd 11194/18/13 3:56 PM
b. Enter a 3-digit extension number (“200” in this example) in the “Prime DN”field, select “IPT” from the drop-down list of the “Type” field, enter the sameextension in the “Name to Display” field, enter the Hunt Group #1’s pilotnumber in the “VM MW Center Port” field, select “1” (System Call ForwardNumber 1) in the “System Call Forward” field, check the “Create New mailbox”checkbox, leave other fields as default and click the “Save” icon. Note that theVMID Code and voicemail password will be automatically generated by the PBXafter you get past entering the Prime DN. Remember to write down yourvoicemail password; you will need it to set up voicemail from the phone later.c. After you have set up the 3-digit extension numbers for the phones (200 to 202in this example), your Station Assignment screen should look like screen above.V 1.02321-OptBus-Toshiba IPedge.indd 12204/18/13 3:56 PM
d. Navigate to “System” “System Timer” to configure the PBX to send theinbound call to voicemail after four rings. Select “16” (seconds) from thedrop-down list of the “CF No Answer Time” field and click the “Save” icon.e. Navigate to “System” “Call Forward” to configure the conditions for the PBX tocall-forward the inbound calls to voicemail. Check the SCF Number 1 checkboxand click the “Edit” icon.V 1.02321-OptBus-Toshiba IPedge.indd 13214/18/13 3:56 PM
f. Change the name of the SCF Number 1 by selecting “Busy No Answer” from thedrop-down list of the “Telephone Status” field and click the “Save” icon.g. Check the checkbox for the entry where Call Type “DID”, TelephoneStatus “Busy No Answer” and Period “Day” and click the “Edit” icon.From the pop-up box, enter Hunt Groupt #1’s pilot number in both the“Destination 1” and “Destination 2” fields and click the “OK” button.V 1.02321-OptBus-Toshiba IPedge.indd 14224/18/13 3:56 PM
h. When you are done with Call Type “DID”, the first half of the SCF Number 1screen should look like the one above.i. When you are done with Call Type “Ring Transfer” and Call Type “Internal”,the second half of the SCF Number 1 screen should look like the one above.V 1.02321-OptBus-Toshiba IPedge.indd 15234/18/13 3:56 PM
7. Navigate to “Trunk” “DID” and then click on the “New” icon to map incomingcalls to the extensions.a. Select the Incoming Line Group number from the pull-down menu of the“ILG Group Number” field.b. Enter the last 4 digits of the SIP Trunk DID (the pilot DID in this example) in the“DID Number” field.c. Select “Dialing Digits” from the pull-down menu of the “Audio Day1 Dst Type”field, “Audio Day2 Dst Type” field and the “Audio Night Dst Type” field.d. If the incoming call should ring an extension, enter the mapped extension inthe “Audio Day1 Dst Digits” field, “Audio Day2 Dst Digits” field and the“Audio Night Dst Digits” field.V 1.02321-OptBus-Toshiba IPedge.indd 16244/18/13 3:56 PM
e. If the incoming call should go to an Auto-Attendant, enter “555” in the“Audio Day1 Dst Digits” field, “Audio Day2 Dst Digits” field and the“Audio Night Dst Digits” field.Important: The IPedge’s Auto-Attendant can only work with Out-of-Band DTMFtones (RFC-2833). The Cablevision network only supports in-band DTMF tones.In order for the Toshiba IPedge PBX to operate correctly with the Cablevisonnetwork, the Optimum Business SIP Trunk Adaptor must be configured toconvert out-of-band DTMF tones sent by the Toshiba IPedge PBX to in-bandDTMF tones and vice versa.To enable this conversion, follow step 3 in the Optimum Business SIP TrunkSet-Up Guide. On the SIP Trunk Configuration page, you must check theConvert Inband DTMF checkbox, and click the Submit button to updatethe setting.f. Leave other fields as default and click the “Save” icon.g. Repeat the steps above until you have mapped all the DIDs to the extensionsfor inbound calls.8. Navigate to “Trunk” “SIP Trunking” to set up SIP Trunk services via theOptimum Business SIP Trunk Adaptor.a. Select the “Channel” tab to create a Channel Group for SIP Trunking service.1) Choose a Channel group number (16 in this example) that has not been usedin another section from the pull-down menu of the “SIP Trunk ChannelGroups” field. Note that the phones will display this channel number whenyou dial 9 first to make an outside call.2) Enter “3” (because we are using 3 phones for the SIP trunk service) in the“SIP Trunk Channels” field.V 1.02321-OptBus-Toshiba IPedge.indd 17254/18/13 3:56 PM
b. Select the the “Service Definition” tab and then click the “New” icon.1) Choose a SIP Trunk Service Definition Index from the pull-down menu of the“Service Definition Index” field.2) You can configure the PBX to communicate with the Optimum Business SIPTrunk Adaptor in Registration mode or Static IP mode.3) To configure the PBX for Registration mode, select “Client” in the“Registration Mode” field.Note: when an outbound call is received by the Optimum BusinessSIP Trunk Adaptor, it will check to see if the outbound call’s caller IDmatches any of the of the SIP Trunk DID’s. If it doesn’t, then the OptimumBusiness SIP Trunk Adaptor will replace the outbound call’s caller IDwith the pilot DID.V 1.02321-OptBus-Toshiba IPedge.indd 18264/18/13 3:56 PM
4) To configure the PBX for Static IP mode, select “None” in the “RegistrationMode” field. Note that the PBX outbound call may use any of the SIP TrunkDID’s as the caller ID. When a PBX outbound call is received by the OptimumBusiness SIP Trunk Adaptor, it will check to see if the outbound call’s callerID matches any of the SIP Trunk DIDs. If it doesn’t, then it will replace theoutbound call’s caller ID with the pilot DID.5) Select the Incoming Line Group number in the “ILG” field.6) Select the Outgoing Line Group number in the “OLG” field.7) Enter the maximum number of calls allowed for the SIP Trunk service in the“Effective Channel Number” field.8) Enter the Optimum Business SIP Trunk Adaptor’s LAN IP address in both the“Domain Name” and “SIP Server” fields. To work with the Optimum BusinessSIP Trunk service, the LAN port should be on the same subnet as the OptimumBusiness SIP Trunk Adaptor’s port 1 and use the Optimum Business SIP TrunkAdaptor’s port 1 IP address as it’s sip server or gateway. This is the IP addressconfigured in step 2 of the Optimum Business SIP Trunk Set-Up Guide.9) Click the “Save” icon.V 1.02321-OptBus-Toshiba IPedge.indd 19274/18/13 3:56 PM
10) Click the “[ ] Show advanced configuration” link and:a. Enter “700” in the “Registration Period” field so that PBX will registermore frequent in Registration mode.b. Select “G.711a” in the “Secondary Audio Codecs” field.c. Enter “0” in the “SIP Trunk Options Interval” field so that the PBX willnot send Option messages.d. Click the “Save” icon.c. Select the the “Service Assignment” tab and then click the “New” icon.1) Select the SIP Trunk Channel Group number in the “SIP TrunkChannel Groups” field.2) Select the “Service Definition Index” in the “Service DefinitionIndex” field.3) Select the “1” in the “Service Number” field.4) Click the “OK” button.V 1.02321-OptBus-Toshiba IPedge.indd 20284/18/13 3:56 PM
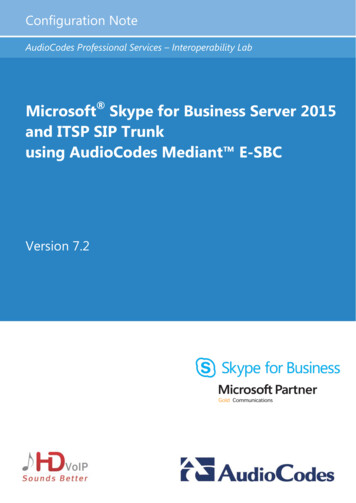
d. Select the the “Service URI” tab and then click the “New” icon to create theSIP URI (this can be the pilot DID or an alphanumeric string (ie: “admin123”))for registering with the Optimum Business SIP Trunk Adaptor.1) Select the “Service Definition Index” in the “Service Definition Index” field.2) Enter the SIP URI string (“admin123” in this example) in the “SIP URI” fieldand Select “MAIN” in the “SIP URI Attribution” field.3) Enter the Authentication username in the “SIP URI User Name” field.4) Enter the Authentication password in the “SIP URI Password” field.Note: The PBX will use this SIP URI string for registration only. The OptimumBusiness SIP Trunk Adaptor must be configured with the same User Name andPassword when using Registration mode. This is step 3 in the OptimumBusiness SIP Trunk Set-Up Guide.5) Leave other fields as default and then click the “OK” button.V 1.02321-OptBus-Toshiba IPedge.indd 21294/18/13 3:56 PM
e. Continue to select the the “Service URI” tab and click the “New” icon to createSIP URI for the SIP Trunk DIDs.1) Select the “Service Definition Index” in the “Se
Optimum Voice Business Trunking offers an optional International Calling Service for direct-dialed calls made from the Customer’s business or from any phone via the Optimum Voice International Calling remote access number to destinations outside of the United States, Puerto Rico