Transcription
CUDATELOptimum BusinessTrunking and theCudaTel 2.6.004 IPPBXConfiguration Guide
CUDATELTable of Contents1. Overview32. SIP Trunk Adaptor Set-up Instructions33. Additional Set-up Information74. International Calling85. PBX Configuration102
CUDATEL1 OverviewThe purpose of this configuration guide is to describe the steps needed toconfigure the Cudatel PBX for proper operation Optimum Business Sip Trunking.2 SIP Trunk Adaptor Set-up InstructionsThese instructions describe the steps needed to configure the LAN side of theOptimum Business SIP Trunk Adaptor.Step 1:Log on to the Optimum Business SIP Trunk Adaptor1. Connect a PC to port 4 of the Optimum Business SIP Trunk Adaptor,the silver device labeled Edgewater Networks, 4550 series.2. Open a Web browser and go to IP Addresshttp://10.10.200.1. A login box will appear.3. Enter login and password and click ‘OK’.Login: pbxinstallPassword: s1ptrunkStep 2:Click on the LAN Settings Link1. Assign an IP Address to the LAN interface of the SIP Trunk Adaptor.The IP address must be on the same subnet as the IP PBX. This changesthe address on port 1 of the Optimum Business SIP Trunk Adaptor.Note: This will become your local SIPproxy IP address. No other IP addresseswill be provided by Cablevision.2. Optional: Specify a VLAN for yourvoice traffic. Click the ‘Enable VoiceVLAN Tagging’ check box. The defaultVLAN ID is 100.Note: VLAN 200 should not be used.It is dedicated to port 4 for management.3
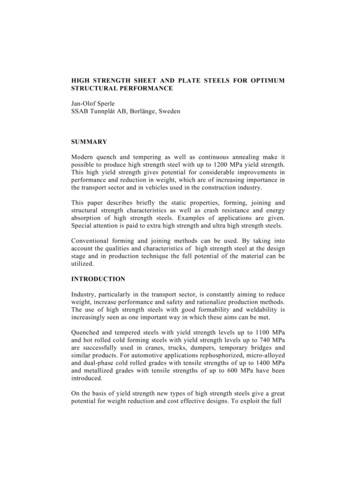
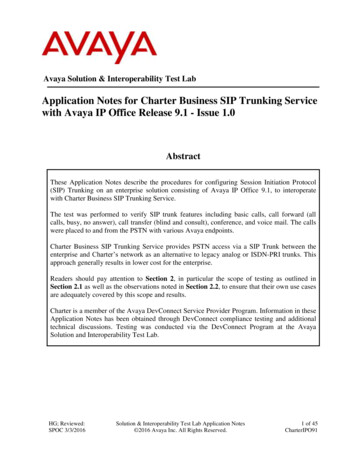
CUDATEL3. Optional: Enable the DHCP server. This will allow the SIP Trunk Adaptor toact as a DHCP server, which will provide IP addresses to the voice network,and create a dedicated voice LAN, as per diagram 2.4. Click ‘Submit’.Diagram 1SIP Trunk Adaptor for IP-PBXsExample: Single LAN ConfigurationUsing a connection from the customer’s LAN, the SIP Trunk Adaptor’s address can bea statically assigned private IP address. It may not be assigned a Public IP address.Diagram 2SIP Trunk Adaptor for IP-PBXsExample: Separate Voice and Data Networks ConfigurationThe customer attaches their Voice Switch to the Ethernet LAN port 1 on theOptimum Business SIP Trunk Adaptor. The Optimum Business SIP Trunk Adaptorcan be enabled as a DHCP server to provide routing for the separate voice network.4
CUDATELStep 3:Click on the SIP Trunk Configuration Link1. Select your IP PBX makeand model from thedrop-down menu.2. Specify how the IP PBXwill register to theOptimum BusinessSIP Trunk Adaptor.3. The Cablevision networkonly supports Inband DTMF.Click on the check boxnext to “Convert InbandDTMF” if you cannotconfigure your IP PBX tosend out Inband DTMF. The DTMF tone duration generated by the phonesand/or PBX may need to be increased from their default setting. Somephones and/or PBX have a default setting between 180ms to 200ms. Thissetting is too low. The recommended setting is 600ms.4. Click ‘Submit’.Step 4:Diagnostics LinkYou can make a test call directlyfrom your phone or use the testcall application under theDiagnostics link.5
CUDATELStep 4 continuedFieldDescriptionOutbound Call TestTelephoneNumberSpecifies an outside phone number to which an outbound callwill be initiated. The pilot telephone number of the SIP Trunk willbe prepopulated.Pilot NumberDisplays the provisioned pilot number, which is used for outboundand inbound call tests.CallInitiates a call outbound to a telephone number entered or inboundto the pilot number displayed.Inbound Call Test(radio button)Indicates whether inbound test call will be enabled or disabled. Ifinbound test calls are enabled, calls made to the pilot number will beredirected to the test UA for fifteen minutes. When the pilot numberis dialed, you will hear a test message play.SubmitEnables or disables the inbound call test.IP Address to PingVerifies basic connectivity to a networking device. Successful pingtest results indicate that both physical and virtual path connectionsexist between the system and the test IP address.Ping ButtonSends a ping to the IP address specified in the field “IP Addressto Ping”.IP Addressto TraceTracks the progress of a packet through the network. The packet canbe tracked through the WAN or LAN interfaces of the adaptor.Interface(radio button)Indicates whether a packet will be tracked through the LAN orthe WAN.TracerouteButtonInitiates a traceroute to the specified IP address on either the LANor the WAN.ResetClears all fields and selections and allows you to enter new information.Reset applies to outbound call test, ping and traceroute.6
CUDATEL3 Additional Set-up InformationSystemsFieldDescriptionPbxinstall LinkSelect to change the default password for the pbxinstall login ID.Only the password can be changed. The login ID cannot be changed.Password7
CUDATELFieldDescriptionUsernameSpecifies the username for which the password can be changed.Current PasswordSpecifies the current password.New PasswordSpecifies the new password.Confirm PasswordConfirms the new password.SubmitApplies the settings configured on this page.ResetClears all fields and selections and allows you to enter new information.4 International CallingOptimum Voice Business Trunking offers an optional International Calling Servicefor direct-dialed calls made from the Customer’s business or from any phone via theOptimum Voice International Calling remote access number to destinations outside ofthe United States, Puerto Rico, Canada and the U.S. Virgin Islands at per minute rates.The Customer must login to the Optimum Business Account Center and activate theservice on the Optimum Business Trunk Pilot telephone number to activate the serviceand manage the monthly International spending limit for the account.Activating International calling on the Pilot TN will enable International calling for allDirect Inward Dial (DIDs) telephone numbers as well. Blocking International calling forone or more DIDs is managed by the customer directly from the PBX phone systemconfiguration. To minimum the exposure to fraudulent calling, It is recommended tolimit International calling capability to those DID’s that require it and set up an accountspending limit that reflects what is necessary to run the business.It is the Customer (and/or the Customer Agent’s) responsibility to properly securethe customer’s PBX to prevent the PBX from being compromised and fraudulent callsfrom being made by unauthorized (internal or external) users. If fraudulent calls aredetected, Cablevision reserves the right to disable International Calling until thePBX is properly secured by the customer.8
CUDATELImportant:The Cablevision network supports only inband DTMF tones. The CudaTelPBX supports only sending out-of-band DTMF tones. In order for the CudaTelPBX to operate correctly with the Cablevision network, the Optimum SIPTrunk Adaptor must be enabled to convert out-of-band DTMF tones sent bythe CudaTel PBX to inband DTMF tones. To enable this conversion, log intothe Optimum SIP Trunk Adaptor using the login and password specified inthe Optimum SIP Trunk Adaptor Set-up Guide. On the SIP TrunkConfiguration page, you must check the Convert Inband DTMFcheckbox, and click the Submit button to update this setting. This is Step 3of the Optimum Sip Trunk Set-up Guide.This configuration guide provides the configuration steps for both PBXregistration and static or non-registration modes of PBX operation.V 1.49
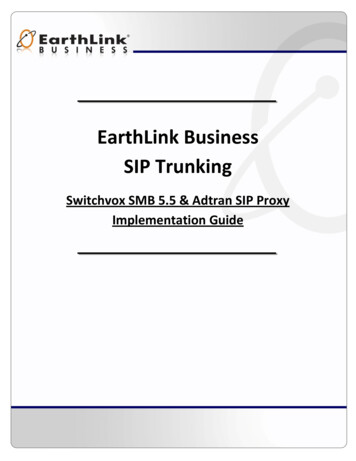
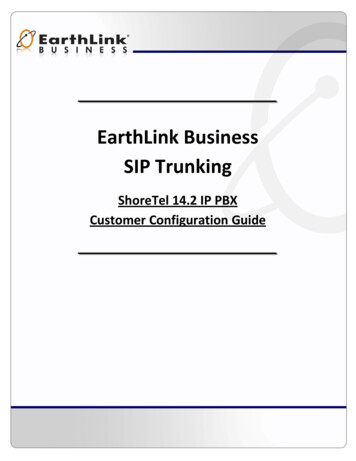
CudaTel5 PBX ConfigurationTo access the PBX configuration GUI point the browser to192.168.200.200 (unless changed from the default IP previously). Thebelow login page will appear.Figure-1The default username and password login is:Username: adminPassword: adminA screen similar to the below image will be displayed upon successfullylogging into the PBX.Figure-2Confirm the firmware is 2.6.004.V 1.410
CudaTelSelect the Configuration button in the upper panel on the far right,select the Network link on the left panel.Figure-3Modify the following settings:LAN Interface: This section will configure the static IP address of the PBX.IP Address: Enter in the IP address to be assigned to the PBX.Subnet Mask: Enter in the subnet mask for the network assignedto the PBX.Gateway: Enter in the Gateway IP address to the network. Bydefault, this is the LAN side IP address of the upstream OptimumBusiness SIP Trunk Adaptor.Use LAN Gateway as Default Gateway: Uncheck this box.Behind NAT Router: Uncheck this box.WAN Interface Enabled: Uncheck this box. No other fields shouldbe populated.Scroll to the bottom of the page, click on the Apply Changes button.With this Network configuration, the WAN port on the PBX will no longerbe in use. The LAN port will be plugged into the Optimum Business SIPTrunk Adaptor’s LAN port or the switch that plugs into the OptimumBusiness SIP Trunk Adaptor’s LAN port.On the left panel, click the Phones link. The page below will appear.V 1.411
CudaTelFigure-4Set Local Area Code: Enter in the Area Code the DID’s will use.Automatic Provisioning: Set this drop-down box to AutomaticProvisioning Off.Codecs: For Incoming Calls, and For Outgoing Calls unselect ALLcodecs except the G.711u and G.711a option.All other options and fields should be left blank or left to the defaultconfiguration. On this page there is no Apply Settings options, this isdone automatically as soon as the options are set.Click the Extensions link on the left panel. The below page will appear.V 1.412
CudaTelFigure-5Click the Add an Extension Block link.A new field will prompt for an extension range, in the first box enter thestarting extension such as 2000, enter 2999 in the second box.Click the blue Add New Extension Block button to complete thischange.On this page there is no Apply Settings button, settings are saved bydefault.On the upper panel, click the Providers link. Click the New SIP Accountlink. The below window will appear.For Registration Mode: Follow the below settings.V 1.413
CudaTelFigure-6Provider/Type: Select the Optimum option from the drop-down list.Name: Set a Name. ToEdgeMarc was selected for this exampleHost: The LAN IP address of the Optimum Business SIP Trunk Adaptor.Port: Cannot change this setting, defaults to 5060.Realm: Set this to the Optimum Business SIP Trunk Adaptor’s LAN IPaddress, should match the Host field.Username: Pilot DID or assigned username for registration to the OptimumSip Trunk Adaptor. This must match what was entered in the OptimumBusiness SIP Trunk Adaptor in Step 3 of the SIP Trunk Set-up Guide.Auth. Username: Same as Username field. This must match what wasentered in the Optimum Business SIP Trunk Adaptor in Step 3 of the SIPTrunk Set-up Guide.Password: Registration password. This must match what was entered inthe Optimum Business SIP Trunk Adaptor in Step 3 of the SIP Trunk Set-upGuide.Registration: Check the Require Registration box and set the secondinterval field to the recommended value of 120.Services: Check both Inbound Calls and Outbound Calls.V 1.414
CudaTelLeave all other settings as default. Scroll to bottom and click theCreate Gateway button.For Non-Registration Mode: Follow the below settings.Figure-7Provider/Type: Select the Optimum option from the drop-down menu.Name: Set a Name. ToEdgeMarc was selected for this example.Host: The LAN IP address assigned to the Optimum Business SIP TrunkAdaptor.Port: Cannot change this setting, defaults to 5060.Realm: Set this to the Optimum Business SIP Trunk Adaptor’s LAN IPaddress, should match the Host field.Username: Leave blank.Auth. Username: Leave blank.V 1.415
CudaTelPassword: Leave blank.Registration: Uncheck and Leave blank.Services: Check both Inbound Calls and Outbound Calls.Leave all other settings as default. Scroll to bottom and click the CreateGateway button.A new Gateway will appear in the Provider’s page. Click on the newGateway. The below page will appear.Figure-8V 1.416
CudaTelScroll to the bottom to continue the configuration.Figure-9Caller ID Number: In this field enter the Pilot DID.Select the Use a Custom Caller ID Number Unless Overridden radiobutton.This setting will use the Pilot DID by default unless an extensionspecifically overrides it. To force the extensions Caller ID, select theNever Use a Custom Caller ID Number. To always force the Pilot DID onoutbound calls select the Always Use a Custom Caller ID Number.Outgoing Music on Hold: There are two options, default and silence. Setthis option to determine what the remote user hears when put on hold.Restrict Codecs To: Select G.711 ulaw and G.711 alaw.Inbound Registration: Uncheck for security reasons.External Numbers: Click the Add External Numbers link. Starting with thePilot DID, add each DID the PBX will use.Outbound Routing: Leave to default, this will auto-populate.Click the Apply Gateway Settings button.V 1.417
CudaTelIn the upper panel, click the Extensions link. In the new left panel, clickthe People link then click the Add New Person link. The below windowwill appear.Figure-10Fill in the First Name, Last Name, and a 4 digit PIN for the new extension.Leave all other options to default. Click the blue Add button.After the creation of the user, click on the new user listed under the Peoplelink and the below page will appear.Figure-11Contact Information (Optional): Click the Edit link to modify the user’scontact details.V 1.418
CudaTelPhones: Click the Add a Phone button, the below will appear.Figure-12Click the Select a Phone button, click an unassigned phone listed. Clickthe blue Add Phone button to complete. The User page should reappearwith the phone listed.Figure-13Under the Add Number section select External Number in the dropdown box. A second drop-down box will appear, select a DID to assign tothis extension. Click the Add Extension button.Click the Apply Setting button.V 1.419
CudaTelClick the Call Parking Extensions on the left panel. Then click the AddNew Parking Extension link.Figure-14The below window will appear.Figure-15V 1.420
CudaTelParking Lot Name: Name the Parking lot.Extension Block: Enter 700 in the first field, 705 in the second field.Music on Hold: Set to Default or Silence. The party transferred into theParking Lot will hear what is defined.Maximum Hold Time: The duration the party is allowed to be parked.After Hold Time, Transfer To : Where to send the caller after thehold time is up. 2999 in this example is the Automated Attendant(recommended).Click the blue Add button to apply changes.In the left panel click the Automated Attendants then click the Add NewAutomated Attendant link.Figure-16The below window will appear.Figure-17V 1.421
CudaTelAutomated Attendant Name: Give the AA a name.Extension: In the drop-down box select Single Extension, enter in theAutomated Attendants extension in the field.Leave other options as default.Click the blue Add button to save the changes.Click on the new Automated Attendant that now appears under theAutomated Attendant page. Configure to each option as desired.Important: The DTMF tone duration generated by the phones needs tobe increased from the default value of 180ms-200ms to 600ms. The PBXdoes not have the capability to change the DTMF settings, the change mustbe done on the phones. The Optimum Business Sip Trunk Adaptor needsto be configured to Convert Inband DTMF. This is Step 3 in the OptimumBusiness Sip Trunk Set-up Guide.V 1.422
CudaTel 2.6.004 IPPBX Configuration Guide. CUDATEL 2 Table of Contents 3 3 7 8 10 1. Overview 2. SIP Trunk Adaptor Set-up Instructions 3. . one or more DIDs is managed by the customer directly from the PBX phone system configura