Transcription
ZULTYSOptimum BusinessTrunking and theZultys MX250 IP PBXConfiguration Guide
ZULTYSTable of Contents1. Overview32. SIP Trunk Adaptor Set-up Instructions33. Additional Set-up Information74. International Calling85. PBX Configuration92
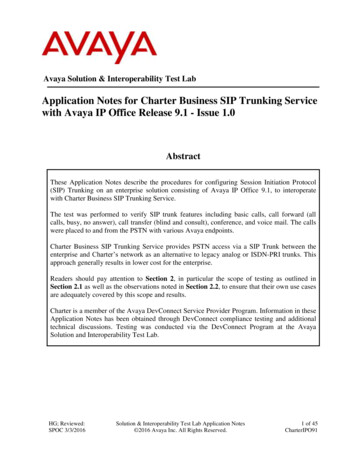
ZULTYS1 OverviewThe purpose of this configuration guide is to describe the steps needed toconfigure the Zultys MX250 IP PBX for proper operation Optimum Business SipTrunking.2 SIP Trunk Adaptor Set-up InstructionsThese instructions describe the steps needed to configure the LAN side of theOptimum Business SIP Trunk Adaptor.Step 1:Log on to the Optimum Business SIP Trunk Adaptor1. Connect a PC to port 4 of the Optimum Business SIP Trunk Adaptor,the silver device labeled Edgewater Networks, 4550 series.2. Open a Web browser and go to IP Addresshttp://10.10.200.1. A login box will appear.3. Enter login and password and click ‘OK’.Login: pbxinstallPassword: s1ptrunkStep 2:Click on the LAN Settings Link1. Assign an IP Address to the LAN interface of the SIP Trunk Adaptor.The IP address must be on the same subnet as the IP PBX. This changesthe address on port 1 of the Optimum Business SIP Trunk Adaptor.Note: This will become your local SIPproxy IP address. No other IP addresseswill be provided by Cablevision.2. Optional: Specify a VLAN for yourvoice traffic. Click the ‘Enable VoiceVLAN Tagging’ check box. The defaultVLAN ID is 100.Note: VLAN 200 should not be used.It is dedicated to port 4 for management.3
ZULTYS3. Optional: Enable the DHCP server. This will allow the SIP Trunk Adaptor toact as a DHCP server, which will provide IP addresses to the voice network,and create a dedicated voice LAN, as per diagram 2.4. Click ‘Submit’.Diagram 1SIP Trunk Adaptor for IP-PBXsExample: Single LAN ConfigurationUsing a connection from the customer’s LAN, the SIP Trunk Adaptor’s address can bea statically assigned private IP address. It may not be assigned a Public IP address.Diagram 2SIP Trunk Adaptor for IP-PBXsExample: Separate Voice and Data Networks ConfigurationThe customer attaches their Voice Switch to the Ethernet LAN port 1 on theOptimum Business SIP Trunk Adaptor. The Optimum Business SIP Trunk Adaptorcan be enabled as a DHCP server to provide routing for the separate voice network.4
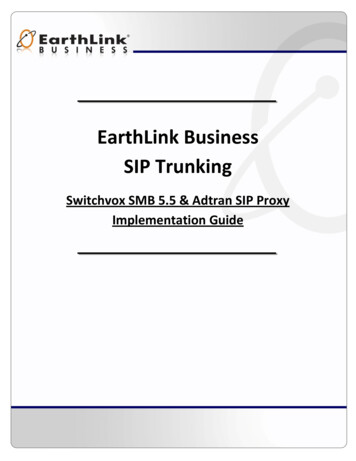
ZULTYSStep 3:Click on the SIP Trunk Configuration Link1. Select your IP PBX makeand model from thedrop-down menu.2. Specify how the IP PBXwill register to theOptimum BusinessSIP Trunk Adaptor.3. The Cablevision networkonly supports Inband DTMF.Click on the check boxnext to “Convert InbandDTMF” if you cannotconfigure your IP PBX tosend out Inband DTMF. The DTMF tone duration generated by the phonesand/or PBX may need to be increased from their default setting. Somephones and/or PBX have a default setting between 180ms to 200ms. Thissetting is too low. The recommended setting is 600ms.4. Click ‘Submit’.Step 4:Diagnostics LinkYou can make a test call directlyfrom your phone or use the testcall application under theDiagnostics link.5
ZULTYSStep 4 continuedFieldDescriptionOutbound Call TestTelephoneNumberSpecifies an outside phone number to which an outbound callwill be initiated. The pilot telephone number of the SIP Trunk willbe prepopulated.Pilot NumberDisplays the provisioned pilot number, which is used for outboundand inbound call tests.CallInitiates a call outbound to a telephone number entered or inboundto the pilot number displayed.Inbound Call Test(radio button)Indicates whether inbound test call will be enabled or disabled. Ifinbound test calls are enabled, calls made to the pilot number will beredirected to the test UA for fifteen minutes. When the pilot numberis dialed, you will hear a test message play.SubmitEnables or disables the inbound call test.IP Address to PingVerifies basic connectivity to a networking device. Successful pingtest results indicate that both physical and virtual path connectionsexist between the system and the test IP address.Ping ButtonSends a ping to the IP address specified in the field “IP Addressto Ping”.IP Addressto TraceTracks the progress of a packet through the network. The packet canbe tracked through the WAN or LAN interfaces of the adaptor.Interface(radio button)Indicates whether a packet will be tracked through the LAN orthe WAN.TracerouteButtonInitiates a traceroute to the specified IP address on either the LANor the WAN.ResetClears all fields and selections and allows you to enter new information.Reset applies to outbound call test, ping and traceroute.6
ZULTYS3 Additional Set-up InformationSystemsFieldDescriptionPbxinstall LinkSelect to change the default password for the pbxinstall login ID.Only the password can be changed. The login ID cannot be changed.Password7
ZULTYSFieldDescriptionUsernameSpecifies the username for which the password can be changed.Current PasswordSpecifies the current password.New PasswordSpecifies the new password.Confirm PasswordConfirms the new password.SubmitApplies the settings configured on this page.ResetClears all fields and selections and allows you to enter new information.4 International CallingOptimum Voice Business Trunking offers an optional International Calling Servicefor direct-dialed calls made from the Customer’s business or from any phone via theOptimum Voice International Calling remote access number to destinations outside ofthe United States, Puerto Rico, Canada and the U.S. Virgin Islands at per minute rates.The Customer must login to the Optimum Business Account Center and activate theservice on the Optimum Business Trunk Pilot telephone number to activate the serviceand manage the monthly International spending limit for the account.Activating International calling on the Pilot TN will enable International calling for allDirect Inward Dial (DIDs) telephone numbers as well. Blocking International calling forone or more DIDs is managed by the customer directly from the PBX phone systemconfiguration. To minimum the exposure to fraudulent calling, It is recommended tolimit International calling capability to those DID’s that require it and set up an accountspending limit that reflects what is necessary to run the business.It is the Customer (and/or the Customer Agent’s) responsibility to properly securethe customer’s PBX to prevent the PBX from being compromised and fraudulent callsfrom being made by unauthorized (internal or external) users. If fraudulent calls aredetected, Cablevision reserves the right to disable International Calling until thePBX is properly secured by the customer.8
ZultysPBX ConfigurationThe steps below describe the minimum configuration required toenable the PBX to use Optimum Business SIP Trunking for inbound andoutbound calling. Please refer to the Zultys MX250 productdocumentation for more information on other advanced PBX features.This configuration guide provides the configuration steps for both PBXregistration and static or non-registration modes of PBX operation.IP PBX InformationManufacturer:ZultysModel:MX250Software Version:8.0.7Does the PBX send SIP Registration messages (Yes/No)?YesImportant:The Zultys PBX only supports RFC2833 out-of-band DTMF tones.The Cablevision network only supports Inband DTMF tones. In orderfor the Zultys PBX to operate correctly with the Cablevision network,the Optimum SIP Trunk Adaptor must be configured to convert out-of-bandDTMF tones sent by the PBX to inband DTMF tones. To enable thisconversion, log into the Optimum Business Sip Trunk Adaptor using thelogin and password specified in the Optimum Business Sip Trunk Set-upGuide. On the SIP Trunk Configuration page you must check theConvert Inband DTMF checkbox and click the submit button to update thissetting. This is described in step 3 of the Optimum SIP Trunk Set-up Guide.The DTMF tones duration generated by the phones and/or PBX may need tobe increased from their default settings. Some phones/PBXes have a defaultsetting between 180ms and 200ms. The recommended setting is 600ms.V19
ZultysNetwork SettingsNavigate to “Provision4Wizard”.Here is where you configure the initial network settings for the device.The ones you will focus on are: Company, IP Addresses, Servers, DHCP,and Miscellaneous. The rest are relative to your setup.Starting with “Company”, enter your company name next to“Company Name”. Enter the IP address of the MX device next to“Default domain”. Enter your Pilot DID next to “Main phone number”and “Default” next to “Name for this location”.V110
ZultysNow go to “IP Addresses”. Remember you need to use the consoleport on the device when configuring the IP addresses and SystemSettings unless the box is being configured for the first time. Whenin normal mode, the console port and the port on the left are justused as Ethernet 1 and 2 interfaces. Choose an address next to“2 consecutive IP addresses starting from”. This is required.“172.16.0.1” was chosen for our example. Right under is where youwill need to enter the addresses you’re using. 10.10.127.11 /24was entered for our (main) field which essentially is the IP of the MX.10.10.127.12/24 was entered for (RTP) and 10.10.127.1/24 for theDefault Gateway which is the IP address of the Optimum BusinessSIP Trunk Adaptor.Now go to “Servers” and enter your DNS addresses. In the examples,you will be using DHCP for your phones, click the radio button of“Internal” under “DHCP” and likewise do the same for our firmwareand click the radio button of “Internal” under “TFTP”.V111
ZultysNow go to “DHCP” and here you will need to enter a starting andending range for your phones. In our example the range 10.10.127.15through 20 is used. The mask will remain/24. Make sure on the bottomunder ”DHCP Options” you have 10.10.127.1 next to Option 3 and10.10.127.11 next to Options 15,42, and 66. The boxes next to Option 6and 42 should also be checked under “Linked”.Now go to “Miscellaneous” and under “For calls forwarded by MX” checkthe radio button of “Use main number”. When finished, apply all changes.V112
ZultysNavigate to “Provision4SBC”.From the top enter RTP port range 2100–2139. Select the radio buttonof “Authenticate all traffic from untrusted networks”. On the bottomright-click anywhere in the empty space and select Add.V113
ZultysEnter 10.10.127.0 for the Network Address, 24 under NML which isthe network mask length, and 255.255.255.0 under Mask. Check the“Trusted Network” box and leave the “Port Mapping” box empty.Again right-click anywhere in the empty space and select “Add”. Enter0.0.0.0 under “Network Address”, 0 under “NML”, and 0.0.0.0 under“Mask”. Leave both “Trusted network” and “Port Mapping” empty.When done click Apply.Then, go to the “RTP Mapping” tab at the top and check as displayed:When done click Apply.V114
ZultysPhone Registration and AssignmentNavigate to “Configure4Devices” and when there click on “Profiles”.Depending on the phones you have the selection will differ but for thistest one 35i phone and one 37G phone were used. For the 35i phonejust open first “ZIP 3 models” and under “ZIP 35i” right-click“ Default-ZIP 35i ” and select “Duplicate”.V115
ZultysThe duplicate was named “Profile ZIP 35i”. When it is highlighted, onthe right you should see several tabs. Go to the “SIP” tab and make surethe Registrar on the bottom under “Registration details for line 1” is setto “MX Address” and that the address is the corresponding MX IP. Makesure to enable Line 1 next to “Lines” above.V116
ZultysFor our purposes mentioned DHCP on the MX is enabled. Under“IP & Provisioning” tab this is what is displayed:Under “Provisioning” you will see the protocol as “DHCP (option 66)”and “MX” as the Server. The other tabs above are relative to your setup.When done click OK then Apply and repeat this process for yourremaining phones. When back on “Configure4Devices” right-clickanywhere in the empty space and select “Insert”.Choose your device and select “Add single device” if you have onephone from this particular model or select “Add multiple devices” if youhave more from this particular model. Click Next.V117
ZultysA screen will appear with various fields. Next to “Profile” select the nameof the duplicate created earlier. Leave “Default Location” as Default.Enter the MAC address of the phone. Check “Use MAC” next to“Device ID” and reenter the MAC address. Next to “Screen Name” youmay enter the extension of the phone. When done click OK.To verify if your device registered correctly or not, navigate to“View4Device Satus” and under “Active” it should display “True”.Otherwise it would say “False”.Now navigate to “Configure4Users”.V118
ZultysRight-click anywhere in the empty space and select “New User”.This is where you will enter your DIDs for your phones. Next to “ID” justenter the extension. The First and Last Name can be anything. You willthen enter a User Name for your phone. Enter the extension numbernext to “Extension”. Enter your DID next to “Voice DID”. Make sure theDefault Role is set to “User”. Next to “User” above leave as “Default”.Where it says “Device Assignment” below make sure to select thecorresponding profile, again this will be the duplicate that was createdearlier. Repeat this process for remaining phones.Click OK, then Apply.V119
ZultysNow you will need to manually associate each phone with theappropriate extension. Navigate to “Configure4Assignment”.Highlight the extension under “Users” from the left and highlight itscorresponding phone under “Devices” on the left and then clickAssign on the bottom. Repeat this process for remaining phones.When done click Apply.Now back to “Configure4Device” right-click each phone and go to“Select Screen name to” then select “User Extension”. Click Updateand simply repeat this process for remaining phones.When done click Apply.V120
ZultysDial PlanNavigate to “Configure4Dial Plan”.Here is where you will configure what numbers can be dialed. Forpurposes of this guide, you created a pattern for our internal extensionsas well as 10-digit numbers. Right-click anywhere in the empty spaceand select “New Pattern”. Enter the name of your pattern, for “Source”select “Internal”. For our first pattern you entered “XXX” under“Pattern” where each X is representative of any digit. You enteredthree because both of our extensions 100 and 101 consist of 3 digits.Under “Destination” choose “Extensions” and just reenter thepattern under “Transformation”. You then created a 10-digit patternbut this time under “Destination” you select “SIP Server: NewSIP”to direct call to SIP Server. For outbound calls, you need to choose thisoption. You can also create patterns for prefixes like 9, 1, and even 91as displayed below. For the 9-digit, you will need to substitute it for “D”under “Transformation” which will mean delete. As for the 1 prefix,under “Transformation” just substitute it for an “X” as shown. You mayconfigure your setup accordingly.When done click Apply.V121
ZultysUnder the “Outside” tab you checked “Use Voice DID for incoming calls”and selected the radio button of “Send calls with unrecognized DIDnumbers to” and have chosen “Default AA”.When done click Apply.As for 911 Emergency calls, this will have to be configured separately.Navigate to “Provision4Locations”.On the left under “Location Name” right-click anywhere in the emptyspace and select “New”.V122
ZultysWhere it says “Emergency Routing” right-click the empty space andselect “New Phone”. Enter 911 under “Number Dialed”, select“SIP Server: NewSIP” under “Route” and re-enter 911 under“Number Transmitted”.Enter “Default” for Location Name and then enter your appropriatetime zone.When done click Apply.Just below, right-click “IP Range” and select “New”. Select the radiobutton of “Subnet” and enter 10.10.127.0/24 and click OK.V123
ZultysSIP RegistrationNavigate to “Provision4SIP Servers and ITSPs” as shown.Right-click anywhere in the empty space and select “Add”. Under name,enter “NewSIP” and check “Active”. Under “Type” choose “External”and under “Codec Profile” choose “Voice Quality”. Leave “SIP Profile”as “Default”.On the right under “Use the following servers” enter the address ofthe Optimum Sip Trunk Adaptor followed by port 5060. The addressof the Optimum Business SIP Trunk Adaptor was assigned in step 2 ofthe Optimum Business Set-up Guide. Just under, make sure to check“Register” and enter your username followed by the timeout.V124
ZultysJust below where it says “SIP Headers” select the “‘From’ domain” taband select the radio button of “Use address of the Server”. Then, clickon the “Caller ID” tab and next to “FROM Header” scroll to and select“Originating party Caller ID”.When done click Apply.Now navigate to “Authentication”.Right-click the empty space and select “Add”. Here you will enter yourSIP credentials with the Optimum Business Sip Trunk Adaptor. Next to“Realm Domain” simply enter the address of the Optimum Business SipTrunk Adaptor. This was the address that was assigned in step 2 of theOptimum Business Sip Trunk Set-up Guide. The user name and passwordmust match what was configured in the Optimum Business Sip Trunk Adaptorin step 3 of the Set-up Guide.V125
ZultysWhen done, click OK then Apply.To verify your registration, navigate to “View4SIP Server and ITSP status”.If registered it will show you as displayed below.V126
ZultysFor Static mode, simply specify the Optimum Business Sip trunk Adaptor’saddress as the server and uncheck the “Register” box as shown:If you desire, you can even monitor the SIP signalling for troubleshooting bynavigating to “View4Call and Protocol Monitor”.When here simply click Start and you should see SIP signaling start flowing.V127
ZultysAuto-AttendantAuto-Attendant requires three steps to configure. First navigate to“Configure4Phone Services”.Right-click anywhere in the empty space and select “New”.Here you will be prompted to enter a name for your AA, extension and DID. Itwas named “MainAA”, assigned it to extension 150 and DID 6314488990.When done click Apply.Now navigate to “Auto Attendant4Auto Attendant and IVR Scripts”.V128
ZultysRight-click anywhere in the empty space and select “New Project”. Enterthe name you desire. In this example “DayAA” was entered. When doneclick OK.Double-click on the project you created and you will see a new screen.On the top right of the screen click “Add”.V129
ZultysNext to the radio button of “File”, where it says “Type”, scroll to and select“Text to Speech”.Click “New” and you will be presented with an empty screen in which youmust type in the text you would like the AA to repeat when being called.Then you must name the file next to “Output File”. Also you have theoption of selecting different AA Speakers from the bottom. When youhave added your text, named the file and selected your speaker, click“Text4Wav”. Finally click OK.Now, just under “Actions” right-click and select “Insert Action”. The“User input” corresponds to the “Actions” field and essentially is telling theAA “if a user enters x then respond with y”. If you would like to allow thecaller to enter an extension number then you must enter a “?” for each dialeddigit. Since in our example there are extensions 100 and 101 that are 3 digits,you will need to enter 3 of these as displayed. Once you enter this, you willneed to select the Action the AA will take by double-clicking “Actions” thenselecting from the list your corresponding action from the left.V130
ZultysFor the extensions, first select “Transfer”, then under “Destination” selectthe radio button of “Variable or Dialog”. From here scroll to and select“Root dialog”, which should be there by default. Click OK.Possible inputs have been added with their corresponding actions. Belowreveals what has been configured in our example. Configure your setupaccordingly to meet the needs of your AA.Finally, when you have configured both the prompt and actions on this page,click the save icon button on top for you, configuration to take effect.As for the l
The Zultys PBX only supports RFC2833 out-of-band DTMF tones. The Cablevision network only supports Inband DTMF tones. In order . test one 35i phone and one 37G phone were used. For the 35i