Transcription
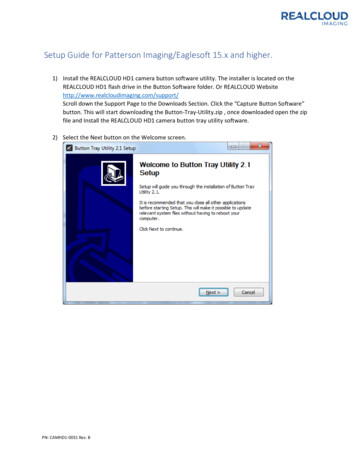
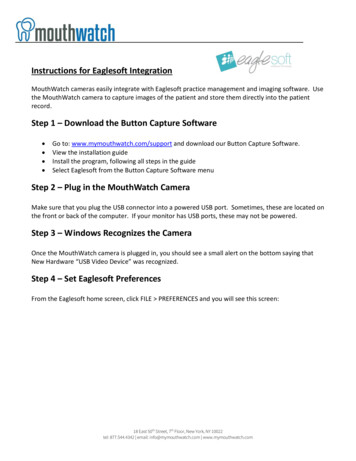
Instructions for Eaglesoft IntegrationMouthWatch cameras easily integrate with Eaglesoft practice management and imaging software. Usethe MouthWatch camera to capture images of the patient and store them directly into the patientrecord.Step 1 – Download the Button Capture Software Go to: www.mymouthwatch.com/support and download our Button Capture Software.View the installation guideInstall the program, following all steps in the guideSelect Eaglesoft from the Button Capture Software menuStep 2 – Plug in the MouthWatch CameraMake sure that you plug the USB connector into a powered USB port. Sometimes, these are located onthe front or back of the computer. If your monitor has USB ports, these may not be powered.Step 3 – Windows Recognizes the CameraOnce the MouthWatch camera is plugged in, you should see a small alert on the bottom saying thatNew Hardware “USB Video Device” was recognized.Step 4 – Set Eaglesoft PreferencesFrom the Eaglesoft home screen, click FILE PREFERENCES and you will see this screen:18 East 50th Street, 7th Floor, New York, NY 10022tel: 877.544.4342 email: info@mymouthwatch.com www.mymouthwatch.com
- Click on the X-Ray tabNOTE: Do not change the Default Device and Default Sensor settings, as these are linked to your digitalx-ray sensors.Click on the Video button:You will now need to select the MouthWatch camera, which is listed as USB Video Device2
Select “Standard Windows Driver Model Device” as the Capture Card and “USB Video Device” as theDefault Device. Click Save.This will take you back to the preferences window. Click “OK”Step 4 – Log off Eaglesoft and Log InIn order for the changes to set, you will need to log off and log back into Eaglesoft.Step 5 – Take a Video ExamThere are a number of ways to do this, but for the next step, you will want to open a patient recordand create a new Intraoral Video exam. If you don’t know how to do this, consult your Eaglesoftmanual or live support.Once in a patient record, click New Exam3
Once the New Exam type has been selected, Right Click on the blank Image Box where you would liketo capture a photo.A menu will drop down.Select Acquire From Video CaptureThis will display a video capture window.4
Press the capture button on the MouthWatch Intraoral CameraYou will then see the text that says “Number: 0” increase by 1When you close out, the images will be saved to the patient recordStep 6 – Setup Video FormatIf the video seems choppy, click on the Setup button in the video capture window: You will then see options for the video streamUnder “Color Space/Compression” make sure that YUY2 is selected. Not MJPG5
Then, press the Default button under the sliders to adjust the color.Step 7 – All Set!Tip – You can start a video exam by clicking on the Intraoral camera icon onthe “Operatory” screen. This will take you right into an exam where youcan capture as many still photos as you like, and they will go right into thepatient’s record.6
Instructions for Eaglesoft Integration MouthWatch cameras easily integrate with Eaglesoft practice management and imaging software. Use the MouthWatch camera to capture images of the patient and store them directly into the pati