Transcription
Patterson EagleSoft 12.00OverviewPatterson EagleSoft Overview 12.00Contents i
Volume XII 2005 Patterson Dental Supply, Inc. All rights reserved.Microsoft is a registered trademark, and Windows XP are trademarks of Microsoft Corporation.All other trademarks, which appear in these pages, are the property of their respective owners.Adobe and Reader are either registered trademarks or trademarks of Adobe Systems Incorporated in the United States and/orother countries. Subject to the terms of our Agreement, Adobe is distributed through a non-exclusive, non-transferable,worldwide, royalty-free license to reproduce and distribute the software.2202 Althoff DriveP.O. Box 1267Effingham, IL 62401Corporate 217.347.5964Sales 800.294.8504Fax 217.342.6950Technical Support 800.475.5036Technical Support Fax 217.342.4571Web Site Address: www.eaglesoft.netii ContentsPatterson EagleSoft Overview 12.00
ContentsOverview1New Icon. 1EagleSoft Today. 1Preferences. 3Referral . 4Referral Reporting . 4Referral Printing . 4Chart . 5Chart Preferences . 5Chart Labels . 6Right-Click Menu Options in Chart . 7Accounting. 7Preferences . 7Modify Completed Service. 9Patient Transfer With History. 9Print Today’s Receipt . 10View Walkout. 10Multi-select. 10Claim and Service Management. 10Group Related Transactions . 13Switch Patient From Family Member . 15Navigation . 15Patient Age . 15Employer . 15Treating Dentist ID. 15Simplify Transactions. 16Last Transaction Key. 16Smart Codes on Walkouts . 16Edit Patient . 17Reports. 17Advanced Imaging. 17Preferences . 17Custom Image Print Templates . 18Templates and Resolution . 18Referral Merge for Custom Image Printing. 19Auto-Take. 19Import Images. 19OnSchedule. 20Preferences . 20All Appointments on Walkout. 20Names on Appointments . 20Busy Bar. 21OnSchedule Activities Toolbar . 21Appointment Cards. 22Current Time Indicator . 23Month At A Glance . 24Preferred Name on Appointments . 25Confirmation Statuses . 25InTouch. 26Patterson EagleSoft Overview 12.00Contents iii
Treatment Plan. 27Informed Consent . 27Default Disclaimer. 28 CAESY . 30EagleSoft/CAESY Power Presentation. 30CAESY Videos and EagleSoft Service Codes . 34SmartDoc . 40SmartDoc Preferences . 40Merge Creation from SmartDoc . 40Send Image to SmartDoc. 41Custom Print to SmartDoc. 41SmartDoc and HIPAA. 41SmartDoc Word Merge . 42JPEG Files in SmartDoc. 42Print Screen. 42Insurance Claims . 43Print Secondary Claim Now . 43Secondary Default Claim Form. 43AutoNotes on Claims . 44Statements. 44Preferences . 44Statement Queue. 45Recalls . 46Recall Tracking . 46Recall Status . 48Recall Types and Service Codes . 50The Recall Wizard. 50Hide Appointment Type . 51Task List . 51Digital Integrations . 51Gendex . 51Sordex. 51Schick . 51Access Password. 51iv ContentsIndex55Notes56Patterson EagleSoft Overview 12.00
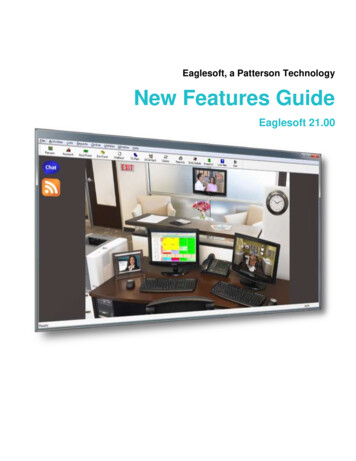
OverviewNew IconThe first thing you may notice is that the EagleSoft icon has changed. Patterson hasintroduced a new logo for its vast line of products and services and this is reflected inthe Patterson EagleSoft icon.EagleSoft TodayEagleSoft TipEagleSoft Today can beused as an interactive routesheet.EagleSoft TipEagleSoft Today uses all thesame icons and indicators asOnSchedule. The colorblocks on the right indicatethe Appointment Type color.Double and Triple bookcolors appear as arrows nextto the appointment time.Overdue Tasks appear inred.EagleSoft Today is like a digital day planner for your desktop. This module willallow you to view daily Appointments, Tasks and Post-Op calls from a centralizedPatterson EagleSoft Overview 12.00Overview 1
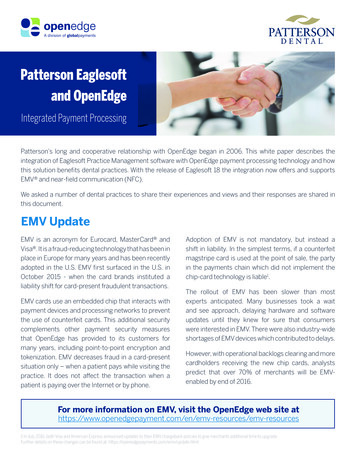
location. Access detailed information associated with these areas of the software.View items by Chair or Provider.To access this new virtual screen, select Window ESToday. In the Appointmentbar, use the drop-down arrow to select the desired date.Double-click appointments, tasks and post-op calls to open the live information forediting.Customizing EagleSoft TodayTo customize your EagleSoft Today, select the hyperlink at the bottom View: AllAppointments by selected setting . In the Customize EagleSoft Todaywindow, use the drop down arrows to select Provider, View and Refresh settings.In the Indicators area, select from the following checkbox options: Patient ArrivalStatus, Double and Triple Book, Patient Pre-med, Lab Cases, Patient Alerts,Patient Photo, Appointment Type and Patient Names.In the Display/Task/Call Options area, select from the following checkbox options:Show Post-Op Calls, Show Tasks, Include Private Tasks, Include CompletedTasks, Appointment Detail Popup and Show Photo in Detail Popup.Select OK to save and apply your options. Select Cancel to close the windowwithout saving.Right-Click Menus2 OverviewPatterson EagleSoft Overview 12.00
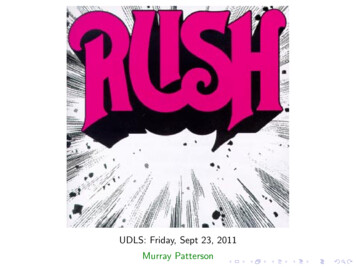
Use the right-click menu on a selected Appointment to Edit, Delete, FindAppointments, Locate Appointments, Call Patient @ Work, Call Patient @Home, Email Patient, Set Next Arrival Indicator, Mark As Walked Out,Refresh and Print Today’s Appointments.Use the left-click menu on the confirmation status to toggle between Confirmed,Unconfirmed, Sent Email, Left Message, No Answer, Phone Busy, Waiting forCallback and Other.Use the right-click menu on a selected Task to Add Task or View Task List.Use the right-click menu on a selected Post-Op call to Call Patient @ Work, CallPatient @ Home.PreferencesWhen viewing the Preferences, you will notice that the Patient Preferences havebeen moved from the General tab to the new Patient tab.EagleSoft TipShow Recent Peopledoes not affect thetoolbar Patient list.Patterson EagleSoft Overview 12.00Overview 3
“Show Recent People” – Number to Display – Use this option to determinethe number of previously accessed persons to be displayed on the Person List. Thiswill allow you to select the Show Recent People checkbox on the Person List anddisplay only the most recently used persons in your database up to the number youhave selected. Your Recent People list will also include any patients who havescheduled appointments for that day.ReferralReferral ReportingManage your Referral and Recipient Sources with several new reports.Patients by OtherReferral SourcePatient Notes by OtherReferral SourceService History byOther Referral SourceReferral SourcesMasterReferral Recipient AndSource MasterReferral Recipient AndSource LabelsReferral Recipient AndSource Laser LabelsA listing of all patients with other referral sources.All notes during the selected date range with the filterability by patient or service code or referral source.This report shows patient recall dates during the selectedrange of dates based on service activity.This report shows a general listing of all referral sourcesincluding patients, providers and other referral sources.Shows a master list of referral recipients and sourcesMailing labels for all sources and recipientsLaser mailing labels for all sources and recipientsReferral PrintingPrint Referral labels from the Edit Patient Referrals screen, the ReferralRecipient screen and the Referral Source screen.In Edit Person Referral, select the Label/Env. button to print labels, laser labelsand envelopes.4 OverviewPatterson EagleSoft Overview 12.00
In the List menu, select Referrals Recipients or Sources. Highlight the desiredRecipient or Source from the list and select Edit. Select the Label/Env. button toprint labels, laser labels or envelopes.ChartChart PreferencesIn the new section When Charting Surface Codes on Multiple Teeth, thefollowing options have been made available for charting.Use Summary from First Tooth – Select this option to apply the summarysurface information entered for the first tooth in the series to all teeth in the series.Patterson EagleSoft Overview 12.00Overview 5
Use Anatomy From First Tooth – Select this option to apply the anatomydetailed surface information entered for the first tooth in the series to all teeth in theseries.Use Detail Pattern From First Tooth – Select this option to apply the detailpattern surface information entered for the first tooth in the series to all teeth in theseries.Prompt For Details When Anatomy Changes – Select this option to promptfor details when anatomy changes are applied to the selected area.Chart LabelsUnder Preferences Printing, select the checkboxes to determine the items that youwish to print on your Chart Labels by default. Choose from the following: PatientID, Patient Name, Patient Address, Patient Home Phone, Patient Work Phoneand Patient Birthday.Use this printing preference for your Chart, InContact and Edit Patient labels.Your preferred method will appear by default.When printing labels from the Edit Patient screen, select from the followingcheckboxes now available in the Edit Chart Label area: Patient ID, Name, Address,Work Phone, Home Phone and Birthday.6 OverviewPatterson EagleSoft Overview 12.00
Right-Click Menu Options in ChartEdit Appointment - Edit appointments from the Chart ledger. Use the right-clickmenu in the chart to edit appointments in OnSchedule.View Associated CAESY Presentation(s) – Select this option to preview anyCAESY Patient Education videos that may be associated with the service codeselected in the chart ledger. See the CAESY section of this overview for moreinformation on CAESY Presentation assignments.AccountingPreferencesNew to the Accounting tab is the Ledger Color button. Select the Ledger Colorbutton to select the colors to be associated with the different entries on the AccountLedger.Patterson EagleSoft Overview 12.00Overview 7
The Account Ledger categories - Account Payments, Primary InsurancePayments, Secondary Insurance Payments, Payment Plan Payments, CreditAdjustments, Write Offs, Debit Adjustments, Services, Billing Charges,Returned Checks, Finance Charges, Transactions On Outstanding Claims,Deleted Transactions/Notes, Notes.To set the color, select the colored area. The Color window opens. Use your mouseto select the color desired. Select OK to use the selected color.Select OK to save your color choices. Select Cancel to close the window withoutsaving. Select the Default button to use the default colors for all options.EagleSoft TipAll existing records willbe classified asStandard.Default Account Type – Use the drop-down arrow to select the Account Typedefault setting.To add or edit an Account Type, select the hyperlink Account Type or go to Lists General Setup Account Type. The following window appearsSelect the Use button to apply the selected Account Type. Select the New button tocreate a new Account Type. Select the Edit button to edit the selected AccountType. Select the Report button to view the Account Type report. Select the Closebutton to close the window without applying an Account Type.The following is an example of the New Account Type window.The Accounts Receivable by Responsible Party and Delinquent Accounts Report canbe filtered by Account Type.To designate an Account Type, select the Preference button on the specificPatient’s Account.8 OverviewPatterson EagleSoft Overview 12.00
Use the drop-down list to select the Account Type desired from the availableoptions.Modify Completed ServiceIn the Account, you can modify the Estimated Primary Insurance and EstimatedSecondary Insurance amounts on completed services.In the Account screen, double-click on the desired service. In the Estimated Primand Estimated Sec area, select inside the field to edit the amount displayed. TheEstimated Patient amount will adjust accordingly. Select OK
Patterson EagleSoft Overview 12.00 Overview 1 Overview New Icon The first thing you may notice is that the EagleSoft icon has changed. Patterson has introduced a new logo for its vast line of products and services and this is reflected in the Patterson EagleSoft icon. EagleSoft Today EagleSoft Today is like a digital day planner for your .File Size: 2MB