Transcription
Interwrite Workspace 1:Basic AnnotationThe College is currently testing the Interwrite Schoolpad and SchoolBoard digitizers or “interactive whiteboard”technology. This document focuses on the first level of training for faculty interested in using the technology intheir classroom.The goal for the training associated with this document is to enable the most fundamental use of theSchoolPad/Board in a live classroom environment: basic mouse control, whiteboard, screen annotation, andpresentations. This use of the SchoolPad/Board allows faculty and students to interact more directly withcomputer-based content and to create a digital record of class activities and discussion.Certainly, the Interwrite Workspace has many more capabilities. Those will be explored progressively as theCollege continues to test the system and enhance/deepen its level of use within classrooms.Interwrite Workspace 1: Basic Annotation .1Make Sure the System is Ready .2School Pad.2School Board .4Mouse Functions .5Starting Interactive Mode .6How it Works .8The Learning Curve of the Schoolpad .8The Whiteboard .9Erasing or Deleting Annotations . 10Duplicating Pages . 11Navigating Interwrite Slides . 12Saving Your Session . 13Screen Annotation . 14The Gallery . 15Grid Pages . 15Exporting Interwrite Slides to PDF . 16Troubleshooting the Pad to PC Connection . 17Interwrite Workspace 1: Basic Annotation – Page 1 of 18Training & Professional Development, 9/13/2007
Make Sure the System is ReadySchool Pad1. Before beginning, there should be:a bluetooth antenna plugged into a USB port on the computer. Not all bluetooth antennas will beidentical to the one shown in the image below, and they may be plugged into a USB port on thebackside of the PC. Bluetooth antennas often look like flash drives with the exception of thedistinctive blue indicator light, which is visible in the image below.Interwrite Device Manager software running in the system tray of the desktop; if you look in thebottom right hand corner of screen, near the clock, you should see the Interwrite logo as below.Clicking on the log will show the Interwrite menu.Interwrite Workspace 1: Basic Annotation – Page 2 of 18Training & Professional Development, 9/13/2007
2. Turn on and connect the Schoolpad. A powerswitch on the top edge of the pad must be turned on, andthe stylus should be pressed in the pen”hole” – highlighted below – to activate the power for the pad.The Schoolpad connects to the PC wirelessly via Bluetooth communications. When the Schoolpad ispowered on, it should automatically connect to the PC. You will hear 3-4 short beeps followed by achirp indicating successful connection combined with the following message from the InterwriteSoftware in the bottom right hand corner of the screen.You can test the connection by moving the stylus over the pad; the mouse pointer on the PC shouldrespond.If the Schoolpad does not connect successfully, please reference the Troubleshooting the Pad to PCConnection section of this document.Interwrite Workspace 1: Basic Annotation – Page 3 of 18Training & Professional Development, 9/13/2007
School Board1. Before beginning, there should be:Interwrite Device Manager software running in the system tray of the desktop; if you look in thebottom right hand corner of screen, near the clock, you should see the Interwrite logo as below.Clicking on the log will show the Interwrite menu.2. Turn on and connect the SchoolBoard. While the Board is already connected to the PC, a powerswitch atthe bottom of the right edge of the Board must be turned on.When the Schoolpad is powered on, it should automatically connect to the PC. You will hear 3-4 shortbeeps followed by a chirp indicating successful connection combined with the following message fromthe Interwrite Software in the bottom right hand corner of the screen. You can test the connection bymoving the stylus over the pad; the mouse pointer on the PC should respond.Interwrite Workspace 1: Basic Annotation – Page 4 of 18Training & Professional Development, 9/13/2007
Mouse FunctionsAt the core, the SchoolPad/Board simply functions as a wireless mouse.Once the SchoolPad/Board connects, you’ll be able to control the mouse pointer by moving the stylus over thesurface of the Pad/Board. In the example below, I used the pen to point at the Start button, tapped the penagainst the surface to left-click the button, moved the cursor to Settings, and tapped the pen on the surfaceagain to left-click which opened the menu to the right.In addition to the tapping for left-click motion, the pen also provides on the shaft a “rocker button;” the bottomof that rocker button executes a left-click, and the top of the rocker button executes a right-click.Interwrite Workspace 1: Basic Annotation – Page 5 of 18Training & Professional Development, 9/13/2007
Starting Interactive ModeUsing the SchoolPad/Board as a wireless mouse is effective but unnecessary. The capabilities of the devices liein the Interactive Mode of the Interwrite application.1. Start Interactive Mode by clicking on the Start button, Programs (All Programs), Interwrite Learning,Interwrite Workspace and Interactive Mode.OR, click on the Interwrite icon in the system tray, and select Interactive Mode in the menu that popsup.Interwrite Workspace 1: Basic Annotation – Page 6 of 18Training & Professional Development, 9/13/2007
2. When Interactive Mode starts, the toolbar will appear on the screen. The basic tools on the toolbar arenoted below; specifics of each will be covered in later sections or subsequent training sessions.Interwrite Workspace 1: Basic Annotation – Page 7 of 18Training & Professional Development, 9/13/2007
How it WorksTo reveal the “man behind the curtain”When you start the Interactive Mode toolbar, the Pad/Board is still in mouse mode. It’s nothing more than apen mouse. However, when you click on ANY of the annotation tools available in Interactive Mode, theInterwrite Workspace software snaps a screenshot of the full-screen and activates the tool you selected:annotation mode. You then have the ability to annotate or write on that screen shot. The screen can be a plainempty page (with background color of your choice), a grid page, an image, a duplicate of the current screen, orany application that happens to be open at the moment you select an annotation tool: Internet Explorer, MSWord, Inspiration, MS Powerpoint etc.More importantly, each screenshot that’s created is automatically saved in the working collection of slides. Youcan navigate forward and backward between each slide. When all annotation activities are complete, you cansave the collection for later reference and/or export to PDF or HTML formats which can be uploaded toBlackboard.The Learning Curve of the SchoolpadUsing a stylus to control the mouse pointer is a bit different than using a mouse, but it does revert back to amore natural and familiar interface: writing on a surface with a pen. There are three basic adjustments to bemade when interacting with a computer with the Interwrite Schoolpad.First, the Schoolpad stylus does not “drag” the mouse pointer across the display; the stylus provides more of adirect pointing device. Touching the stylus to the top left corner of the pad will move the mouse pointer to thetop left corner of the display regardless of the display’s size; picking up the stylus and moving it to the bottomright corner of the pad will cause the mouse pointer to “jump” to the bottom right corner of the display, againregardless of the display’s size.Second, there is learning curve, albeit a short one, for many users adjusting to the scale of writing on a devicethat’s 8 inches across and seeing the results appear on a display that measure 8 feet across.Third, we monitor our writing by observing the outcomes of our movement. With a typical pen, the outcome ofthe writing motion occurs at the tip where the pen meets the paper. For the Schoolpad, the outcome of thewriting motion is dislocated from the tip of the pen; the results are on the computer display or projectionscreen. It is a slight adjustment, but an adjustment nonetheless.Interwrite Workspace 1: Basic Annotation – Page 8 of 18Training & Professional Development, 9/13/2007
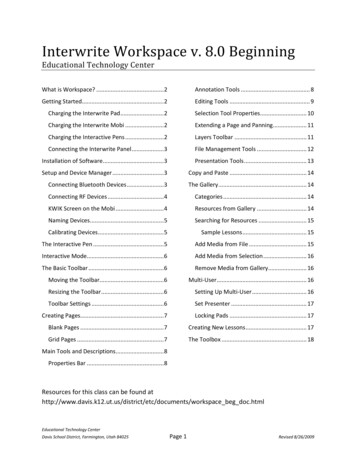
The WhiteboardThe Whiteboard tool is nothing more than a plain screen or page on which you can write. This tool is opened byclicking on the Create Blank Page button on the Interactive Mode toolbar (highlighted below).Once the plain screen is opened, you can then select any of the annotation tools. The Pen tool is highlightedbelow along with the Pen Options that appear at the bottom of the screen including: color, line width, linetransparency, line ends, dash styles and a preview of the lines to be drawn with the pen.Given that all slides can be saved and exported for later viewing by learners, this tool could be used torecord/document classroom notes and announcements.The Whiteboard tool can also be used in lieu of a markerboard, chalkboard or overhead projector with theadded benefit of being able to save and export all written content for later viewing by learners.Interwrite Workspace 1: Basic Annotation – Page 9 of 18Training & Professional Development, 9/13/2007
Erasing or Deleting AnnotationsIf you need to erase or delete annotations you’ve made, the Interactive Mode toolbar provides two options.The Eraser button activates an eraser thatwill remove your notes in a manner similar tousing an eraser on a markerboard orchalkboard. When you select the Eraser, aslider appears at the bottom of the screen tocontrol the dimensions of the eraser.The Clear button (Red X) will delete/clear ALLannotations you’ve made on the currentslide.Interwrite Workspace 1: Basic Annotation – Page 10 of 18Training & Professional Development, 9/13/2007
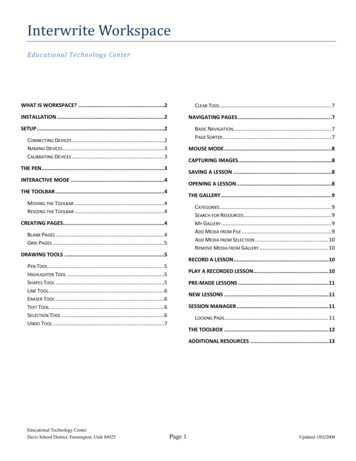
Duplicating PagesThe basic whiteboard function of the software can be extended by the Create Duplicate Page button(highlighted below).In this example, a blank page is created and the original formula, in black, is written. The Create Duplicate Pagebutton is used to create a copy on which the next step of the formula, in green, is recorded. The next two steps,in blue then red, are written on subsequent duplicate pages.This creates, in real time as you are teaching, a progressive solution of a math problem. When saved andexported, each of the four slides is presented in sequence. This offers learners the opportunity to reviewclassroom notes and examples in the same, progressive manner in which they were originally presented.Interwrite Workspace 1: Basic Annotation – Page 11 of 18Training & Professional Development, 9/13/2007
Navigating Interwrite SlidesEach individual screenshot is automatically saved as a slide, with all annotations, in the Page Sorter.Navigate the slides – moving forward and backward in the collection – by using the two green arrows on theInteractive Mode toolbar or the slide navigation tool at the bottom right of the screen when in annotationmode.The Page Sorter, highlighted next to the green arrows, allows you to move slides around or delete them asneeded.Using the Page Sorter, you can select an insertion point for any additional slides you may create. If you do usethe Page Sorter and want to continue adding slides to the end of the collection, make sure your insertion point isafter the last slide before closing the Page Sorter and adding additional slides.Interwrite Workspace 1: Basic Annotation – Page 12 of 18Training & Professional Development, 9/13/2007
Saving Your SessionA critical feature of the Interwrite application is the ability to save all screens with all annotations for later use.While each slide is saved as you work, you will need to save your collection of slides when you finish a classsession.1.Click on the Save button on the Interactive Mode toolbar. A typical Save File window will appear; theInterwrite Schoolpad/Board2. You can name the file and save it to any network location or removable/flash drive.Interwrite Workspace 1: Basic Annotation – Page 13 of 18Training & Professional Development, 9/13/2007
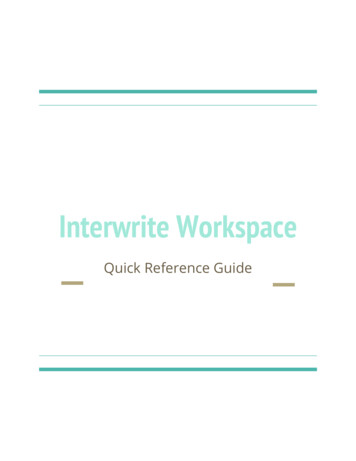
Screen AnnotationWhen you click on ANY of the annotation tools available on the Interactive Mode Toolbar, the software snaps ascreenshot of the full-screen and activates the tool you selected: entering annotation mode. You then have theability to annotate or write on that screen shot.As noted earlier, this works with ANY screen including any application that happens to be open at the momentyou select an annotation tool: Internet Explorer, MS Word, Inspiration, MS Powerpoint etc.In this example, we’ve highlighted the Pen tool, and you can see in the background that it was used to draw anarrow on the College webpage pointing to the “Start your future now” box.This application of the Interwrite tools may be used to:add labels of particular body parts to an imageof the human torso accessed via the internethighlight main ideas or sentence structure in a paragraph displayed in MS Wordpoint out certain features of MS Excel 2007 by circling a ribbon or groupcreate a software tutorial by drawing the steps and using the Create Duplicate Page as neededadd additional notes to existing Powerpoint slidestrace over boundaries or features of a map to better illustrate a conceptcollaboratively review and edit a writing sampleOf course, learners can also use the devices – whether standing at the front of the room with the Board orsitting in their seat with the Pad – to do any of the above tasks.Interwrite Workspace 1: Basic Annotation – Page 14 of 18Training & Professional Development, 9/13/2007
The GalleryThe Gallery offers a significant library of images relevant to many different disciplines; the Gallery button(grayed out in the image below) reveals the Interwrite Gallery which can be searched or browsed as needed.Images from the Gallery can be dragged and dropped onto any existing slide: plain page or screenshot of anapplication.Grid PagesThe Create Grid Page can be used with the Line, Shapes and Pen tools to graph formulas or chart otherinformation.Interwrite Workspace 1: Basic Annotation – Page 15 of 18Training & Professional Development, 9/13/2007
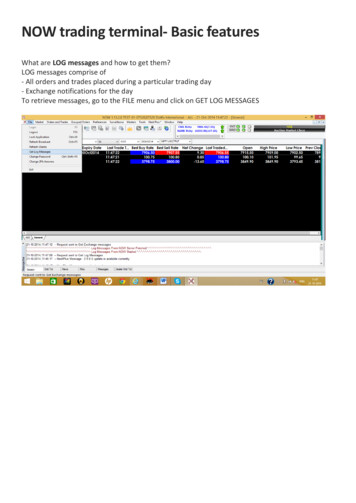
Exporting Interwrite Slides to PDFOnce you’ve completed a session, you can export your collection of slides to two different formats which may beuploaded to Blackboard or otherwise made available to learners: web format or PDF format.1. Click on the Workspace Menu button on the Interactive Mode toolbar.2. Click on File.3. Click on Export PDF File.4. You can name the file and save it to any network location or removable/flash drive.Interwrite Workspace 1: Basic Annotation – Page 16 of 18Training & Professional Development, 9/13/2007
Troubleshooting the Pad to PC ConnectionIf the Schoolpad does not connect successfully – noted by a lower tone and the absence of the notice that theSchoolpad has connected – the typical fix is to stop and restart the Device Manager that connects the Schoolpadto the PC via Bluetooth.1. Right click on the Interwrite Workspace Device Manager icon in the system tray.2. In the menu that appears, select Exit. This will close the Interwrite Workspace Device Manager.3. Restart the Device Manager by clicking on the Windows Start button All Programs InterwriteLearning Interwrie Workspace Device Manager.Interwrite Workspace 1: Basic Annotation – Page 17 of 18Training & Professional Development, 9/13/2007
4. On the Schoolpad, use the stylus on the Connect dent (for the lack of a better word). The pad shouldbegin chirping followed by a successful connection.If that process does not resolve the issue, please contact Tech Support at extension 6137.Interwrite Workspace 1: Basic Annotation – Page 18 of 18Training & Professional Development, 9/13/2007
Interwrite Workspace software snaps a screenshot of the full-screen and activates the tool you selected: annotation mode. You then have the ability to annotate or write on that screen shot. The screen can be a plain em