Transcription
Epson Projector ManagementOperation Guide
ContentsIntroduction to Epson Projector Management. 5Epson Projector Management Features. 5Setting Up the Software for the First Time . 7Installing the Software . 7System Requirements . 7Installing Epson Projector Management . 8Importing Settings From EasyMP Monitor . 9Selecting Projector Network Settings . 9Setting Up a Projector to Connect in Advanced Connection Mode (Wired) . 9Setting Up a Projector to Connect in Advanced Connection Mode (Wireless). 10Monitoring and Controlling the Projectors .Registering Projectors for Monitoring .Searching for Projectors .Creating a Projector Group.Projector Monitoring Views.Projector Status Display .Projector Control Options .13131316182122Using Additional Functions.Scheduling Projector Events .Making Security Settings.Setting the Password.Restricting the Use of the Application .Sending Email Notifications.Message Broadcasting.Broadcasting a Message Immediately.Broadcasting a Message at a Specific Date and Time.Saving Projector Log Files .23232525262628283034Solving Problems . 36Solving Network Connection Problems . 36Solutions When You Cannot Connect Projectors Using Advanced Connection Mode (Wired). 363
Solutions When You Cannot Connect Projectors Using Advanced Connection Mode (Wireless) . 37Solving Monitoring and Controlling Problems. 38Solutions When You Cannot Monitor or Control the Projector . 39Solutions When Network Alert Emails are not Received . 39Solutions When You Cannot Broadcast a Message . 40Screen Summary .Epson Projector Management Main Screen.Projector Status Icons .Projector Properties Screen .Projector Properties - Information.Projector Properties - Error History.Projector Properties - Usage History .Projector Properties - Schedule.Projector Properties - Status Information.Projector Properties - Service.Environment Setup Screen .Environment Setup - General .Environment Setup - Monitor .Environment Setup - Display List.Environment Setup - Mail .414142434446474850515152535455Appendix .Updating and Uninstalling the Software .Uninstalling Epson Projector Management (Windows 7).Uninstalling Epson Projector Management (Windows 8.x) .Limitations for Non-Epson Projectors .Notices .Copyright Notice .About Notations .General Notice.Copyright Attribution .575757575858595959604
Introduction to Epson Projector ManagementSee the information here to learn more about Epson Projector Management software.Epson Projector Management FeaturesEpson Projector Management FeaturesEpson Projector Management allows you to check the status of multiple networked projectors andperform various projector operations from your computer. Monitoring the status of projectorsYou can visually check projector information such as power status, errors, and warnings so you arealerted to projector abnormalities immediately. You can also select individual projectors or projectorgroups to check detailed information such as the usage hours of the projector light source, the currentinput source, and any current errors or warnings. Controlling the projectorsYou can turn projectors on or off, or change input sources for individual projectors or projector groups.You can schedule various projector events to occur automatically on the specified date and time. Sending email notificationYou can set up the projector to send you an email alert over the network if there is a problem with theprojector. Message BroadcastingYou can distribute images or text messages to multiple projectors for simultaneous display on thoseprojectors. Monitoring and controlling non-Epson projectors using the PJLink protocolYou can monitor and control projectors that support the PJLink protocol.Parent topic: Introduction to Epson Projector ManagementRelated referencesProjector Monitoring ViewsLimitations for Non-Epson ProjectorsRelated tasksScheduling Projector EventsSending Email Notifications5
Related topicsMessage Broadcasting6
Setting Up the Software for the First TimeFollow these instructions before connecting a computer to the projector over a network.Installing the SoftwareSelecting Projector Network SettingsInstalling the SoftwareCheck the system requirements necessary to run the software, and then install the software.Note: If the language selected for the installation differs from the language of the operating system beingused, the screens may not display correctly.System RequirementsInstalling Epson Projector ManagementImporting Settings From EasyMP MonitorParent topic: Setting Up the Software for the First TimeSystem RequirementsThis application supports the following operating systems, and is compatible with computers that meetthe following system requirements.Operating SystemsWindows 7 Ultimate (32- and 64-bit) Enterprise (32- and 64-bit) Professional (32- and 64-bit) Home Premium (32- and 64-bit) Home Basic (32-bit)7
Windows 8.1 Windows 8.1 (32- and 64-bit) Windows 8.1 Pro (32- and 64-bit) Windows 8.1 Enterprise (32- and 64-bit)Windows 10 Windows 10 Home (32- and 64-bit) Windows 10 Pro (32- and 64-bit) Windows 10 Enterprise (32- and 64-bit)CPUIntel Core i5 or faster(Intel Core i7 or faster recommended)Memory2 GB or more(8 GB or more recommended)Hard Disk Space1 GB or moreDisplayResolution between 1280 800 (WXGA) and 1920 1200 (WUXGA)16-bit color or greater (approximately 32,000 display colors)Parent topic: Installing the SoftwareInstalling Epson Projector ManagementDownload and install the Epson Projector Management on your computer.Visit epson.com/support (U.S.) or epson.ca/support (Canada) and select your projector to download thelatest version of the Epson Projector Management.Note: You need administrator authority to install the Epson Projector Management. You need to install Microsoft .NET Framework 4.5 before installing Epson Projector Management. While installing Epson Projector Management, you may need to install other required software such asMicrosoft SQL Server LocalDB 2014 Express. Follow the on-screen instructions to continueinstallation.1. Download the latest version of the Epson Projector Management.8
2. Double-click Epson Projector Management Ver.X.XX.exe to start the installer.3. Follow the on-screen instructions.Parent topic: Installing the SoftwareImporting Settings From EasyMP MonitorYou can transfer setting information from EasyMP Monitor (version 4.50 or later). Start Epson ProjectorManagement on the same computer and the settings are imported automatically the first time you startthe software. When finished, you see an message telling you that the settings are imported.If you want to use the imported settings on another computer that is running Epson ProjectorManagement, you can save a configuration file on the original computer using the Save ConfigurationFile feature on the Environment setup screen. Then copy the resulting configuration file to the followingdirectory on the other computer.C:\ProgramData\SEIKO EPSON CORPORATION\Epson Projector ManagementParent topic: Installing the SoftwareRelated referencesEnvironment Setup - GeneralSelecting Projector Network SettingsFollow these instructions to select a connection method between a computer and the projector, and thenset up the projector.Connect the projector to your network using the Advanced connection mode.Setting Up a Projector to Connect in Advanced Connection Mode (Wired)Setting Up a Projector to Connect in Advanced Connection Mode (Wireless)Parent topic: Setting Up the Software for the First TimeSetting Up a Projector to Connect in Advanced Connection Mode (Wired)To connect a computer to the projector using a wired LAN, you need to select network settings on thecomputer and the projector.1. Connect the computer to the network.Note: To set up a network connection, if necessary, see the documentation supplied with yourcomputer or network adapter.9
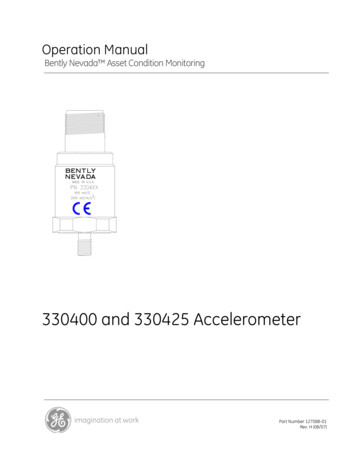
2. Connect a LAN cable to the projector.3. Turn on the projector.4. Press the Menu button on the remote control or the control panel, select the Network menu, andselect Network Configuration.5. Select Wired LAN.A screen like one of the following is displayed.6. Set DHCP to Off and enter the projector's IP Address, Subnet Mask, and Gateway Address valuesas necessary.7. When you have finished making settings, select Setup Complete or Complete, and follow the onscreen instructions to save your settings and exit the menus.Parent topic: Selecting Projector Network SettingsRelated referencesSolutions When You Cannot Connect Projectors Using Advanced Connection Mode (Wired)Setting Up a Projector to Connect in Advanced Connection Mode (Wireless)To connect a computer to the projector over a wireless LAN, you need to select network settings on thecomputer and the projector.1. Contact your network administrator and write down the settings for the access point, such as theSSID and security settings.10
2. Connect the computer to the network.Note: To set up a network connection, if necessary, see the documentation supplied with yourcomputer or network adapter.3. Install the wireless LAN unit in the projector, if necessary. See your projector User's Guide forinstructions.4. Turn on the projector.5. Press the Menu button on the remote control or the control panel, select the Network menu, andthen select Network Configuration.6. Select Wireless LAN.A screen like one of the following is displayed.7. Turn on wireless LAN support.Note: The necessary settings vary depending on your projector. See your projector User's Guide forinstructions.8. Select Advanced for Connection Mode.9. Select other options as necessary for your network. See your projector User's Guide for instructions.10. Select security settings on the Security menu as necessary for your network. Check with yournetwork administrator for more information on making the correct settings.11. When you have finished making settings, select Setup Complete or Complete, and follow the onscreen instructions to save your settings and exit the menus.11
Parent topic: Selecting Projector Network SettingsRelated referencesSolutions When You Cannot Connect Projectors Using Advanced Connection Mode (Wireless)12
Monitoring and Controlling the ProjectorsFollow these instructions to monitor and control the registered projectors.Registering Projectors for MonitoringProjector Monitoring ViewsProjector Status DisplayProjector Control OptionsRegistering Projectors for MonitoringTo monitor or control projectors, you must register the projectors to Epson Projector Management. Onceyou registered, the projector status is automatically displayed when you start Epson ProjectorManagement.If you need to register a large number of projectors, you can create projector groups so you can monitorand control the projectors in small units. First create your projector groups and then register eachprojector to a group.You can register up to 2000 projectors and groups in total. To monitor a large number of projectors,make sure your computer meets or exceeds the system requirements.Searching for ProjectorsCreating a Projector GroupParent topic: Monitoring and Controlling the ProjectorsRelated referencesSystem RequirementsSearching for ProjectorsYou can search for projectors on the same segment automatically, as well as searching for projectors byspecifying an IP addresses.1. Start Epson Projector Management. Windows 7: Click Start, select Programs (or All Programs), EPSON Projector, and then clickEpson Projector Management Ver.X.XX. Windows 8.1: Navigate to the Apps screen and select Epson Projector Management Ver.X.XX. Windows 10: Select Start, select EPSON Projector, and then select Epson ProjectorManagement Ver.X.XX.13
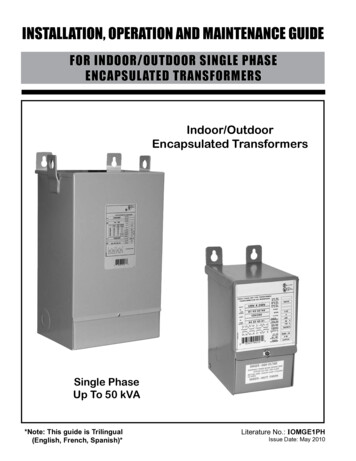
Epson Projector Management starts.2. Select Projector from the menu bar and select Projector Registration.The Projector Registration screen appears.3. Select a search mode. Select Automatic search to search for the projector on the same network. Select Manual search to search for the projector by specifying the IP address. Enter an IPaddress. Select Range search to search for the projector by setting an IP address range. Enter an IPaddress in Start IP Address and End IP Address.Note: If you want to search non-Epson projectors that support PJLink Class2 automatically, selectSearch for Projectors in PJLink.4. Click Search.You see a list of network projectors.14
5. Select the projector that you want to register.6. Select the necessary settings for each projector.1Enter the name of the projector. This name is displayed in the Epson Projector Managementmain screen. You can enter up to 64 characters.2Displays the name that has been registered to the projector.3Select the icon.4Select a group if you want to register the projector to a group. (You must first create a group toadd projectors to it.)5Displays the projector's IP address.15
6Enter notes about the projector, such as its location, if necessary. Notes entered here aredisplayed in Projector Properties. You can enter up to 60 characters.7If a password has been set for the projector, enter the password here. If you do not enter thecorrect password, you cannot monitor or control the projector, even after registering theprojector. For more information about passwords, see your projector User's Guide.7. Click Register.To register additional projectors, repeat steps 5 to 7.You see the registered projectors in the Epson Projector Management main screen.Note: To change the projector information for a registered projector, double-click the projector in the EpsonProjector Management main screen, and then change the necessary information on the ProjectorProperties screen. To remove a registered projector, right-click the projector in the Epson Projector Management mainscreen, and then select Delete.Parent topic: Registering Projectors for MonitoringRelated referencesProjector Properties - InformationCreating a Projector GroupRegistering projectors to a group allows you to monitor and control multiple projectors all at once. Whenyou select a parent group, you can also monitor and control all projectors included in multiple groups.1. Select Projector from the menu bar and select Group Registration.The Group Registration screen appears
10 2. Connect a LAN cable to the projector. 3. Turn on the projector. 4. Press the Menu button on the remote control or the control panel, select the Network menu, and select Network Configuration. 5. Select Wi