Transcription
CHAPTER5Configuring theServer(s)IN THIS CHAPTER. Introduction. Overview of MachineConfiguration Options. Installing and ConfiguringFileMaker Server. Testing Your InstallationIntroductionIn Chapter 1, “How Web Publishing Works,” I recommended that you rent a web server when you are gettingstarted with web publishing. If you really want the behindthe-scenes stuff to be taken care of by experts, you can takethings one step further and rent a web server that specifically supports FileMaker hosting.These specialized types of hosting companies are referred toas “FileMaker Hosting Providers.” Because they are not ascommon as typical web hosting providers, they can be a bitmore expensive. However, using a FileMaker HostingProvider has a couple of big advantages:. You don’t have to buy the FileMaker Server (FMS)software. You don’t have to worry about administering theserver machine. Their uptime and performance will probably be betterthan anything you could provide with your ownmachine.This is a great option for people who just want to createfiles, upload them, and forget about it. However, if you aremore hands-on and want to get under the hood, you probably ought to pony up for FMS and maintain your ownmachine (or machines, as we’ll see shortly). Hosting Your File. PHP Site Assistant
CHAPTER 568Configuring the Server(s)NOTEIf you do rent a web server, be sure to talk to your provider about whether or not youwill be sharing disk space with its other customers. Depending on the sensitivity oryour data, you might want to consider paying for a dedicated server.Overview of Machine Configuration OptionsThere are three main components to consider when working with FileMaker Server as awebsite back end:. Database Server—Hosts the FileMaker files. Web Server—Handles the browser requests. Web Publishing Engine (WPE)—Acts as the translator between the Web Server andthe Database Server.These three components can be installed on one, two, or three machines, as follows:. Single Machine—Database Server, Web Server, and WPE on a single machine. Two Machines—Database Server on one machine and Web Server and WPE onanother machine. Two Machines (Alternative)—Database Server and WPE on one machine and theWeb Server on another machine. Three Machines—Database Server on one machine, WPE on a second machine, andWeb Server on a third machineThere are a number of considerations when deciding on a machine configuration:. Single Machine allows for very fast communication between the three components,but puts a heavy load on the processor. Also, it means that you have a single pointof failure. With a multiple machine configuration, you can reboot your web serverwithout affecting clients connecting to the database with FMP. Two Machines spreads out the processor load and separates the website load fromthe FileMaker Pro client connections. If you have a lot of FileMaker Pro client activity, and a lot of web activity, this might be a good option. However, the communication between the WPE and FMS could be a bottleneck if the connection speed islacking. Two Machines (Alternative) moves the WPE to the FMS machine, which means thatweb requests to the database could impact your FMP clients more so than theregular Two Machines configuration.
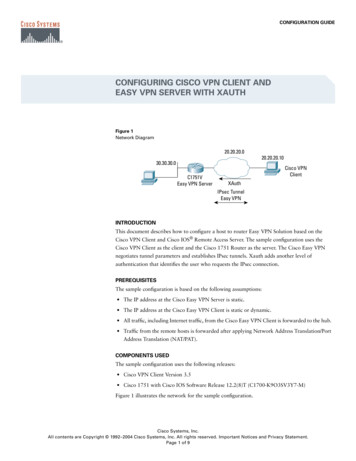
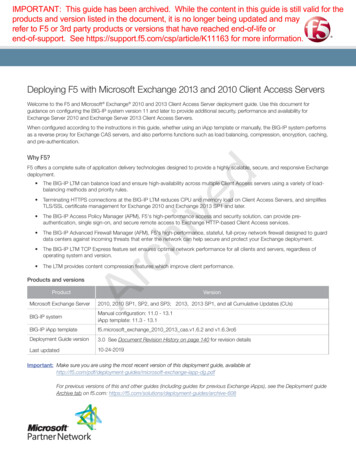
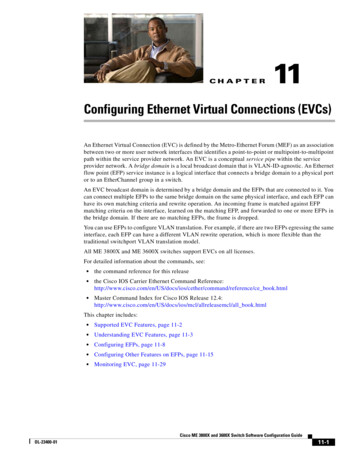
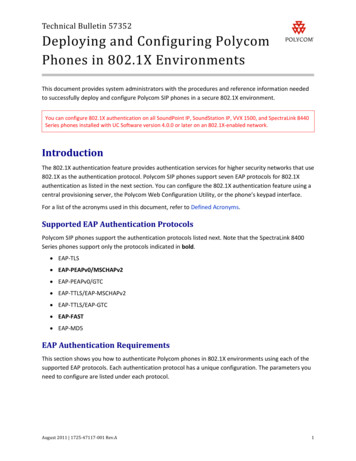
Installing and Configuring FileMaker Server69. Three Machines spreads out the processor load the most, but a slow connectionbetween any of the machines can cause performance problems. Also, there is theobvious expense of the three machines.Only you can decide which machine configuration is best for you, but here are somethoughts that might help:. If you are not sure which option is best for you, go with the easiest and least expensive. You can always ramp up if you find that performance or stability is lacking. For development purposes, I am a big fan of the Single Machine configuration. I justinstall everything on my laptop and I am good to go, even without a networkconnection.Installing and Configuring FileMaker ServerNOTEIf you have a previous version of FMS installed, there are a few things that you shoulddo prior to installation:1. Uninstall any previous version of FMS.2. On your web server machine, revert your httpd.conf file to its default state.3. Restart your machine (or machines).After you read and agree to the software license agreement, you will be asked to decidebetween a single or multiple machine configuration (see Figure 5.1).If you select Single Machine and click Next, you will then be asked to enter your name,organization, and your license key. Then, you click the Install button and sit back. Theinstallation can take a few minutes—there are more than 6,000 files that need to becreated on your hard drive.If you opt for a Multiple Machines install, you will be presented with an additional screenasking whether this particular installation is the Master machine, or a Worker machine(see Figure 5.2). The master machine is the one on which your FileMaker files will behosted, and might or might not be running the WPE. The worker machine is the onerunning the WPE, the web server, or both.NOTEIf you are planning a multiple machine installation, I recommend doing the installs onthe worker machine or machines first, and the master machine (the Database Server)last.5This installation process is pretty straightforward—you just insert the disk, launch theinstaller, and follow the instructions. However, there are a couple of options dependingon which machine configuration you are planning to use.
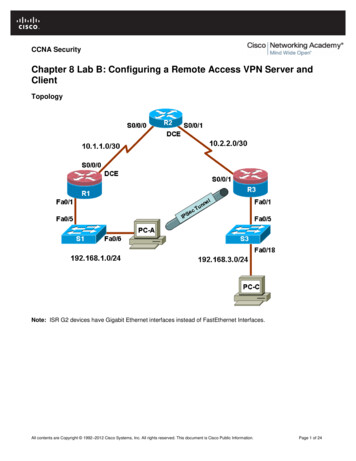
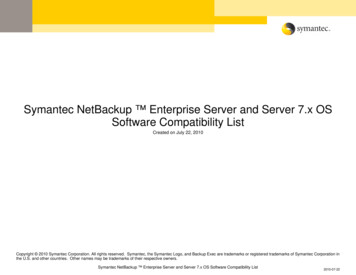
70CHAPTER 5Configuring the Server(s)FIGURE 5.1The FileMaker Server installer prompts you to specify the number of machinesfor the installation.FIGURE 5.2For a multiple machine installation, you are asked to specify whether this is themaster machine or a worker machine. The master machine is the one that will actually host thedatabase files.If you select Master and click Next, you are prompted to enter your name, organization,and your license key. If you select Worker and click Next, the installer does not promptyou for any information and just proceeds with the installation.After the FMS install is complete (either the Single Machine or Master Machine), theinstaller asks you whether you want to deploy FileMaker Server. You can opt to continue,which will launch the Deployment Assistant, or you can quit to leave the installer.
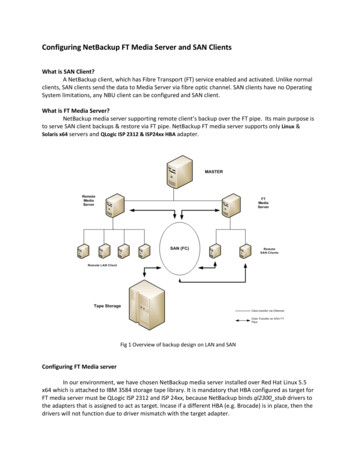
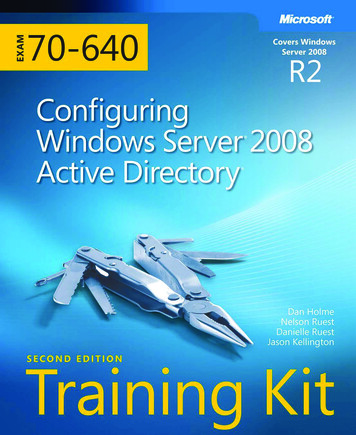
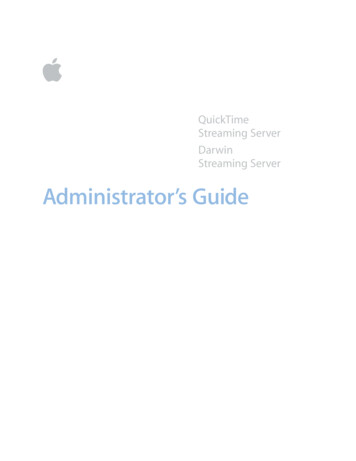
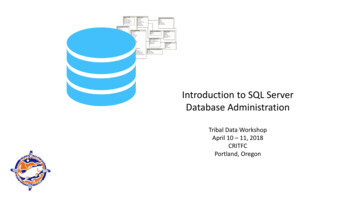
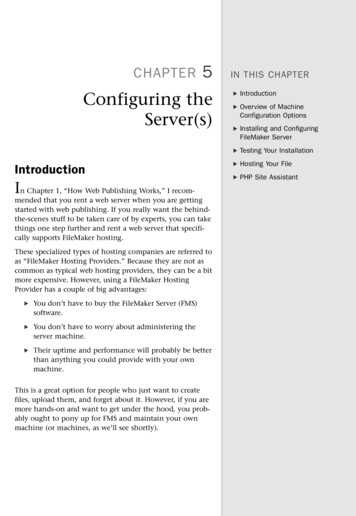
Installing and Configuring FileMaker Server71Click Continue to launch the Deployment Assistant. The server prelaunch page opens ina browser (see Figure 5.3). After a minute or so, the page updates and tells you that theAdmin Console is starting. Be patient while this process completes. It can take severalminutes.5FIGURE 5.3The Admin Console Start Page appears automatically after the installation ofthe Database Server.A file named admin console init webstart.jnlp will be downloaded to your defaultdownload directory. It is a Java Web Start application that kicks off the initial launch ofthe Admin Console and the Deployment Assistant. In another minute or so, you will bepresented with the first page of the five-page Deployment Assistant (see Figure 5.4) andwalked through the following steps.NOTESome browser configurations can prevent the jnlp file from launching automaticallyafter download. If nothing seems to happen, you can just manually launch the jnlp fileby double-clicking it. Page 1—Specify a username and password that will be used to open the AdminConsole. Page 2—Specify a name and other optional information about this FMS installation.The server name that you choose is what will appear in the Open Remote dialogbox for FileMaker Pro users. Page 3—Specify whether you want to allow clients to connect to your FileMakerdatabase via ODBC. This is only available with FileMaker Server Advanced. Page 4—Specify whether you want to enable web publishing. You should select Yeson this page.
CHAPTER 572Configuring the Server(s). Page 4, part 2—Specify which web technologies you want to enable. For now, youjust need to enable PHP. Under the PHP option, you need to choose whether to useFileMaker Server’s version or not. You will probably want to use FileMaker’s version,unless you have your own customized version of PHP installed. (Note that InstantWeb Publishing is only available with FileMaker Server Advanced.). Page 4, part 3—Select a web server. In most cases, there will only be one web serveroption. If there is more than one, specify your selection. Page 5—A summary of your deployment. Click Finish to close the DeploymentAssistant. You will be asked to stand by while the deployment is executed.FIGURE 5.4This is the first page of the Deployment Assistant that launches after your initialinstall of the Database Server.When the deployment process completes, you will see the FileMaker Server AdminConsole Welcome dialog box (see Figure 5.5). Click the OK button to dismiss thedialog box.You will be presented with the Overview page of the FileMaker Server Admin Console (seeFigure 5.6). The overview page gives you a quick view into the status of the server. Thereshould be three green circles in the center area—one each next to the Web Server, theWeb Publishing Engine, and the Database Server.NOTENote that in the lower-right area of the screen is a link to the Deployment Assistant,where you can modify your deployment options should you change your mind in thefuture.
Installing and Configuring FileMaker Server73FIGURE 5.5The Admin Console Welcome dialog box allows you to register your server oropen the technology tests page. You can easily access these options from the Admin Consolelater, if you want.5FIGURE 5.6The Admin Console Overview page gives you a quick view into the status ofthe server.NOTEIf you are familiar with previous versions of FMS, you are in for a number of big—andpleasant—surprises with FMS 9, particularly with regard to the new Admin Console:. All aspects of FMS can be administered from a single interface (the ServerAdmin Tool and the Web Publishing Admin Console have been combined).
74CHAPTER 5Configuring the Server(s). The interface is identical on both Mac and Windows. The server can be administered from any machine with a network connection—no prior installations necessary. You can upload FileMaker files to the server through the Admin Console. FileMaker scripts can be scheduled to run in the background. Backup schedules are automatically created by default. Backup files are scanned to ensure that they are not corrupt. You can set up email notifications for server warnings and errors.There are an enormous number of configuration options in the Admin Console, but, inmost cases, the default configuration should serve you just fine. Still, there are a fewthings you should be familiar with if you are administering the FMS machine.Administration: ClientsThis page allows you to disconnect or send a message to an individual client or all clientsof the server. The tabs at the lower portion of the page alternately provide informationabout which databases the selected client has open, or details about the selected client(see Figure 5.7).FIGURE 5.7The Administration: Clients page of the Admin Console allows you to see whois connected to what. You can then send messages to, or disconnect one or all clients, fromthis page.
Installing and Configuring FileMaker Server75Administration: DatabasesThis page displays a list of databases hosted on your server. Using the Actions menu, youcan opt to Open, Close, Pause, Resume, Upload, or Remove one or all databases. You canalso send a message to the FileMaker Pro clients of one or all databases (see Figure 5.8).5FIGURE 5.8The Administration: Databases page of the Admin Console displays which databases are on the server, their status, what types of connections are allowed, and which clientsare connected to each file, if any.NOTEIn previous versions of FileMaker Server, it was possible to manually copy a file to theserver that did not have the fmapp extended privilege enabled, meaning that you couldeffectively host a file that you couldn’t access with FileMaker Pro. When using theUpload feature of FMS 9, the file is now checked for this issue. If the fmapp extendedprivilege is missing from all privilege sets, it is automatically assigned to the FullAccess privilege set. An additional improvement over previous versions of FMS is thatthe file system permissions on the uploaded file are now set appropriately. Previously,this was a manual operation on the Mac platform.Administration: SchedulesThis page allows you to specify automated tasks. There are three types of scheduledactions supported:
CHAPTER 576Configuring the Server(s). Back Up Databases. Run a Script (executes a shell script, batch file, or FileMaker script). Send a Message (sends a message to connected FMP users)By default, three backup schedules are created when you install FMS—Daily, Hourly, andWeekly—but only Daily is enabled (see Figure 5.9).FIGURE 5.9The Administration: Schedules page of the Admin Console shows you what automated tasks have been scheduled, what type they are, whether they are enabled, and whenthey are going to run next, among other things.NOTEThe ability to run a FileMaker script is a new—and welcome—feature. It allows you toselect a script from one of the host files to run at a specified time. Writing FileMakerscripts is not a topic covered in this book, but if you are already familiar with theconcept, this is a great feature. (Note that only web-compatible script steps aresupported.)
Hosting Your File77Testing Your InstallationAfter you are satisfied with your installation and configuration, you can test FileMakerServer as follows:1. Select the Open Test Page option from the Server menu of the Admin Console. Abrowser window should open to the FileMaker Server Technology Test page. Thereare up to four active links on the test page, depending on whether you haveFileMaker Server or FileMaker Server Advanced installed. In this case, we want totest FileMaker Pro and PHP Custom Web Publishing.2. If you have multiple versions of FileMaker Pro installed, make sure only FMP 9 isrunning.3. Click the Test FileMaker Pro link. The FMServer Sample.fp7 file should open inFMP 9.If either of the tests fail, navigate to the Administration: Databases screen and confirmthat the FMServer Sample.fp7 is open. If it is open, stop and restart the database server. Ifyour test still fails, restart the machine and try again. If that still doesn’t work, call me athome and I’ll fix it. Uh just kidding.Hosting Your FileNow we are ready to upload the Product Catalog.fp7 file to the Database Server.1. Navigate to the Administration: Databases screen in the Admin Console.2. Select Upload from the Actions menu and click the Perform Action button.3. Follow the instructions in the Upload Database Assistant to select the ProductCatalog.fp7 file and upload it to the server (see Figures 5.10 through 5.14).After this process is completed, you should see the Product Catalog.fp7 file in the list ofdatabases.54. Click the Test PHP Custom Web Publishing link. A new browser window shouldopen displaying a list of records from the FMServer Sample.fp7 database. There willalso be a green circle on the page indicating that the test was successful. If the testfailed, the circle would be red.
78CHAPTER 5Configuring the Server(s)FIGURE 5.10After launching the Upload Assistant, click the Add Database button.FIGURE 5.11You will be asked to select a database to upload.
Hosting Your File79FIGURE 5.12FIGURE 5.13You can opt to open the file after upload, or not. Note that the fmappextended privilege will be added to the Full Access privilege set if it is not enabled for anyprivilege sets.5After the database is selected, it will appear in the list. Click the Next buttonto upload the file.
80CHAPTER 5Configuring the Server(s)FIGURE 5.14Success! The Product Catalog file was uploaded and is showing an OK statusin the Upload Databases Summary dialog box.PHP Site AssistantNew to FileMaker Server 9 is a snazzy little tool called the PHP Site Assistant (PHPSA). ThePHPSA walks you through a wizard-type interface and ultimately outputs basic PHP pagesthat allow you to interact with your FileMaker database.These pages are normal text documents that you can manually customize to your needs.Even after you are comfortable coding PHP from scratch (which we get into in the nextsection), the PHPSA is a powerful resource that can get you up and running in a pinch,give your “from scratch” site a head start, or just give you some good ideas.Launching the PHP Site AssistantThe PHPSA can be found on the master machine of your FMS installation. To launch theSite Assistant, open the Admin Console and select Server, Open Start Page from the Servermenu. A browser should open up to the Admin Console Start Page. In the lower-rightquadrant of the page is a link to the PHP Site Assistant and XSLT Site Assistant Tools (seeFigure 5.15). Click the link to open the Web Publishing Tools page (see Figure 5.16). Afterthe page loads, click the Start PHP Site Assistant button. A file called phpsa webstart.jnlp should download to your download directory. If the Site Assistant doesn’t launchautomatically, double-click the .jnlp file to launch it.
PHP Site Assistant815FIGURE 5.15You can launch the Web Publishing Tools page from the FileMaker ServerStart Page.FIGURE 5.16Click the Start PHP Site Assistant link on the Web Publishing Tools page todownload and launch the PHPSA.Building a Search SiteWhen the PHPSA first launches, you are presented with an overview page thatoutlines the seven steps to creating your website. Click the Create a New Site link in
82CHAPTER 5Configuring the Server(s)the lower-right corner to proceed. You are prompted to specify a name for your newproject. This name will eventually be used as the name of the export folder for the site.On the following page, you are asked to connect to a FileMaker Server machine, to selecta file that is hosted there, and specify an authentication method (see Figure 5.17). If youhave been following along at home, the Product Catalog file will be available. Select it byclicking once. Then select the Store Database Account Name and Password in Site optionand click the Open Database button. You are asked to provide a valid account name andpassword for the Product Catalog file. Be sure to use an account that has the PHPextended privilege enabled. Click the Choose a Layout Group link in the lower-rightcorner to continue.FIGURE 5.17 The Database Settings page allows you to establish a connection to a file onthe database host.On the Layout Group page, you will see a list of table occurrences (TOs) from the ProductCatalog file. Clicking the disclosure arrow next to the table occurrence name will revealall layouts that are based on the selected TO that are accessible via PHP (see Figure 5.18).For this example, select the Product TO and click the Choose a Site Profile link in thelower-right corner to continue.The Site Profile page allows you to pick a flow for your site from a list of typical websiteparadigms. I encourage you to experiment with all of these so you will be familiar withthe capabilities of the tool, but for now, select Search Page with Record List and click theApply button. By doing so, you are telling the PHPSA that you want a three-page site: ahome page, a search page, and a record list page. Click the Configure Home Page link inthe lower-right corner to begin configuring your pages.
PHP Site Assistant835FIGURE 5.18The Layout Group page allows you to select from table occurrences (TOs) inthe selected file. Doing so will establish the context for the Site Profile pages to come.The Home Page does not have a lot of options. It’s really just a splash page for the user.You can give it a title and description, which will both be displayed to users when theyfirst visit the site. Click the Configure Search Page link to continue.The Search Page
70 CHAPTER 5 Configuring the Server(s) FIGURE 5.1 The FileMaker Server installer prompts you to specify the number of machines for the installation. FIGURE 5.2 For a multiple machine installation, you are asked to specify whether this is the master machine or a worker machine. The master machi