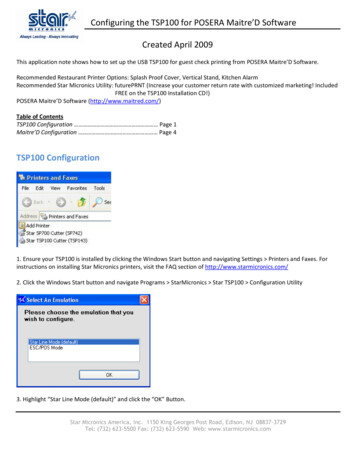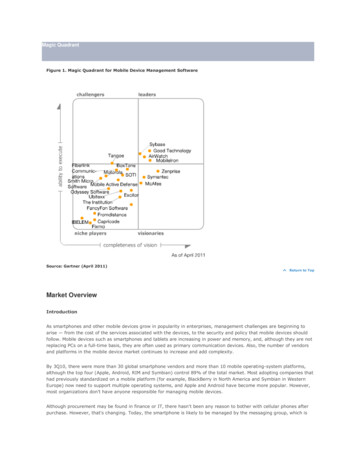
Transcription
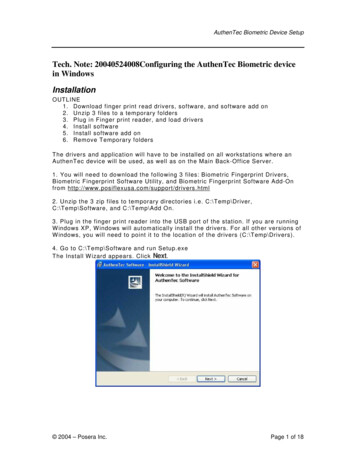
AuthenTec Biometric Device SetupTech. Note: 20040524008Configuring the AuthenTec Biometric devicein WindowsInstallationOUTLINE1. Download finger print read drivers, software, and software add on2. Unzip 3 files to a temporary folders3. Plug in Finger print reader, and load drivers4. Install software5. Install software add on6. Remove Temporary foldersThe drivers and application will have to be installed on all workstations where anAuthenTec device will be used, as well as on the Main Back-Office Server.1. You will need to download the following 3 files: Biometric Fingerprint Drivers,Biometric Fingerprint Software Utility, and Biometric Fingerprint Software Add-Onfrom http://www.posiflexusa.com/support/drivers.html2. Unzip the 3 zip files to temporary directories i.e. C:\Temp\Driver,C:\Temp\Software, and C:\Temp\Add On.3. Plug in the finger print reader into the USB port of the station. If you are runningW indows XP, W indows will automatically install the drivers. For all other versions ofW indows, you will need to point it to the location of the drivers (C:\Temp\Drivers).4. Go to C:\Temp\Software and run Setup.exeThe Install W izard appears. Click Next. 2004 – Posera Inc.Page 1 of 18
AuthenTec Biometric Device SetupRead the end-user agreement, and if you do agree, selectI Accept the terms in the license agreement, and then clickEnter in the Customer information, selectclick Next. 2004 – Posera Inc.Next.Anyone who uses this computer, and thenPage 2 of 18
AuthenTec Biometric Device SetupSelectComplete as the Setup Type, and click Next.To initiate the software installation, click 2004 – Posera Inc.Install.Page 3 of 18
AuthenTec Biometric Device SetupOnce installation is complete, clickFinish.5. Go to C:\Temp\Add On directory and run AT6210.exe. The add-on utility installsitself with no user interaction. At the end of the installation, click on Finish. If thesystem prompts you to reboot, do so.6. Delete the C:\Temp\ directories you created for this installation.Repeat steps 2 through 6 for all workstations as well as the main back office server. 2004 – Posera Inc.Page 4 of 18
AuthenTec Biometric Device SetupTestsEnrollment TestThe Aware shortcut (highlighted icon) and the ATDatabase.dat file were added toyour desktop.Note: Instructions beyond this point are for testing purposes. You could gostraight to the Maitre ‘D setup, but we recommend to first test the deviceoutside of Maitre’D. If the device does not work using the following steps, itcan not work within Maitre ‘D either.Double click the Aware icon and follow these steps. 2004 – Posera Inc.Page 5 of 18
AuthenTec Biometric Device SetupSelectEnroll.Enter your name in the User ID field, select the finger you will be scanning, andclick OK. 2004 – Posera Inc.Page 6 of 18
AuthenTec Biometric Device SetupRead the instructions and pressOK.Make sure the biometric device is on a fixed and stable surface, and put the ball ofyour finger on the biometric device. You will be required to scan it three times tosave your fingerprint.Note: During the enrollment process, the fingerprint is saved in theATDatabase.dat file for later identification. 2004 – Posera Inc.Page 7 of 18
AuthenTec Biometric Device SetupThis is the screen after the first fingerprint capture. (In this screen capture, no realfingerprint is shown).After the second fingerprint capture, notice the indicator circled in red. 2004 – Posera Inc.Page 8 of 18
AuthenTec Biometric Device SetupThird time, capture is complete, press ok.Identification TestSelectIdentify.The screen looks similar as during the enrollment process, except for the title. ThePC will look through the database and authenticate any user whose fingerprint has 2004 – Posera Inc.Page 9 of 18
AuthenTec Biometric Device Setupbeen scanned. Put the ball of your finger on the biometric device and see if thesystem identifies you.If the biometric device identified you, it will display a message stating, “User (yourname) identified. Access granter”. The device is working properly, and you are nowready to move on to the Maitre ‘D setup.If the biometric device did not identify you, try going through the enrollment processagain, before trying the identification process again. If it still fails to identify you,remove and reinstall the AuthenTec software and drivers, and try again. If all thisfails, contact Posiflex at tech.support@posiflexusa.com or (510) 429-7097. 2004 – Posera Inc.Page 10 of 18
AuthenTec Biometric Device SetupConfiguring the AuthenTec Biometric device in Maitre’DBack-Office SetupOnce the AuthenTec software is installed and tested on the Main Server and allworkstations, there is a small amount of configuration to be setup in the Maitre’DBack-Office.System Configuration / View / Options / DevicesBiometric ReaderSelect AuthenTec 2004 – Posera Inc.Page 11 of 18
AuthenTec Biometric Device SetupPOS Control / Workstation / Options / DevicesFor each workstation where a biometric device is installed, clickSelectAdd.Biometric Reader, and then click Setup. 2004 – Posera Inc.Page 12 of 18
AuthenTec Biometric Device SetupSelect theAuthenTec type, and click OK.The Biometric Reader is now setup. Click 2004 – Posera Inc.OK.Page 13 of 18
AuthenTec Biometric Device SetupPOS Control / Employees / Configuration / Functions / Setup FunctionsIn the manager configuration, enable Access Setup. 2004 – Posera Inc.Page 14 of 18
AuthenTec Biometric Device SetupPOS Access SetupOn the workstation, use a manager number to access theManager Menu, touch Access Setup.Functions screen. In theSelect an employee ready to scan a fingerprint.Note: The employee must have been previously created in the Back-Officebefore they can be fingerprinted.Have the employee put the ball of a first finger on the device. The system willrequire that this finger be scanned three times. 2004 – Posera Inc.Page 15 of 18
AuthenTec Biometric Device SetupHave the employee put the ball of a different finger on the device, in case the firstfinger gets hurt, burned or cut. The system will require that this other finger bescanned three times as well. 2004 – Posera Inc.Page 16 of 18
AuthenTec Biometric Device SetupOptional Back-Office SetupPOS Control / View / Options / SecurityYou can also adjust the way the system uses the biometric device with theseoptions.Biometric Log on Only:Enable this option to force employees to use the biometric device, and disable theserver’s passwords. If this option in disabled, employees will still be able to log onusing their server number and password.Biometric TA Punch Only:Select this option to force employees to use the biometric device when they punchin, and disable the server’s passwords, even if the employee record is linked to aserver number and that server number does not need the biometric device to order.Biometric as Validation Device:Select this option to use the biometric device only to validate an employee’s identityinstead of a password. Employees will still have to enter their server number on theworkstation to identify themselves, but when the password is required, they willtouch the biometric device instead of entering their password. The same will applywhen punching in or out with the Time & Attendance module. 2004 – Posera Inc.Page 17 of 18
AuthenTec Biometric Device SetupThe following is an example of an employee trying to log on without using thebiometric device, when the Biometric Log on Only option is enabled. 2004 – Posera Inc.Page 18 of 18
Configuring the AuthenTec Biometric device in Maitre’D Back-Office Setup Once the AuthenTec software is installed and tested on the Main Server and all workstations, there is a small amount of configuration to be setup in the Maitre’D Back-Office. System Configuration / V