Transcription
WebEx Guideuconnhealth.webex.comAll faculty, staff, and students have access to the Cisco WebEx videoconferencing service. You can use WebEx to hostand join meetings that can accommodate up to 1,000 participants. In a WebEx virtual meeting room, you can share anycombination of audio, video, and the content on your screen. WebEx Rooms can also be recorded for future viewing.Click on the text to navigateWebEx Account VerificationJoining a Webex Meeting WebEx Meeting Invitation Join a Webex Meeting from a Computer or LaptopHosting a Webex Meeting Hosting a Personal Room Meeting from a Computer or Laptop Hosting a Scheduled MeetingConnecting WebEx Audio/Video Connecting to Audio/Video before a meeting Changing Audio settings during a meetingJoin a Webex Meeting by PhoneSharing ContentScheduling WebEx Meetings Scheduling using uconnhealth.webex.com website Scheduling using Webex Outlook Integration Installing Outlook Integration (Webex Productivity Tools) Scheduling meetings on behalf of someone Assigning alternate hostsInstalling WebEx Mobile ApplicationWebEx Security: Securing your WebEx Meeting Adjust the Personal Room Automatic Lock Managing ParticipantsAudio ConferenceAnnotateBreakout SessionsChange Profile Name and PicturePollingRaising HandVirtual Backgrounds
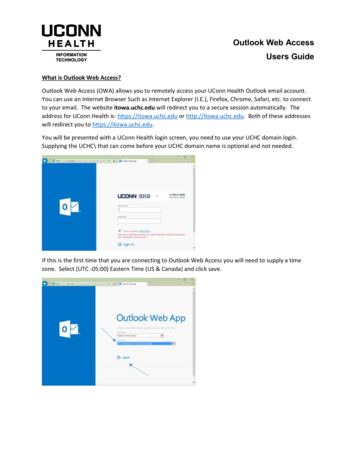
VerificationTo have full capabilities within your WebEx account for scheduling meetings and changing permissions you must verifyyour account first. This procedure only needs to be done one time and takes about one minute to complete.Verification Process1.Sign in at uconnhealth.webex.com with your @uchc.edu email and password (click the blue Sign In button at the topright of your screen)2.Click on Send Verification Email (it should say sent after you click on the link)3.Sign in your @uchc.edu email4.Find the verification email and open it5.Click on the verification link. This should open a web browser and say you have been verified.6.Navigate back to uconnhealth.webex.com and Sign in and you should see your personal room with your name. Seethe figure below.Example of a Personal Room Home Page:2
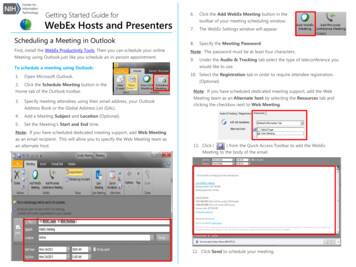
Joining a WebEx Meeting (invitation explained)Note: Cisco recommends using Google Chrome as your browser for the best WebEx experience.1. Login to your email.2. Navigate to your Email Inbox or Calendar and open the WebEx Invitation email.PC users: If you accept the invitation it will go to your Sent folder and will also be on your calendar at the date/time specified.Mac users: If you accept the invitation it will go into your Junk folder and will also be on your calendar at the date/time specified.3. This invitation will allow you to join from a computer, laptop, smartphone, phone line or video conference system. Choose yourmethod:Important: Invitations may look different than the examples shown below. Follow the instructions provided on your invitation.Join by Computer/Laptop: Select Join meeting (green icon)Join by phone: Dial the Join by phone number provided and enter the access code when prompted.Join by Video system: Using the room’s touch panel select Video conference, then type in the Join by video system address by using the number/letter keypads. Then select Call.Example email invitation #1:Meeting # (access code)Meeting passwordJoin by Computer/LaptopJoin by mobile device (auto dialin with number and passcode)Join by Phone(dial in)Join by videosystemExample email invitation #2:Join by Computer/LaptopUCONN Health IT's Personal Roomhttps://uchc.webex.com/meet/UCONN 800921123Join by videosystemJoin by video systemDial UCONN.uchc@webex.comYou can also dial 123.456.2.68 and enter your meeting number.Join by Phone(dial in)Join by phone 1-415-655-0003 US TollAccess code: 800 921 1233
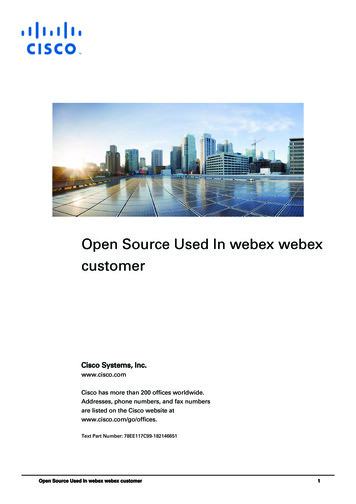
Joining a Webex Meeting on a Computer/Laptop1. Navigate to the Webex invitation you received. If you did not accept the invitation, it will be in your inbox.PC users: If you accepted the invitation it will go to your Sent folder and will also be on your calendar at the date/time specified.Mac users: If you accepted the invitation it will go into your Junk folder and will also be on your calendar at the date/time specified.Open the calendar meeting and you will see the invitation.2. Select the Join Meeting (green button)Important: Webex invitations may be customized. Make sure to follow the instructions on the invitation. Generally there is ablue hyperlink to click to join the meeting from a computer.3. If this is the first time you’re joining a webex meeting, you will be prompted to download and install Webex Meetings app (theapp will download automatically). We recommend doing so at this time for the full Webex experience.Optional: If you do not want to download and install the application do the following:A. Cancel the download in order to continue to the Web App.B.Wait up to 10 seconds after you cancel the download, or until the "Having trouble downloading the app" messageappears. Click on Join from your browser. See image below.4. A meeting preview screen will launch. Select your audio connection type. Preview screen below:Use computer audio: Will use built in or external audio source fromyour computer or laptop.Call in: Will provide call in information to dial in by a phone line. Audio will not connect until you manually call in from a phone.(Note: After joining the meeting, call in information will be displayed)Don’t connect to audio: Will disconnect audio. You cannot hear orspeak.4
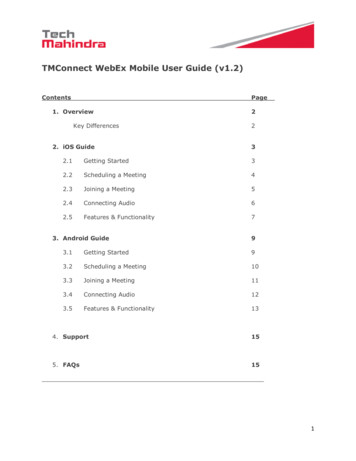
5. Select your microphone, speaker, and camera. When using a webcam or laptop, Webex will automatically choose the defaultsettings for your mic, speaker, and camera (not in all cases).Note: Webex will remember the settings you chose for your previous meeting.Settings Example:Optional: Before entering a meeting, you may choose to test your microphone and camera to ensure they are working properly.Speaker: Select Test and you shouldhear a sound playing. If you do not hearsound, make sure your device volume isturned up and not off or muted. If youneed to, try selecting a different speakeroption in the settings (if available).Microphone: Select Test and it will startrecording a test for a few seconds. Starttalking as you would normally be talkingin your meeting. The system will playbackthe recording so you can hear yourself. Ifyou do not hear yourself make sure yourmic is on and not muted. If you need to,try selecting a different microphoneoption in the settings (if available).Optional: Before entering a meeting, you may choose to have your microphone on or muted and your video (camera) on orstopped. Select Mute to mute your mic. Select Stop video to stop your video (camera). You can turn your microphone and cameraon and off at any time during the meeting.Note: You can leave your mic muted and press and hold the “spacebar” to talk. Let go of the space bar to remain muted.Mic: OnCam: OnMic: OffCam: Off6. Select Join Meeting when you are ready.5
Hosting a Webex Meeting on a Computer or LaptopWebex Personal RoomYour Webex Personal Room is your own virtual conference space that you can use for meetings at anytime. Your Webex PersonalRoom is always available, you don’t have to book it, and you always know where to find it. When you invite people to your Personal Room, they can easily find your meetings since the link to your meeting location never changes.Start a Personal Room Meeting from uconnhealth.webex.com website1. Sign in at uconnhealth.webex.com. Webex recommends using google chrome (windows) or safari (mac).2. Select Start a Meeting2. A preview screen will launch. Select your audio and video settings. Click here for help selecting audio and video settings.3. Select Start Meeting. A meeting will launch and attendees are able to join now.6
Start a Personal Room with the Desktop Application1. Open Cisco Webex Meetings app2. Select Start a Meeting.Note: The Start a Meeting can only start a Personal Room meeting.Start a PersonalRoom Meeting3. A preview screen will launch. Select your audio and video settings. Click here for help selecting audio and video settings.4. Select Start Meeting7
Starting/Hosting a scheduled meetingScheduled Webex MeetingYou can schedule a meeting in advance. Scheduled meetings are required to have passwords and the meeting information isunique for each scheduled meeting (unless using recurring scheduling option). Scheduling helps to ensure a secure meeting.Start a Scheduled Meeting from uconnhealth.webex.com website1. Sign in at uconnhealth.webex.com. Webex recommends using google chrome (windows) or safari (mac).2. Select Meetings (left side menu)3. If you have scheduled a webex meeting it will appear on the list of Upcoming meetings.Note: If you are looking for a meeting that is past the scheduled end time of the meeting, you will find it under Past.4. Find your meeting title (verify with date/time) and select Start.Note: For meeting details click on the meeting title. A new window will appear with the meeting information. You may also startthe meeting here.Patient DiscussionBetty SmileBusiness PlanMartin Frown5. A preview screen will launch. Select your audio and video settings. Click here for help selecting audio and video settings.6. Select Start Meeting8
Starting/Hosting a scheduled meetingStart a Scheduled Meeting from Outlook1. Open Outlook using the desktop application. (Click the outlook icon on your desktop)2. Find the invitation you sent out in your inbox or sent folder3. Open the invitation and select Start Meeting.Note: If the invitation says Join Meeting and you are the host or a cohost you may click on the Join Meeting link and the meetingwill start.5. A preview screen will launch. Select your audio and video settings. Click here for help selecting audio and video settings.6. Select Start MeetingStart a Scheduled Meeting from Outlook Calendar1. Open Outlook using the desktop application. (Click the outlook icon on your desktop)2. Open your outlook calendar3. Find your meeting invitation by the date/time and title of your meeting. Double click on the calendar meeting to open it.4. Select Start Meeting.Note: If the invitation says Join Meeting and you are the host or a cohost you may click on the Join Meeting link and the meetingwill start.5. A preview screen will launch. Select your audio and video settings. Click here for help selecting audio and video settings.6. Select Start Meeting9
Start a Scheduled Meeting with the Desktop Application1. Open Cisco Webex Meetings app2. Select Start a Meeting.Note: The Start a Meeting can only start a Personal Room meeting.Start a PersonalRoom MeetingStart a Scheduledmeeting3. A preview screen will launch. Select your audio and video settings. Click here for help selecting audio and video settings.4. Select Start Meeting10
Audio/Video SettingsChoose your Audio and Video Settings Before you Join a Webex Meeting or EventChoose how you want to connect to the audio, mute or unmute your microphone, and turn on or turn off your video before youjoin a meeting or event. Click here for a video guide.1. Once you have clicked a link to a join a webex meeting a preview screen will appear. In this screen you may choose your audioand video settings before you enter the meeting.2. Select your audio connection type.Use computer audio: Will use built in or external audio source from your computer or laptop.Call in: Will provide call in information to dial in by a phone line. Audio will not connect until you manually call in from a phone .Note: After joining the meeting, the call in information will be displayed in a popup window. Follow the instructions provided.Don’t connect to audio: Will disconnect audio. You cannot hear or speak.2. If you are choosing to Use Computer Audio , select the audio options arrow to change your audio settings (microphone andspeakers)Select your Speaker:Use system setting: Uses whatever the systemdefault settings are set to.Speaker: Uses built in or external speakers.Headphones: Uses headphones that areplugged into the computer.Select your Microphone:Use system setting: Uses whatever the systemdefault settings are set to.Internal Microphone: Uses built in microphone(generally on laptops).External Microphone: Uses a microphone that isplugged into the computer.3. Select your camera.11
4. Test your audio settings to ensure your microphone and speakers are working before you enter the meeting.A. Select Test speaker and microphone on the preview screenB. Select Test next to the speaker settings and a chime will play.If you do not hear the test sound make sure your speakers are on and your computer sound isn’t muted. Try changingthe speaker setting to another device such as headphones. There may be more than one option for selecting speakers.C. Select Test next to the microphone settings. Start speaking into your microphone and webex will record your voiceand then play it back to you after five seconds.If you do not hear your voice played back ensure that your microphone is not muted, fully plugged in, and your speakersare working (so you can hear your voice played back). There may be more than one option for selecting your microphone.Select Test to test your speakers orheadset. A short audio clip willplay (repeating chime).Select Test and start speaking into yourmicrophone. Webex will record yourvoice for five seconds then the recording will be played back to you.5. Optional: Before entering a meeting, you may choose to have your microphone on or muted and your video (camera) on orstopped. Select Mute to mute your mic. Select Stop video to stop your video (camera). You can turn your microphone and cameraback on during the meeting. You can mute/unmute your mic and start/stop video whenever you want during the meeting.Note: You can leave your mic muted and press and hold the “spacebar” to talk. Let go of the space bar to remain muted.Mic: OnCam: OnMic: OffCam: Off12
Change your Audio Settings During a Webex Meeting or EventChange your microphone or speaker setting1. Select Audio & Video at the top of the meeting window and then select Speaker and Microphone Settings.2. Select the speaker options to select a different speaker.3. Select the microphone options to select a different microphone.4. Try testing your microphone and speaker option to ensure they are working. If your speakers or microphone aren't working, trytesting each microphone and speaker option available in each menu. You may have several different options to try.Select Test to test your speakers orheadset. A short audio clip willplay (repeating chime).Select Test and start speaking into yourmicrophone. Webex will record yourvoice for five seconds then the recording will be played back to you.5. When you are ready, close the Speaker and Microphone options box. You will be in the meeting with the speaker and microphone settings you just selected.13
Change from Computer Audio to Call In or Disconnect Audio during a MeetingChange from Computer Audio to Call In1. Select Audio & Video at the top of the meeting window and then select Switch Audio.2. Select Disconnect. This will disconnect you from using your computer audio (speakers and microphone).Note: You will not be able to hear or speak in the meeting until you Call in3. Select Call in. (select view)4. The Call In window will popup with instructions on how to call into the meeting from a phone line. Call the number provided (If calling from UConn Health, Dial 9 first to reach an outside line). Enter the access code provided followed by the # sign. Enter your Attendee ID. There is a different number for everyone in the meeting. This will match your name on your computerto the phone line you are calling from. (you will not show up as a5. You should now be able to hear the meeting audio and talk if you need to. You may mute/unmute yourself using the computermute button in the meeting or your phone’s mute. Click here for audio controls for your phone.14
WebEx Content SharingYou can share your entire screen with others, or choose which files and applications you want to share so you can keep everythingelse private.Share your screenWhen you share your screen, everyone sees what you can see on your screen. If you have a Word document or a PowerPoint slide,or even a website or chat window open, they’ll see it.Note: Before your meeting, mute notifications and close any personal or sensitive documents. This way, you don’t have to worryabout accidentally sharing private or distracting information.Select Shareand Screen.Share only a specific applicationWhen you share a specific application, others can't see anything other than the shared application. For example, if you have yourbrowser and PowerPoint open and you choose to share PowerPoint, they can't see the browser tabs you have open. But if youhave several PowerPoint presentations open, you can switch between them and they'll still be shared. You can also edit slides asyou share them. If you accidentally click on an application that’s not shared, they’ll see a gray screen.To share an application that is open, select ShareTo share an application that is not open, select Shareapplication you want to share.and select the application from the list of open applications.and Other Applications, then clicknext to theChoose anapplication15
Share a videoSharing video is slightly different from sharing any other type of content. That’s why Webex Meetings has a sharing mode that’soptimized for video.Note: Optimizing for motion and video isn't currently available in Webex Events. If you're using Webex Events, share your video byselecting Share and Share File.Go to Sharewant to share., select Optimize for motion and video from the drop-down menu, and then choose the content youSee what you're sharingWhen you’re sharing content, you want to make sure you’re sharing only what you want and that everyone in the meeting can seeit. When you share your screen or an application, check what everyone else sees by opening a window that shows you what you'resharing.While sharing, go to the tab in the meeting control bar at the top of the screen and click the down arrow.Share a fileSharing files allows you to share a single file. It could be anything, like a document or video file stored on your computer.Note: If you already have the file open, share your screen or application. File sharing may not work when you're trying to share aPowerPoint presentation with embedded video.To share a file, Select Shareand Share File.Share a whiteboardCreate a whiteboard to visually share your ideas. Whiteboards shared during a meeting aren't automatically saved. Remember tosave your whiteboard.To share a blank work area where you can collaborate with the other meeting participants using both text and graphics tools,select Shareand New Whiteboard.16
Scheduling WebEx MeetingsWebEx is a university-support online video conferencing system that faculty, staff, and students can use to schedulemeetings on their personal and work computers.Get Started1. Go to uconnhealth.webex.com2. Click the blue Sign In button in the top-right corner of the window.3. Enter your UConn Health email to sign in.NOTE: If you are logging in from outside the UConn network (home) you may have to use: UCHC\usernameSchedule a Meeting from the UConnhealth.webex.com WebsiteOnce you log in, your personal room page is displayed, and you can schedule and manage your meetings.1. Click Schedule17
2. Complete the fields in the Schedule a Meeting page.Meeting Title(required)Password(required)A. Use "WebEx Meetings Pro 1000" for the meeting type. This should be your default choice.B. Enter a title for the meeting.C. Meeting participants will need the password generated to join the meeting.D. Add attendees, who will receive an invitation, by entering their email addresses.Optional Advanced Options Click the drop down arrow for "Show advanced options" Under the "Audio connection options" menu, look at the "Entry and exit tone." This is a sound that will play when
4. Find the verification email and open it 5. lick on the verification link. This should open a web browser and say you have been verified. 6. Navigate back to uconnhealth.webex.com and Sign in and you should see your personal room with you