Transcription
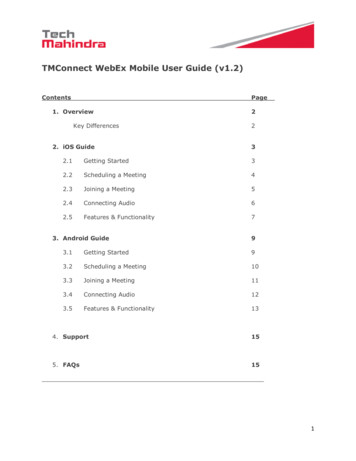
TROY WebEx GuideContentsRequesting a WebEx Account . 2Scheduling a WebEx Meeting . 3Adding a Scheduled WebEx Meeting to Your Calendar Program . 5Editing a Scheduled WebEx Meeting . 6Canceling a Scheduled WebEx Meeting . 7Starting a WebEx Meeting . 8Reminding Invitees to Join Your Meeting . 10Enabling Audio . 11Enabling Video . 13Muting and Unmuting Microphones . 14Recording a Meeting . 16Multiple Presenters. 18Granting Sharing Privileges . 19Taking Notes . 20Sharing Content . 21Sharing a Whiteboard . 22Polling Attendees . 23Ending a Meeting . 31Allowing Another User to Schedule Meetings For You . 321
Requesting a WebEx AccountTo request a WebEx account, please submit a helpdesk ticket at http://helpdesk.troy.edu. After logging in, create a newticket and select WebEx Meeting Center for the problem type.2
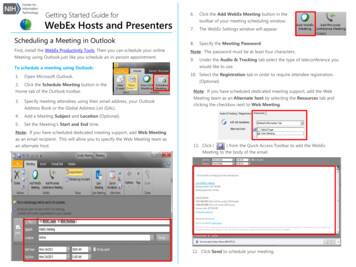
Scheduling a WebEx Meeting1. Navigate to the WebEx site https://troyu.webex.com/2. Click the host login button on the right-hand side and login with your WebEx Credentials3. Under the Host a Meeting header, select Schedule a Meeting4. Enter the relevant details for your meeting. Be sure to select Send a copy of the invitation email to me.If you need to invite additional attendees after your meeting has already been scheduled, you can forward themthe invitation email.3
Audio Conference SettingsIf you would like to use audio for the meeting, you must change the audio conference settings to match thesettings below. (** Your attendee’s internet connection will affect their portion of the audio**)5. Click Schedule Meeting or Start Now (this option depends on the date/time your meeting is scheduled).4
Adding a Scheduled WebEx Meeting to Your Calendar Program1. Do one of following: On the Meeting Scheduled page, click Add to My Calendar On the Meeting Updated page, click Update My Calendar On the Meeting Information page for the meeting, click Add to My Calendar In the confirmation email message you receive once you schedule or edit a meeting, click the link to addthe meeting to your calendar2. A meeting item will open in your calendar program3. Select the option to accept the meeting request. For example, in Outlook, click Accept to add the meeting itemto your calendarNOTE: If you cancel a meeting, the Meeting Deleted confirmation page and the confirmation email message thatyou receive contains an option that lets you remove the meeting from your calendar program. If you invite attendees to a meeting, the invitation email message they receive contains an option to addthe meeting to their calendar program.5
Editing a Scheduled WebEx Meeting1. Navigate to the WebEx site https://troyu.webex.com/2. Click the host login button on the right-hand side and login with your WebEx Credentials3.4.5.6.7.Under the Host a Meeting header, select My MeetingsSelect the meeting you would like to editClick EditModify the meetingClick Save If you invited attendees, a message appears, asking you whether you want to send an updated emailinvitation to attendees8. If a message box appears, clickt he appropriate update option, and then click OK If you click Cancel in the message box, the meeting is not updated9. The meeting updated page appears. You receive a confirmation email message that includes information aboutthe changes you made to the meeting.10. Optional. If you added the meeting to your calendar program, such as Microsoft Outlook, in the MeetingUpdated page, click Update My Calendar Alternatively, this can be from the confirmation email by clicking the update to your calendar programlink6
Canceling a Scheduled WebEx Meeting1. Navigate to the WebEx site https://troyu.webex.com/2. Click the host login button on the right-hand side and login with your WebEx Credentials3. Under the Host a Meeting header, select My Meetings4. Do one of the following: Check the box next to the meeting you want to cancel, then click Delete Click the meeting you would like to cancel. The meeting information window will open. Click Delete5. If you invited attendees, a message appears, asking you whether you want to send a cancellation email messageto all attendees whom you invited to the meeting.6. In the message box, click Yes or No, as appropriate. If you click Cancel in the message box, the meeting is not cancelled7. You will receive a cancellation confirmation email message8. Optional. If you added the meeting to your calendar program, such as Microsoft Outlook, in the MeetingDeleted page, click Remove From My Calendar Alternatively, this can be done from the confirmation email by clicking the remove the meeting from yourcalendar link7
Starting a WebEx Meeting1. Navigate to the WebEx site https://troyu.webex.com/2. Click the host login button on the right-hand side and login with your WebEx Credentials3. Under the Host a Meeting header, select My Meetings and click the Start button next to the meetingThis will launch the WebEx Meeting Center and start the meeting.8
NOTE: After you schedule a meeting, you will receive an email with the meeting details. You can also start or join themeeting from the link provided in the email.9
Reminding Invitees to Join Your Meeting1. Click the Invite & Remind icon2.Select the Remind button.NOTE: All invitees who are not in the meeting are automatically chosen to receive the reminder. Uncheck the boxbeside any person you don’t want to remind.3. Click Send10
Enabling Audio1. Click the Connect to Audio iconThis will open the Speaker/Microphone Audio Test window. You can test the microphone from this window. After youare done, click OK.The volume window will now appear. The microphone should be unmuted by default, if not, be sure to do so. Thiswindow can be closed without affecting the meeting.11
NOTE: This window can be reopened from the Audio menu.When the Voice Conference is active, the icon will indicate so.**NOTE: Depending on the internet connection of your attendees, their audio quality could be affected. **12
Enabling VideoIf your meeting requires the use of video, you can enable this functionality by following the steps outlined below:On the participant’s window, click the camera icon next to the host. This will open the video window and distribute thefeed to all participants.If you have more than one video camera connected to your computer, you can select the secondary camera manually.On the participants bar, select the video options icon.This will open the Video Options window. If the secondary camera is properly connected, the video feed will beginautomatically, or you will need to select the correct camera from the drop down.NOTE: If you are sharing content and video, your meeting will now be similar to the image below. You can minimizethe video window by clicking on the icon in the top left.13
Muting and Unmuting MicrophonesAs the host or presenter, you can mute or unmute individual participant microphones and mute or unmute allparticipant microphones simultaneously. This latter option does not affect the host's and presenter's microphones.14
Muting and Unmuting an Individual Microphone1. Select the participant you would like to mute2. Click the Microphone icon to the right of the participant’s nameMuting and Unmuting All Microphones Simultaneously1. Right click on the participant list2. Select Mute All or Unmute AllNOTE: During sharing, participants can mute and unmute their microphones from the Meeting Controls Panel at thetop of their screen or through the Participants Panel.15
Recording a Meeting1. On the menu bar, select Session Recording Settings. Click on Record on this Computer(do not record on Server)2. Check Record on my computer, then click Start Recording3. You will now be prompted to save the file. It is common to use the meeting name as the file name.16
4. The Recorder Panel will appear, click the recorder icon to initiate the recording.17
Multiple PresentersThe host can allow other users to present/share content. In order to do so, the users must first be attendees in themeeting. The host can then update the user’s role to allow content sharing/presentation. These steps are outlinedbelow:1. Navigate to the participants list,Then right-click on the user, select Change Role To Presenter. The window below will appear briefly during thistransition.After the transition is complete, the participants list will reflect the changes. The user can now share content/present.NOTE: The host can regain control at any point by performing the same steps outlined above, but on the original host.18
Granting Sharing Privileges1. In the Meeting window, on the Participant menu, choose Assign Privileges2. Grant or remove a privilege, as follows: To grant a specific privilege, select its check box To grant all privileges, select the Assign all privileges check box To remove a privilege, clear its check box To revert to the preset privileges, click Reset to Meeting Defaults3. Click Assign19
Taking NotesTaking personal notes:1. In the Meeting Window, open the Notes panel2. Type your notes in the boxTaking public notes:1. In the Meeting Window, open the Notes panel2. Type your notes in the box3. To publish your notes, so they appear in each participant’s Notes panel, click PublishSaving Notes:1. On the File menu, choose Save or Save As Notes2. Select a location at which to save the file3. In the “File name” drop-down list, enter a name for the file4. In the “Save as type” drop-down list, select the format in which you to save the results5. Click SaveYou can now view the notes by opening the file.20
Sharing ContentClick on the Share My Desktop buttonThe following toolbar will appear at the top of the screen momentarily and then minimize. Any content on the desktop isnow being shared to all participants. The power point slide or other presentation material should now be brought to theforeground.21
Sharing a WhiteboardSharing a whiteboard allows you to draw objects and type text that all Participants can see in their content viewers.To share a whiteboard:1. On the Share menu, choose WhiteboardNOTE: You can also share a whiteboard by click the New Whiteboard icon next to the Panels window.To save a whiteboard:1. Select the appropriate Whiteboard tab2. On the File menu, choose Save or Save As Document3. Select a location at which to save the file4. In the “File name” drop-down list, enter a name for the file5. In the “Save as type” drop-down list, select the format in which you to save the results6. Click SaveYou can now view the whiteboard by opening the file.22
Polling AttendeesDuring a meeting, you can poll participants by presenting them with a questionnaire. Conducting a poll can be useful forgathering feedback from participants, allowing participants to vote on a proposal, a potential candidate, testingparticipant knowledge of a topic, and so on.Creating a Poll QuestionnaireTo conduct a poll, you must first create a poll questionnaire. You create a questionnaire in a meeting. To savetime during a meeting, you can start the meeting earlier than the scheduled time, create a questionnaire on thePolling panel, save it, and then open it during the actual meeting.1. First enable the polling panel by selecting the View menu, Panels, click Manage Panels2. Select Polling under Available Panels, click Add, then OK23
3. Open and expand the Poling Panel4. In the Question section, select one of these question types: To create a multiple-answer question, select Multiple Choice, and then select Multiple Answers in thedrop-down list To create a single-answer question, select Multiple Choice, and then select Single Answer in the dropdown list To create a text question, select Short Answer5. Click New6. Type a question in the box that appears7. In the Answer section, click Add8. Type an answer in the box that appears; to type another answer click Add once you finish typing an answer24
Editing a Poll QuestionnaireYou can change the type of a question and edit, rearrange, or delete the questions and answers.To change the type of question:1. Select the question by clicking it, and then select the new type of question in the Question section2. Click Change Type25
To edit any question or answer that you entered:1. Select the question or answer by clicking it, and then click the Edit icon2. You can now make your changesTo delete a question or answer:1. Select the question or answer by clicking it, and then click the Delete iconTo rearrange questions or answers:1. Select the question or answer by clicking it, and then click the Move Up or Move Down icon26
Display a Timer During PollingYou can specify that a timer displays for participants and yourself when a poll is in progress.1. Open the polling Options2. In the dialog box that appears, select Display, then type the length of time in the Alarm box, and selectOK27
Opening a PollAfter you finish preparing a poll questionnaire, you can open the poll.1. Click Open PollNOTE: The questionnaire appears on participants' Polling panels. Participants can now answer the poll. Asparticipants answer the questions, you can watch the polling status on your Polling panel.2. Click Close Poll when the time is up. If you specified a timer and the poll times out, the pollautomatically closes. Participants can no longer answer questions.Viewing and Sharing Poll ResultsAfter closing a poll, you can view the complete results of the poll and share group results with participants. Theresults will appear in your polling panel.To share the results:1. In the Share with attendees section on your Polling panel, select Poll results, and then click Apply. Youcan also choose to share individual results by selecting Individual results.28
NOTE: The results of the poll appear in the participants' Polling panels, just as they do on your Pollingpanel.Saving and Opening Poll Questionnaires and ResultsTo save a poll questionnaire:1. On the File menu, choose Save Poll Questions2. Choose a location at which to save the file3. Type a name for the file4. Click SaveNOTE: Meeting Manager saves the poll questionnaire to a file at the location you specified. Pollquestionnaire file names have an .atp extension.To save results of a poll:1.2.3.4.Close the poll if you have not done so.On the File menu, choose Save or Save As Poll ResultsSelect a location at which to save the fileIn the “File name” drop-down list, enter a name for the file29
5. In the “Save as type” drop-down list, select the format in which you to save the results6. Click SaveYou can now view poll results by opening the file.Opening a Poll Questionnaire File1. Use one of these methods to browse to the file: On the File menu, choose Open Poll Questions Click the Open icon on your Polling panel2. Select the poll questionnaire file that you want to openA poll questionnaire file has an .atp extension3. Click OpenThe poll questionnaire appears on your Polling panel. You can now open the poll to the participants.30
Ending a MeetingIf applicable, click the Stop Sharing button to return to the Meeting CenterClick End MeetingClick End Meeting on the next window.31
Allowing Another User to Schedule Meetings For YouYou can grant permission to one or more Meeting Center users to schedule meetings on your behalf. A user to whomyou grant permission to schedule meetings must have an account on your Meeting Center Web site. Once a userschedules a meeting for you, the meeting appears in your list of meetings on your My Meetings page. You can then startthe meeting and host it as you normally do when you schedule meetings yourself.1. Navigate to the WebEx site https://troyu.webex.com/2. Click the Host Login button on the right-hand side and login with your WebEx Credentials3. On the navigation bar, click My WebEx4. Click My Profile5. Under Session Options, do either or both of the following: In the Scheduling permission box, type the email addresses of the users to whom you want to grantscheduling permission. Separate multiple addresses with either a comma or semicolon Click Select From Host List to select users form a list of all user who have WebEx accounts6. Click Update32
5 Adding a Scheduled WebEx Meeting to Your Calendar Program 1. Do one of following: On the Meeting Scheduled page, click Add to My Calendar On the Meeting Updated page, click Update My Calendar On the Meeting Information page for the meeting, click Add to My Calendar In the confirmation email message you receive o