Transcription
GE HealthcareMAC 2000 ECGAnalysis System Quick Reference GuideGlobal Customer Education2053535-065 Rev E
NoticeThe materials contained in this document are intended foreducational purposes only. This document does not establishspecifications, operating procedures or maintenance methods forany of the products referenced. Always refer to the official writtenmaterials (labeling) provided with the product for specifications,operating procedures and maintenance requirements.ContentsSkin Preparation and Resting 12-lead Placement . . . . . . . . . . . . . . . . . . . 1Skin Preparation and Stress ECG Lead Placement . . . . . . . . . . . . . . . . . . . 2Patient Data (ADT) . . . . . . . . . . . . . . . . . . . . . . . . . . . . . . . . . . . . . . . . . . . . . . . . 4Patient Data (Simple Orders) . . . . . . . . . . . . . . . . . . . . . . . . . . . . . . . . . . . . . . . 5Patient Data (Advanced Order Manager) . . . . . . . . . . . . . . . . . . . . . . . . . . . 6Acquire an ECG . . . . . . . . . . . . . . . . . . . . . . . . . . . . . . . . . . . . . . . . . . . . . . . . . . . 8Print Continuous Rhythm . . . . . . . . . . . . . . . . . . . . . . . . . . . . . . . . . . . . . . . . . 9RR Analysis . . . . . . . . . . . . . . . . . . . . . . . . . . . . . . . . . . . . . . . . . . . . . . . . . . . . . . 10Acquire an Arrhythmia . . . . . . . . . . . . . . . . . . . . . . . . . . . . . . . . . . . . . . . . . . 11Acquire a Stress ECG Test . . . . . . . . . . . . . . . . . . . . . . . . . . . . . . . . . . . . . . . . 12File Manager . . . . . . . . . . . . . . . . . . . . . . . . . . . . . . . . . . . . . . . . . . . . . . . . . . . . 20Exporting to SD Card . . . . . . . . . . . . . . . . . . . . . . . . . . . . . . . . . . . . . . . . . . . . . 23
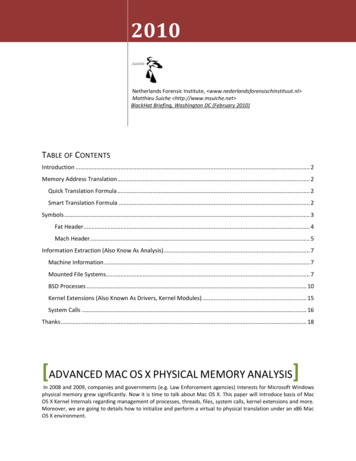
1. Ensure that skin is dry, clean andremove excessive hair.102. Mark each electrode site with a felttip pen.713. Degrease each site with a skinpreparation cream.24. Use a mild abrasion to remove themark left by the felt tip pen.34655. Apply the electrodes to the preparedsites.9Lead AHA Label IEC LabelC1 red6. Look at the hook-up advisor andon-screen messages for indication oflead problems.8Description1V1 redFourth intercostal space at the right sternal border2V2 yellow C2 yellow Fourth intercostal space at the left sternal border3V3 greenC3 green4V4 blueC4 brown Mid-clavicular line in the fifth intercostal spaceSkin Preparation and Resting 12-lead PlacementThe quality of your ECG tracing is a directresult of skin prep and lead placement.Skin Preparationand Resting 12-leadPlacementMidway between location 2 and 45V5 orange C5 blackAnterior axillary line on the same horizontal level as 46V6 purple C6 purple Mid-axillary line on the same horizontal level as 4 and 57LA blackL yellowLeft wrist8LLF greenAbove left ankle (Alternate placement, upper leg as close to torso as possible)9RL greenN blackAbove right ankle (Alternate placement, upper leg as close to torso as possible)10RA whiteR redRight wrist1
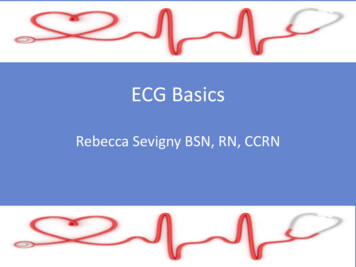
Skin Preparation and Stress ECG Lead Placement10712346598Skin Preparation and Stress ECG Lead PlacementPreparing the patient correctly oftheir ECG is a critical part ofmaking sure that the reading isaccurate and free of noise. Hereis what is suggested for a properpatient prep.21. Ensure that skin is dry, cleanand remove excessive hair.5. Apply the electrodes to theprepared sites.2. Mark each electrode site witha felt tip pen.6. Look at the hook-up advisorand on-screen messages forindication of lead problems.3. Degrease each site with askin preparation cream.4. Use a mild abrasion toremove the mark left by thefelt tip pen.
Electrode Placement1Fourth intercostal space at the right sternal border2Fourth intercostal space at the left sternal border3Midway between 2 and 44Mid-clavicular line in the fifth intercostal space5Anterior axillary line on the same horizontal level as 46Mid-axillary line on the same horizontal level as 4 and 510Recommend placing in the soft fleshy area just below the right clavicle7Recommend placing in the soft fleshy area just below the left clavicle9Recommend placing on the corresponding right side of the thorax at the lower edge of the ribcage, or at the lower level of umbilicus at the right mid-clavicular line.8Recommend placing on the corresponding left side of the thorax at the lower edge of the ribcage, or at the lower level of umbilicus at the left mid-clavicular line.Skin Preparation and Stress ECG Lead PlacementLead3
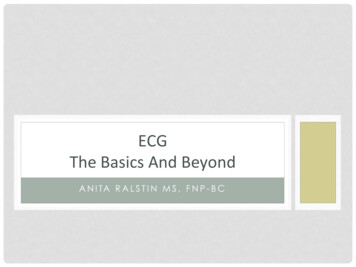
Patient Data (ADT)Resting ECGArrhythmiaStress ECGFile ManagerSystemConfigurationMore25 mm/s10 mm/mV150 HzPace EnhanceOffMore1Patient Data2Patient Data (ADT)The MAC 2000 allows you todownload patient demographicsvia an ADT interface. You candownload patient demographicsusing internal or externalkeyboard, or barcode reader.Use the following procedures toquery the database and selectpatient demographic for each.Database Query Using BarcodeReader1. Select Resting ECG.2. Select the Patient Data.3. Scan the patient barcodeusing the barcode reader.A dialog box opens with thescanned Patient ID.Database Query Using Internalor External Keyboard1. Select Resting ECG.2. Select the Patient Data. Adialog box opens instructingyou to enter the Patient ID.4. Click OK to accept theselection.3. Enter the Patient ID using theinternal keypad or externalkeyboard. A dialog box opens5. The patient demographicwith the Patient ID you entered.data is populated. Modify anyfields as necessary.4. Click OK to accept the selection.6. Select Save.45. The patient demographic datapopulated. Modify any fields asnecessary.6. Select Save.
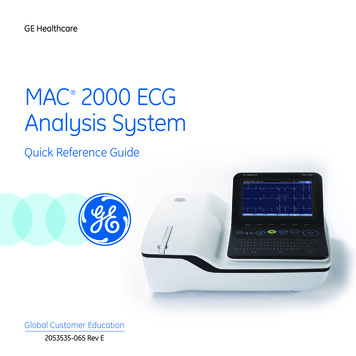
ArrhythmiaStress ECGFile ManagerSystemConfigurationMore25 mm/s10 mm/mV150 HzPace EnhanceOffMoreMain MenuMore1Patient DataPrinter LeadsRhythm 6ADSOnCancelOrders23Page UpPage DownPatient Data (Simple Orders)Resting ECGLoad5Patient ListPage DownCancelSave6Simple OrdersSimple Orders provides aninterface to quickly downloadand execute one order at a time.Use the following steps toexecute a simple order.1. Select Resting ECG2. Select More.3. Select Orders.Note! If Auto Execute SingleOrder setting is enabled inResting ECG Setup and onlyone open order for thatgiven location is present thesystem will automaticallydownload that single orderand populate the PatientInformation screen.4. Select an order from the list.5. Select Load.6. The order will download andpopulate the Patient Datascreen. Modify as patientdata as necessary.7. Select Save.5
Patient Data (Advanced Order Manager)Resting ECGArrhythmiaOrder ManagerRR AnalysisSelectLoad Orders2File ManagerSystemConfigurationMore1MoreDelete OrdersSort OrdersMain MenuPrint3Advanced Order ManagerAdvanced Order Managerprovides an interface todownload and store multipleorders on the system andexecute them later. Use thefollowing procedure to executean advanced order.46Stress ECG1. From the Main Menu, selectMore.2. Select Order Manager.3. Select Load Orders.4. Enter the location(s).Note! To query multiplelocations, add a commabetween each locationnumber e.g. 1,2,5,7.5. Select Ok.
Page UpPage DownLoad Orders7SelectLoad OrdersDelete OrdersSort OrdersPrintMain MenuCancelOK810Patient ListPage DownCancelSave136. Select the order(s) from thelist.7. Select Load Orders.8. Select Select.9. Select an order.10. Select Ok to confirm the orderselection.Patient Data (Advanced Order Manager)Cancel11. Select Patient Data to openwith the patient informationscreen which will be populatedfrom the selected order.12. Modify the patient and testdata as necessary.13. Select Save.7
Acquire an! ECG1@#21. Prepare the patient. 32. Open the Resting ECGQ of twoWways:Efunction in one Power on the unit orA selectS From Main MenuResting ECG.3. Verify waveformShiftquality by:Z%5 6&7*8(5. Select Patient Data to enterthe patient information.Y6.R SelectTPage DowntoUaccessIother Test Informationwindows.DFGHJ7. Select Save to save and closethe Patient Data window.X Checking Hook-upEscAdvisor. Green indicates agood quality waveform. Cycle through the leadgroups to visually verifylead quality by selectingthe Leads key on thekeyboard.4. Use the appropriate keys tomake adjustments to(if necessary): Speed Gain Filter84B key onN the M8. CSelectVthe ECGkeyboard to record and printan ECG.Space9. If you have your system setto Preview before Analysis,select Continue to proceed toanalyze and print an ECG orCancel to cancel the analysis.10. If finished, continue with step11, or continue with theseoptions: Select Print to printanother copy Select Save if the unit isnot set to save the ECGautomatically.9) Select- Transmit totransmit that single ? the defaultrecordtoOP/\transmit location.0 “LeadsStopRhythmECGL start: a; new patient or Select Next Patient toK ,‘Acquire an ECGECGLeadsSelect the ECG key totakeECG on the . anotherEntersamepatient.11. When finished, do one ofAlttwo things: Proceed to File Managerto transmit records. (SeeTransmit StoredRecords.) Turn the unit off and plugit into AC power.Note! Steps 1, 5 and 8 arethe minimal basic stepsfor acquiring an ECG. Allother steps are only usedas required depending onoptions and featuresturned on.
!@1#2QWAS%4EZShift 3RDXEsc 5TFC&6VRhythmStop*7YGStopUHB(8IJN)9OKM?P:;L ,Space -0 . /“ECGLeadsRhythm\‘LeadsPrint Continuous RhythmPowerEnterAltPrint Continuous Rhythm1. Prepare the Patient.2. Open the Resting ECGfunction in one of two ways: If the select defaultpower on option isResting ECG, simplypower on the unit or From Main Menu selectResting ECG3. Verify waveform quality by: Checking Hook-upAdvisor. Green indicatesa good quality waveform. Cycle through the leadgroups to visually verifylead quality by selectingthe Leads key on theKeyboard.4. Use the keys to makeadjustments to (if necessary): Speed Gain Filter5. Select Patient Data to enterpatient information.6. Select Page Down to accessother Test Informationwindows7. Select Save to saveand close the PatientData window.8. Select the Rhythm key on thekeyboard to print a continuousrhythm.9. Select the Stop button tostop printing.Note! Rhythm reports arenot stored to File Manager.9
RR AnalysisResting ECGOrder ManagerArrhythmiaStress ECGFile ManagerSystemConfigurationRR AnalysisMore2More3Start TestPatient Data64PrintRR Analysis SetupMain Menu5PDF ExportMain MenuReturn7Printing an RR Analysis Report (not sold in all countries)RR table) as necessary byselecting RR Analysis Setup.Use the following steps togenerate an RR Analysis report.1. Prepare the patient.2. From the Main Menu selectMore.6. Select Start Test to start thetest.When the target is achieved,a preview of the summaryresults, histogram, andtrendgram are shown on thedisplay.3. Select RR Analysis. You canalso access RR Analysis fromthe Resting ECG mode afteran ECG has been acquired.4. Select Patient Data andenter the patient data.105. Adjust the setup options(target, record lead, gain,speed, filter, pacemakerdetection, rhythm record, and7. To discard the reading andbegin over, select Return.and repeat from Step 5. To discard the reading andreturn to the Main Menu,select Main Menu. To accept the reading andprint the report on thethermal printer, select PrintNote! You may selectStop Test to stop the testprior to the reaching thetarget. To accept the reading andexport the results as a PDFfile, select PDFExport.While reviewing the preview,do any of the following:Note! Steps 1, 4 and 6 arethe minimal basic stepsfor acquiring RR Analysis.
10 mm/mV12.5 mm/s5 mm/sStart Recording8StopRhythmECGLeadsMore150 HzAcquire an ArrhythmiaStart recording buttonLeads button@# 23Acquire an 1Arrhythmia1. Prepare the Patient.QWE2. Open the Arrhythmia functionin one of two ways:4%5 6&7*8(5. Select Save to save and closeR the PatientTYUIData window.6. Verify waveform quality by:)9 -0 8. Select StartRecording. ?OP/\9. Select Stop Recording.“!10. Select Confirm Stop to: ;recording or ContinueF CheckingGHJAdvisor.KLstop the If the select AdefaultSpowerDHook-upon option is Arrhythmia,Green indicates a goodRecording to continue tosimply power on the unitquality waveform. , collect . information.ZXCVBNMEnteror Shift Cycle through the lead11. After the recording is From Main Menu selectgroups to visually verifystopped, select the type ofSpaceAlt you wishArrhythmiaEsclead quality byselectingArrhythmia reportthe Leads key on thethe printout to include:3. The Patient Data windowKeyboard.Summary Report, Tableautomatically opens. EnterReport, or Episode Report.7. Make adjustments tothe desired information.(if necessary):12. Select Main Menu.4. Select Page Down to access SpeedNote! Steps 1, 3 and 8 areother Test Information Gainthe minimal basic stepswindows. Filterfor acquiring an ECG.‘11
Acquire a Stress ECG TestLeads13PretestExerciseRecoveryTest EndRecall12 ldMediansComment2!1The Stress ECG test keys arelocated at the top of the stresstest keyboard. These keys areused to control the functions ofthe stress test as well as theconnected stress device.1. Pretest: Advanced the test tothe Pretest Phase or while inthe Pretest Phase if selectedwill advance to the next stagein that phase.6#27 38%4 57. Test End: Ends the currenttest. When a confirmationmessage appears on thescreen, select the desiredfunction key.4. 12 Ld: Prints a 12 lead report.8. Comment: Allows you toenter comments about thetest. Comments are printedon the Tabular SummaryReport. You can enter up to100 characters.QWAES5. Recovery: Advances to theRecovery phase or while inthe Recovery Phase ifselected will advance to thenext stage.ZXMedians: Prints a medianreport. Set the type of medianreport you wish to print in theStress Setup window underIn-test Reports.EscRDTFC&63. Exercise: Advanced the testto the Exercise Phase or whilein the Exercise Phase ifselected will advance to thenext stage in that phase.Shift6.2. Recall: Prints a one-pagerhythm strip report using theprevious 10 secs of data fromthe point from which youselect the Recall key54@Stress ECG Testing Keyboard12ECGYGVB
StopRhythmSpeed W GradeTmilEnter BPSpeed W-GradeTmil*78)9 -0 9. Hold Stage: Maintains thecurrent test stage anddoesn’t allow the protocol togo to next stage. Select againto remove the stage hold andto go back to programmedprotocol staging.12. Speed W- : Decreasestreadmill speed or ergometerload. Selecting this button will?result in the system no longerfollowing the selectedprotocol and places thesystem in manual mode.10. Enter BP: Allows you to entera Blood Pressure readingmanually or triggers areading for a supportedexternal device.13. Grade : Increase treadmillincline. Selecting this buttonwill result in the system nolonger following the selectedprotocol and places thesystem in manual mode.IJNOKM ,11. Speed W : Increase treadmillspeed or ergometer load.Selecting this button willresult in the system no longerfollowing the selectedprotocol and places thesystem in manual mode.SpaceP:;L .1615. Tmil : Starts the Treadmill16. Tmil : Stops the Treadmill /“UH(14\‘12Acquire a Stress ECG Test15Hold Stage10&13119Enter14 Grade : Decrease treadmillincline. Selecting this buttonwill result in the system nolonger following the selectedprotocol and places thesystem in manual mode.Alt13
Acquire a Stress ECG TestResting ECGArrhythmiaStress ECGFile Manager1Patient Data25 mm’s10 mm/mV2Pace EnhanceOffPrinter Leads12Select ProtocolReport FormatSystemConfigurationMoreFRFOnMore3Target HRMore4Accessing Stress ECG ModeThe Stress ECG mode is apurchasable option and allowsyou to conduct a Stress ECG testwith a direct connection totreadmill or ergometer.Regardless of the devices thebasic procedure for conducting aStress ECG test is the same. Nowlet’s access the Stress ECG menu.1. Select Stress ECG from theMain Menu.2. Select Patient Data and enterthe appropriate data.143. Select More.5. You can also turn PaceEnhance On or Off, select thePrinter Leads, select ReportFormats or change the TargetHR.4. Select Protocol to choosedesired protocol. The defaultprotocol will be chosen,however you can selectanother protocol from the list.If you do select a newprotocol, select Save.Note! In setups you canautomatically set theTarget HR % that you wishto achieve. This number iscalculated against thepatient’s age.
45LeadsStopRhythmECG6PretestExerciseRecoveryTest EndHold StageSpeed W GradeTmilRecall12 ldMediansCommentEnter BPSpeed W-GradeTmilQPretest Phase#2 3 3W 4EA Stress ECG protocol typically iscomposed of 4 Aphases.SThese Dinclude Pretest, ExerciseRecovery and Test End.ShiftZ%XPretest allows the user to takeECG and bloodEscpressuremeasurements in a variety ofpatient positions. Depending onthe protocol, it is also a phasethat could be used to allow thepatient to warm-up before theExercise portion of the StressECG test.R 5T&6Y*7 2 8U()9I1. Select the Pretest button onF the keyboardGHto enterJ the KPretest Phase.C 2. SelectV theBBP buttonN on theMkeyboard and enter patient’sblood pressure.SpaceO -0P? /\4. Select the Pretest button to: ;through theLadvanceStanding and Hypervent12-lead as , stages . a BP andEnterrequired.“1@‘!Acquire a Stress ECG Test15. Select the Pretest button toAltadvance to Warm-up.6. Select the Tmil button tostart the treadmill.3. Select the 12 ld button on thekeyboard to take a 12-leadECG7. Have the patient start to walkat speed based on theselected protocol.15
Leads2PretestExerciseRecoveryTest EndHold StageSpeed W GradeTmilRecall12 ldMediansCommentEnter BPSpeed W-GradeTmil51@Q#2Exercise PhaseW44 3E%R6 65T&Y73* 8U(Imanually control thetreadmill or ergometer’sworkload.GHJKOnce the patient is comfortableAS or DFwalking on the treadmillpeddling on the ergometer, select 2. Select the Hold Stage buttonthe Exercise key onZthe keyboardin the stageXC willV result BN beingMShiftto start the Exercise Phase. Theheld at that workload for asphase will now indicate Exerciselong as the stageis held.EscSpaceand the stage timeand workloadSelect Hold Stage a secondwill be dictated by the protocol.time to release the stage toNote! Selecting theSpeed or Grade controlsfor the treadmill orergometer will result inthe system dropping outof the protocol. At thispoint the user must)9follow the selected protocol.O -0 ?P/3. A blood pressurewill\beautomatically prompted for: ; the protocol or youLbased oncan select the Enter BP button on the keyboard to enter a BP.“!1. Select the Exercise button onthe keyboard. The system willnow enter the exercise phaseand follow the selectedprotocol. Select the Exercisebutton a second time willadvance the protocol to thenext stage.16StopRhythmECG,.‘Acquire a Stress ECG Test1Enter4. A 12 lead will be automaticallytaken by the systembased onAltthe protocol or you can selectthe 12 ld button on thekeyboard to take a 12 lead.You may also take a medianreport at any time by selectingMedians.5. Select the Recall button tocapture the previous 10 sec ofECG that just pasted on thescreen.Note! The stage time willturn red when the stageis in hold.6. Select Comment on thekeyboard to enter a patientrelated comment.
ECGStopRhythmPretestExerciseRecoveryTest EndHold StageSpeed W GradeTmilRecall12 ldMediansCommentEnter BPSpeed W-GradeTmilQ#2Recovery PhaseW 3E%4R 5T&6Y*7U(8)9IOnce it is determined that thekey onASD 1.F SelectGthe RecoveryHJKExercise portion of the stress testthe function keyboard whenhas been completed, you willthe patient has reached peakZXC exercise,VB when NShiftnow selectthe Recoverybuttonoryou areMand enter into the recoveryready to advance to thephase. The Recoveryphase isRecovery Phase.EscSpaceopportunity to continue to2. On supported treadmills themonitor the patient to make surespeed and grade of thetheir blood pressure, heart rate,treadmill will graduallysymptoms and ECG return todecrease according to thetheir pre- test values. The lengthprotocol.of the Recovery Phase will3. The system will automaticallydepend on your clinicianprint a peak 12-lead orprotocol.median report according tothe protocol.O -0P?6 /“@1\4. BP will :automatically beL;prompted based on theprotocol. , .‘!Acquire a Stress ECG
RR Analysis Printing an RR Analysis Report (not sold in all countries) Use the following steps to generate an RR Analysis report. 1. Prepare the patient. 2. From the Main Menu select More. 3. Select RR Analysis. You can also access RR Analysis from the Resting ECG mode after an ECG has been acquired. 4. Select Patient Data and enter the patient .