Transcription
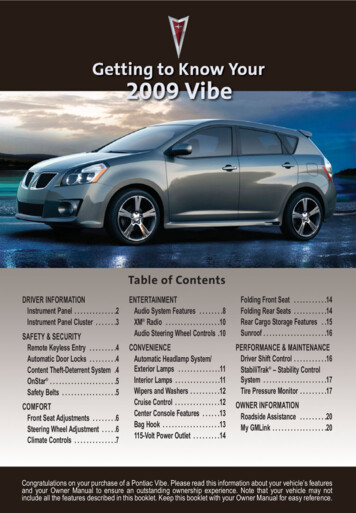
DRIVER INFORMATIONInstrument Panel . . . . . . . . . . . . . .2Instrument Panel Cluster . . . . . . .3SAFETY & SECURITYRemote Keyless Entry . . . . . . . . .4Automatic Door Locks . . . . . . . . .4Content Theft-Deterrent System .4OnStar . . . . . . . . . . . . . . . . . . . . . .5Safety Belts . . . . . . . . . . . . . . . . . .5COMFORTFront Seat Adjustments . . . . . . . .6Steering Wheel Adjustment . . . . .6Climate Controls . . . . . . . . . . . . . .7ENTERTAINMENTAudio System Features . . . . . . . .8XM Radio . . . . . . . . . . . . . . . . . .10Audio Steering Wheel Controls .10Folding Front Seat . . . . . . . . . . .14Folding Rear Seats . . . . . . . . . . .14Rear Cargo Storage Features . .15Sunroof . . . . . . . . . . . . . . . . . . . . .16CONVENIENCEAutomatic Headlamp System/Exterior Lamps . . . . . . . . . . . . . .11Interior Lamps . . . . . . . . . . . . . . .11Wipers and Washers . . . . . . . . . .12Cruise Control . . . . . . . . . . . . . . .12Center Console Features . . . . . .13Bag Hook . . . . . . . . . . . . . . . . . . .13115-Volt Power Outlet . . . . . . . . .14PERFORMANCE & MAINTENANCEDriver Shift Control . . . . . . . . . . .16StabiliTrak – Stability ControlSystem . . . . . . . . . . . . . . . . . . . . .17Tire Pressure Monitor . . . . . . . . .17OWNER INFORMATIONRoadside Assistance . . . . . . . . .20My GMLink . . . . . . . . . . . . . . . . . .20Congratulations on your purchase of a Pontiac Vibe. Please read this information about your vehicle’s featuresand your Owner Manual to ensure an outstanding ownership experience. Note that your vehicle may notinclude all the features described in this booklet. Keep this booklet with your Owner Manual for easy reference.
Getting to Know Your Vibe2DRIVER INFORMATIONInstrument PanelABCI J K LMDNEOThe main features of the instrumentpanel include:A. Air OutletsB. Outside Mirror ControlsC. Turn Signal/Exterior Lamp Controls/Multifunction LeverD. Instrument Panel ClusterE. Windshield Wipers LeverF. Passenger Airbag Status Indicator/Front Passenger Safety BeltReminder Light/Security LightG. Hazard Warning Flashers ButtonH. Audio SystemI. StabiliTrak/Traction Control ButtonFPAQ RJ.K.L.M.N.O.P.Q.R.S.T.U.V.GHSATUVStorage CompartmentHood Release LeverAudio Steering Wheel ControlsTilt/Telescope Steering Wheel LeverHornCruise Control LeverIgnition Switch115-Volt Main Power Switch115-Volt Power OutletShift LeverClimate ControlsBag HookGlove BoxSee Instruments and Controls in your Owner Manual.
3Instrument Panel ClusterABYour vehicle’s instrument panel cluster isdesigned to let you know at a glancehow your vehicle is running. It includesthese key features:A. TachometerB. SpeedometerC. Fuel GaugeD. Outside Temperature DisplayE. Odometer/Trip OdometerF. Automatic Transmission ShiftPosition Indicator (if equipped)CDEFGHG. Engine Coolant Temperature GaugeH. Instrument Panel Brightness Controland Odometer/Trip Odometer ResetButtonNote: The instrument panel cluster isdesigned to let you know about manyimportant aspects of your vehicle’soperation. It is important to read yourOwner Manual and become familiarwith the information being relayed toyou by the lights, gauges and indicators,as well as what action can be taken toensure safety and to prevent damage.See Instruments and Controls in your Owner Manual.
Getting to Know Your Vibe4SAFETY & SECURITYRemote Keyless Entry(if equipped)Remote KeylessEntry (RKE) transmitter functionsinclude:(Unlock): Pressthis button to unlockthe driver’s door.Press it again withinthree seconds tounlock all otherdoors. The unlock function can be customized to your preference. See yourPontiac dealer.Note: If a door is not opened after thevehicle is unlocked, the Automatic DoorLock function locks the vehicle againafter a specified period of time. Thisfunction can be customized to yourpreference. See your Pontiac dealer.(Lock): Press this button to lock alldoors.HOLD(Panic Alarm): Press and holdthis button for one second to activatethe panic alarm. The vehicle lights willflash and an alarm will sound. To cancelthe alarm, press any button on thetransmitter.See Keys, Doors and Windows in your OwnerManual.Automatic Door Locks(if equipped)Automatic Transmission DoorLocking (if equipped)When shifting out of Park, this functionlocks all doors.Automatic Transmission DoorUnlocking (if equipped)When shifting to Park and turning thekey to ACC (Accessory) or Lock/Off,this function unlocks all doors.See Keys, Doors and Windows in your OwnerManual.Content Theft-Deterrent System(if equipped)The content theft-deterrent alarmsystem will not be armed or disarmed ifthe doors are locked or unlocked withthe manual door lock or the power doorlock button.
5 To arm the alarm system, lock thedoors using the RKE transmitter orkey. The security light on the instrument panel will illuminate for approximately 30 seconds. The alarm isarmed when the security light startsflashing. To disarm the system, unlock thedoors using the RKE transmitter orkey, or turn the ignition switch to On.Safety BeltsSafety Belt Height AdjusterSee Keys, Doors and Windows in your OwnerManual.OnStar Your vehicle may feature the OnStarSafe & Sound Plan or the uplevelOnStar Directions & Connections Plan,with one year of OnStar service from thedate you purchased your new vehicle.OnStar offers a variety of capabilities,such as Remote Door Unlock, AutomaticNotification of Airbag Deployment, andHands-Free Calling.Press the OnStar button to ask anOnStar Advisor about the service planyou have or to upgrade your plan.For more information, refer toyour OnStar Owner’s Guide, call1-888-4-ONSTAR (1-888-466-7827),or visit onstar.com. To adjust the height of the frontshoulder belts, press the button ontop of the height adjuster and movethe height adjuster up or down to thedesired position.Safety Belt RemindersThe safety belt reminder lights willflash until the appropriate safety belt isbuckled.The driver’s safety belt reminder light ison the instrument panel cluster.The front passenger’s safety beltreminder light is on the center of theinstrument panel near the audio system.See Instruments and Controls in your OwnerManual.See Seats and Restraints in your OwnerManual.
Getting to Know Your Vibe6COMFORTSteering Wheel AdjustmentFront Seat AdjustmentsABCSeat Adjustment Lift the bar (A) under the front of theseat to slide the seat to the desiredposition; then release the bar.Seat Height Adjustment (Driver’s Seatonly) Ratchet the height adjustment lever(B) on the outboard side of thedriver’s seat up or down repeatedlyto raise or lower the seat.Seatback Recline Adjustment Lift the recline lever (C) on the outboard side of the seat to move theseatback to the desired position;then release the lever.See Seats and Restraints in your OwnerManual.Adjust the driver’s seat to a comfortableposition before adjusting the steeringwheel.To adjust the position of the steeringwheel:1. Push down the lever under the steering column.2. Adjust the steering wheel to a comfortable position by moving it up ordown as well as in or out.3. Pull up the lever to lock the steeringwheel in place.See Instruments and Controls in your OwnerManual.
7Climate ControlsABCThe climate controls include:Air Outlet Selection: Turn the selectiondial (A) to change the direction of theair delivery to the vent, bi-level, floor,defog/floor, or defrost mode.(Recirculation): Press this buttonon the air outlet selection dial to recirculate air inside the vehicle. Recirculationhelps heat or cool the vehicle morequickly and prevents outside air andodors from entering the vehicle.Recirculation will not operate when thedefog/floor or defrost mode is selected.(Fan): Turn the fan control dial (B)to increase or decrease the fan speed.Turn the dial fully counterclockwise toturn off the fan.(Rear Window Defogger): Pressthis button on the fan control dial to turnthe rear window defogger on or off.Temperature Control: Turn the temperature control dial (C) to increase ordecrease the temperature setting.A/C (Air Conditioning) (if equipped):Press this button on the temperaturecontrol dial to turn the air conditioningsystem on or off.Note: When the recirculation mode isused for extended periods without the airconditioning, the air humidity increasesand the windows may fog more easily.Maximum Air ConditioningPerformanceTo cool the vehicle interior quickly:1. Turn the temperature control dial tothe MAX A/C position.2. Press the A/C button.3. Press the(Recirculation) button.See Climate Controls in your Owner Manual.
8Getting to Know Your VibeENTERTAINMENTAudio System FeaturesWhile most of the features on the audiosystem will look familiar, some of thefollowing may be new:PWR-VOL (Power/Volume): Press thisknob to turn the system on or off.Turn the knob to adjust the volume.TUNE-ADJ (Tune/Adjust): Turn thisknob to tune in radio stations.Press the knob to adjust the tone control(bass/midrange/treble) or speaker control (balance/fade) setting. Turn the knobto adjust the selected setting.FAV (Favorite): Press this button to gothrough up to six pages of any combination (AM, FM, or XM, if equipped) ofpreset favorite radio stations. On eachpage, up to six stations are available byusing the six pushbuttons below theradio display.BAND: Press this button to switchbetween AM, FM and XM bands. Whenplaying a CD, press this button to switchto the radio.CD/AUX (CD/Auxiliary): Press thisbutton to switch to CD operation. Pressit again to switch to operation of anauxiliary device, such as a portableaudio player, connected to the auxiliaryinput jack on the radio.INFO (Information): Press this button todisplay additional information related tothe current FM-RDS or XM station, orMP3 song (if equipped).EQ (Equalization): Press this button toselect preset equalization settings.CAT (Category): Press this button tofind XM stations (if equipped) within adesired category.MENU: Press this button to access thesystem setup menu.Auxiliary Input Jack: A portable audioplayer (such as an iPod or MP3 player)can be connected to the auxiliary inputjack located on the radio. Press theCD/AUX button to play audio from theportable player over the vehicle speakers. To optimize speaker volume, fullyincrease the volume level of the portableplayer.
9Playing MP3 Files (if equipped)The audio system may have MP3 fileplayback capability. When playing aCD-R containing MP3 audio tracks,an MP3 label will be displayed.Note: CDs with any affixed labels mayjam in the CD player. Label a CD using apermanent marker. If more than one CDis inserted into the slot at a time, or ifscratched or damaged CDs are played,the CD player could be damaged. Whenusing the CD player, use only CDs ingood condition without labels; load oneCD at a time; and keep the CD playerand the loading slot free of foreignmaterials, liquids or debris.Radio Data SystemWhen you tune to a Radio Data System(RDS) station, the station name or callletters will appear on the display insteadof the frequency. Depending on the RDSstation, additional text information maybe available by pressing the INFO button.RDS features are available for use onlyon FM stations that broadcast RDSinformation. RDS relies on receivingspecific information from these stationsand will work only when the informationis available.Favorite StationsBefore setting your favorite stations,park the vehicle.Note: Engaging in extended searchingfor specific audio stations or songs byusing buttons and knobs — or givingextended attention to entertainment tasks— can lead you to look away from theroad frequently or for prolonged periods,which may cause you to miss seeingthings on the road that you need to see.Avoid engaging in extended searching forspecific items while driving.You can set up to six pages of any combination (AM, FM, or XM, if equipped) offavorite radio stations (up to four pageswithout XM), with up to six stationsstored on each page.Set Number of Favorite Station Pages1. Press the MENU button to display theradio setup menu.2. Press the pushbutton below the FAV1–6 label on the radio display.3. Select the desired number of favoritestation pages.4. Press the FAV button. You may nowbegin storing your favorite stations forthe chosen number of pages.Store Favorite Stations1. Tune in the desired radio station.2. Press the FAV button to display thepage where the station is to bestored.3. Press and hold one of the six pushbuttons until a beep sounds to storethe station.4. Repeat the steps for each pushbuttonon each page.
10Getting to Know Your VibeSetting the Time and Date1. Turn on the radio.2. Press the(Clock) button.3. Press the pushbutton under any ofthe labels to be changed.4. Press the pushbutton again, the upSEEK arrow or the FWD button toincrease the numbers. Press thedown SEEK arrow or the REV buttonto decrease the numbers. Rotatingthe TUNE-ADJ knob also will increaseor decrease the selected label.5. Press the Clock button again to setthe currently displayed time and date.See Infotainment in your Owner Manual.XM RadioXM Radio offers more than 170channels of digital-quality sound thatgoes wherever you go — coast to coast.After a free three-month trial period,activation and service subscription feesapply. Service is based in the continentalU.S. and Canada. For more information,visit XM online at www.XMradio.comor call 1-800-929-2100.See Infotainment in your Owner Manual.Audio Steering Wheel Controls(if equipped)The followingaudio controlsare locatedon the steering wheel: –(Volume):Press the or – buttonto adjust thevolume.(Next/Previous): Press the upor down arrow button to go to thenext/previous preset radio station, or tothe next/previous track or file when playing a CD.Press and hold the up or down buttonuntil a beep sounds to seek thenext/previous radio station with a strongsignal, or to go to the next/previous fileon a CD.MODE: Press this button to turn onthe audio system. Press and hold thisbutton until a beep sounds to turn off theaudio system.Press this button to select the audiosource (AM; FM; XM, if equipped; CD;or AUX).See Infotainment in your Owner Manual.
11CONVENIENCEInterior LampsAutomatic Headlamp System/Exterior LampsThe Automatic Headlamp System turnson the Daytime Running Lamps in thedaytime and the headlamps and otherexterior lamps at night or when necessary. The (Lights On) reminder lampilluminates in the instrument panel cluster when the headlamps are on.The system uses a light sensor, locatedon top of the instrument panel, to determine light conditions. For proper operation, avoid placing any objects on ornear the sensor.Exterior Lamps ControlThe exterior lamps control switch on theend of the left steering column lever canbe rotated to the following positions:(Off): This position turns off allexterior lamps except Daytime RunningLamps.(Parking Lamps): This positionturns on the parking lamps and taillamps.(Headlamps): This position turnson the headlamps, parking lamps andtaillamps.(Fog Lamps) (if equipped): Rotatethe inner control band to this position toturn on the fog lamps.See Lighting in your Owner Manual.The interior lamp switch on the frontoverhead lamp can be set to one of thefollowing settings:DOOR: This position enables the interiorlamp(s) to turn on when a door isunlocked, a front door or the liftgate isopened (or a rear door is opened, ifequipped with Remote Keyless Entry),or the ignition switch is turned to theLock position. This function can be customized to your preference. See yourPontiac dealer.OFF: This position turns off the interiorlamp(s) at all times, including when adoor is open.ON: This position turns on the interiorlamp(s) at all times.See Lighting in your Owner Manual.
12Getting to Know Your VibeWipers and WashersThe controls for the windshieldwipers/washer and rear wiper/washerare on the upper-right steering columnlever.Windshield Wipers/WasherThe windshield wipers/washer controlsinclude:(Mist): Move the lever up from theOff position to turn the wipers on for onewipe.(Off): Move the lever to this positionto turn off the wipers.(Intermittent): Move the leverdown to the first position to set a delaybetween wipes. Rotate the inner controlband to adjust the delay. The wipersactivate more frequently as the band isrotated upward.(Low): Move the lever down to thesecond position for steady, low-speedwipes.(High): Move the lever down tothe third position for rapid, high-speedwipes.(Washer Fluid): Pull the levertoward you to spray washer fluid on thewindshield and activate the wipers.Rear Wiper/WasherThe rear wiper/washer control switch onthe end of the lever can be rotated tothe following positions:(Low): This position turns on thewiper in the intermittent mode.(High): This position turns on thewiper in the normal mode.(Washer Fluid): Rotate the switchall the way up or down to spray washerfluid on the rear window and activate thewiper.See Instruments and Controls in your OwnerManual.Cruise ControlThe cruise control is operated using thelower-right steering column lever.Set Cruise Control1. Press the ON-OFF button on the endof the lever to turn on cruise control.2. When traveling at the desired speed,move the lever down to the – SETposition.Adjust a Set Speed Tap down or hold the lever down tothe – SET position to reduce the setspeed. Tap up or hold the lever up to the RES position to increase the setspeed.
13Cancel and Resume Cruise Control1. Pull the lever toward you or pressthe brake pedal (or clutch pedal,if equipped) to cancel cruise controlbut retain the set speed in memory.2. Move the lever up to the RESposition to return to the set speed.Storage CompartmentsSee Instruments and Controls in your OwnerManual.Center Console FeaturesCupholdersCDYour vehicle has a center console withtwo storage compartments. To access the upper tray, lift the lidwhile pressing the upper lever (C) onthe front of the lid. To access the lower storage area, liftthe lid and upper tray while pressingthe lower lever (D) on the front of thetray.See Storage in your Owner Manual.BAThe front cupholders can be adjusted tovarious sizes. Pull up the front holder (A) and moveit forward or rearward to change thesize of the cupholder for various drinkcontainers. Remove the front (A) and rear (B)holders to store small items.Bag HookA bag hook is located on the right sideof the instrument panel next to the glovebox. It can be used to hold a trash bagor secure a grocery bag. To use the bag hook, press the top ofthe hook. It will pop out.See Storage in your Owner Manual.
14Getting to Know Your Vibe115-Volt Power OutletFolding Front Seat (if equipped)BAThe 115-volt household-style AC poweroutlet is located in front of the centerconsole. It provides power for a varietyof small electronic equipment. To turn on the power outlet (A), pressthe AC 115V power switch (B) belowthe climate controls. The ignitionswitch must be in the On position.Note: Do not plug in equipment thatrequires more than 100 watts; otherwise,the protection circuit will cut the powersupply. It will reset after 30 secondswhen equipment that operates withinthe limit is plugged in.To fold the front passenger seat:1. Lower the head restraint.2. Pull up either seatback release knobon the lower back of the seatbackand fold the seatback down.See Seats and Restraints in your OwnerManual.Folding Rear SeatsTo fold the rear passenger seats:1. Lower the head restraints.2. Stow the safety belt buckles fully(as shown in A) in the seat.See Instruments and Controls in your OwnerManual.A3. Pull up either seatback release knobon the outboard top of the seatbackand fold the seatback down.
15When returning the seatback to theupright position, make sure it is lockedin place. If the seatback is not securelylocked, the red marking on the seatbackrelease knob will be visible.To use the cargo management system:1. Turn the center lock knob to theUnlock position.2. Lift up the cover.3. Fold out the side panels and engagethem in the outboard side clips.4. Hook the nets into the cover s
3. Select the desired number of favorite station pages. 4. Press the FAV button. You may now begin storing your favorite stations for the chosen number of pages. Store Favorite Stations 1. Tune in the desired radio station. 2. Press the FAV button to display the page where the station is to be stored
