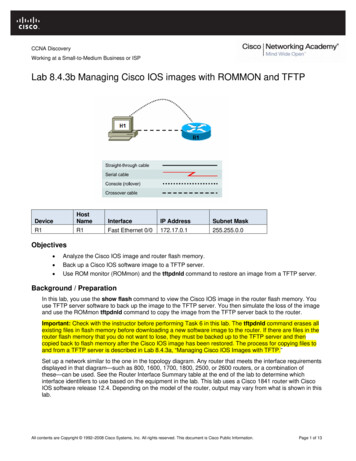
Transcription
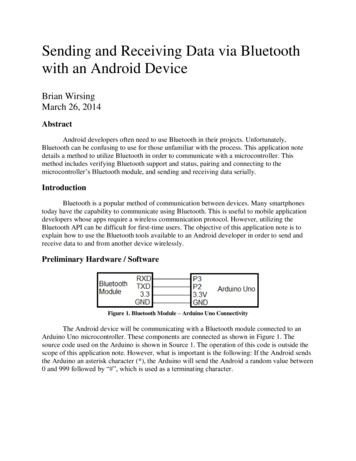
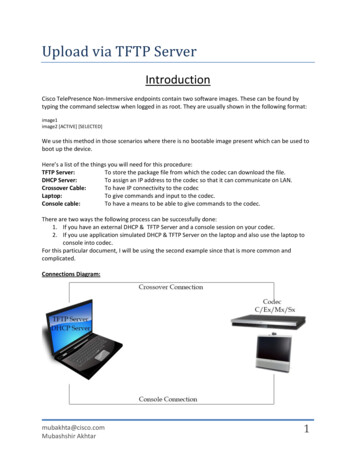
Upload via TFTP ServerIntroductionCisco TelePresence Non-Immersive endpoints contain two software images. These can be found bytyping the command selectsw when logged in as root. They are usually shown in the following format:image1image2 [ACTIVE] [SELECTED]We use this method in those scenarios where there is no bootable image present which can be used toboot up the device.Here’s a list of the things you will need for this procedure:TFTP Server:To store the package file from which the codec can download the file.DHCP Server:To assign an IP address to the codec so that it can communicate on LAN.Crossover Cable:To have IP connectivity to the codecLaptop:To give commands and input to the codec.Console cable:To have a means to be able to give commands to the codec.There are two ways the following process can be successfully done:1. If you have an external DHCP & TFTP Server and a console session on your codec.2. If you use application simulated DHCP & TFTP Server on the laptop and also use the laptop toconsole into codec.For this particular document, I will be using the second example since that is more common andcomplicated.Connections Diagram:mubakhta@cisco.comMubashshir Akhtar1
U-Boot ExplainedThis section will explain how the process works and what is the theory applied behind this procedure.For all those who are only interested in the steps and not looking for any more information, can skip thissection.Normally when the codec is not booting up, it means that the software image is corrupted. Using thefollowing procedure, we would be able to upload a fresh software image to the codec. The software isuploaded to the hard disk and then it is installed. Once the process is started, the hard disk is first erasedwhich would delete any previous software on the device. When I tried to do it once on my system, evenmy release and option keys were wiped out and so was the configuration. So it is always recommendedthat whenever you have a working system, you should always take a backup.The process is done using the U boot which is a special interface with some useful commands. U boot iseither automatically activated when there is no software image present in the system, or it can bemanually triggered by a user. During the task, there are many instances where the process might fail. Inthis document I will be highlighting all such instances where there are chances of process failure.ProcedureStep 1: MAKE PHYSICAL CONNECTIONS AS SHOWN IN THE DIAGRAM ON PAGE 1We need to have one console connection and one Ethernet connection between the codec & laptop.Ethernet connection should be made using the Crossover cable.Step 2: ASSIGN A STATIC IP TO THE LAPTOPOnce the connections are made, choose the interface connected to your codec (in case if you havemultiple interfaces) & assign a static IP with the following details:mubakhta@cisco.comMubashshir Akhtar2
Step 3: BREAK THE BOOT SEQUENCEThe first process is to reach the Uboot prompt. Either you will be automatically sent to the U bootprompt or you can activate the U boot when the codec is booting up. You will require a console sessionwith the codec in order to see the prompt. When you are on the console session, you would see thisoutput when the codec is booting up:CPU: e300c1, MPC8347 TBGA EA, Rev: 3.0 at 600 MHz, CSB: 200 MHzI2C: readyDRAM: DDR2 RAM: 512 MiBRAM data bus test [PASS]RAM address bus test[PASS]FLASH: j 5NAND: 2048 MiBRTC: 2012-10-05 (Friday) - Time: 13:33:37PCI Video Processor Detection[PASS]FalconSN: A1AR44D00273Object level: 05Falcon main boardRev: ISN: F1004485Object level: 68MAC: 00:50:60:06:4B:BDNet: TSEC0, TSEC1Hwmon: 45Press 'b' to enter u-boot promptPress 'c' to stop autoboot:The following text “Press ‘b’ to enter u-boot prompt” & “Press ‘c’ to stop autoboot” will show up on thescreen. As soon as you see it, you need to hold ‘B’ key and press ‘C’ key.There is a short window open for the process, hence it should be very quick.Once the boot sequence is broken, you would see a prompt come up on the console session. Themubakhta@cisco.comMubashshir Akhtar3
prompt would differ as per the device you’re using. Here are the different prompts:FALCON For Ex90AMERICA For C40CASPER For C60SATURN For C90VENETO For MX300Once we have reached this prompt, the boot sequence is broken.STEP 4: ASSIGN IP ADDRESS TO CODEC VIA DHCP SERVERWe now have to assign an IP address to the codec so that it is able to download the file from the TFTPserver. There is an open source application available called TFTPd32. Download link:http://tftpd32.jounin.net/tftpd32 download.htmlThis application can be used for both the purpose; TFTP Server & DHCP Server.Here’s the screenshot of the application on my laptop:However, most of the times we have seen that using this application as a DHCP as well as TFTP createissues. The DHCP server does not assign IP addresses and if you open the Log viewer tab on theapplication, you will see these errors:Rcvd DHCP Discover Msg for IP 0.0.0.0, Mac 00:50:60:06:4B:BD [05/10 20:20:07.458]Client requested address 0.0.0.109 [05/10 20:20:07.475]Suppress pingable address 10.78.140.2 [05/10 20:20:16.217]Another indication is when you type these commands on the Uboot prompt, you will see the followingmubakhta@cisco.comMubashshir Akhtar4
results:FALCON dhcpBOOTP broadcast 1BOOTP broadcast 2BOOTP broadcast 3BOOTP broadcast 4BOOTP broadcast 5Retry count exceeded; starting againFALCON printenv ipaddr## Error: "ipaddr" not definedIf you see these errors, this means that the DHCP server is not working well. In that case I wouldrecommend having DHCP & TFTP run on different applications rather than running on the same.DHCPd32 is one open source application which can be used for this purpose. Download -Download-77229.htmlFIRST close the TFTPd32 application window and THEN run DHCPd32 (running DHCPd32 first is requiredso that bootp agent which is used to assign IP addresses is used for DHCPd32 rather TFTPd32)Here’s a screenshot of the DHCPd32 application with the settings:You will notice the logs on the left hand side top corner.Go to the codec U boot prompt and type this command:FALCON dhcpBOOTP broadcast 1DHCP client bound to address 10.78.141.252FALCON printenv ipaddripaddr 10.78.140.10Also logs can be seen on the DHCPd32 window top left corner. This shows the IP address 10.78.140.10was successfully assigned to the codec.Step 5: START TFTP SERVER WITH ACCESS TO FILES REQUIREDmubakhta@cisco.comMubashshir Akhtar5
Mainly the package files are only required however, in the case of C series codec, you would also requiretwo files namely; pkgextract.elf & u-boot.ini. These files can be downloaded from the following ervlet/download/23161-1-123930/pkgfiles uboot.rar.zipCreate a TC5 folder on your desktop so that they contain all the files required for the process. Run theTFTPd32 in order to configure it. If you followed the steps and ran DHCPd32 first, you will see this errorupon running TFTPd32:Ignore it, it is just telling you that DHCP can only be used by one application and is currently being usedby DHCPd32 hence TFTPd32 will not be able to use it. Now point the TFTP server to the correct directoryTC5 on your desktop. Also if you have multiple network interfaces on the laptop, make sure the ServerInterface is showing the IP address assigned to the interface connected with the codec.Step 6: CONFIGURE THE CODEC FOR DOWNLOADING FILES FROM TFTPFALCON setenv serverip 10.78.140.1FALCON setenv tftp path (blank since files in the root directory of TFTP)FALCON setenv saturnpkg s52000tc5 1 4.pkgStep 7: START UPLOAD OF FILES FROM THE TFTPWe will now start the upload process:FALCON run pkgexBOOTP broadcast 1*** Unhandled DHCP Option in OFFER/ACK: 7*** Unhandled DHCP Option in OFFER/ACK: 44*** Unhandled DHCP Option in OFFER/ACK: 7*** Unhandled DHCP Option in OFFER/ACK: 44DHCP client bound to address 10.78.140.10Unmounting yaffs2 mount point /flashNAND erase: device 0 whole chipErasing at 0x0 -- 0% complete.Erasing at 0x1440000 -- 1% complete.Erasing at 0x28c0000 -- 2% complete.Erasing at0x3d40000 -- 3% complete.Erasing at 0x51c0000 -- 4% complete.Erasing at 0x6640000 -- 5% complete.Erasing at 0x7ac0000-- 6% complete.CQ Í ¹ at 0x8f40000 -- 7% complete.Erasing at 0xa3c0000 -- 8% complete.Erasing at 0xb840000 -- 9%complete.Erasing at 0x18500000 -- 19% complete.Erasing at 0x19980000 -- 20% complete.Erasing at 0x1ae00000 -- 21%complete.Erasing at 0x1c280000 -- 22% complete.Erasing at 0x1d700000 -- 23% complete.Erasing at 0x1eb80000 -- 24%complete.Erasing at 0x1ffc0000 -- 25% complete.Erasing at 0x21440000 -- 26% complete.Skipping bad block at 0x21dc0000mubakhta@cisco.comMubashshir Akhtar6
Erasing at 0x228c0000 -- 27% complete.Skipping bad block at 0x23a80000complete.CQ Í ¹ at 0x5c280000 -- 72% complete.Erasing at 0x5d700000 -- 73% complete.Erasing at 0x5eb80000 -- 74%complete.Erasing at 0x5ffc0000 -- 75% complete.Erasing at 0x61440000 -- 76% complete.Erasing at 0x628c0000 -- 77%complete.Erasing at 0x63d40000 -- 78% complete.Erasing at 0x651c0000 -- 79% complete.Erasing at 0x66640000 -- 80%complete.Erasing at 0x67ac0000 -- 81% complete.Skipping bad block at 0x68780000Erasing at 0x68f40000 -- 82% complete.Erasing at 0x6a3c0000 -- 83% complete.Erasing at 0x6b840000 -- 84%complete.Skipping bad block at 0x6bfc0000Erasing at 0x6ccc0000 -- 85% complete.Erasing at 0x6e140000 -- 86% complete.Erasing at 0x6f5c0000 -- 87%complete.Skipping bad block at 0x6fc40000Erasing at 0x70a00000 -- 88% complete.Skipping bad block at 0x71100000Erasing at 0x71e80000 -- 89% complete.Erasing at 0x73300000 -- 90% complete.Erasing at 0x74780000 -- 91%complete.Erasing at 0x75c00000 -- 92% complete.Erasing at 0x77080000 -- 93% complete.Skipping bad block at 0x78480000Erasing at 0x78500000 -- 94% complete.Erasing at 0x79980000 -- 95% complete.Erasing at 0x7ae00000 -- 96%complete.Skipping bad block at 0x7bec0000Erasing at 0x7c280000 -- 97% complete.Erasing at 0x7d700000 -- 98% complete.Erasing at 0x7eb80000 -- 99%complete.Skipping bad block at 0x7fa40000Erasing at 0x7ffc0000 -- 100% complete.Till this part, we can see that the IP address was identified from the DHCP & hard disk erased in order todownload and install the new package. After this, you should see the following :Mounting yaffs2 mount point /flashMount point name already usedUsing TSEC0 deviceTFTP from server 10.78.140.1; our IP address is 10.78.140.10Filename 'TC5/s52000tc5 1 4.pkg'.Load address: 0x2000000Filename shows the exact location of the file which the codec is looking to download. If the path isincorrect, you will get the following error:Filename 'TC5/test.pkg'.Load address: 0x2000000Loading: *TFTP error: 'File not found' (1)Not retrying.The last hiccup to download the file from the TFTP would be the MTU size. You might encounter thefollowing error:TFTP from server 10.78.140.1; our IP address is 10.78.140.10Filename '/s52000tc5 1 4.pkg'.Load address: 0x2000000Loading: *Ethernet ERROR: IP fragmentationCheck ethernet MTU on serverEthernet ERROR: IP fragmentationCheck ethernet MTU on serverThis error shows up because it is required for the TFTP server to have the MTU of 1500. Hence, on yourPC the MTU should be configured as 1500 which is not of this value by default. You can follow thesesteps to set it to 1500.On Windows 7 PC:Open a command line window as an Administrator (ie. right click on All Programs Accessories Command Prompt and select Run as administrator) .Type the command netsh and wait for promptType the command interface and wait for promptType the command ipv4 and wait for promptmubakhta@cisco.comMubashshir Akhtar7
Type the command set subinterface "Local Area Connection" mtu xxxx store persistentexit [Enter]Eg:C:\Users\mubakhta netshnetsh interfacenetsh interface ipv4netsh interface ipv4 set subinterface "Local Area Connection" mtu 1500 store persistentOk.Finally if everything goes well, you will see the file getting downloaded:TFTP from server 10.78.140.1; our IP address is 10.78.140.10Filename '/s52000tc5 1 4.pkg'.Load address: 0x2000000Loading: ##################ä#########doneBytes transferred 215957872 (cdf4170 hex)Once all the processing is complete, you will return to the same prompt. Type boot to start booting thecodec:FALCON bootConfigure FPGAs\ /Setting up Davinci HD (00.10.00). 675Mhz[DONE]Setting up Davinci HD (00.11.00). 675Mhz[DONE]Setting up Davinci HD (00.12.00). 675MhzJ [DONE]Setting up Davinci HD (00.13.00). 675MhzJ [DONE]Setting up Davinci HD (00.14.00). 675Mhz[DONE]Copy /flash/image1/arm/rootfs to 0x03000000.[DONE]Copy /flash/image1/arm/kernel to 0x02000000.[DONE]Copy /flash/image1/arm/u-boot.bin to 0x01000000.[DONE]Copy /flash/image1/kernel to 0x01000000.[DONE]Copy /flash/image1/rootfs to 0x02000000.[DONE]Copy /flash/image1/dtb3 to 0x03000000.[DONE]Unmounting yaffs2 mount point /flashYou should now see the login prompt and when you login as admin, the API should now be accessible:login: adminWelcome toTANDBERG Codec Release TC5.1.4.295090SW Release Date: 2012-08-10OKIf the codec still does not boot up, break the boot sequence again as shown in Step 3 and restore thecodec to factory default settings using the following command:FALCON setenv othbootargs factorydefaultOnce done boot the codec again and you should now be able to login.mubakhta@cisco.comMubashshir Akhtar8
TFTP Server: To store the package file from which the codec can download the file. DHCP Server: To assign an IP address to the codec so that it can communicate on LAN. Crossover Cable: To have IP connectivity to the codec Laptop: To give commands and input to the codec. Console cable: To have a means to be able to give commands to the codec.