Transcription
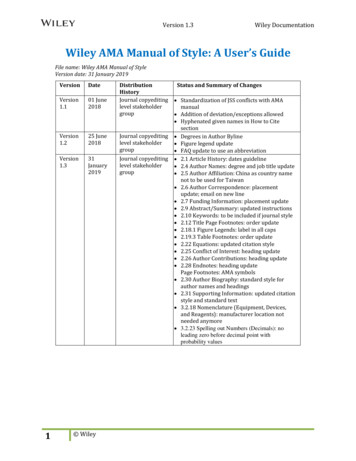
Educational Technologies Office Rowe 422edtech@uconn.edu860.486.5052HuskyCT User Guide: How to Upload Scantron (aka “Bubble Sheet”)GradesInstructors receive an email from ScantronX@uconn.edu (X refers to which device; I, 2, or a regional campusdevice) with the subject “Remark Results for Department” followed by the course information and instructors’NetID. This email contains a .zip file that instructors need to download. The .zip file contains a .csv file named“ExamGrades.csv” that is used to upload the grades to the HuskyCT Grade Center. There are also five reports in.pdf files, one or .rbbx files that integrate to BlackBoard, and three other files. These instructions cover how toconvert and upload the .csv file into HuskyCT.Step 1: Prepare your Scantron file for upload to HuskyCTStep 1A: Convert your fileIn order to easily upload Scantron grades into HuskyCT, instructors must now run the ExamGrades.csv file theyreceive in their email from Scantron through a file converter website. That website will match the student IDnumbers (aka PeopleSoft IDs) students enter on their bubblesheets with their NetIDs, which are necessary foruploading the file into HuskyCT and populating student test/exam grades in the Grade Center.Here is how to run your Scantron .csv file through the file converter website:--Open the ScantronReports.zip file you received with your email from the Scantron machine. (On somecomputers you may need to right-click and select “Extract” to access the files within the .zip package.)Save those files to your computer if you choose. You will need to upload the ExamGrades.csv file intothe converter website, so you will need to know where to find that file on your computer. Do not makeany changes to the ExamGrades.csv file prior to uploading it to the converter site.Go to https://scantronconverter.uconn.edu/Click on the “Choose File” button, and find the ExamGrades.csv file on your computer.Click “Submit.” The converter website will generate a new file called “converted scantron.csv” and this isthe file you will eventually upload to HuskyCT.Step 1B: Delete Columns Prior to HuskyCT UploadThe converted file has five columns: Student Name, ID, Username, Raw Score, and Percent Score. (Theconverter website matched students’ ID numbers to their NetIDs, which is what appears in the Usernamecolumn.) Remove the “Student Name” and ID columns. Also remove the score column you do not wish toimport (either Raw Score or Percent Score). You can change the name of the score column to however youwould like that column to appear in the HuskyCT Grade Center, i.e., Test 1, Exam 1, etc.NOTE: The file must be kept a .csv file and should contain TWO COLUMNS – the onewith the NetIDs and the one with the scores.
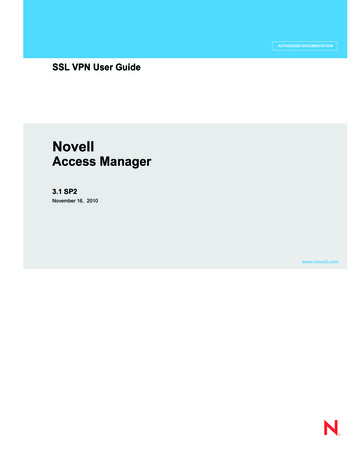
Rename the score column you want to upload, if you want it to be something other than Raw Score or PercentScore. If you plan to create the HuskyCT Grade Center column during the import, the name you choose will bethe name used for the new column (see Option 1). If you wish to load the scores into an existing column thename will need to exactly match that column’s title which includes a hidden ID (see Option 2).Step 2: Upload the .csv file to the Grade CenterAt the upper right of the Grade Center, click on “WorkOffline” and then on “Upload”Next, browse your computerfor your converted file, select“Comma” as the Delimitertype, and click “Submit”NOTE: A new column will be created during the upload to hold the uploaded grades (Option 1)unless the test score column title in the .csv file exactly matches the Grade Center column title(Option 2). This requires the addition of a special ID code, which is covered under Option 2below.Step 2 - OPTION 1: Adding a new Grade Center column for the test/exam grades during the uploadThe example .csv file above had “Test 1” as the title of the column forthe test scores. This title does not contain the special ID so when the filewas uploaded, a new column was created in the Grade Center with thename “Test 1”.Step 2 - OPTION 2: Populating grades into an existing column2
In this case, a column was previously created in the HuskyCT Grade Centerusing the “Create Column” function and “Test 1” was entered into the“Column Name” field. Go to the Grade CenterClick on the gray down arrow to the right of the column titleClick on the option “Quick Column Information”Copy down the Column IDAdd the Column ID to the column title as follows:Add “ column #” to the title of the grade columnNOTE: Another way to retrieve the exact column title of the Grade Center column is to Download the GradeCenter as a .csv file and then copy/paste the column title from there into the .csv file being prepared for theupload of the test scores.3
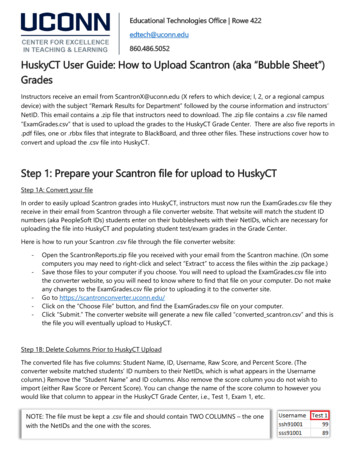
Step 3: Changing the column Primary Display from “Text” to “Score”By default, uploading grade values from a .csv file into the Grade Center sets the Primary Display to “Text.” In order forthose grades to count towards any calculations, that setting must be changed to “Score.”Click the gray down arrow next to the column title, then choosethe option “Edit Column Information”Click on the down arrow for thePrimary Display menu, thenchange the Display Type to“Score”Enter the Points PossibleClick “Submit”Click “OK” on thewarning message4
The test scores should now displaywith decimal places.Still need help?For further information or assistance with HuskyCT, please contact the Educational Technology Office atedtech@uconn.edu or 860-486-5052.5
HuskyCT User Guide: How to Upload Scantron (aka “Bubble Sheet”) Grades Instructors receive an email from ScantronX@uconn.edu (X refers to which device; I, 2, or a regional campus device) with the subject “Remark Results for Department” followed by the course information and instructors’ NetID. This email contains a .zip file that instructors need to download. The .zip file contains a .