Transcription
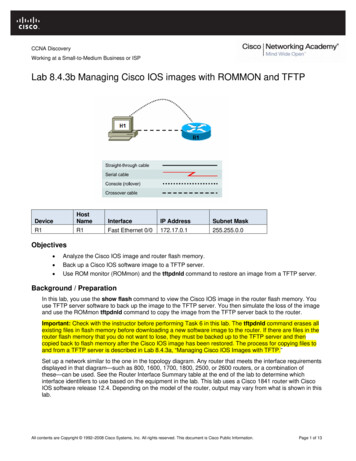
CCNA DiscoveryWorking at a Small-to-Medium Business or ISPLab 8.4.3b Managing Cisco IOS images with ROMMON and TFTPDeviceHostNameInterfaceIP AddressSubnet MaskR1R1Fast Ethernet 0/0172.17.0.1255.255.0.0Objectives Analyze the Cisco IOS image and router flash memory. Back up a Cisco IOS software image to a TFTP server. Use ROM monitor (ROMmon) and the tftpdnld command to restore an image from a TFTP server.Background / PreparationIn this lab, you use the show flash command to view the Cisco IOS image in the router flash memory. Youuse TFTP server software to back up the image to the TFTP server. You then simulate the loss of the imageand use the ROMmon tftpdnld command to copy the image from the TFTP server back to the router.Important: Check with the instructor before performing Task 6 in this lab. The tftpdnld command erases allexisting files in flash memory before downloading a new software image to the router. If there are files in therouter flash memory that you do not want to lose, they must be backed up to the TFTP server and thencopied back to flash memory after the Cisco IOS image has been restored. The process for copying files toand from a TFTP server is described in Lab 8.4.3a, “Managing Cisco IOS Images with TFTP.”Set up a network similar to the one in the topology diagram. Any router that meets the interface requirementsdisplayed in that diagram—such as 800, 1600, 1700, 1800, 2500, or 2600 routers, or a combination ofthese—can be used. See the Router Interface Summary table at the end of the lab to determine whichinterface identifiers to use based on the equipment in the lab. This lab uses a Cisco 1841 router with CiscoIOS software release 12.4. Depending on the model of the router, output may vary from what is shown in thislab.All contents are Copyright 1992–2008 Cisco Systems, Inc. All rights reserved. This document is Cisco Public Information.Page 1 of 13
CCNA DiscoveryWorking at a Small-to-Medium Business or ISPRequired ResourcesThe following resources are required: One router with an Ethernet interface One Windows XP computer (or Discovery Server) Crossover Category 5 Ethernet cable (H1 to router R1) Console cable (from H1 to R1) Access to the computer host command prompt Access to the computer host network TCP/IP configurationNote: Instead of using a PC and installing TFTP server software, you may use the Discovery Server, whichhas Linux-based TFTP server software pre-installed. Check with the instructor on the availability of aDiscovery Server CD. The Discovery Server can take the place of host H1 in the topology diagram. The IPaddresses used to configure host H1 and R1 in this lab are compatible with the Discovery Server.From host H1, start a HyperTerminal session to the attached router.Note: Make sure that the router has been erased and has no startup configurations. Instructions for erasingare provided in the Lab Manual, located on Academy Connection in the Tools section. Check with theinstructor if you are unsure of how to do this.Task 1: Build the Network and Verify ConnectivityStep 1: Configure the TFTP server host.Connect the router and host H1 according to the topology diagram. Configure host H1 IP address with thefollowing settings.IP address: 172.17.0.2Subnet mask: 255.255.0.0Default gateway: 172.17.0.1Step 2: Log in to router R1 and configure the basic settings.a. Configure the host name for R1.Router enableRouter#configure terminalRouter(config)#hostname R1b. Configure a console, vty, and enable secret passwords. Configure synchronous logging for theconsole line.R1(config)#line console 0R1(config-line)#password ciscoR1(config-line)#loginR1(config-line)#logging synchronousR1(config-line)#line vty 0 4R1(config-line)#password onfig)#enable secret classR1(config)#exitc.Configure a message-of-the-day (MOTD) banner using and no ip domain lookup.R1(config)#banner motd #Unauthorized Use Prohibited#R1(config)#no ip domain lookupAll contents are Copyright 1992–2008 Cisco Systems, Inc. All rights reserved. This document is Cisco Public Information.Page 2 of 13
CCNA DiscoveryWorking at a Small-to-Medium Business or ISPd. Configure the R1 Fast Ethernet interface.R1(config)#interface FastEthernet 0/0R1(config-if)#description R1 LAN Default GatewayR1(config-if)#ip address 172.17.0.1 255.255.0.0R1(config-if)#no shutdownR1(config-if)#endStep 3: Display the R1 router configuration.Issue the show running-config command in privileged EXEC mode, and verify all the configurationcommands that you have entered so far. Note that this command can be abbreviated as sh run.R1#show running-configStep 4: Verify basic connectivity.Host H1 will be the TFTP server, and router R1 will be the TFTP client. To copy files to and from a TFTPserver, you must have IP connectivity between the server and the client.From host H1, ping the router Fast Ethernet interface at IP address 172.17.0.1. Are the pings successful?If the pings are not successful, troubleshoot the host and router configs until they are.Step 5: Save the configuration on R1.Save the running configuration to the startup configuration from the privileged EXEC prompt.R1#copy running-config startup-configTask 2: Collect Router Memory and Image InformationStep 1: Collect information to document the router.a. From the router HyperTerminal session, issue the show version command.Router show versionb. What is the value of the config-register?c.How much flash memory does this router have?d. What is the version number of the boot ROM?Step 2: Collect information about flash memory.a. Issue the show flash command.Router show flashb. Is the Cisco IOS image already stored in flash?c.If yes, what is the exact name of that file?d. What is the size of the image in flash memory?e. How much flash is available or unused?f.To what value is the configuration register set?Note: There must be enough flash memory to hold the new Cisco IOS image.g. How many files are in Flash memory?All contents are Copyright 1992–2008 Cisco Systems, Inc. All rights reserved. This document is Cisco Public Information.Page 3 of 13
CCNA DiscoveryWorking at a Small-to-Medium Business or ISPR1 show flash-#- Mar 15 2007 07:03:50May 18 2007 14:25:40May 18 2007 14:25:40May 18 2007 14:25:42May 18 2007 14:25:44May 18 2007 14:25:54May 18 2007 14:26:04May 18 2007 14:25:42Mar 15 2007 07:23:20Mar 15 2007 slclient-win-1.1.0.154.pkg31121408 bytes available (32874496 bytes used)Task 3: Use TFTP to Save the Cisco IOS ImageStep 1: Obtain and install the TFTP server application.There are many free TFTP servers available. A search for “free TFTP server” identifies several you canchoose from to download. This lab uses the free SolarWinds TFTP Server application. SolarWinds is amultithreaded TFTP server commonly used to upload and download executable images andconfigurations to routers and switches. It runs on most Microsoft operating systems, includingWindows XP, Vista, 2000, and 2003. The SolarWinds software requires the Microsoft .NET 2.0framework to install.Note: Check with the instructor for a copy of SolarWinds or another TFTP server that you can install.a. Go to the SolarWinds website and download the free TFTP server software and save it to yourdesktop.http://www.solarwinds.com/downloads/b. Double-click on the SolarWinds TFTP application to begin installation. Select Next. Agree to thelicense agreement, and accept default settings. After the installation has finished, click Finish.Step 2: Start the TFTP application.Start the TFTP server by choosing Start Programs SolarWinds TFTP Server TFTP Server.All contents are Copyright 1992–2008 Cisco Systems, Inc. All rights reserved. This document is Cisco Public Information.Page 4 of 13
CCNA DiscoveryWorking at a Small-to-Medium Business or ISPStep 3: Configure the TFTP server.a. To configure the TFTP server, choose File Configure. The screen displayed should be similar tothe following. On the General tab, check that the default TFTP Server Root Directory is set toC:\TFTP-Root.All contents are Copyright 1992–2008 Cisco Systems, Inc. All rights reserved. This document is Cisco Public Information.Page 5 of 13
CCNA DiscoveryWorking at a Small-to-Medium Business or ISPb. Click on the Security tab. Check that Permitted Transfer Types is set to Send and Receive files,and set IP Address Restrictions to allow transfers from only the router R1 Fast Ethernet 0/0 IPaddress (172.17.0.1 To 172.17.0.1).c.In the General tab, click the Start button to activate the TFTP Server.d. When finished, click OK. The screen should look similar to the following.All contents are Copyright 1992–2008 Cisco Systems, Inc. All rights reserved. This document is Cisco Public Information.Page 6 of 13
CCNA DiscoveryWorking at a Small-to-Medium Business or ISPe. On which well-known UDP port number is the TFTP server operating?f.Leave the TFTP Server window open so that you can view the activity as the file is copied.Step 4: Save the R1 Cisco IOS image file to TFTP server.a. Write down the Cisco IOS image filename that you will be copying.b. From the HyperTerminal session on router R1, begin uploading the Cisco IOS image to the TFTPserver using the copy flash tftp command. Respond to the prompts as shown below, but replace theimage filename shown with the one on your router.R1#copy flash tftpSource filename []? c1841-advipservicesk9-mz.124-10b.binAddress or name of remote host []? 172.17.0.2Destination filename !!!!!!!!!!!!!!!!!!!!!!!!!!!22063220 bytes copied in 58.264 secs (378677 bytes/sec)Step 5: Verify the TFTP server activity.a. Observe the TFTP Server window, which shows the connection entries for the transfer of the runningconfig file to the server. The output should look similar to the following.b. Use Windows Explorer to examine the contents of folder C:\TFTP-Root\ on the host H1 TFTP server.Verify the flash image size in the TFTP server directory. The file size in the show flash commandshould be the same size as the file stored on the TFTP server. If the file sizes are not identical, checkwith the instructor. The IOS image file should be listed similar to the one shown in the screen below.All contents are Copyright 1992–2008 Cisco Systems, Inc. All rights reserved. This document is Cisco Public Information.Page 7 of 13
CCNA DiscoveryWorking at a Small-to-Medium Business or ISPTask 4: Consider IOS Restoration OptionsThere are several options for restoring a corrupted or missing Cisco IOS image.Option 1. Using ROMmon and tftpdnld (part of this lab) – This option can be used if the image ismissing or corrupt. The router boots up in ROMmon mode if this is the case. Ethernet and IP connectivitymust be available to access the TFTP server.Option 2. Using ROMmon and xmodem (not part of this lab) – This option is used as an emergencywhen the Cisco IOS image is missing or corrupt and there is no possibility of downloading a new versionfrom a TFTP server. The xmodem command is used at the console to download Cisco IOS softwareusing ROMmon and HyperTerminal. This procedure can also be used if there are no TFTP servers ornetwork connections, and a direct PC connection through the console (or through a modem connection) isthe only viable option. Because this procedure relies on the console speed of the router and the serial portof the PC, it can take a long time to download an image. Depending on the image size and the consolebaud rate, the download can take several hours.Option 3. Replacing the flash card (not part of this lab) – If the router only boots up in ROMmon mode,you may be able to recover the image if you have a similar router with a compatible flash card. You candownload the correct Cisco IOS image on that router, and then move the flash card to the router that hasa problem.Task 5: Working in ROMmon ModeStep 1: Configure the boot register to enter ROMmon mode.Typically, if the Cisco IOS software image is corrupt, the router only boots up in ROMmon mode.You will simulate the loss of the Cisco IOS image by changing the router config-register so that it boots upto the rommon prompt. The config register is normally set to 0x2102 to enable the router to boot theCisco IOS image from flash. See the show version command output in Task 2, Step 1 to see the configregister setting.a. Change the configuration register to 0x2100 to cause the router to start up in ROMmon mode.Router enableRouter#configure terminalEnter configuration commands, one per line. End with CNTL/Z.Router(config)#config-register 0x2100Router(config)#exitRouter#All contents are Copyright 1992–2008 Cisco Systems, Inc. All rights reserved. This document is Cisco Public Information.Page 8 of 13
CCNA DiscoveryWorking at a Small-to-Medium Business or ISPb. Issue the show version command to verify that the new config register setting will take effect at thenext reload. What is the last line of the show version output?c.Issue the reload command to restart the router.Router#reloadSystem Bootstrap, Version 12.4(13r)T, RELEASE SOFTWARE (fc1)Technical Support: http://www.cisco.com/techsupportCopyright (c) 2006 by cisco Systems, Inc.PLD version 0x10GIO ASIC version 0x127c1841 platform with 196608 Kbytes of main memoryMain memory is configured to 64 bit mode with parity disabledUpgrade ROMMON initializedrommon 1 Step 2: View available commands from the ROMmon prompt.Enter a question mark (?) at the ROMmon prompt.rommon 2 ?aliasset and display aliases commandbootboot up an external processbreakset/show/clear the breakpointconfregconfiguration register utilitycontcontinue executing a downloaded imagecontextdisplay the context of a loaded imagecookiedisplay contents of motherboard cookie PROM in hexdevlist the device tabledirlist files in file systemdisdisassemble instruction streamdnldserial download a program moduleframeprint out a selected stack framegioshowshow the gio versionhelpmonitor builtin command helphistorymonitor command historyiomemsetset IO memory percentmeminfomain memory informationrepeatrepeat a monitor commandresetsystem resetrommon-prefSelect ROMMONsetdisplay the monitor variablesshowmondisplay currently selected ROM monitorstackproduce a stack tracesyncwrite monitor environment to NVRAMsysretprint out info from last system returntftpdnldtftp image downloadunaliasunset an aliasunsetunset a monitor variablexmodemx/ymodem image downloadStep 3: Find a valid image in flash.In some cases, a Cisco IOS image fails to load properly, and the router boots to the ROMmon prompt, butthe image may still be valid. There may also be more than one image in flash memory. You can use theboot command at the ROMmon prompt to attempt to load a single image, or you can select from multipleimages in flash if they exist.All contents are Copyright 1992–2008 Cisco Systems, Inc. All rights reserved. This document is Cisco Public Information.Page 9 of 13
CCNA DiscoveryWorking at a Small-to-Medium Business or ISPa. From the ROMmon prompt, issue the dir flash: command. Look for a valid Cisco IOS softwareimage.rommon 3 dir flash:program load complete, entry point: 0x8000f000, size: 0xcb80Directory of 10385971473446471271821712816845777540398305rommon 4 -k9.pkgsslclient-win-1.1.0.154.pkgb. Boot from any image that is listed in the previous step (typically files with a .bin extension). If theimage is valid, it brings back normal operation.rommon 4 boot flash:c1841-advipservicesk9-mz.124-10b.binprogram load complete, entry point: 0x8000f000, size: 0x150a6d4Self decompressing the image #################################### .c.Restart the router using the reload command. It comes up in ROMmon mode again, because theconfig register is still set to 0x2100.Step 4: Reset the config register so that the router boots from flash on the next reload.From the ROMmon prompt, set the boot register back to 0x2102, before the Cisco IOS image transfer,using the confreg command. Depending on the router model and ROMmon prompt, you may need to usethe o/r command.Note: The number at the ROMmon prompt increments with each command issued.rommon 5 confreg 0x2102or o/r 0x2102The router responds with:You must reset or power cycle for new config to take effectrommon 6 Note: Do not reset the router at this time.Task 6: Use ROMmon and tftpdnld to Restore a Cisco IOS Image (Optional)Important: Check with the instructor before performing Task 6 in this lab. The tftpdnld command erases allexisting files in flash memory before downloading a new software image to the router. If there are files in therouter flash memory that you do not want to lose, they must be backed up to the TFTP server and thencopied back to flash memory after the Cisco IOS image has been restored. The process for copying files toand from a TFTP server is described in Lab 8.4.3a, “Managing Cisco IOS Images with TFTP.”Note: If performing this task presents a problem to the lab environment, just read through the steps tobecome familiar with the procedure.All contents are Copyright 1992–2008 Cisco Systems, Inc. All rights reserved. This document is Cisco Public Information.Page 10 of 13
CCNA DiscoveryWorking at a Small-to-Medium Business or ISPStep 1: Use the tftpdnld command to transfer the image.a. Record the name of the Cisco IOS image displayed in the show flash output in Task 2, Step 2. Thisfile was saved to the TFTP server.b. The ROMmon TFTP transfer works only on the first LAN port. To use TFTP in ROMmon mode, youmust first set a few environmental variables, including the IP address of the LAN interface, and thenuse the tftpdnld command to restore the image. To set a ROMmon environment variable, type thevariable name, an equal sign ( ), and the value for the variable. For example, to set the IP address to172.17.0.1, type IP ADDRESS 172.17.0.1.Commonly required environment variables are:IP ADDRESS – IP address on the LAN interfaceIP SUBNET MASK – Subnet mask for the LAN interfaceDEFAULT GATEWAY – Default gateway for the LAN interfaceTFTP SERVER – IP address of the TFTP serverTFTP FILE – Cisco IOS filename on the serverEnter the environment variables as follows (be sure to replace the image name with the one for therouter that you are using).rommonrommonrommonrommonrommonc.7 IP ADDRESS 172.17.0.18 IP SUBNET MASK 255.255.0.09 DEFAULT GATEWAY 172.17.0.110 TFTP SERVER 172.17.0.211 TFTP FILE c1841-advipservicesk9-mz.124-10b.binUse the set command to view and verify the ROMmon environment variables.rommon 12 setPS1 rommon ! BSI 0RANDOM NUM 1770598170WARM REBOOT RET 2 RTS 18:04:12 UTC Mon Feb 25 2008RET 2 RCALTS 1203962657? 0IP ADDRESS 172.17.0.1IP SUBNET MASK 255.255.0.0TFTP SERVER 172.17.0.2TFTP FILE c1841-advipservicesk9-mz.124-10b.bind. Use the tftpdnld command to start the Cisco IOS image transfer from the TFTP server. As eachdatagram of the Cisco IOS file is received, an exclamation point (!) is displayed. When the entireCisco IOS file is copied, the flash is erased and the new image file is written.rommon 13 tftpdnldIP ADDRESS:IP SUBNET MASK:DEFAULT GATEWAY:TFTP SERVER:TFTP FILE:TFTP MACADDR:TFTP VERBOSE:TFTP RETRY COUNT:TFTP TIMEOUT:TFTP :6eProgress187200YesAll contents are Copyright 1992–2008 Cisco Systems, Inc. All rights reserved. This document is Cisco Public Information.Page 11 of 13
There are many free TFTP servers available. A search for “free TFTP server” identifies several you can choose from to download. This lab uses the free SolarWinds TFTP Server application. SolarWinds is a multithreaded TFTP server commonly used to upload and download executable images and configurations to routers and switches.