Transcription
User Manual3CX VOIP client / Soft phoneVersion 6.0VoIPonwww.voipon.co.uk sales@voipon.co.ukTel: 44 (0)1245 808195Fax: 44 (0)1245 808299
Information in this document is subject to change without notice. Companies’ names anddata used in examples herein are fictitious unless otherwise noted. No part of thisdocument may be reproduced or transmitted in any form or by any means, electronic ormechanical, for any purpose, without the express written permission of 3CX Ltd.3CX Phone System for Windows is copyright of 3CX Ltd.3CX is a registered trademark, and 3CX Phone System for Windows and the 3CX logoare trademarks of 3CX Ltd. in Europe, the United States and other countries.Version 6.0 – Last updated 11 June 2008VoIPonwww.voipon.co.uk sales@voipon.co.ukTel: 44 (0)1245 808195Fax: 44 (0)1245 808299
VoIPonwww.voipon.co.uk sales@voipon.co.ukTel: 44 (0)1245 808195Fax: 44 (0)1245 808299
Table of ContentsInstalling 3CX VOIP client . 5What is the 3CX VOIP client?. 5Installing 3CX VOIP client . 5Configuring 3CX VOIP client for use on the local LAN. 5Configuring a Remote Connection . 6Configuring a remote connection using the 3CX Tunnel . 6Configuring a “direct” remote connection . 8Configuring a connection to a 3rd party VOIP provider/SIP server . 9Using the 3CX VOIP client . 11Introduction . 11Using the 3CX VOIP client as a SIP phone . 11Making calls . 11Answering Calls . 12Transferring calls. 12Transferring calls to voice mail . 13Recording a call . 13Call History. 14Adjusting Microphone level. 14Using 3CX VOIP client with a desk phone. 15Features common to both VOIP client and Soft phone mode . 15Status screen . 15Extension, Line & Queue Status. 16Specifying Away/Available status . 16Preferences. 16Launching calls from Microsoft Outlook . 19Introduction . 19Call Queues . 21Logging into a Call Queue . 21VoIPonwww.voipon.co.uk sales@voipon.co.ukTel: 44 (0)1245 808195Fax: 44 (0)1245 808299
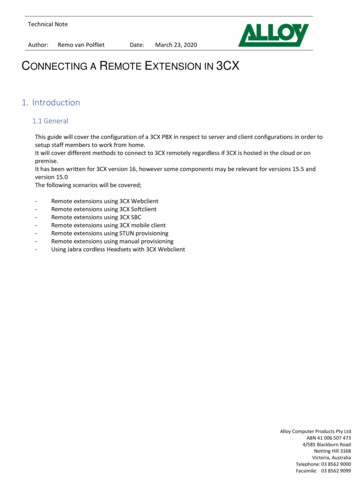
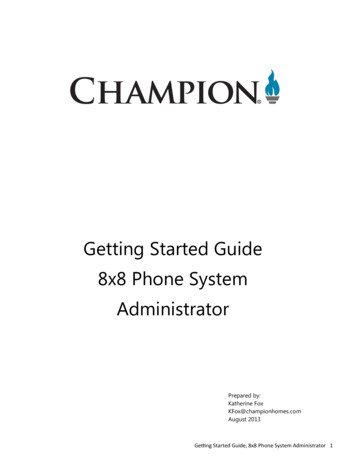
3CX Phone System for Windows System for Windowswww.3cx.comInstalling 3CX VOIP clientWhat is the 3CX VOIP client?The 3CX VOIP Client is a small Windows application that allows you to make and receivecalls via your desktop phone or using a headset connected directly to your computer.You can see the extension numbers of other users and whether they are available to takecalls. Important is that you can use the 3CX VOIP client without having to use the headset - you can continue to use your desk based phone if you prefer.The 3CX VOIP client ships with all editions of 3CX Phone System, including the Freeedition. However, in the Small Business, Pro and Enterprise editions, the 3CX VOIP clientallows you to see the presence of other users on the phone system. In the FREE edition,other extensions appear greyed out.Installing 3CX VOIP clientThe 3CX VOIP client is a small application and is easy install:1. Download the latest 3CX VOIP client 2. Click ‘Run’ to execute the setup process. You will be prompted for your preferredinterface language and to select a location.3. The files will be copied. Click Finish to complete installation.Configuring 3CX VOIP client for use on the local LANThe first time you start the 3CX VOIP client, you will have to configure a number ofoptions.Screenshot 1 – Login to 3CX Phone SystemTo set-up 3CX VOIP client:1. Start 3CX VOIP client from the 3CX VOIP Client program group or by doubleclicking on the tray icon.Page 5VoIPonwww.voipon.co.uk sales@voipon.co.ukTel: 44 (0)1245 808195Fax: 44 (0)1245 808299
3CX Phone System for Windows System for Windows2. In the connection drop down, you can specify which connection/location profiles 3CXVOIP client should use. For now leave the default ‘In Office’ for first setup. See thefollowing paragraph for more information on creating additional connection/locationprofiles.3. In the top field enter the hostname or IP of the machine which has 3CX PhoneSystem installed.4. Enter your extension number and your voice mail pin number (By default the PIN isthe same as your extension number) You can change this from your voice mailmenu or from the user portal.5. Now select whether you are using a desk phone, or whether you are using aheadset connected directly to your computer. In this case, 3CX VOIP client will actas a soft phone.6. Click OK to start 3CX VOIP client. Once you have logged in successfully, yourextension number will be shown in the phone screen.Configuring a Remote Connection3CX VOIP client can be used both on the local network, as well as from a remotenetwork, for example from home. In this case you will need to create differentlocation/connection profiles, since the network connection settings are different.This feature requires help from your administrator, who will need to give you the rightnetwork settings as well as tell you whether you should use the 3CX Tunnel feature ormake a ‘direct’ connection.Configuring a remote connection using the 3CX TunnelTo simplify firewall configuration, you can use the 3CX Tunnel feature, which tunnels allSIP traffic over a single TCP Port. To set-up a connection profile using a 3CX Tunnel:1. Select File Connections from the menuPage 6VoIPonwww.voipon.co.uk sales@voipon.co.ukTel: 44 (0)1245 808195Fax: 44 (0)1245 808299
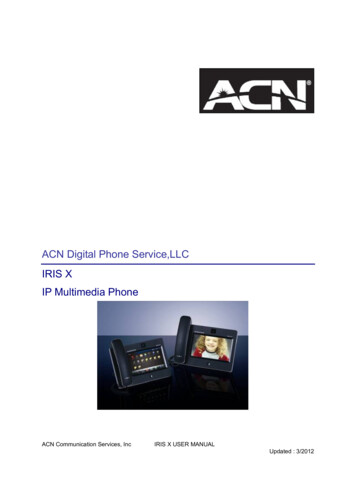
3CX Phone System for Windows System for WindowsScreenshot 2 –Creating an Out of the Office Connection2. In the Connection Settings dialog, click on the ‘Out of Office’ connection and specifythe internal IP of 3CX Phone System on the right hand side.3. In the section ‘Authentication’, select ‘3CX Phone System’ and enter your extensionnumber and pin code.4. Click on the tab ‘Tunnel’. Tick the option ‘Use 3CX tunnel’ and then specify the publicIP and port of the 3CX Phone System machine in the field “Remote end of Tunnel’. Bydefault this is 5090.5. Click Connect to check that the tunnel is working. The Tunnel status will show youwhether connection has been successful.6. Click on the OK button to exit the dialog. You can rename the profile by right-clickingon the profile and giving it a different name.To switch to ‘Outside the office mode’ from within the phone, select ‘Action Connection Out side the office’ from the menu. The connection will be re-established with the newconnection settings.Note: If you wish to use a 3CX Tunnel installed on a different host, simply enter the IP ofthe host with the 3CX Tunnel service installed. In this case you must configure theRemote end of the Tunnel on the machine using the tunnel.Page 7VoIPonwww.voipon.co.uk sales@voipon.co.ukTel: 44 (0)1245 808195Fax: 44 (0)1245 808299
3CX Phone System for Windows System for WindowsConfiguring a “direct” remote connectionUsing the ‘direct’ mode requires that your administrator has setup the firewall in front of3CX Phone System correctly, as well as that your NAT device can handle VOIP. Mostmodern home routers (Linksys, Netgear and so on) are now capable of handling VOIPcorrectly.To create an Out of Office connection that does NOT use a 3CX Tunnel:1. Select File Connections from the menuScreenshot 3–Creating an Out of the Office Connection2. In the Connection Settings dialog, click on the ‘Out of Office’ connection and specifythe public IP of 3CX Phone System on the right hand side.3. In the section ‘Authentication’, select ‘3CX Phone System’ and enter your extensionnumber and pin code.4. Click on the tab ‘GENERAL and enable the option “Use STUN – Resolved Public IPAddress’. Leave the default STUN server or enter another one.5. Now click ‘Apply’. You can rename the profile by right-clicking on the profile and give ita different name.To switch to ‘Outside the office mode’ from within the phone, select ‘Action Connection Out side the office’ from the menu. The connection will be re-established with the newconnection settings.Page 8VoIPonwww.voipon.co.uk sales@voipon.co.ukTel: 44 (0)1245 808195Fax: 44 (0)1245 808299
3CX Phone System for Windows System for WindowsConfiguring a connection to a 3rd party VOIP provider/SIP serverIf you want to create connection that must connect to a VOIP provider, or another SIPserver (for example Asterisk), then create the connection as follows:1. Select File Connections from the menu. Click on the ‘Add’ button to create a newconnection profile.Screenshot 4 –Creating an Out of the Office Connection2. Now specify the IP of the VOIP provider or SIP server on the right hand side. If indoubt, contact your administrator.3. In the section ‘Authentication’, select ‘SIP server / VOIP provider’ and enter theAccount (usually your VOIP provider number or Extension number) and your assignedAuthentication ID and Password.4. If connecting to a VOIP provider or remote SIP server, click on the tab ‘STUN andenable the option “Use STUN – Resolved Public IP Address’. Leave the default STUNserver or enter another one.5. Now click ‘Apply’ to save the connection profile.To switch to this connection from within the phone, select ‘Action Connection Connection name’ from the menu. The connection will be re-established with the newconnection settings.Page 9VoIPonwww.voipon.co.uk sales@voipon.co.ukTel: 44 (0)1245 808195Fax: 44 (0)1245 808299
VoIPonwww.voipon.co.uk sales@voipon.co.ukTel: 44 (0)1245 808195Fax: 44 (0)1245 808299
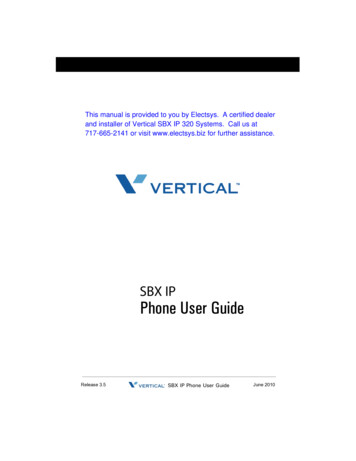
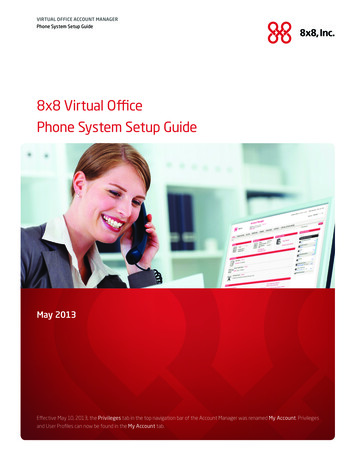
3CX Phone System for Windows System for WindowsUsing the 3CX VOIP clientIntroduction3CX VOIP client can work as a soft phone and it can work in combination with a deskphone. You can use a desk phone and the 3CX soft phone at the same time. (Because3CX supports SIP forking). In this way you can make and receive calls on either the deskphone or the soft phone, whichever is more convenient at the time.This chapter explains how to use 3CX VOIP client as a soft phone, then explains how itcan be used with a desk phone and finally it discusses the common features, available inboth ‘modes’.Using the 3CX VOIP client as a SIP phoneScreenshot 5 - 3CX VOIP client in SIP phone mode1. Dial Pad2. Phone functions3. Lines4. Status screen5. Phone modes6. Status panel7. Dial8. Hang upIf you selected to use 3CX VOIP client with a head set, then the 3CX VOIP client will workas a SIP Phone, and the interface will resemble a phone.Making callsTo make a call, simply dial the number on the keypad using your mouse, or enter thenumber using your keypad. Click the green buttonor hit the enter key to instruct thephone to dial the number. 3CX VOIP client will make the call on the first available line.Page 11VoIPonwww.voipon.co.uk sales@voipon.co.ukTel: 44 (0)1245 808195Fax: 44 (0)1245 808299
3CX Phone System for Windows System for WindowsAnswering CallsAs soon as a call comes in, 3CX VOIP client will ring and show the incoming call on thescreen of the phone. It will also pop up a small dialog in the system tray informing you ofthe new call.Screenshot 6 – Answering CallsThe incoming call will light up the LED on the first available line.To answer the call, click on the answer buttonor hit the ‘Enter’ key.To reject the call, click on the red hang-up button or hit the ‘Escape’ key. The caller will betreated as if your phone was busy. The forwarding settings for ‘Call Busy’ will betriggered.You can answer a call by hitting the “Enter” key, or cancel a call by hitting the“Escape” keyNote: If you already have a call active, the call will be received on the second line, andthe LED on the second line will flash. To answer this call, click on the line 2 button first.Your call on line 1 will automatically be put on hold and the LED one line 1 will flash.Transferring callsBlind transferA blind transfer transfers the call to another extension without first speaking to the targetextension. There are 2 ways to perform a blind transfer:Method 11. Click on the transfer button2. Dial the destination number or double-click on the extension in the status panel andclick on the dial buttonor hit the ‘Enter’ key.Method 21. Select the ‘Transfer Call’ option from the Action menu2. Enter the extension number to which you want to transfer the call and click OKAttended transferAn attended transfer is performed by first calling the target extension and speaking to theperson who is to take the call. There are 2 ways to perform an attended transfer:Page 12VoIPonwww.voipon.co.uk sales@voipon.co.ukTel: 44 (0)1245 808195Fax: 44 (0)1245 808299
3CX Phone System for Windows System for WindowsMethod 11. Select the Attended Transfer option from the Action menu2. Enter the extension number to which you want to transfer the call and click OK.3. After you have introduced the caller to the user of the extension, click on the transferbutton to transfer the call.Method 21. Click on the ‘Line 2’ button and dial the number of the extension you wish to reach.Alternatively double-click on the extension in the status panel. The call on ‘Line 1’ willautomatically be put on hold.2. After you have introduced the caller to the user of the extension, click on the transferbutton and click on ‘Line 1’ to connect both extensions.Transferring calls to voice mailIf you are unable to take a call, you can transfer the call to your Voice mail. You can dothis by clicking on the icon in the menu bar, or the menu item Action Transfer to Voicemail. The caller will be transferred to your voice mail box where he can leave a message.Recording a callScreenshot 7 – Recording a callYou can record a call simply by clicking on the record call button. This will record thecurrent call in progress and save it as a wav file on the server. To get access to therecording, contact your administrator.Page 13VoIPonwww.voipon.co.uk sales@voipon.co.ukTel: 44 (0)1245 808195Fax: 44 (0)1245 808299
3CX Phone System for Windows System for WindowsCall HistoryScreenshot 8 – Viewing Call HistoryYou can view the history of calls received and placed by clicking on the ‘History’ button.To place a call to a number in the call history, simply double-click on the number tolaunch a call to that number. Alternatively select the entry and click the Redial button.Adjusting Microphone levelScreenshot 9 - Adjusting the Microphone levelThe microphone audio level is set by the sound card driver in Windows. To adjust it:1. Go to Windows Control Panel and double click on ‘Sounds and Audio Devices’. In theAudio tab, click on the Volume button in the Sound Recording section, then use thesliders to adjust the microphone recording level.Page 14VoIPonwww.voipon.co.uk sales@voipon.co.ukTel: 44 (0)1245 808195Fax: 44 (0)1245 808299
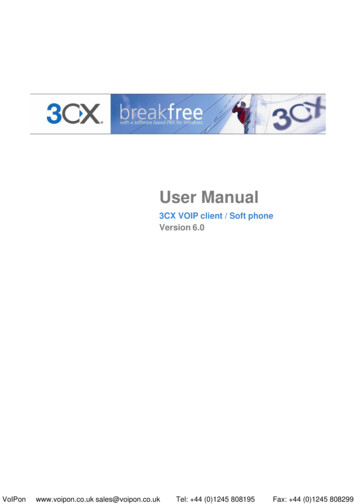
3CX Phone System for Windows System for Windows2. Alternatively, double click the speaker icon in the Windows taskbar. Go to Propertiesand from the Mixer device drop down menu select an Input device, click on OK tocontinue. Moving the sliders up or down will adjust the microphone recording levelaccordingly.Using 3CX VOIP client with a desk phoneScreenshot 10 – Using the VOIP client as a desk phoneIf you selected to use 3CX VOIP client with a desk phone, the interface will not have adial pad – all phone calls will be made and received via your desk phone. However, youcan see the status of other users on the phone system, as well as monitor extensionstatus via the status screen.Features common to both VOIP client and Soft phone modeStatus screen1.Extension number2.3.Soft Phone/Desktop modeIn office/Out of office mode4. Voicemail5. Available/AwayScreenshot 11 – Status ScreenPage 15VoIPonwww.voipon.co.uk sales@voipon.co.ukTel: 44 (0)1245 808195Fax: 44 (0)1245 808299
3CX Phone System for Windows System for WindowsThe status screen on the phone summarizes important information. It shows·Your extension number and name·If you have voice mail waiting and if so, how many·Whether you are using a desk phone or using the client as a SIP phone·Whether your phone is set to ‘in the office’ or ‘out of the office’ mode·Whether your status is set to ‘Available’ or ‘Away’Furthermore, when you make or receive a call, the number to be dialled OR the caller IDof the caller is shown in the middle of the status screen. Just below it you will getinformation messages about the progress of the call.Extension, Line & Queue Status3CX VOIP client has an ‘Operator panel’ which allows you to see the status of otherusers. In the FREE edition, other extensions will appear as greyed out. Presenceinformation is only available in the commercial editions.Screenshot 12 - Presence filter buttonsBy default all extensions, lines and queues are listed, however you can filter them usingthe tool bar buttons.Screenshot 13 - Adding / Removing columnsIf you do not want to expand the columns, and not all the extensions fit, you can click onthe arrow buttons to browse the remaining extensions in the last available column.Specifying Away/Available statusScreenshot 14 – Specifying Away statusIf you temporarily can not answer the phone, you can specify that you are ‘Away’. Thiswill show your colleagues that you are not in a position to answer calls.All calls that do get sent to your extension will be handled according to the “Phone busy”setting configured for your extension.To set your extension status, select “Available” or “Away” from the toolbar. Note that thissetting will persist even if you shut down 3CX VOIP client!PreferencesThe preferences dialog allows you to set your 3CX VOIP client preferences. You canchange your extension options by click
Configuring 3CX VOIP client for use on the local LAN The first time you start the 3CX VOIP client, you will have to configure a number of options. Screenshot 1 – Login to 3CX Phone System To set-up 3CX VOIP client: 1. Start 3CX VOIP client from the 3CX VOIP Client