Transcription
Technical NoteAuthor:Remo van PolflietDate:March 23, 2020CONNECTING A REMOTE EXTENSION IN 3CX1. Introduction1.1 GeneralThis guide will cover the configuration of a 3CX PBX in respect to server and client configurations in order tosetup staff members to work from home.It will cover different methods to connect to 3CX remotely regardless if 3CX is hosted in the cloud or onpremise.It has been written for 3CX version 16, however some components may be relevant for versions 15.5 andversion 15.0The following scenarios will be covered;-Remote extensions using 3CX WebclientRemote extensions using 3CX SoftclientRemote extensions using 3CX SBCRemote extensions using 3CX mobile clientRemote extensions using STUN provisioningRemote extensions using manual provisioningUsing Jabra cordless Headsets with 3CX WebclientAlloy Computer Products Pty LtdABN 41 006 507 4734/585 Blackburn RoadNotting Hill 3168Victoria, AustraliaTelephone: 03 8562 9000Facsimile: 03 8562 9099
Contents1.Introduction .11.1 General .12.General preparation.42.1 Prerequisites .42.2 Data consumption – 3CX Server side .43.Configuration .53.1 3CX Webclient .53.1.1 Prerequisites .53.1.2 Server side .53.1.3 Client side .73.2 3CX Softclient .93.2.1 Prerequisites .93.2.2 Server side .93.2.3 Client side .103.3 3CX SBC .153.3.1 Prerequisites .153.3.2 Server Side .153.3.3 Client Side .163.4 3CX Mobile client .233.4.1 Prerequisites .233.4.2 Server Side .233.4.3 Client side .233.5 Remote connection using STUN.263.5.1 Prerequisites .263.5.2 Preparing the RPS server.263.6 Remote connection using manual provisioning.313.6.1 Prerequisites .313.6.2 Server side .313.6.3 Client side .324.Using the 3CX Web-Client with Jabra headset.334.1 General .334.1 Preparation: .334.2 Option 1: .354.2.1 Step 1: .352 Page
4.2.2 Step 2: .354.2.3 Step 3: .354.2.4 Step 4: .364.3 Option 2: .373 Page
2. General preparation2.1 PrerequisitesTo have these solutions implemented properly the following points should be followed;--Proper port preservation/port forwarding setup forall the required ports (SIP (Default Port 5060), RTP(Default 9000-10999), Tunnel (Default 5090) and HTTPS (Default 5001)) on the firewall on the 3CXServer side.If using STUN or manual provisioning a configurable firewall must be on the remote end.If the 3CX is on premise and remote workers also must access the LAN in the Office, ensure that there isenough bandwidth on the WAN connection of the office side.Setup 3CX on an OS you are familiar with.Ensure that QoS is enabled on all necessary network componentsSIP ALG is disabled on any possible border device (Router/Firewall) on the server side!2.2 Data consumption – 3CX Server sideHaving remote extensions, creates an additional layer of traffic that you would not experience if extensionswhere in the same office. For example calls between local extensions will now take extra bandwidth as theywill be traversing over the internet.Please find the data usage on 3CX with different codecs:- or-voip/- p/Additional traffic will also be generated by using SIP-Notify messages on port 5001 for BLF keys. The more extensions that use BLF, the more SIP-Notify traffic is generated The more BLF keys every single extension uses, the more SIP-Notify traffic is generated4 Page
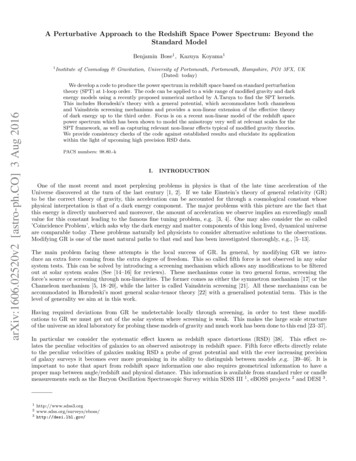
3. Configuration3.1 3CX Webclient3.1.1 Prerequisites-Port forwarding on the firewall is implemented and configured properly on the 3CX server side.Chrome is default browser on clients.Corded or cordless headset configured as main audio device on the remote computer.3.1.2 Server sideBy default, every extension has Webclient enabled. To ensure it is enabled go on the Navigation pane toExtensions – mark the Ext. – General tab – scroll down to ‘Web Authentication’ – Tick ‘Enable WebClient’Click on the extensionChoose the ‘General’ tabScroll down to ‘Web Authentication’ and ensure ‘Enable Web Client’ is ticked.Also make sure that every extension that should receive the Webclient login has an e-mail address insidethe ‘User Information’ under the ‘General’ tab inside the extension.Once this is all checked and confirmed, simply choose either all extensions from the top of the list or onlythe ones that need the credentials and choose ‘Send Welcome Email’.5 Page
Highlight the extensionChoose ‘Send Welcome Email’-The users credentials will be sent now to the e-mail address entered inside the extension.The welcome e-mail contains the following information:Config-file for the 3CX SoftclientQR code for the 3CX mobile clientNumber of the extensionPersonal VM PINNumber of the VM System3CX Webclient login link and credentialsLink for the Chrome ‘click2call’ pluginLinks to download the Softclient and Mobile clientOptional: Password changeIn the ‘Password’ field a random password is entered by default. This can be found in the welcome email.However, a new password can be entered there.If you enter a new password, make sure the password is strong enough!Once done, scroll to the extension or search for it by entering the extension number, highlight theextension6 Page
and press ‘Send Welcome Email’. A welcome mail with the ne login credentials will be sent to the user.3.1.3 Client sideThe e-mail has been successfully received by the user.Open the email and scroll to ‘Using the 3CX Webclient’.Click on the 2nd link ‘when out of office’ that contains the FQDN.Enter the extension number and the password from the welcome e-mail.7 Page
In the 3CX Management console we can see the extension now as being registered.Detailed description on how to use the Webclient can be found in the Alloy 3CX Webclient user guide.To view the 3CX Webclient user guide please click here.8 Page
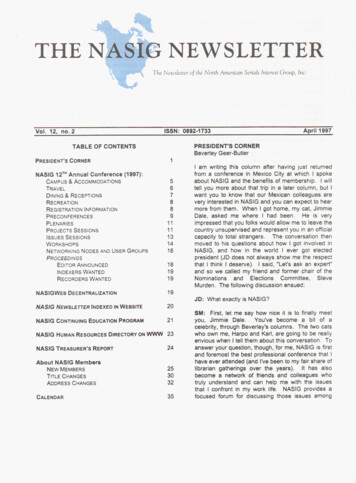
3.2 3CX Softclient3.2.1 Prerequisites-Port forwarding is setup on the firewall properly on the 3CX server side.Corded or cordless headset configured as main audio device on the computer.3.2.2 Server sideBy default, every extension has the Softclient pre-configured by already.All that needs to be setup is the email address inside the ‘User Information’ under the ‘General’ tabinside the extension.Then head over to the ‘Phone Provisioning’ tab and ensure under ‘Network’ all boxes are ticked: ‘EnablePUSH for smartphones’, ‘Re-provision phone on Startup’ and ‘Use 3CX Tunnel for remote connections(3CX App only)’9 Page
Once this is all checked and confirmed, simply choose either all extensions from the top of the list or onlythe ones that need the credentialsand choose ‘Send Welcome Email’.The users credentials will be sent now to the e-mail address entered inside the extension.-The welcome e-mail contains the following information:Config-file for the 3CX SoftclientQR code for the 3CX mobile clientNumber of the extensionPersonal VM PINNumber of the VM System3CX Webclient login link and credentialsLink for the Chrome ‘click2call’ pluginLinks to download the Softclient and Mobile client3.2.3 Client sideThe e-mail has been successfully received by the user.Open the email and scroll to ‘Installing the 3CX Client/Softphone’ and click on the correct link, f.e.Windows and safe the file on the computer.Once the link is clicked the file download starts.Choose ‘Save File’10 P a g e
Choose the download directory and hit ‘Save’Open the containing folder and find the downloaded file.Double click on the installation file or right click on it and choose ‘Install’ and then click ‘Run’.Choose ‘Next’11 P a g e
Accept ‘Terms and Conditions’ and click ‘Next’.Keep the installation path and choose ‘Next’.Then choose ‘Install’.Accept the ‘User Account Control’ from Windows with Yes.12 P a g e
Leave ‘Launch 3CX Client for Windows’ ticked and click ‘Finish’.The client was installed successfully. If you are asked to install an update from the phone system accept with Yes/ok.Now go back to the welcome e-mail and double click on the ‘3CX config file’.Choose ‘Open’.13 P a g e
The file is opened with the 3CX Softclient.The Softclient gets provisioned and is registered automatically.In the 3CX Management console we can see the extension now as being registeredDetailed description on how to use the Softclient can be found in the following userguides:WindowsMac14 P a g e
3.3 3CX SBC3.3.1 Prerequisites-Port forwarding is setup on the firewall properly on the 3CX server side.Single/unused Windows10 computer or supported raspberry Pi with supported hardwareSpecifications. Link here : Hardware specificationsIP Deskphone on remote site3.3.2 Server SideLog into the 3CX Management Console, ‘SIP Trunks’ and choose ‘Add SBC’.Enter a ‘Name’ for the SBCChoose ‘OK’ to save the SBCOn the Trunk overview we can see now the SBC as ‘Down’.Go back into the configuration and keep the window open, as certain information will be needed.Now we log into the remote machine:15 P a g e
3.3.3 Client Side3.3.3.1 Installing and connecting the SBCOpen this link to come to the download page of 3CX to download the 3CX SBC unto the remotemachine.Choose ‘Save File’Open the file locationDouble click on the installation file or right click on it and choose ‘Install’, read the lined-out ‘Prerequisites’ and then click ‘Next’.16 P a g e
Accept the ‘Terms and Conditions’ and choose ‘Next’.Keep the install path and choose ‘Next’.Now enter the values from the 3CX Management console into these fields.17 P a g e
Copy the ‘Web URL’ incl. Port and ‘Authentication KEY ID’ with the help of the copy icons on theright.Once done confirm with ‘Next’.Now choose ‘Install’ and accept the ‘User Account Control’ from Windows with Yes.Then click on ‘Finish’.18 P a g e
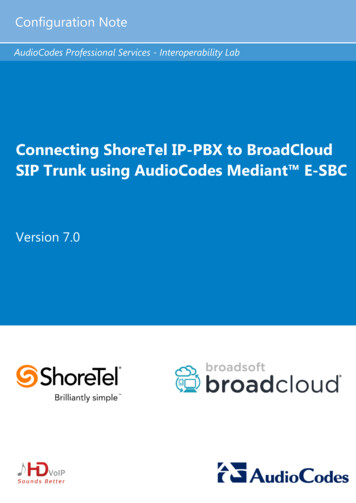
Done!Now we can check the status of the SBC from the SIP Trunk list and can see the Trunk is already up.3.3.3.2 Adding the remote Phone-The following steps are done once the IP-Phone is plugged into the remote network.We go back into the SBC connection and note down the local IP of the SBC, in our case192.168.75.112We choose the extension we want to configure.Inside the extension we choose the ‘Phone Provisioning’ tab.19 P a g e
Under ‘IP Phone’ we change the ‘Provisioning Method’ to ‘3CX SBC’ and enter the LAN IP of the SBC,in our case 192.168.75.112 and save.Now the IP Phone must be factory reset:How-to- Yealink- Snom- GrandstreamOnce Factory defaulted the phone appears inside the phones node with as a bold entry.20 P a g e
Highlight the required phone and choose ‘Assign Ext’.Assign the phone to its original extension, in this case ‘501’.Then click ‘OK’.The ‘Phone Provisioning’ tab opens automatically and lets you choose the settings, change if there isneed to (f.e. Timezone, etc.).21 P a g e
Then choose the ‘Options’ tab, scroll down to ‘Troubleshooting’ and ensure ‘PBX Delivers Audio’ isunticked and save.The phone receives the provisioning information and depending on the model either reboots ordirectly takes over the new settings.After a few moments the phone is up and running. (If it was previously used on the same system, it should notline out that it has the wrong firmware!)The Deskphone can now be used as it would be inside the office network. Also in terms of maintenance.22 P a g e
3.4 3CX Mobile client3.4.1 Prerequisites-Port forwarding is setup on the firewall properly on the 3CX server side.Mobile device running iOS 13 and higher or Android 7 and higherApp Store or Google Play Store account3.4.2 Server SideAll that must be done is setup the e-mail address inside the ‘User Information’ under the General tabinside the extension.Once this is all checked and confirmed, simply choose either all extensions from the top of the list or onlythe ones that need the credentialsand choose ‘Send Welcome Email’.The users credentials will be sent now to the e-mail address entered inside the extension.-The welcome e-mail contains the following information:Config-file for the 3CX SoftclientQR code for the 3CX mobile clientNumber of the extensionPersonal VM PINNumber of the VM System3CX Webclient login link and credentialsLink for the Chrome ‘click2call’ pluginLinks to download the Softclient and Mobile client3.4.3 Client sideThe e-mail has been successfully received by the user.Now open the App Store on the mobile deice and search for 3CX Android or 3CX iOS app. Click on it andpress the ‘Install’ button.23 P a g e
Once the app is installed open the app by clicking on the icon. The 3CX app opens.Choose the ‘Menu’ top left.Open the email and click on the QR code.Inside the app choose ‘Scan QR code’.24 P a g e
Hold the scanner fully over the QR Code displayed in the mail.The provisioning information is retrieved and the client is configured.Done!Detailed description on how to use the Mobile client can be found in the following userguides:- iOS- Android25 P a g e
3.5 Remote connection using STUN3.5.1 Prerequisites-Port forwarding is setup on the firewall properly on the 3CX server side.SIP ALG is disabled on any firewall/router device on the remote side!If using port 5060 as a port for a remote device, ensure to lock 5060 down to the public IP of the3CX server on the remote firewall, else 5060 will be attacked by hacking tools like ‘Sipvicious’.Port forwarding is setup on the firewall properly on the remote extension side.- The below conditions must be met for each remote phone on at the same location Every remote phone uses a static IP address Every remote phone uses a different SIP port. F.e. 5060, 5065, 5070, Every remote phone uses a different RTP port range. f.e. 11000-11005, 11006-11010, SIP and RTP port are mapped equally Source port outside port and they areforwarded to the static IP address of the matching device.Using STUN provisioning we show the solution using Yealink RPS. To fully keep control over theremote device we advise to follow our steps as lined out:3.5.2 Preparing the RPS server3.5.2.1 What is RPSRPS (Remote Provisioning Server) from Yealink, GAPS from Grandstream or Snom Active are freeprovisioning services designed to dropship devices to the customer and have them auto configuredupon first boot. All that is required is a free account to the respective service.Free registration for Alloy resellers can be done:- Yealink RPS- Snom Active- Grandstream GAPS send request to: support@alloy.com.au3.5.2.2 How does it workUpon every first boot (after factory default has been performed) the IP Phone contacts the RPSservice to see if there is any provisioning information available. If there is no information available,the device skips this step and stays unprovisioned
- Links to download the Softclient and Mobile client 3.2.3 Client side The e-mail has been successfully received by the user. Open the email and scroll to Installing the 3CX Client/Softphone and click on the correct link, f.e. Windows and safe the file on the computer. Once the link is clicked the file download starts. hoose ZSave File