Transcription
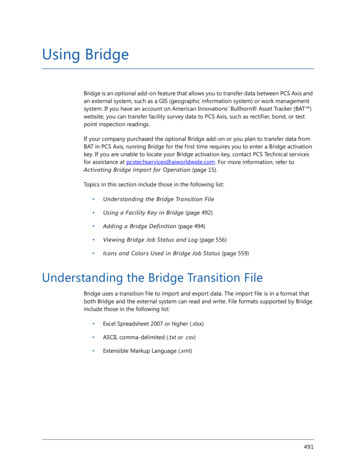
Using BridgeBridge is an optional add-on feature that allows you to transfer data between PCS Axis andan external system, such as a GIS (geographic information system) or work managementsystem. If you have an account on American Innovations’ Bullhorn Asset Tracker (BAT )website, you can transfer facility survey data to PCS Axis, such as rectifier, bond, or testpoint inspection readings.If your company purchased the optional Bridge add-on or you plan to transfer data fromBAT in PCS Axis, running Bridge for the first time requires you to enter a Bridge activationkey. If you are unable to locate your Bridge activation key, contact PCS Technical servicesfor assistance at pcstechservices@aiworldwide.com. For more information, refer toActivating Bridge Import for Operation (page 15).Topics in this section include those in the following list: Understanding the Bridge Transition File Using a Facility Key in Bridge (page 492) Adding a Bridge Definition (page 494) Viewing Bridge Job Status and Log (page 556) Icons and Colors Used in Bridge Job Status (page 559)Understanding the Bridge Transition FileBridge uses a transition file to import and export data. The import file is in a format thatboth Bridge and the external system can read and write. File formats supported by Bridgeinclude those in the following list: Excel Spreadsheet 2007 or higher (.xlsx) ASCII, comma-delimited (.txt or .csv) Extensible Markup Language (.xml)491
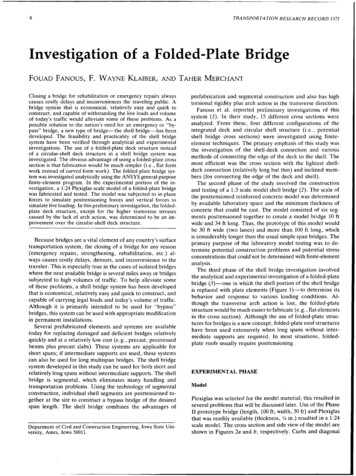
PCS Axis User and Administrator GuideUsing a Facility Key in BridgeBridge provides the option of associating a facility key in PCS Axis with an external systemID when setting up a Bridge import definition. The facility key must be unique for eachfacility. It is used to update mileposts, ROWs, or facility IDs for existing facilities.A facility key is a user-defined field set up in PCS Axis. An external system ID is typically aunique identifier generated by an external system, such as a GIS or work managementsystem. The facility key is used in place of the PCS Axis fields labeled ROW Code orMilepost when setting up the Bridge import definition. The facility key allows you to map(or link) facilities between PCS Axis and the external system.NOTE: The Facility Key feature applies only to a Bridge Import.To add a facility key for an external system ID, follow these steps:1Click Tools Field and UDF Customizations to open the Field and UDFCustomizations window (Figure 10-1, page 493).2Open the folders labeled Facility Surveys and Common to All Facilities in theselection tree. Then click ROW and Pipeline to display related fields in the grid.NOTE: Clicking the Properties bar collapses the Properties panel allowing you toview more of the grid. Clicking the bar again expands the panel.492 Using Bridge
PCS Axis User and Administrator GuideFigure 10-1. Field and UDF Customizations3ClickNormal in the toolbar to open the Add Normal Field dialog box(Figure 10-2).4Type a unique name for the UDF in the Caption field. Then clicksave changes and close the dialog box.Save toThe UDF is now ready to be used as the Facility Key in a Bridge import or exportdefinition file.Figure 10-2. Add Normal FieldUsing Bridge493
PCS Axis User and Administrator GuideAdding a Bridge DefinitionInformation in this section explains how to add a Bridge import, export, import/export,and Bullhorn definition. Topics include those in the following list: Adding a Bridge Import Definition Adding a Bridge Import Definition for an SDL Survey File Adding a Bridge Export Definition (page 513) Adding a Bridge Import/Export Definition (page 527) Adding a Bullhorn Bridge Definition (page 543)Adding a Bridge Import DefinitionA Bridge import definition specifies the property settings and options for importing datain PCS Axis. It defines the data transfer options; location of the import file; and fieldmappings in PCS Axis and the import file.To add a Bridge import definition, follow these steps:1Select one or more pipeline segments in the Select ROWs window (Figure 10-3).Select pipeline segment(s) with facilities you want to include in the Bridgedefinition. ClickSave to close the window.Figure 10-3. Select ROWs494 Using Bridge
PCS Axis User and Administrator Guide2Click Tools Bridge to open the Bridge window (Figure 10-4).Figure 10-4. Bridge Definitions3ClickBasic to open the basic definition panel (Figure 10-5).Figure 10-5. Basic Definition PanelUsing Bridge495
PCS Axis User and Administrator Guide4Type a unique name for the definition in the Name field.NOTE: Clicking the Bridge Definitions bar collapses the panel allowing you toview more of the definition panel. Clicking the bar again expands the panel.5To set properties in the Data Transfer group box, follow these steps (Figure 10-6):Figure 10-6. Bridge Import DefinitionaClick the Import check box.bIf you are importing large amounts of data, click the check box Reindex afterimport to reindex the PCS Axis database after the import process completes.NOTE: Enabling this option prevents index fragmentation from occurring inthe PCS Axis database, which in turn may result in slow system performance.Index fragmentation may occur after importing large amounts of data in PCSAxis using Bridge Import, Bullhorn Bridge, or Field Computer. You can alsoreindex the database using the option Reindex Database in Job ServiceViewer (Tools Job Service Viewer).496 Using Bridge
PCS Axis User and Administrator GuidecIf you want PCS Axis to automatically run the import file at a scheduled time,click the Scheduled check box and then type a scheduled time in the adjacentfield. Enter a scheduled time using 12-hour time format to specify the hour,minute, and AM/PM setting (HH:MM AM or PM).When the import file is not scheduled to run automatically, you can run itmanually by clicking theImport button.IMPORTANT: When scheduling a time to run Bridge, choose a time that doesnot impact other network services or computer resources. For example,consider a staggered time schedule instead of running Bridge at the sametime as other scheduled network services.6To set properties in the Options group box (Figure 10-6), follow these steps:aClick the Public check box if you want the import definition file available foruse by all PCS Axis users. When the check box is empty, the definition file isavailable only to the user who creates it.bClick the check box Use Facility Key if you plan to map facilities to a userdefined field (UDF) set up previously for an external system ID. See Using aFacility Key in Bridge (page 492) for more information if needed.When facilities are not mapped to a facility key, they are mapped to thefollowing required fields: ROW Code, Milepost, and Facility ID.cIf you plan to run the Bridge definition manually and want Bridge to renamethe file after importing data, click the check box Rename files on manualbridge runs .7ClickSave.8ClickFull View to hide the group boxes Data Transfer and Options. ClickingFull View again displays these group boxes.NOTE: Clicking thetoggle button in theinformation bar displays importantinformation related to required property settings.Using Bridge497
PCS Axis User and Administrator Guide9Select the data item(s) you want to import in PCS Axis. ClickAdd Data Item toopen the Data Items window (Figure 10-7), and then complete the followingsteps:aOpen the folder(s) containing the data item(s) you want to import. Repeat thisstep as needed for other folders. For example, the folders CPDM and Rectifierare selected in Figure 10-7.Figure 10-7. Data Items SelectedNOTE: The right pane of the Data Items window lists all selected data itemsfor import. To remove a data item for import, double-click the data item in theright pane to move it back to the left pane.bDouble-click to select a data item and move it to the right pane of the window.Repeat this step as needed for other data items. For example, the data itemRectifier Inspection is selected in Figure 10-7.cClickOK to close the dialog box and return to the definition panel.dClickSave .10 Identify the location of the import file using the following steps:498 Using BridgeaClick the ellipsis button in the field Import File Name to open the ImportFile dialog box. Navigate to the import file and then select it.bClick Open to close the dialog box and return to the definition panel. The pathto the import file displays in the field Import File Name.
PCS Axis User and Administrator Guide11 To assign inspections to a survey folder based on the inspection date, completeone or both of the following steps in the Options group box as required(Figure 10-8):aIf you want to assign inspections to an annual survey folder, click the checkbox Assign inspections to an Annual Survey.bIf you want to assign inspections to a periodic survey folder, click the checkbox Assign inspections to a Periodic Survey.Figure 10-8. DefinitionUsing Bridge499
PCS Axis User and Administrator Guide12 To map fields in PCS Axis with fields in the import file, follow these steps:aClickEdit in the Maps group box to open a field mapping window(Figure 10-9).Figure 10-9. Field MappingsNOTE: Fields in the Mappings panel with a lock iconare required fields formapping, such as ROW Code, Milepost, Facility ID, and Inspection Dateshown in Figure 10-9.bSelect PCS Axis fields for mapping. Click the toggle arrow for a fieldcategory in the Internal Fields panel to view a list of available fields. Forexample, Rectifier Inspection Fields is selected in Figure 10-9.cClick the check box for one or more PCS Axis fields listed in the Internal Fieldspanel. Then click thetop arrow button to move selections to the Mappingspanel. Double-clicking a field also moves it to the Mappings panel.For example, the PCS Axis fields Rectifier Output Current Found (Amps) andRectifier Output Volts Found (Volts) are selected for mapping in Figure 10-9.500 Using BridgedIf you want to sort import fields listed in the Transition Fields panel inalphabetical order, click the check box Sort Alphabetically.eTo map PCS Axis fields with fields in the import file, follow these steps:
PCS Axis User and Administrator Guide Select a PCS Axis field in the Mappings panel. Map the selected field to afield in the import file by double-clicking a field listed in the TransitionFields panel. Repeat this step for remaining fields you want to map.NOTE: When theAuto Map button is enabled and the names offields in the import file match those in PCS Axis, double-clicking a PCSAxis field in the Mappings panel automatically maps to an import fieldlisted in the Transition Fields panel. If the definition is set up to use a facility key, click the Facility Key optionbutton in the Mappings panel for the field you want to use as the facilitykey, such as ROW Code or Milepost. If the field Choose a conversion. is present in the Mappings panel for apair of mapped fields and you want to apply a conversion option, click thefield Choose a conversion . and select an option in the selection list.fIf you want to preview fields for mapping in the import file, click thePreview button to open the import file in the Preview Mapswindow.gTo remove a field mapping in the Mappings panel, select the field in theMappings panel and then clickDelete Map. Double-clicking the fieldalso removes it. Unmapped fields are moved to the Internal Fields panel.13 ClickOK to close the mapping window and return to the definition window.Then clickSave .Field mappings display in the Maps group box.14 To validate the definition, click thePrevalidate button. When thevalidation process completes and the following message displays (Figure 1010), clickView Job Status to open the Job Status window orReturnto Definition to open the Definitions window.NOTE: The Prevalidate process confirms the definition file is set up correctly; itdoes not post data in the database. Only the first 1,000 records of the import filewill be displayed.Figure 10-10. Validated MessageUsing Bridge501
PCS Axis User and Administrator Guide15 If you want to manually import data in PCS Axis, complete one of the followingsteps:aIf the Job Status window is open, clickRun for a selected import file listedin the Job Status window. Then clickRefresh to update status information.bIf the Definitions window is open for the import file, clickImport .16 To view the status of a Bridge session, clickJob Status in the Definitionswindow to open the Job Status window (Figure 10-11, page 502). ClickingLogfor a Bridge session opens the log file for the selected session.NOTE: For a description of the icons and colors used in Job Status, see Icons andColors Used in Bridge Job Status (page 559).Figure 10-11. Job Status17 To copy the Bridge definition to a file, such as a Notepad or Microsoft Word file,follow these steps:502 Using BridgeaClick the Definitions tab if the Definitions window is not open.bClickcStart the software program, such as Notepad or Microsoft Word.dOpen a new file and then Paste the definition file. Click Save.Copy to Clipboard.
PCS Axis User and Administrator GuideAdding a Bridge Import Definition for an SDL Survey FileInformation in this section explains how to set up a Bridge definition for importing one ormore stationary data logger (SDL) survey files. The Bridge definition specifies propertysettings and options for importing data in PCS Axis; defines the data transfer options; andidentifies the location of the SDL survey file(s).IMPORTANT: Bridge Import is an optional add-on that requires an activation key foroperation. Running Bridge Import for the first time requires you to enter your Bridgeactivation key. If you are unable to locate your Bridge activation key, contact PCS Technicalservices for assistance at pcstechservices@aiworldwide.com. For more information, referto Activating Bridge Import for Operation (page 15).To add a Bridge Import definition and import an SDL survey file, follow these steps:1Select one or more pipeline segments in the Select ROWs window. Select pipelinesegment(s) you want to import SDL survey files. ClickSave to close thewindow (Figure 10-3, page 494).2Click Tools Bridge to open the Bridge window (Figure 10-12).Figure 10-12. Bridge Import DefinitionUsing Bridge503
PCS Axis User and Administrator Guide3ClickBasic to open the basic definition panel. Then click the title bar of theBridge Definitions panel to hide the panel. (Figure 10-13).Figure 10-13. Basic Definition Panel4Type a unique name for the definition in the Name field (Figure 10-14, page 505).5Complete the following steps to set properties in the Data Transfer group box(Figure 10-14, page 505):aClick the Import check box.NOTE: Because SDL imports are typically run manually “on demand”, settingproperty settings for Scheduled option are not required.bClick the check box Reindex after import to reindex the PCS Axis databaseafter the import process completes.IMPORTANT: Enabling this option prevents index fragmentation fromoccurring in the PCS Axis database, which in turn may result in slow systemperformance. Index fragmentation may occur after importing large amounts ofdata in PCS Axis using Bridge Import, Bullhorn Bridge, or Field Computer.You can also reindex the database using the option Reindex Database in JobService Viewer (Tools Job Service Viewer).504 Using Bridge
PCS Axis User and Administrator GuideFigure 10-14. Bridge Import Definition6Complete the following steps to set properties in the Options group box(Figure 10-14):aClick the Public check box if you want the import definition file available foruse by all PCS Axis users. When the check box is empty, the definition file isavailable only to the user who creates it.NOTE: The option labeled Use Facility Key does not apply when using Bridgeto import SDLs. See Using a Facility Key in Bridge (page 492) for moreinformation if needed.b7If you want the Bridge import process to rename the import file afterimporting data, click the check box Rename files on manual bridge runs .ClickSave and then clickFull View to hide the group boxes Data Transferand Options. Clicking Full View again displays these group boxes.NOTE: Clicking thetoggle button in theinformation bar displays importantinformation related to required property settings.Using Bridge505
PCS Axis User and Administrator Guide8Select the PCS Axis data item used to import SDL survey files. ClickAdd DataItem to open the Data Items window and then complete the following steps(Figure 10-7):aClick thetoggle arrow to open the System Items folder (Figure 10-15).bDouble-click Stationary Survey Measurement to move the data item to theright pane of the window.NOTE: The right pane of the Data Items window lists all selected data itemsfor import. To remove a data item for import, double-click the data item in theright pane to move it back to the left pane.cClickOK to close the dialog box and return to the definition panel.Figure 10-15. Data Items9ClickSave to save the definition file.10 Complete the following steps to identify the location of the SDL survey file(s)(Figure 10-16):506 Using BridgeaClick the ellipsis button in the field Import File Name.bWhen the Import File dialog box opens, navigate to the SDL survey file(s) andselect each one you want to import. Then click Open.
PCS Axis User and Administrator GuideFigure 10-16. Select SDL Import File11 When the Stationary Survey(s) window opens (Figure 10-17, page 507), select theSDL survey file and then click the Snap To Facility button to open the Snap ToFacility window (Figure 10-18, page 508).NOTE: A yellowSnap To Facility button indicates the SDL survey file ismatched to an unregistered milepost location. A greenSnap To Facilitybutton indicates the SDL survey file has been automatically matched to a milepostlocation already established in PCS Axis. A blueSnap To Facility buttonindicates a match was not found for the pipeline segment or pipeline Series.Figure 10-17. Stationary Survey(s)Using Bridge507
PCS Axis User and Administrator Guide12 When the milepost location of the SDL survey does not match a pipeline segmentalready established in PCS Axis, it is identified as an UnRegistered Milepost(Figure 10-18).When the milepost location of the SDL survey does match an existing pipelinesegment in PCS Axis, use the Snap To Facility window to match the SDL survey toa milepost location on the pipeline segment. This process ensures telluriccompensation calculations are accurate.To match the SDL survey to an existing milepost location, follow these steps:aClick Existing Facilities to enable the grid for use (Figure 10-18).bIf the pipeline segment is not selected in the ROW field, click the down arrowand select the pipeline segment in the selection list.cSelect a milepost record in the grid and then clicksurvey to the selected milepost.Figure 10-18. Snap To Facility508 Using BridgeOK to snap the SDL
PCS Axis User and Administrator Guide13 When the Stationary Survey(s) window opens, clickProcess Files toautomatically map data fields in the SDL survey with data fields in PCS Axis(Figure 10-19).Figure 10-19. Process Files / Stationary Survey(s)After processing files, the definition window opens. The Maps group box includesa list of field mappings in the columns labeled Internal Field (PCS Axis) andTransition Field (SDL survey) as shown in the following example (Figure 10-20).Figure 10-20. Bridge DefinitionUsing Bridge509
PCS Axis User and Administrator Guide14 If you want to apply an Import Voltage Conversion filter to surveymeasurements (such as On Voltage survey measurements), complete the followingsteps:aClickEdit in the Maps group box to open the Stationary SurveyMeasurement dialog box (Figure 10-21).Figure 10-21. Stationary Survey MeasurementbSelect a survey measurement field in the grid. Then click the down arrow in theImport Voltage Conversion field and select one of the following filteroptions in the selection list (Figure 10-22, page 511). No ConversionDoes not apply a voltage conversion filter. (
system. If you have an account on American Innovations’ Bullhorn Asset Tracker (BAT ) website, you can transfer facility survey data to PCS Axis, such as rectifier, bond, or test point inspection readings. If your company purchased the optional Bridge add-on or you plan to transfer data from