Transcription
Nexmo SIP TrunkingConfiguration GuideMitel MiVoice Business 8.0 PR2 andMitel Border Gateway 9.4.0.29July 20171
Contents1 Introduction.32 SIP Trunking Network Components.32.1 Hardware Components.32.2 Software Requirements.43 Features.43.1.1 Features Supported.43.1.2 Features Not Supported by PBX.43.1.3 Caveats and Limitations.44 Configuration.54.1 IP Address Worksheet.54.2 Configuring Mitel MiVoice Business.64.2.1 Network Elements.64.2.2 Mitel Class of Service Parameters.74.2.3 Trunk Attributes.154.2.4 SIP Peer Profile for Nexmo.164.2.5 Dial Plan.214.3 Configuring Mitel Border Gateway (MBG).224.3.1 Network Profile.224.3.2 ICP Configuration.234.3.3 SIP Trunk Information.244.3.4 System Configuration Settings.314.4 Configure Numbers in Nexmo Account.332
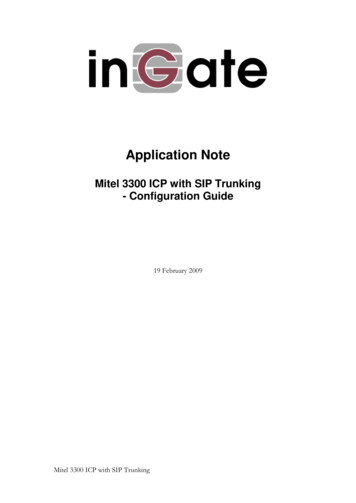
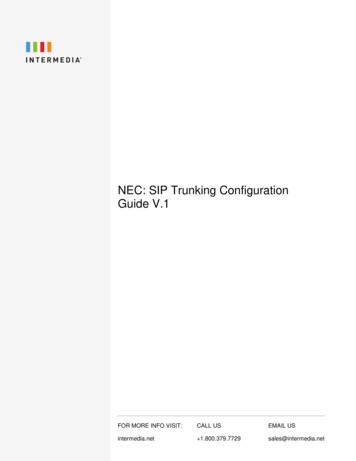
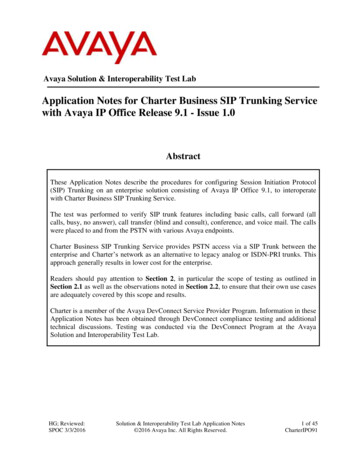
1 IntroductionThis document is intended for the SIP trunk customer’s technical staff and Value Added Retailer(VAR) having installation and operational responsibilities. This configuration guide provides stepsfor configuring Mitel MiVoice Business version 8.0 PR2 and Mitel Border Gateway 9.4.0.29 toNexmo SIP Trunking services.2 SIP Trunking Network ComponentsThe network for the SIP trunk reference configuration shown below is representative of a MitelMiVoice Business and Mitel MiVoice Border Gateway configuration to Nexmo SIP trunking.Figure 1: Topology Diagram2.1 Hardware Components MiVoice Business MXE Platform3
VMware Host Version ESXi 5.5.0Mitel Minet phones 5360, 52242.2 Software Requirements Mitel MiVoice Business, Version 14.0.0.95, Release 8.0 PR2Mitel Border Gateway, Version: 9.4.0.293 Features3.1.1 Features Supported Incoming and outgoing off-net calls using G711ULAW & G711ALAW voice codecsCalling Line (number) Identification PresentationCall Hold and ResumeCall Transfer (unattended and attended )Call ConferenceCall Forward (all, no answer)DTMF relay both directions (RFC2833)Media flow-through on Mitel Border Gateway3.1.2 Features Not Supported by PBX None3.1.3 Caveats and Limitations None4
4 Configuration4.1 IP Address WorksheetThe specific values listed in the table below and in subsequent sections used in the labconfiguration described in this document, and are for illustrative purposes only. The customermust obtain and use the values for your deployment.Table 1 – IP AddressesComponentLAN IP AddressLAN Subnet MaskWAN IP AddressWAN Subnet MaskSystem IP AddressLab ValueCustomer ValueMitel Border 5.255.128Mitel MiVoice Business PBX IP10.35.31.855
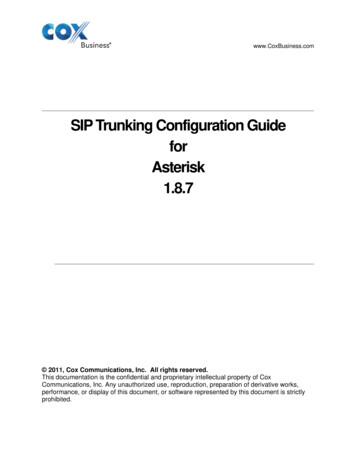
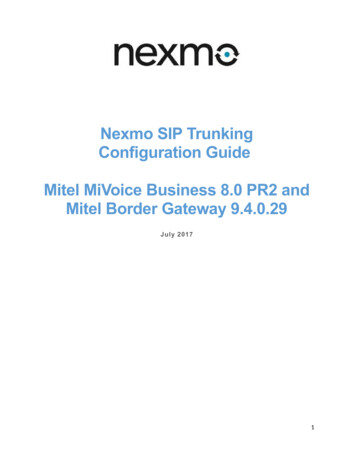
4.2 Configuring Mitel MiVoice Business4.2.1 Network Elements1. Navigate to Voice Network Network Elements2. Create network element for Nexmo.comFigure 2: Network Element for Nexmo.com6
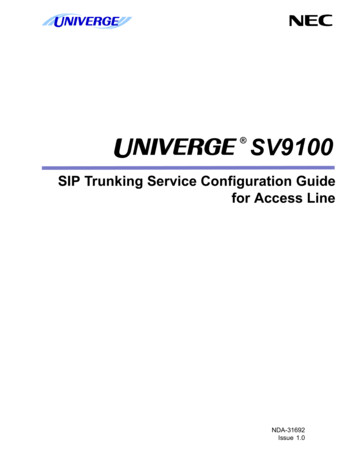
3. Create network element for Mitel Border Gateway (MBG)Figure 3: Network Element for Mitel Border Gateway4.2.2 Mitel Class of Service Parameters1. Navigate to System Properties System Feature Settings Class of ServiceOptions2. Create Class of Service (COS) for Nexmo.com as shown for COS 18 below7
Figure 4: Class of Service for Nexmo SIP TrunkThe configuration changes were only to the Class of Service General tab. The Advanced tab isconfigure using default settings.1.2.3.4.Set Music On Hold on Transfer: YesSet Public Network Access via DPNSS: YesThe remainder of options are set to defaultThe settings in the Advanced Tab are set to defaultFigure 5: Class of Service (General)8
Figure 6: Class of Service Options (General) – Cont.9
Figure 7: Class of Service Options (General) – Cont.10
Figure 8: Class of Service Options (General) – Cont.11
Figure 9: Class of Service Options (General) – Cont.12
Figure 10: Class of Service Options (General) – Cont.13
Figure 11: Class of Service Options (General) – Cont.14
4.2.3 Trunk AttributesNavigation: Trunks Trunk Attributes1. Set Direct Inward Dialing Service On2. Set Class of Service 18 as our example was used3. Set Dial In Trunks Incoming Digit Modification–Absorb 14. Set Trunk Label Nexmo as our example was used5. The remaining attributes are set to default as shown belowFigure 12: Trunk Attributes15
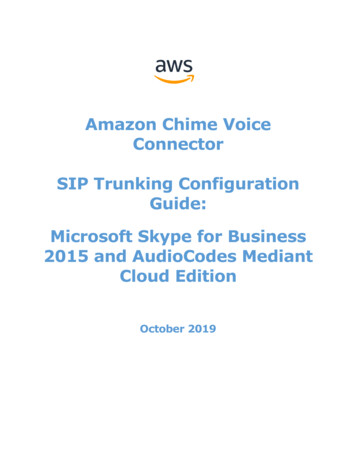
4.2.4 SIP Peer Profile for NexmoSIP trunks are configure to route off-net calls between the Mitel Border Gateway (MBG) andNexmo Network. Calls are configure to route via Mitel MBG to sip.nexmo.com. The firewall wasopen for the list of IPs in the portal provided by Nexmo.1.2.3.4.5.Navigate to Trunks SIP SIP Peer Profile Basic tabSet SIP Peer Profile Label: Nexmo is used as an exampleSet Network Element: Nexmo-com in this exampleSet Address Type: FQDN: sip.nexmo.comAdministration Options:o Set Maximum Simultaneous Calls: 4 is used as an exampleo Set Outbound Proxy Server: Nexmo-MBGo Set Trunk Service: 5 is used as an exampleo Set Zone: 1 is used as an example6. Authentication Options:o Set User Name: Enter the user name provided by Nexmo.como Set Password: Enter the password provided by Nexmo.comFigure 13: SIP Peer Profile16
7. Select the Call Routing tabFigure 14: SIP Peer Profile8. Select the Calling Line ID tabFigure 15: SIP Peer Profile – Cont.17
9. Select the SDP Options tab10. Set Force sending SDP in initial invite message: Yes11. Set Force sending SDP in initial invite – Early Answer: YesFigure 16: SIP Peer Profile – Cont.18
12. Select the Signaling and Header Manipulation tab13. Set E.164: Enable sending ‘ ’: Yes14. Set E.164: Add ‘ ’ if digit length N digits: 1015. Set E.164: Do not add ‘ ’to Called Party: Yes16. Set Use P-Early-Media Header: sendrcvFigure 17: SIP Peer Profile – Cont.19
17. Select the Timers tabFigure 18: SIP Peer Profile – Cont.18. Select the Key Press Event tabFigure 19: SIP Peer Profile – Cont.20
4.2.5 Dial Plan1. Navigate to Call Routing ARS Routes2. An ARS Route is configured for Nexmo trunk routingFigure 20: ARS Route List3. Navigate to Call Routing ARS Digits Dialed4. Prefix digits are configure to route calls to PSTN and International networksFigure 21: ARS Digits Dialed21
4.3 Configuring Mitel Border Gateway (MBG)4.3.1 Network ProfileConfigure the LAN and WAN IP addresses on the MBG. The IP addresses shown are forillustration only, the actual IP address can vary.1. Navigate to Applications MiVoice Border Gateway System Configuration Network ProfilesFigure 22: MBG Network Profiles22
2. Navigate to System Configuration Network profiles Custom Configuration3. Set LAN IP address to ICP: 10.64.3.168 is used in this example4. Set WAN IP address: 192.65.79.xxx (as provided by your network administrator)Figure 23: Network Profiles Configuration4.3.2 ICP ConfigurationConfiguration for MiVoice Business ICP1. Navigate to Service Configuration ICPsFigure 24: ICP Configuration23
4.3.3 SIP Trunk InformationThe SIP trunks were configure as follows to meet the ITSP requirements. The ITSP requiredoutgoing calls to route to the FQDN sip.nexmo.com. The FQDN resolved to a single IP address.Inbound calls routing to the MBG utilized different IP addresses that were not resolved by FQDNsip.nexmo.com. Individual trunks had to be configure for each IP address used by the ITSP.Otherwise, the MBG does not know about these IP addresses and calls are not trusted.ooOutbound calls utilized the ITSP FQDN sip.nexmo.com to route callsInbound trunks were configure for calls to be trusted into the MBG. The followingIP addresses were configured as separate trunks as shown below.1. Navigate to Service Configuration SIP TrunkingFigure 25: SIP Trunk Service Configuration24
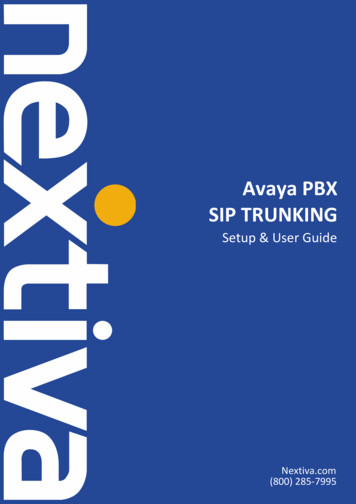
4.3.3.1 Outbound Trunk ConfigurationNexmo Outbound Trunk (Outbound trunk) details shown below.1.2.3.4.5.Set Name: Nexmo Outbound used in this exampleSet Remote trunk endpoint address: sip.nexmo.comSet Remote RTP framesize(ms): 20msSet Authentication username, password: (see ITSP for this information)Click on Enabled checkbox to enable trunkFigure 26: Outbound Trunk Configuration25
4.3.3.2 Inbound Trunk ConfigurationInbound calls routing to the MBG from the ITSP arrived from different IP addresses and trunkshad to be configure for each IP address used by the ITSP. Otherwise, the MBG does not knowabout these IP addresses and calls are not trusted.Shown below are configuration used for the inbound Trunks. The same configuration is requiredfor each inbound IP address as provided by the ITSP.1. Enabled: Check to enable trunk2. Set the Name: Nexmo inbound1 used in this example3. Set the Remote trunk endpoint address: Enter the IP address provided by ITSP4. Added Rules for DIDs to Match Request URI as shownFigure 27: Inbound Trunk 1 Configuration26
Inbound Trunk Configuration for DID 5.10.112.xxxFigure 28: Inbound Trunk 2 Configuration27
Inbound Trunk Configuration for DID 5.10.112.xxx.Figure 29: Inbound Trunk 3 Configuration28
Inbound Trunk Configuration for DID 119.81.44.xxx.Figure 30: Inbound Trunk 4 Configuration29
Inbound Trunk Configuration for DID 119.81.44.xxx.Figure 31: Inbound Trunk 5 Configuration30
4.3.4 System Configuration SettingsThis configuration did not change for this ITSP but shown for informational purposes.Navigation: System Configuration SettingsFigure 32: System Configuration31
Figure 33: System Configuration – Cont.32
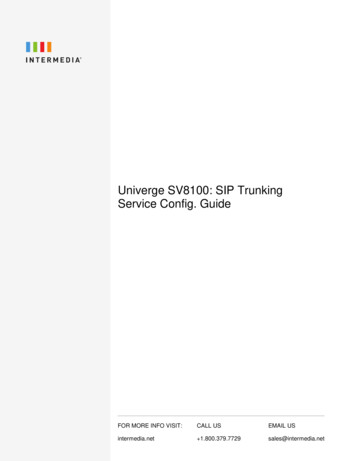
4.4 Configure Numbers in Nexmo Account1. Login to the Nexmo account using the credentials provided at the time of registration. AKey and Secret is display on the dashboard and can be use as the username andpassword for Registration SIP Trunks.Figure 34: Nexmo Dashboard2. In order to provide the URL to which the call has to be routed from Nexmo, navigate tothe Numbers tab3. Click Edit against each number as shown belowFigure 35: Nexmo DID Numbers33
4. A pop-up will be displayed5. Select the “Forward to” and provide the URL to which the calls route6. Click Update to save the changesFigure 36: Your Numbers – Cont.34
This document is intended for the SIP trunk customer’s technical staff and Value Added Retailer (VAR) having installation and operational responsibilities. This configuration guide provides steps for configuring Mitel MiVoice Business version 8.0 PR2 and Mitel Border Gateway 9.4.0.29 to Nexmo SIP Trunking services. 2 SIP Trunking Network .