Transcription
Tenable and IBM QRadar SIEM v3.0 Integration GuideLast Revised: May 22, 2021
Table of ContentsWelcome to Tenable for IBM QRadar SIEM v3.03Install Tenable App for QRadar v3.04Configuration6Tenable.io Configuration7Tenable.sc Configuration10Tenable.ot Log Extension for QRadar13Sending Tenable.ot Alerts to QRadar16Create a Rule21View Offenses25Uninstall26Troubleshooting27Copyright 2021 Tenable, Inc. All rights reserved. Tenable, Tenable.io, Tenable Network Security, Nessus, SecurityCenter, SecurityCenter Continuous View and Log Correlation Engine are registered trademarks ofTenable,Inc. Tenable.sc, Tenable.ot, Lumin, Indegy, Assure, and The Cyber Exposure Company are trademarks of Tenable, Inc. All other products or services are trademarks of their respective owners.
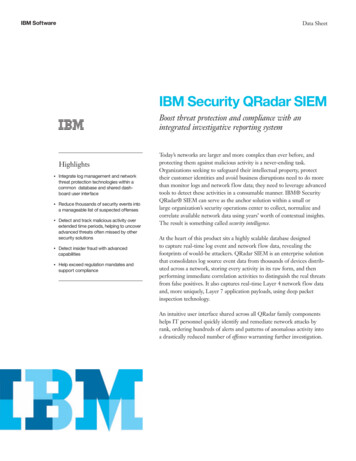
Welcome to Tenable for IBM QRadar SIEM v3.0This document provides information and steps for integrating Tenable.io and Tenable.sc applicationswith IBM QRadar Security Information and Event Management (SIEM) v3.0.IBM QRadar SIEM v3.0 (QRadar) is a network security management platform that provides situationalawareness and compliance support. It collects, processes, aggregates, and stores network data in realtime. QRadar v3.0 has a modular architecture that provides real-time visibility of your IT infrastructurethat you can use for threat detection and prioritization.You can use the customized Tenable applications in QRadar v3.0. to obtain vulnerability summaries forTenable.io or Tenable.sc that correspond to the source IP address for each offense.For additional information about IBM QRadar SIEM, see the IBM QRadar SIEM website.Copyright 2021 Tenable, Inc. All rights reserved. Tenable, Tenable.io, Tenable Network Security, Nessus, SecurityCenter, SecurityCenter Continuous View and Log Correlation Engine are registeredtrademarks of Tenable,Inc. Tenable.sc, Tenable.ot, Lumin, Indegy, Assure, and The Cyber Exposure Company are trademarks of Tenable, Inc. All other products or services are trademarks of theirrespective owners.-3-
Install Tenable App for QRadar v3.0Complete the following steps to install the Tenable App For QRadar.Before you begin:lEnsure you have a Tenable.io or Tenable.sc account with administrative privileges.lEnsure you have QRadar 7.4.1 lDownload the Tenable App For QRadar v3.0 from the IBM App Exchange website.To upgrade the Tenable App For Qradar:1. Log in to the IBM QRadar SIEM Console.2. Click thebutton.The Menu options appear.3. Click Admin.The Admin options appear.4. In the Systems Configuration section, click Extensions Management.The Extensions Management window appears.5. Click Add.The Add a New Extension window appears.6. Click Browse and select the Tenable App For QRadar file.7. Click Add.A Confirm Installation window appears.8. Click Install.A validation window appears.9. After the validation completes, the Tenable App For QRadar window appears.Copyright 2021 Tenable, Inc. All rights reserved. Tenable, Tenable.io, Tenable Network Security, Nessus, SecurityCenter, SecurityCenter Continuous View and Log Correlation Engine are registeredtrademarks of Tenable,Inc. Tenable.sc, Tenable.ot, Lumin, Indegy, Assure, and The Cyber Exposure Company are trademarks of Tenable, Inc. All other products or services are trademarks of theirrespective owners.-4-
10. Click Install.A validation window appears.A docker container is created.After the validation completes, the Tenable App appears in the list of Applications Packages onthe Tenable App For QRadar window.11. Click OK.12. Clear the browser cache and refresh the page.The Tenable App For QRadar appears on the Extensions Management page.Copyright 2021 Tenable, Inc. All rights reserved. Tenable, Tenable.io, Tenable Network Security, Nessus, SecurityCenter, SecurityCenter Continuous View and Log Correlation Engine are registeredtrademarks of Tenable,Inc. Tenable.sc, Tenable.ot, Lumin, Indegy, Assure, and The Cyber Exposure Company are trademarks of Tenable, Inc. All other products or services are trademarks of theirrespective owners.-5-
ConfigurationYou can configure QRadar with Tenable.io or Tenable.sc. Click the corresponding link for configurationsteps.lTenable.io ConfigurationlTenable.sc ConfigurationCopyright 2021 Tenable, Inc. All rights reserved. Tenable, Tenable.io, Tenable Network Security, Nessus, SecurityCenter, SecurityCenter Continuous View and Log Correlation Engine are registeredtrademarks of Tenable,Inc. Tenable.sc, Tenable.ot, Lumin, Indegy, Assure, and The Cyber Exposure Company are trademarks of Tenable, Inc. All other products or services are trademarks of theirrespective owners.-6-
Tenable.io ConfigurationRequired User Role: Basic, VM Scan Operator, VM Standard, VM Scan Manager, or AdministratorComplete the following steps to configure the Tenable App For QRadar v2.0.To configure the Tenable App For Qradar v2.0:1. Log in to the IBM QRadar SIEM Console.2. Click thebutton.The Menu options appear.3. Click Admin.The Admin options appear.4. Scroll to the Tenable section.5. Click Tenable App Settings.The Tenable Configuration appears.6. Click Add Tenable.io Account.7. Configure the settings for Tenable.io.Copyright 2021 Tenable, Inc. All rights reserved. Tenable, Tenable.io, Tenable Network Security, Nessus, SecurityCenter, SecurityCenter Continuous View and Log Correlation Engine are registeredtrademarks of Tenable,Inc. Tenable.sc, Tenable.ot, Lumin, Indegy, Assure, and The Cyber Exposure Company are trademarks of Tenable, Inc. All other products or services are trademarks of theirrespective owners.-7-
a. In the Address box, enter the the domain name used to access Tenable.io.b. In the Access Key box, enter the API access key for Tenable.io. For information on generating API keys see the Generate API Key section in the Tenable.io User Guide.c. In the Secret Key box, enter the API secret key for Tenable.io. For information on generating API keys see the Generate API Key section in the Tenable.io User Guide.d. In the Rule based Scan Name box, enter a scan name that exists in Tenable.io.If a scan does not exist, you must create one with the associated QRadar credentials in Tenable.io.This scan is used for the rule based scan function.e. In the Right Click Scan Name box, enter a scan name that exists in Tenable.io.If a scan does not exist, you must create one with the associated QRadar credentials in Tenable.io. This scan is used for the right click scan function.Copyright 2021 Tenable, Inc. All rights reserved. Tenable, Tenable.io, Tenable Network Security, Nessus, SecurityCenter, SecurityCenter Continuous View and Log Correlation Engine are registeredtrademarks of Tenable,Inc. Tenable.sc, Tenable.ot, Lumin, Indegy, Assure, and The Cyber Exposure Company are trademarks of Tenable, Inc. All other products or services are trademarks of theirrespective owners.-8-
Note: This scan can be the same as the Rule Based Scan Name.f. In the Authorized Service Token box, enter your QRadar authorized service token. Authorized tokens are found under User Management in the Authorized Services section.See the IBM QRadar SIEM website for steps on creating an authorized service token.g. (Optional) Click the toggle to enable or disable SSL verification.h. (Optional) Connect to Tenable.io using a proxy.lClick the toggle to Enable/Disable Proxy.lType an IP/Hostname.lType a Port.l(Optional) Select the Require Authentication for Proxy check box.lIf you required authentication for proxy, type the proxy Username, Password, andConfirm Password.8. Click Save.The Tenable Configuration window appears and displays a success message.9. Create an Offense Rule to generate offenses for the offense rule. For steps on creating offenserules, see the IBM QRadar SIEM documentation.Copyright 2021 Tenable, Inc. All rights reserved. Tenable, Tenable.io, Tenable Network Security, Nessus, SecurityCenter, SecurityCenter Continuous View and Log Correlation Engine are registeredtrademarks of Tenable,Inc. Tenable.sc, Tenable.ot, Lumin, Indegy, Assure, and The Cyber Exposure Company are trademarks of Tenable, Inc. All other products or services are trademarks of theirrespective owners.-9-
Tenable.sc ConfigurationRequired User Role: Security AnalystNote: In Tenable App for QRadar v2 and later, you must authenticate using an API Access Key and Secret Key. Formore information, see the Generate API section in the Tenable.sc User Guide.Complete the following steps to configure the Tenable App For QRadar v2.0.To configure TenableApp For Qradar v2.0:1. Log in to the IBM QRadar SIEM console.2. Click thebutton.The Menu options appear.3. Click Admin.The Admin options appear.4. Scroll to the Tenable section.5. Click Tenable App Settings.The Tenable Configuration appears.6. Click Add Tenable.sc Account.7. Configure the settings for Tenable.sc.Copyright 2021 Tenable, Inc. All rights reserved. Tenable, Tenable.io, Tenable Network Security, Nessus, SecurityCenter, SecurityCenter Continuous View and Log Correlation Engine are registeredtrademarks of Tenable,Inc. Tenable.sc, Tenable.ot, Lumin, Indegy, Assure, and The Cyber Exposure Company are trademarks of Tenable, Inc. All other products or services are trademarks of theirrespective owners.- 10 -
a. In the Address box, enter the IP address used to access Tenable.sc.b. In the Access Key box, enter your generated Tenable.sc access key. For more information,see Enable API Key Authentication and Generate API Keys.c. In the Secret Key box, enter your generated Tenable.sc secret key. For more information,see Enable API Key Authentication and Generate API Keys.d. In the Rule based Scan Name box, enter a scan name that exists in Tenable.sc.If a scan does not exist, you must create one with the associated QRadar credentials in Tenable.sc. This scan is used for the rule based scan function.e. In the Right Click Scan Name box, enter a scan name that exists in Tenable.sc.If a scan does not exist, you must create one with the associated QRadar credentials in Tenable.sc. This scan is used for the right click scan function.Copyright 2021 Tenable, Inc. All rights reserved. Tenable, Tenable.io, Tenable Network Security, Nessus, SecurityCenter, SecurityCenter Continuous View and Log Correlation Engine are registeredtrademarks of Tenable,Inc. Tenable.sc, Tenable.ot, Lumin, Indegy, Assure, and The Cyber Exposure Company are trademarks of Tenable, Inc. All other products or services are trademarks of theirrespective owners.- 11 -
Note: This scan can be the same as the Rule Based Scan Name.f. In the Authorized Service Token box, enter your Qradar authorized service token. Authorized tokens are found under User Management in the Authorized Services section.See the IBM QRadar SIEM website for steps on creating an authorized service token.g. (Optional) Click the toggle to enable or disable SSL verification. It may be required to enterthe hostname of the machine hosting Tenable.sc in the Address box.h. (Optional) Connect to Tenable.sc using a proxy.lClick the Enable/Disable Proxy toggle.lType an IP/Hostname.lType a Port.l(Optional) Select the Require Authentication for Proxy check box.lIf you required authentication for proxy, type the proxy Username, Password, andConfirm Password.8. Click Save.The Tenable Configuration window appears and displays a success message.9. Create an Offense Rule to generate offenses for the offense rule. For steps on creating offenserules, see the IBM QRadar SIEM documentation.Copyright 2021 Tenable, Inc. All rights reserved. Tenable, Tenable.io, Tenable Network Security, Nessus, SecurityCenter, SecurityCenter Continuous View and Log Correlation Engine are registeredtrademarks of Tenable,Inc. Tenable.sc, Tenable.ot, Lumin, Indegy, Assure, and The Cyber Exposure Company are trademarks of Tenable, Inc. All other products or services are trademarks of theirrespective owners.- 12 -
Tenable.ot Log Extension for QRadarOverviewTenable.ot enables operational engineers and cybersecurity personnel to gain visibility into, and control over, Industrial Control System (ICS) networks. Through its policies and alerts mechanism, Tenable.ot generates real-time alerts that are accurate, actionable, and customized for each network andits unique needs.Tenable.ot detects unauthorized changes made to industrial processes in ICS networks. It can producevarious alerts on changes in the configuration of controllers (PLC, DCS, IED), details, communications,and alert on a range of network attack vectors that may threaten industrial processes. Tenable.ot alsoactively verifies the controllers’ configuration and alerts on changes made to them.Tenable.ot reports these alerts to QRadar via Syslog. For each individual policy, users can decidewhether an alert should be sent to QRadar via Syslog; this offers them maximum control over whichinformation is being sent.Installing the Tenable.ot ExtensionIn order to integrate Tenable.ot with your QRadar system, you need to download the Tenable.ot extension from the IBM X-Force Exchange and install it.To download and install the extension:1. In the IBM QRadar console, open the Admin tab.2. In the System Configuration section, click on Extension Management.Copyright 2021 Tenable, Inc. All rights reserved. Tenable, Tenable.io, Tenable Network Security, Nessus, SecurityCenter, SecurityCenter Continuous View and Log Correlation Engine are registeredtrademarks of Tenable,Inc. Tenable.sc, Tenable.ot, Lumin, Indegy, Assure, and The Cyber Exposure Company are trademarks of Tenable, Inc. All other products or services are trademarks of theirrespective owners.- 13 -
3. In the Extension Management window, click Add and select the TenableotCustom ext archivefile.4. Select the Install Immediately checkbox to install the extension immediately. Before the extension is installed, a preview list of the content items is displayed.Configuring a Tenable.ot Log SourceTo configure Tenable.ot as a log source:1. In the Data Sources section of the Admin tab, click on Log Sources.2. In the Log Source window click on Add.Copyright 2021 Tenable, Inc. All rights reserved. Tenable, Tenable.io, Tenable Network Security, Nessus, SecurityCenter, SecurityCenter Continuous View and Log Correlation Engine are registeredtrademarks of Tenable,Inc. Tenable.sc, Tenable.ot, Lumin, Indegy, Assure, and The Cyber Exposure Company are trademarks of Tenable, Inc. All other products or services are trademarks of theirrespective owners.- 14 -
3. The Add a log source window opens.4. In the Log Source Type field, select Tenable.ot.5. In the Log Source Extension field, select TenableotCustom ext.6. Fill in the additional fields as needed and click Save.For information on how to send alerts to QRadar, see Sending Tenable.ot Alerts to QRadar.Copyright 2021 Tenable, Inc. All rights reserved. Tenable, Tenable.io, Tenable Network Security, Nessus, SecurityCenter, SecurityCenter Continuous View and Log Correlation Engine are registeredtrademarks of Tenable,Inc. Tenable.sc, Tenable.ot, Lumin, Indegy, Assure, and The Cyber Exposure Company are trademarks of Tenable, Inc. All other products or services are trademarks of theirrespective owners.- 15 -
Sending Tenable.ot Alerts to QRadarOverviewIn order to send Tenable.ot alerts to QRadar, you first need to configure Tenable.ot for your QRadar system. Then, for each relevant Policy, you can specify QRadar as a target for receiving alerts.Connecting QRadar to Tenable.otTo connect your QRadar Syslog server to Tenable.ot:1. In the Tenable.ot console, under Local Settings, go to the Servers Syslog Servers screen.2. Click Add Syslog Server. The Syslog Server configuration window is displayed.3. In the Server Name field, enter a name for your QRadar system.4. In the Hostname\IP field, enter the IP address of your QRadar system.Copyright 2021 Tenable, Inc. All rights reserved. Tenable, Tenable.io, Tenable Network Security, Nessus, SecurityCenter, SecurityCenter Continuous View and Log Correlation Engine are registeredtrademarks of Tenable,Inc. Tenable.sc, Tenable.ot, Lumin, Indegy, Assure, and The Cyber Exposure Company are trademarks of Tenable, Inc. All other products or services are trademarks of theirrespective owners.- 16 -
5. In the Port field, enter the port number on the QRadar system to which the events will be sent.(Default value is 514)6. In the Transport field, select from the dropdown list the transport protocol to be used. (Optionsare TCP or UDP)7. Click Send Test Message to send a test message to verify that the configuration was successful,and check if the message has arrived. If the message did not arrive, then troubleshoot to discover the cause of the problem and correct it.8. Click Save.Specifying QRadar as a Target for Policy AlertsTo configure a policy to send alerts to QRadar:1. Create a new Policy or edit an existing Policy.2. Fill in all fields as needed.3. On the Policy Actions page, under Syslog, select your QRadar system.Copyright 2021 Tenable, Inc. All rights reserved. Tenable, Tenable.io, Tenable Network Security, Nessus, SecurityCenter, SecurityCenter Continuous View and Log Correlation Engine are registeredtrademarks of Tenable,Inc. Tenable.sc, Tenable.ot, Lumin, Indegy, Assure, and The Cyber Exposure Company are trademarks of Tenable, Inc. All other products or services are trademarks of theirrespective owners.- 17 -
4. Click Create (or Save if you are editing a Policy).To configure multiple Policies (bulk process) to send alerts to QRadar:1. On the Policies screen, select the checkbox next each of the desired Policies.2. Click on the Bulk Actions menu and select Edit from the dropdown list.Copyright 2021 Tenable, Inc. All rights reserved. Tenable, Tenable.io, Tenable Network Security, Nessus, SecurityCenter, SecurityCenter Continuous View and Log Correlation Engine are registeredtrademarks of Tenable,Inc. Tenable.sc, Tenable.ot, Lumin, Indegy, Assure, and The Cyber Exposure Company are trademarks of Tenable, Inc. All other products or services are trademarks of theirrespective owners.- 18 -
3. The Bulk Edit screen is shown with the Policy Actions available for bulk editing.Copyright 2021 Tenable, Inc. All rights reserved. Tenable, Tenable.io, Tenable Network Security, Nessus, SecurityCenter, SecurityCenter Continuous View and Log Correlation Engine are registeredtrademarks of Tenable,Inc. Tenable.sc, Tenable.ot, Lumin, Indegy, Assure, and The Cyber Exposure Company are trademarks of Tenable, Inc. All other products or services are trademarks of theirrespective owners.- 19 -
4. Under Syslog, select the checkbox next to your QRadar system.5. Click Save.The Policies are saved with the new configuration.Copyright 2021 Tenable, Inc. All rights reserved. Tenable, Tenable.io, Tenable Network Security, Nessus, SecurityCenter, SecurityCenter Continuous View and Log Correlation Engine are registeredtrademarks of Tenable,Inc. Tenable.sc, Tenable.ot, Lumin, Indegy, Assure, and The Cyber Exposure Company are trademarks of Tenable, Inc. All other products or services are trademarks of theirrespective owners.- 20 -
Create a RuleIn QRadar, you can create a rule based on SIEM data. If the rule conditions are found, a scan launcheson the requested IP address. You can also right click an IP address in QRadar to initiate a scan. Whenscans are launched, rules with the associated IP address scan Tenable.io and Tenable.sc.A background script runs periodically to launch scans on the IP address. The default time for run is1200 seconds.Complete the following steps to create a rule in your Tenable application for IBM QRadar SIEM .To create a rule:1. On the IBM QRadar SIEM console, click thebutton.The Menu options appear.2. Click Offenses.The Offenses menu appears.3. In the Offenses menu, click Rules.The Rules page appears.4. In the Rules menu, click Actions.A drop-down box appears.5. Select one of the New Rule options.The Rule Wizard window appears.6. Clic
IBM QRadar SIEM v3.0 (QRadar) is a network security management platform that provides situational awareness and compliance support. It collects, processes, aggregates, and stores network data in real time. QRadar v3.0 has a modular architecture tha