Transcription
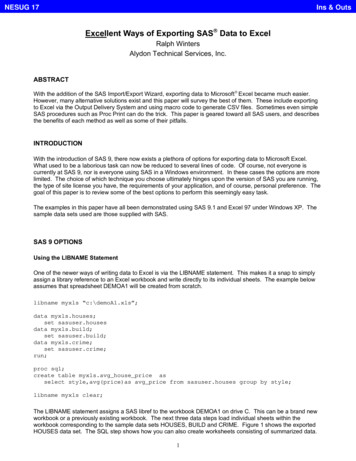
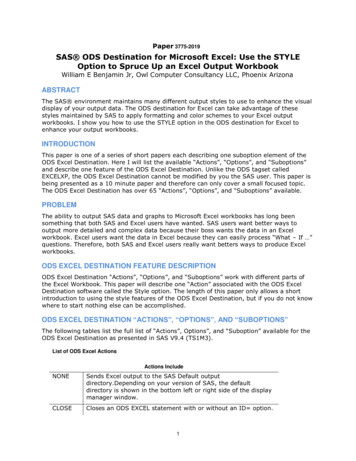
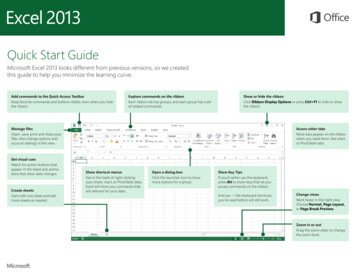
Exporting Data to Excel from the James City County Property Information Website1. Start a new search. To search by subdivision (or other criteria), make sure to select “Show Advanced SearchOptions”.2. Enter the subdivision name, or add in the first letters and a list will populate with subdivision names. Once youhave your subdivision or other criteria entered, hit “Search”
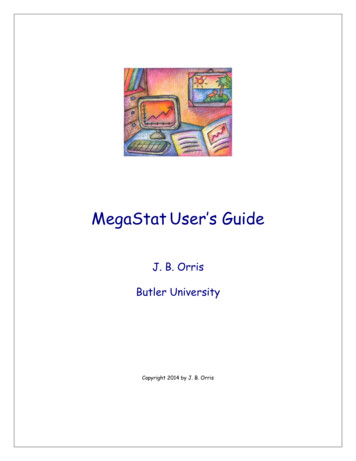
3. The results for the search for Adam’s Hunt are below. This is where a lot of searches stop, by clicking “exportresults”. While you can use the “Export Results button”, you only get the fields (columns) you see on thescreen. If these fields contain the needed information, you can stop here. However, to get a table with thecomplete fields of data, the selection and export requires a few more steps.4. To download a complete table of information, this must be created in the map, first select “view in Map” forany of the parcels in the selection. This will get you to the correct area on the map tab.
5. Selecting “View in Map”, directs you to the Mapping page. Close the pop-up box56. Use the side scale or mouse scroll wheel to zoom to get the whole target area on the screen.
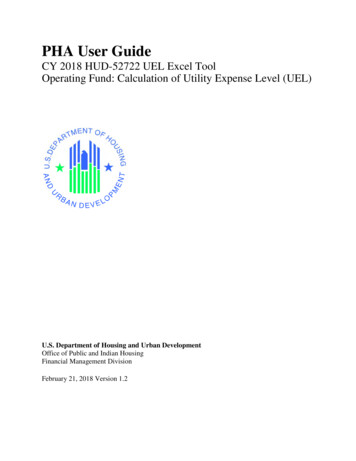
7.1.2.3.4.Click “Tools”From the dropdown that opens select “identify”.Select “Custom Shape” from the Identify toolbar.In the Layer box, make sure to click into where it says all visible and select “Parcels” otherwise theselection will include unwanted layers.31248. Draw a polygon around the target area. Click once to get the line started, then click any time you want to changedirections. The tool draws with straight lines only. While drawing your shape, the area that is being selected willfill in with transparent blue, like below. When you have a rough estimate of your target area, double click tofinish your selection shape. It does not have to be perfect.
9. To change your shape, click and drag the blue boxes along the lines to move that vertex.A red dotted line will appear showing the change that will be made. Simply relase the mouse button and thepolygon will change to where the red lines indicate.
You can also click the empty boxes in the middle of lines to add more vertexes if you need them.NOTE: Any parcel that has even a part of the blue polygon in it will be selected.10. Adjust your line to select as close to the area as you need.1. When you are happy with the selection polygon, make sure “Results” is the active tab.2. Click on “Tools” in the Results frame3. Select “Export All to Excel”. This will only export the information for the parcels that have been selected.
4. The counter above the “Tools” button shows you how many parcels are currently in the selection.Search is limited to 1,000 parcels per selection.412311. You will get a window that pops up to let you know your export has been successful and the Excel spreadsheethas been created. Click “View Export” to download and view the results.12. Open the created Excel file. You will notice a much larger number of fields (columns) and their associated data.The field names are required to be short when downloaded, but there is a key at the end of this document thatgives a longer description and the creator of each field.
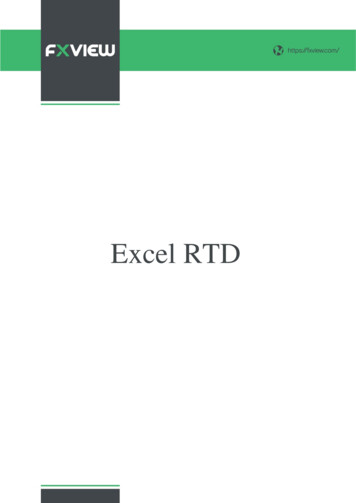
13. The selection polygon may have selected some polygons not in the target subdivision, so check your results andremove extra results that fall outside of the subdivision as needed.To select parcels with a buffer1. Click Tools2. Click Identify3. Click Buffer
4. Set your Criteria and Pick Parcels for the layer5. Click a spot on the map and a buffer will draw.6. Return to step 10 above to Export the table to Excel.12345
To search by subdivision (or other criteria), make sure to select "Show Advanced Search Options". 2. Enter the subdivision name, or add in the first letters and a list will populate with subdivision names. Once you . Open the created Excel file. You will notice a much larger number of fields (columns) and their associated data. .