Transcription
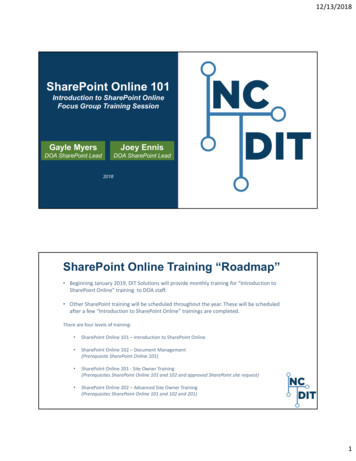
Use SharePoint Designer 2010 to Create aDocument ViewerPrizm Content Connect TutorialThe Prizm Content Connect Viewer can be utilized in a variety of ways in SharePoint, and thistutorial will show how in a few quick steps, you can create a web part page that will allow you toscroll through your documents and see the Prizm Content Connect Viewer load the contentimmediately on the same page.To get started building your SharePoint document viewer, download Prizm ContentConnect here.At the end of the document, you should have an ASPX page that looks similar to this. It willallow for clicking on each document and viewing a preview of the document on the same page,with the associated rights you’ve assigned through Digital Rights Management in Prizm ContentConnect.
Determine Where to Add the Web Part PageYou will be adding a web part page to a document library. The steps below outline how to createa document library for web part pages and add a web part page to it.You can also use an existing document library:1. Select Site Actions.2. Select More Options 3. Filter by Page.4. Create a Web Part Page, then skip to Step 2 below, where you will need tospecify the document library where you want the Web Part Page to be saved.1. Open your SharePoint site and select Site Actions. Select New Document Library:
2. The Create dialog is displayed. Specify the name of the document library andchoose Web Part page for the Document Template. Click Create:3. The new document library is displayed. Click New Document on the Documents tabunder Library Tools:
Add the Web Part Page1. Specify a Name and Layout Template for the Web Part Page. Click Create:Add Web Parts to the Web Part PageAfter adding the Web Part Page, the Web Part Page is displayed. Follow the steps below to adda Document Library Web Part and a Web Part for the Prizm Content Connect Viewer to theWeb Part Page:1. Click Add a Web Part in the area you want to display the files in the Document Library:
2. Select the Lists and Libraries category. Select the Document Library you want to addto the page. Click Add:3. You will see the contents of your document library appear in the area you selected.Click Add a Web Part where you would like the Prizm Content Connect Viewer todisplay:
4. Select the Media and Content category. Select the Content Editor Web Part andclick Add:5. In the Content Editor Web Part, click the Click here to add new content link:6. Select HTML on the Format Text menu under Editing Tools. Select Edit HTML Source:
7. The HTML Source dialog is displayed. Enter the following text and click OK:HTML CodeCopy Code iframe name ”prizmviewer” width 100% height 700 /iframe 8. Click on the Page Ribbon and click Stop Editing:
Edit the Web Part Page in SharePoint DesignerFollow the steps below to edit the Web Part Page in SharePoint Designer to modify theDocument Library Web Part links to open in the Prizm Content Connect Viewer Web Part.SharePoint Designer will not open if you are running a 64-bit browser. You will need to openthe Web Part Page in a 32-bit browser.SharePoint Designer will not work unless SharePoint Client Integration is turned on. See theWorking with Client Integration Features topic in the Help file for steps on how to modifywhether SharePoint Client Integration is enabled or not.SharePoint Designer does not work if the Prizm DRM redirector is activated. See theEnabling the DRM Redirector for a Web Application topic in the Help file for steps on how tomodify whether the Prizm DRM Redirector is activated or not.1. On the Page Ribbon, pull down the Edit Page menu and select Edit in SharePointDesigner:
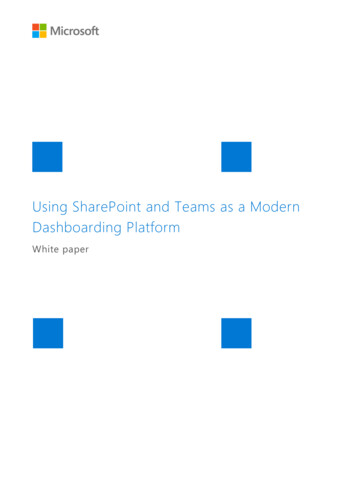
2. Select the Split view at the lower left hand corner of the page to show both the designand code. Click on a document name so you can see the cursor in front of it:3. The Tag Properties should display. If they do not display, you can right-click where thecursor is and select Properties. In the Tag Properties, remove all Events andAttributes except the href attribute. Then locate the code shown highlighted below andchange it to the following. Be sure to replace "http://your-site-url" with the URL of yoursite: a href "/ dentifier http://your-siteurl{ thisNode/@FileRef.urlencode}&IsDlg 1" target "prizmviewer"
4. You can optionally add and remove columns to show only the information you wish todisplay in the Web Part. Click anywhere in the Web Part and then select Add/RemoveColumns from the Options menu under List View Tools:5. The Displayed Fields dialog is displayed. Add or remove fields that you want displayed.At a minimum the Name field must be included. In this example, the Type and Namefields are selected:
Reset SettingsYou can now turn SharePoint Client Integration off again and enable the Prizm DRMRedirector again if you are using it.You should now be able to browse to the Web Part Page and click on a document to see itdisplay in the Prizm Content Connect Viewer.Prizm Content Connect is an enterprise class technology platform with several options for enduser document viewing and collaboration, including a SharePoint Edition that is perfect forsharing information across an enterprise. Get a Prizm Content Connect trial or view ouronline demo.
Use SharePoint Designer 2010 to Create a Document Viewer . Prizm Content Connect Tutorial . The Prizm Content Connect Viewer can be utilized in a variety of ways in SharePoint, and this tutorial will show how in a few quick steps, you can create a web part page that will allow you to
![Microsoft SharePoint Designer Crack [Mac/Win] (Final 2022)](/img/47/microsoft-sharepoint-designer.jpg)