Transcription
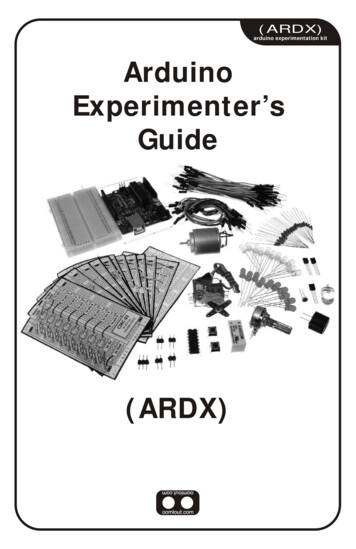
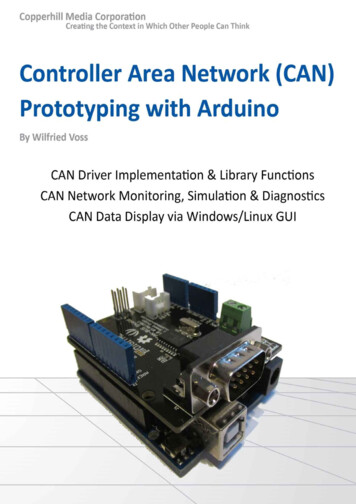
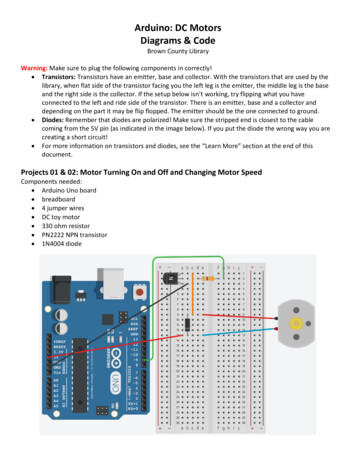
Arduino: DC MotorsDiagrams & CodeBrown County LibraryWarning: Make sure to plug the following components in correctly! Transistors: Transistors have an emitter, base and collector. With the transistors that are used by thelibrary, when flat side of the transistor facing you the left leg is the emitter, the middle leg is the baseand the right side is the collector. If the setup below isn’t working, try flipping what you haveconnected to the left and ride side of the transistor. There is an emitter, base and a collector anddepending on the part it may be flip flopped. The emitter should be the one connected to ground. Diodes: Remember that diodes are polarized! Make sure the stripped end is closest to the cablecoming from the 5V pin (as indicated in the image below). If you put the diode the wrong way you arecreating a short circuit! For more information on transistors and diodes, see the “Learn More” section at the end of thisdocument.Projects 01 & 02: Motor Turning On and Off and Changing Motor SpeedComponents needed: Arduino Uno board breadboard 4 jumper wires DC toy motor 330 ohm resistor PN2222 NPN transistor 1N4004 diode
/*DC Motors 01 : Turn Motor On and OffSource: Code adapted from SparkFun Inventor's Kit Example Sketch -amotor)*/int motorPin 9;// motor is connected to pin 9void setup() {pinMode(motorPin, OUTPUT); // motor pin is an output}void loop() {digitalWrite(motorPin, HIGH); // turn the motor on (full speed)delay(3000);// wait (delay) for this many millisecondsdigitalWrite(motorPin, LOW); // turn the motor offdelay(3000);// wait (delay) for this many milliseconds}3/2018Brown County Library
/*DC Motors 02 : Change Motor SpeedSource: Code adapted from SparkFun Inventor's Kit Example Sketch -amotor)*/int motorPin 9;// motor is connected to pin 9void setup() {pinMode(motorPin, OUTPUT); // motor pin is an output}void loop() {int Speed1 200; // between 0 (stopped) and 255 (full speed)int Speed2 50; // between 0 (stopped) and 255 (full speed)analogWrite(motorPin, Speed1); // runs the motor on Speed 1delay(500);// wait (delay) for this many millisecondsanalogWrite(motorPin, Speed2); // runs the motor on Speed 2delay(1000);// wait (delay) for this many milliseconds}3/2018Brown County Library
Project 03: Using an H-BridgeThis is what each leg of an H-bridge means:123Enable LeftDriver V ChipInput 1Input 4Output 1Output 4478151413Ground5616Output 212Output 3Input 2Input 3 VMotorEnableRight Driver11109For more information about how H-bridges work, see:H-Bridges: The Basics. dge-secrets/h-bridges-the-basics/3/2018Brown County Library
Project 03: Using an H-BridgeComponents needed: Arduino Uno board breadboard 8 jumper wires DC toy motor H-bridge – L293D Motor Control ChipBuild in stages:3/2018Brown County Library
Project 3 continued:3/2018Brown County Library
Project 03 continued:Note: No code is needed for this project – you will manually move jumper wires to make the DC motor start,stop and move in the direction that you want. However, make sure to plug the Arduino back into thecomputer to provide power once you have completed the setup below.Now what? We will now control the motor manually by moving the jumper wires. Once the Arduino is plugged back in, the motor should be spinning – we’ll call the direction that it iscurrently spinning “Direction A.” Move Pin 1 (Enable) to the ground gutter. The motor will stop, as we have just disabled the left side ofthe driver. Reconnect to power to start the motor again. Now move Pin 2 (Input 1) to ground. Now Pins 2 & 7 (Inputs 1 & 2) are both connected to ground andthe motor will stop. Move Pin 7 (Input 2) to power. As Pins 2 & 7 arePin 2Pin 7Motorconnected differently again, the motor will begin but(Input 1)(Input 2)rotate in the opposite direction (Direction B).PowerGroundTurns (A) Connect Pin 2 (Input 1) back to power. Pins 2 & 7(Inputs 1 & 2) are both connected to power and theGroundGroundStoppedmotor will stop. Use the table to the right as a reference.GroundPowerTurns (B)PowerPowerStopped3/2018Brown County Library
Project 04: Controlling a MotorComponents needed: Arduino Uno board breadboard 8 jumper wires DC toy motor H-bridge – L293D Motor Control Chip Potentiometer ButtonBuild in stages:3/2018Brown County Library
Project 4 continued:3/2018Brown County Library
Project 4 continued:3/2018Brown County Library
/*DC Motors 04 : Controlling a MotorSource: Code adapted from Adafruit Arduino - Lesson 15. w)*/int enablePin 11;int forwardPin 10;int reversePin 9;int buttonPin 7;int potPin 0;// enables left side of the h-bridge// pin 2 from h-bridge – tells the motor to go forward// pin 7 from h-bridge – tells the motor to go backward// button// potentiometervoid setup(){pinMode(forwardPin, OUTPUT);pinMode(reversePin, OUTPUT);pinMode(enablePin, OUTPUT);pinMode(buttonPin, INPUT PULLUP);resistor)}// the h bridge pins are set as outputs// the button is an input (pullup enables the internal pull-upvoid loop(){int speed analogRead(potPin) / 4; // divide the potentiometer reading by 4 to get a number between 0 & 255boolean buttonPressed ! digitalRead(buttonPin); // read the button. Since false pressed, use not (!) to switch the value aroundsetMotor(speed, buttonPressed);// send our settings to the motor}void setMotor(int speed, boolean buttonPressed){analogWrite(enablePin, speed);// turns motor on or off & sets speed on the enable pinif(buttonPressed) {digitalWrite(forwardPin, HIGH);digitalWrite(reversePin, LOW);}else {digitalWrite(forwardPin, LOW);digitalWrite(reversePin, HIGH);}// enable going forward// disable going backward// disable going forward// enable going backward}3/2018Brown County Library
Ideas to Build OnSet the motor to automatically accelerate and decelerate:Use the code found on page 13 of this document and the same setup as Projects 01 and 02 above.Control a motor using a serial monitor:Try the serial speed function at the bottom of the code found on this ng-a-motorCreate a setup where a motor runs when you push a 6/dc%20motor%20pushbuttonAdd another motor to the other side of the -robots-using-arduino-h-bridgeLearn MoreWant to learn more about how DC motors work? Try these resources:Adafruit Arduino Lesson 13: DC Motors. Simon esson-13-dc-motorsAdafruit Arduino Lesson 15: DC Motor Reversing. Simon esson-15-dc-motor-reversingExploring Arduino: Tools and Techniques for Engineering Wizardry. Jeremy Blum. 2013.H-Bridges: The s/h-bridge-secrets/h-bridges-the-basics/Sparkfun SIK Experiment Guide for Arduino V3.3 – Experiment 12: Driving a ing-a-motorSparkfun Tutorials: Motors and Selecting the Right d-selecting-the-right-oneSparkfun Tutorials: Sparkfun Tutorials: ransistors3/2018Brown County Library
/*DC Motors : Automatic Acceleration & DecelerationSource: Code adapted from SparkFun Inventor's Kit Example Sketch -amotor) and Jeremy Blum's Exploring Arduino t motorPin 9;// motor is connected to pin 9void setup() {pinMode(motorPin, OUTPUT); // motor pin is an output}void loop() {int speed;int delayTime 20; // milliseconds between each speed step// accelerate the motorfor(speed 0; speed 255; speed ) // counts from 0 to 255 (max speed) using the variable "speed"{analogWrite(motorPin,speed); // set the new speeddelay(delayTime);// delay between speed steps}// decelerate the motorfor(speed 255; speed 0; speed--) // counts down from 0 to 255 (max speed) using the variable "speed"{analogWrite(motorPin,speed); // set the new speeddelay(delayTime);// delay between speed steps}}3/2018Brown County Library
Arduino: DC Motors Diagrams & Code Brown County Library Warning: Make sure to plug the following components in correctly! Transistors: Transistors have an emitter, base and collector. With the transistors that are used by the library, when flat side of the transistor facing you the left leg is the emitter, the middle leg is the base
