Transcription
Toon BoomHarmony 20 EssentialsGetting Started GuideTOON BOOM ANIMATION INC. 1 514 278 86664200 St.Laurent Blvd, Suite 1020Montreal, Quebec, CanadaH2W 2R2contact@toonboom.comtoonboom.com
Harmony 20 Essentials Getting Started GuideLegal NoticesToon Boom Animation Inc.4200 Saint-Laurent, Suite 1020Montreal, Quebec, CanadaH2W 2R2Tel: 1 514 278 8666Fax: 1 514 278 2666toonboom.comDisclaimerThe content of this document is the property of Toon Boom Animation Inc. and is copyrighted. Anyreproduction in whole or in part is strictly prohibited.The content of this document is covered by a specific limited warranty and exclusions and limit of liability underthe applicable License Agreement as supplemented by the special terms and conditions for Adobe Flash FileFormat (SWF). For details, refer to the License Agreement and to those special terms and conditions.TrademarksToon Boom is a registered trademark. Harmony and the Toon Boom logo are trademarks of Toon BoomAnimation Inc. All other trademarks of the property of their respective owners.Publication Date03-11-2021Copyright 2021 Toon Boom Animation Inc., a Corus Entertainment Inc. company. All rights reserved.1
Table of ContentsTable of ContentsTable of Contents2Introduction6Chapter 1: Creating a Scene8Chapter 2: Introduction to the Harmony User InterfaceViews1010Adding a View11Camera view13Drawing view14Tool Properties view15Colour view16Timeline view16Drawing Substitutions View17Xsheet view18Library view19Toolbars20Adding Toolbars20Tools Toolbar25File Toolbar26Edit Toolbar26Playback Toolbar26Interface Navigation26Touch Interface30Chapter 3: How to Add Layers32Renaming Layers32Adding Layers33Deleting Layers34Reordering Layers34Grouping Layers35Hiding and Showing Layers362
Harmony 20 Essentials Getting Started GuideLocking and Unlocking Layers36Chapter 4: How to Draw38Adjusting Artwork40About Art Styles, Drawing Tools and Layer Types43Chapter 5: How to Paint46Colour Palettes47Painting48Closing Gaps49Chapter 6: How to Create Paperless Traditional Animation52Creating a Rough Animation52Reviewing your Animation56Cleaning Up57Chapter 7: How to Import Images62Vectorizing Images64Chapter 8: How to Position and Animate Layers66Positioning Layers66Repositioning the Pivot68Animating a Layer69Chapter 9: How to Position and Animate the Camera74Adding a Camera74Adding a Parent Peg74Positioning the Camera75Animating the Camera77Chapter 10: How to Rig a Cut-out Character80Drawing the Pieces80Adding Pegs83Creating a Layer Hierarchy84Master Peg86Chapter 11: How to Animate a Cut-out Character90Navigating Layers963
Table of ContentsChapter 12: How to Use Deformers100Bone Deformer100Game Bone Deformer101Creating Deformers101Displaying Deformers103Animating With Deformers105Chapter 13: How to Import Sound and Add Lip-Sync110Importing Sound110Automatic Lip-Sync Detection111Animating Lip-Sync Manually114Chapter 14: How to Add Effects to a Scene118About Effects118Adding an Effect119Using the Cutter Effect120Animating an Effect123Creating an Effect Based on an Animated Character133Chapter 15: How to Use Drawing Guides136Chapter 16: How to Create a Multiplane146Chapter 17: How to Create and Use Templates150Creating a Template150Importing a Template151Chapter 18: How to Export a Movie154Glossary1584
Harmony 20 Essentials Getting Started Guide5
IntroductionIntroductionHarmony is a complete animation software allowing you to create all kinds of creative animation projects. Itcomes with a very wide variety of tools and features.In this Getting Started Guide, you will learn the basics of how to use the main features in Harmony Essentials,which will quickly bring you up to speed. Refer to the complete Toon Boom Harmony Essentials documentationavailable online at docs.toonboom.com to learn about all the tools and options, as well as more advancedtechniques.6
Harmony 20 Essentials Getting Started Guide7
Chapter 1: Creating a SceneChapter 1: Creating a SceneAs soon as you launch Harmony, you are greeted with the Welcome screen, from which you can:lCreate sceneslChoose your new scene's resolutionlManage your scene resolution presetslQuickly open recently opened sceneslBrowse for and open a scene you already created.lWatch Harmony video tutorials on the web.lAccess the support web page.How to create a scene from the Welcome screen1. In the Name field, type the scene’s name.8
Harmony 20 Essentials Getting Started GuideNOTEThe scene name should not exceed 23 characters and cannot contain specialcharacters, such as *& %!.2. To decide in which directory the scene will be created, click the Browse button next to the Locationfield.3. From the Camera Size menu, select a scene resolution.4. Click on Create Scene.A new scene is created. The main application window will appear with your new scene opened in it.9
Chapter 2: Introduction to the Harmony User InterfaceChapter 2: Introduction to the Harmony User InterfaceUsing Toon Boom Harmony Essentials will be significantly easier if you first become familiar with its userinterface. The following chapter gives you a basic introduction to the most important elements of the userinterface. As you go through the ensuing chapters, you will learn more detailed information about each of theseelements.When you start Toon Boom Harmony Essentials for the first time, the default workspace is displayed. Theworkspace is divided in rectangular user interfaces which are referred to as views, each of which has its ownspecific purpose. The top and left side of the user interface, as well as some views, also contain toolbars, eachwith specific functions.ViewsViews are small user interfaces that each have a specific purposes. They can be added to the main applicationwindow, in which case they are “docked”, or can be opened as separate windows.Each views has a tab on top of it which contains its name. Not only this can be used to identify the views you’reworking with, tabs also allow you to stack several views in the same area of the user interface. For example, inthe default workspace, most of the area is occupied by the Camera view. At the top of the camera view are twotabs, one that says Camera and the other that says Drawing. This is because the Drawing view is stacked withthe Camera view, and you can quickly switch between both by clicking on either tab.10
Harmony 20 Essentials Getting Started GuideRight of the tabs of each division in your workspace are theAdd View andClose View buttons, whichallow you to stack more views or to remove the currently selected view from this area of the workspace.Adding a ViewYou can add, remove, move and stack views all over your workspace to optimize your workflow.How to add a view to your workspace as a tab1. In the top-right corner of an existing view, click theAdd View button2. Select the desired view from the list.The view appears as a new tab, in the section of your workspace where you added it.11
Chapter 2: Introduction to the Harmony User InterfaceNOTESome views, such as the Camera view, can be opened in multiple instances. For example, thiscan be useful if you want to have two instances of the Camera views open, each focused ondifferent areas of your scene, to quickly switch between working on these two areas.How to add a view to your workspace as a window1. Open the Windows menu.2. In the Windows menu, select the view you wish to add.The view will appear as a new window over Harmony's main application window.How to dock a view window to your workspace1. Click and drag the floating view by its tab and do one of the following:lDrop the window over another tab to add it to that set of tabs.lDrop the window above, below or beside an existing view. When you get close to theedge of a view, a cyan rectangle appears, indicating where the view will be docked.12
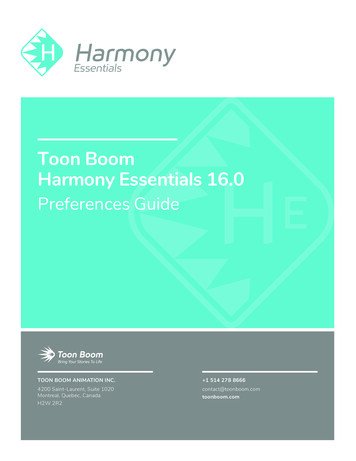
Harmony 20 Essentials Getting Started GuideHere is a short introduction to each of the most commonly used views in Harmony.Camera viewThe Camera view is the centre of operations in Harmony. In this view, you can draw, paint, animate, set up yourscene, manipulate objects, open symbols and preview your animation.The Camera view also has a top and bottom toolbar that you can use to navigate in the view, change thedisplay mode or go up your symbol hierarchy.13
Chapter 2: Introduction to the Harmony User InterfaceDrawing viewIn Harmony, you can draw in both the Drawing or Camera views. Although the two views are similar, there aresome differences when it comes to drawing.Only the selected drawing is displayed by default in the Drawing view. You can use features, such as the lighttable to display the current drawing of all the enabled layers of your scene in washed-out colours, or the OnionSkin to display the previous and next drawings of the currently selected drawing layer.14
Harmony 20 Essentials Getting Started GuideTool Properties viewThe Tool Properties view contains the most common options and operations related to the currently selectedtool. When you select a tool from the Tools toolbar, the Tool Properties view updates.For example, if you choose the Select tool, the Tool Properties view will display the options and operationsrelated to it, such as Snap to Contour, Apply to All Drawings, Flip Horizontal, and Flatten.15
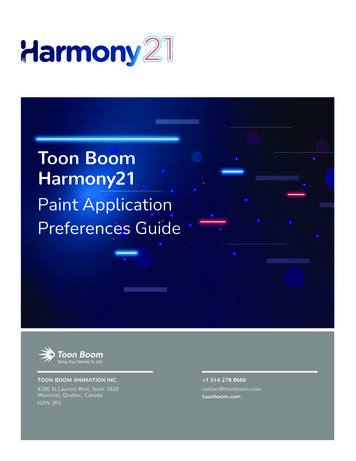
Chapter 2: Introduction to the Harmony User InterfaceColour viewThe Colour view is where you create colours and palettes and import existing palettes into your project. TheColour view is also necessary for drawing, painting and creating colour styling.Timeline viewTo set your animation timing, you will mostly work with the Timeline and Xsheet views. It's extremely useful tobecome familiar with the Timeline view, how it works, and its interface.The Timeline view is the main view used when adjusting the timing of drawings, adding keyframes andordering layers. The Timeline view displays layers, effects, sounds, keyframe values, scene length, layer names,drawings, keyframes, timing, and frames.16
Harmony 20 Essentials Getting Started GuideThe Timeline view allows you to read your timing from left to right. It represents the scene’s elements in theirsimplest form. You can also see the layers and their names, as well as the drawing’s exposure. The drawingname is displayed when you place your pointer over the drawing’s exposure.Drawing Substitutions ViewThe Drawing Substitutions view allows you to view all the drawings in the selected layer in a list of thumbnails,as well as to quickly select which drawing should be exposed at the current frame.17
Chapter 2: Introduction to the Harmony User InterfaceXsheet viewThe Xsheet view lets you read the timing vertically by displaying it in a grid, with each drawing layerrepresented by a column, each frame of your scene represented by a row, and each exposed drawing displayedby its name in the cells. It is meant to work like a traditional animation exposure sheet.Using the functions panel, you can also view the functions and keyframes of the motion paths for the selectedcolumn, with the value of those functions for each frame listed in the cells.Contrary to the Timeline view, the Xsheet view does not display pegs, effects or layer hierarchy. Hence, it isoptimized for traditional and paperless animation, whereas the Timeline view is optimized for digital or cut-outanimation.18
Harmony 20 Essentials Getting Started GuideLibrary viewThe Library view is used to store elements such as animation, drawings, backgrounds and character models soas to reuse in different scenes and projects. You can also use the Library view to create and store symbols, aswell as to store and import images and sound files.To reuse elements from a scene in other scenes, you must create a template so that you can import it intodifferent scenes. Templates can contain anything from a single drawing to a whole scene structure. You cancreate a template by creating it in a scene, then copying the elements you want in your template into a library.The resulting template is structured like a mini-scene that contains only the elements you copied into it. Atemplate does not have any dependencies on the scene it was originally created in. Hence, it can safely beimported in any other scene.Additionally, the Library view's Drawing Substitutions panel allows you to quickly change the current frame'sexposure to one of the existing drawings in a layer. This is especially useful for animating a cut-out character'smouths, hands, eyelids and other such body parts which typically contain several drawings to choose from.19
Chapter 2: Introduction to the Harmony User InterfaceToolbarsThe Harmony interface contains toolbars that quicky give you you access many useful tools. You can add, moveand remove toolbars in your workspace.Toolbars are separated in two main categories:lWorkspace toolbars are toolbars that have a general purpose. For example, the File, Edit, Workspaceand Deformation toolbars at the top, as well as the Tools toolbar on the left, are workspace toolbars.Those toolbars can be placed at the top, bottom, left or right edge of the application window. They canalso be placed at the edge of specific views if preferred.lView toolbars are toolbars that are useful for a specific view. For example, the Camera view has a Cameratoolbar at its top. View toolbars can only be displayed inside their respective view. They can be placed atthe top, bottom, left or right edge of their view.Adding ToolbarsHow to add or remove a workspace toolbar to the general workspace1. Do one of the following:lIn the top menu, select Windows Toolbars and in the sub-menu, select the toolbar youwant to add.lRight-click on any toolbar that is at the top or side of the workspace, or in the empty space20
Harmony 20 Essentials Getting Started Guidenext to these toolbars, and select the toolbar you want to add in the contextual menu.How to add a view toolbar to a view1. Do one of the following:lClick on the tab of the view for which you want to add a toolbar to set the focus on it. Then, inthe top menu, select Windows Toolbars and select the toolbar you want to add.NOTEIn the list of toolbars in the top menu and in the contextual menu of theworkspace, the toolbars listed above the separator are workspace toolbars, andthe ones below the separator are view toolbars.lIn the top area of the view to which you want to add a toolbar, to the left of its tab, right-click21
Chapter 2: Introduction to the Harmony User Interfaceand select the toolbar you want to add in the contextual menu.NOTESlIn the list of toolbars in the contextual menu of a view, the toolbars listedabove the separator are workspace toolbars, and the ones below theseparator are view toolbars.lIf you select a workspace toolbar in the contextual menu of a view, thisworkspace toolbar will be added to the view. If it was already present in yourworkspace, it will be removed from its previous location.lWhen a workspace toolbar is added to a view that is stacked with otherviews, that toolbar is visible in every view that is stacked in the same area. Forexample, if you add the Advanced Animation toolbar to the Camera view, itwill also be visible in the Drawing view.22
Harmony 20 Essentials Getting Started GuideHow to move a toolbar around1. Click and hold the handle at the left of the toolbar you want to move.2. Do one of the following:lIf the toolbar is horizontal, move it up or down to make it pop out of its row.lIf the toolbar is vertical, move it left or right to make it pop out of its column.3. Do one of the following:lTo reorder toolbars, drag the toolbar where you want it to be located and drop it.The toolbar will move to its new position. Toolbars to the right (or to the bottom, if the toolbaris vertical) will be offset to make space for it.lTo move the toolbar to a new row or to a new column, simply move the toolbar where thenew row or column should be created. For example, to create a new row of toolbars at the topof the user interface, move it just below the existing toolbars at the top of the user interface.A new row or column will appear, highlighted in cyan.When you drop the toolbar, the new row will be created and the toolbar will be placed at theleft end of the row.23
Chapter 2: Introduction to the Harmony User InterfaceLikewise, to create a new column at the left of the user interface, move the toolbar just rightof the existing toolbars at the left of the user interface.lTo move the toolbar to another edge of the user interface, drag it all the way to that edge ofthe user interface.How to move a toolbar over another toolbar1. Make sure both toolbars are in the same row or column. If they are not, move both toolbars to thesame row or column using the method previously described.lIf the toolbars are horizontal, click and hold the handle at the left of the rightmost toolbar.Then, without going outside of the toolbar’s row, slide the toolbar towards the left.lIf the toolbars are vertical, click and hold the handle at the top of the bottom toolbar. Then,without going outside of the toolbar’s column, slide the toolbar up.As you slide the toolbar over the other toolbar, the other toolbar’s buttons become hidden and apop-up menu button appear.2. To separate the toolbars again, simply slide the same toolbar in the opposite direction.24
Harmony 20 Essentials Getting Started Guide3. To expand a toolbar that is overlapped by another toolbar, click on the expand button at the right ofthe overlapped toolbar.Tools ToolbarThe Tools toolbar contains the main tools you need to work in Harmony. In the default workspace, this toolbarlocated on the left edge of the application window.Some of the buttons in the Tools toolbar have a triangle in their bottom-right corner. This is to indicate thatseveral tools are stacked on this button. To access these tools, either click and hold on the tool button, or selectthe tool then click on it again.TIPMany toolbar buttons have a keyboard shortcut associated to them. You can check which keyboardshortcut is associated to a button by leaving your mouse cursor over the button for a second. If thebutton has a keyboard shortcut, it will be indicated in the tooltip that appears.25
Chapter 2: Introduction to the Harmony User InterfaceFile ToolbarThe File toolbar contains buttons for common file operations such as New, Save and Open. These commandscan also be found in the File top menu.Edit ToolbarThe Edit toolbar contains common operations such as Undo, Redo, Cut, Copy and Paste. These commands canalso be found in the Edit top menu.Playback ToolbarThe Playback toolbar allows you to play your animation as well as to set some playback options such as looping,audio playback, playback range and playback speed.Interface NavigationWith the help of menu commands and keyboard shortcuts, some views let you navigate their content byzooming in, zooming out, panning and rotating them. You can also reset the zoom level, pan and rotation angleof these views as needed.The navigation commands in the table below can be used in the following views, with some exceptions:26
Harmony 20 Essentials Getting Started GuidelCameralDrawinglTimelinelXsheetlFunctionlSide and TopTIPKeyboard shortcuts can be customized. You can view, search for and change keyboard shortcuts forHarmony in the Keyboard Shortcuts dialog. To access the Keyboard shortcuts dialog:lWindows: In the top menu, select Edit Keyboard Shortcuts.lmacOS: In the top menu, select Harmony Essentials Keyboard Shortcuts.CommandActionZoom InZooms in theview.Access MethodsView Zoom InPress 2Roll the mouse wheel up (except in the Timeline and Xsheet views)View Zoom OutZoom OutZooms out theview.Zoom In or OutZooms in or out ofthe view.PanMoves the viewhorizontally orvertically.Reset PanResets the view’span to its defaultposition.Press 1Roll the mouse wheel down (except in the Timeline and Xsheetviews)Roll the middle mouse button up or down.Hold down the Spacebar and the middle mouse button whiledragging the mouse up or down.Hold down the Spacebar and drag in the direction you want to panthe view.View Reset PanPress Shift N27
Chapter 2: Introduction to the Harmony User InterfaceCommandActionReset ViewResets the view toits defaultposition.Reset RotationResets the view’srotation to itsAccess MethodsView Reset ViewPress Shift MTheReset View button at the bottom of the Camera view.View Reset Rotationdefault position.Press Shift XReset ZoomResets the view’szoom to itsdefault position.View Reset ZoomRotate ViewRotates the view.While holding Ctrl Alt (Windows/Linux) or Ctrl (macOS), clickand drag the rotating disc to rotate it clockwise or counterclockwise.Rotate 30 CWRotates theCamera view 30degreesclockwise, like anView Rotate View CWanimation table.Rotate 30 CCWRotates theCamera view 30degrees counterclockwise, like ananimation table.Mirror ViewTemporarily flipsthe Camera orDrawing viewhorizontally,allowing you toview and edit yourartwork as if itwas beingmirrored.Toggle QuickClose-upInstantlymultiplies theview's ZoomView Rotate View CCWView Mirror ViewIn the Camera or Drawing toolbar, click on thebutton.Shift Z28Mirror View
Harmony 20 Essentials Getting Started GuideCommandActionAccess MethodsFactor by 4. Forexample, if theCamera View'sZoom Factor is at100%, this willmake it togglebetween 400%and 100%.Cycles throughthe followingdisplay modes:llNormalFullScreen:The mainapplicationwindowbecomesfull screen.View FullScreen:Theselectedviewbecomesfull screenand allotherviews arecollapsed.Toggle FullScreenlView Toggle Full ScreenPress Ctrl F (Windows/Linux) or F (macOS)Normal:The mainapplicationwindow isrestored toits originalsize andcollapsedviews areexpanded.29
Chapter 2: Introduction to the Harmony User InterfaceTouch InterfaceIf you are working with a touch screen, a trackpad or a tablet that supports touch input, you can also usestandard two-finger gestures to zoom, rotate and pan the Camera and Drawing Views. To be able to do this,you must first enable the Support Gestures preference.How to enable gesture support1. From the top menu, go to Edit Preferences (Windows/Linux) or Harmony Preferences (Mac OSX).2. Open the General tab.3. In the Touch Interface section, check the Support Gestures check box.4. Click on OK.5. Restart Harmony.You can now manipulate the Camera and Drawing views by dragging two fingers on your touchinterface.How to use gestures1. In the Camera or Drawing view, press two fingers a short distance from each other.2. Do one of the following:lTo pan the view, drag your two fingers in any direction, keeping both fingers at the samedistance from each other.lTo zoom in, drag your two fingers away from each other.30
Harmony 20 Essentials Getting Started GuidelTo zoom out, drag your two fingers closer to each other.lTo rotate, drag your two fingers in a curve so that they revolve in the same direction.31
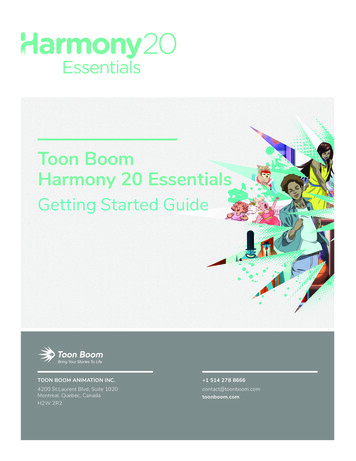
Chapter 3: How to Add LayersChapter 3: How to Add LayersJust like with traditional animation, Harmony uses layers to keep elements such as characters, backgrounds andprops separate from each other, allowing you to animate them independently.When you create a new scene, your scene will have a default layer named Drawing, in which you canimmediately start drawing.Layers can be selected and managed in the Timeline view. A scene can have as many layers as needed. Whenyour scene has several layers, layers higher in the list appear over lower layers.Renaming LayersIn a new scene, there is only one layer created by default, named Drawing. In traditional animation, it iscommon to name animation layers with single letters (A, B, C, etc.) and layout layers with acronyms (BG forbackground, OL for overlay, etc). So you can start off your scene by giving your first layer an appropriate name.How to rename a layer in the Timeline view1. In the Timeline view, double-click on the name of the layer to rename.A text-input field appears over the name.32
Harmony 20 Essentials Getting Started Guide2. Type in the new name for your layer and press Enter/Return.The layer now has the new name.Adding LayersHow to add a drawing element from the Timeline view1. Do one of the following:lIn the Timeline view, click theAdd Drawing Layer button.lIn the top menu, select Insert Drawing.lPress Ctrl R (Windows/Linux) or R (macOS).The Add Drawing Layer dialog appears.2. In the Name field, type in the name for your new layer.3. Do one of the following:lClick Add to create this layer, but leave the dialog open so you can create more layers.lClick Add and Close to create this layer and close the dialog.A new drawing layer is added to the Timeline view.33
Chapter 3: How to Add LayersDeleting LayersHow to delete layers in the Timeline view1. In the Timeline view, select the layers to delete.NOTEYou can select several contiguous layers by holding down the Shift key, clicking on thefirst layer you want to select, then on the last layer you want to select. You can alsoselect several layers by holding the Ctrl (Windows/Linux) or (macOS) key andclicking on each layer you want to select.2. Do one of the following:lIn the Timeline’s Layer toolbar, click theDelete Layers button.lRight-click on the selection and select Delete.The selected layers are removed from the Timeline view.Reordering LayersHow to reorder layers in the Timeline view1. In the Timeline view, select the layers to move.34
Harmony 20 Essentials Getting Started Guide2. Click and drag the selection, then do one of the following:lDrop the selection between two layers to move it between those layers. A cyan line willappear between the layers where the selection will be moved.lDrop the selection onto a layer to rig the selected layers as children over that layer.Grouping LayersGrouping layers allows you to keep your scene structure organized.Additionally, you can put several layers inside a group, then add an effect on this group to apply that effect onall the layers inside the group.How to group layers in the Timeline view1. In the Timeline view, select the elements you want to group.NOTEAny layer between the selected layers will be grouped with the selected layers.2. Do one of the following:lRight-click on the highlighted layers and select Group Selection.lPress Ctrl Shift G (Windows/Linux) or Shift G (macOS).A new Group layer is added to the Timeline view.35
Chapter 3: How to Add LayersIf you click on theExpand Group button, you will find the grouped layers rigged as children ofthe group layer.Hiding and Showing LayersYou can temporarily hide layers so that they do not clutter the Camera view while you are working on otherlayers.How to hide a layer in the Timeline view1. In the Timeline view, left of the layer you want to hide, click on theDisable Layer button.The layer will become invisible in the Camera view.2. When you want to unhide the layer, click on theEnable Layer button to display it again.Locking and Unlocking LayersYou can temporarily lock layers. Locked layers can still be edited in the Timeline or Xsheet view, but you cannotselect them, draw them or manipulate them in the Camera view. This can be useful to avoid accidentallyselecting or drawing over your backgrounds, overlays, props or characters you are not currently working on.36
Harmony 20 Essentials Getting Started GuideHow to lock a layer in the Timeline view1. In the Timeline view, left of the layer you want to lock, click on theLock button.The layer will become impossible to select or draw on in the Camera view. The name of the layer willappear in red in the Timeline view.2. When you want to unlock the layer, click on the37Unlock Layer button to display it again.
Chapter 4: How to DrawChapter 4: How to DrawWhen you create a scene, your scene comes with a default Drawing layer in which you can immediately startdrawing.NOTEDepending on your drawing style and what you are comfortable with, you may prefer to draw withthe Brush tool or the Pencil tool. For more information on the difference between those tools, seeWhen you create a scene, your scene comes with a default Drawing layer in which you canimmediately start drawing. on page 38.How to draw with the Brush tool1. In the Timeline or Xsheet view, click in the first cell of the drawing layer.2. If you want to try drawing with the Brush tool, do one of the following:lIn the Tools toolbar, select theBrush tool.lIn the top menu, select Tools Brush.lPress Alt B.If you want to try drawing with the Pencil too, do one of the following:lIn the Tools toolbar, select thePencil tool.lIn the top menu, select Tools Pencil.lPress Alt /.3. In the Presets list of the Tool Properties view, select a brush or pencil preset to use.4. Use the Maximum Size slider to select the desired size for your brush or pencil.38
Harmony 20 Essentials Getting Started Guide5. To select a colour, click on the colour you wish to use in the Colour view. For more information on howto create and edit colours, see How to create or edit colour swatches on page 48.6. In the Drawing or Camera view, start drawing.7. If you are using the Brush tool and wish to makes changes to your brush, in the Tool Properties view,click on the arrow button to open the Brush Properties dialog. In this dialog, you can customize thesize, shape and smoothing of your brush.39
Chapter 4: How to DrawTIPSYou can quickly adjust the size of the selected drawing tool by pressing and holding the Olkey, then clicking and dragging in the drawing space. If you are using a tablet pen, doingthis with the eraser tip of your pen will adjust the size of the Eraser tool, regardless of whichdrawing tool is selected.lIf you press and hold the Shift key before or while drawing, you will draw a straight line.lIf you press and hold the Spacebar key while drawing a straight line, the angle of your linewill lock. If you are using a pressure-sensitive tablet, you can draw over your line to ad
In this Getting Started Guide, you will learn the basics of how to use the main features in Harmony Essentials, which will quickly bring you up to speed. Refer to the complete Toon Boom Harmony Essentials documentation available online at docs.toonboom.com to learn about all the tools and options, as well as more advanced techniques. 6