Transcription
Toon BoomHarmony 17 AdvancedGetting Started GuideTOON BOOM ANIMATION INC. 1 514 278 86664200 Saint-Laurent, Suite 1020Montreal, Quebec, CanadaH2W 2R2contact@toonboom.comtoonboom.com
Harmony 17 Advanced Getting Started GuideLegal NoticesToon Boom Animation Inc.4200 Saint-Laurent, Suite 1020Montreal, Quebec, CanadaH2W 2R2Tel: 1 514 278 8666Fax: 1 514 278 2666toonboom.comDisclaimerThe content of this document is the property of Toon Boom Animation Inc. and is copyrighted. Anyreproduction in whole or in part is strictly prohibited.The content of this document is covered by a specific limited warranty and exclusions and limit of liability underthe applicable License Agreement as supplemented by the special terms and conditions for Adobe Flash FileFormat (SWF). For details, refer to the License Agreement and to those special terms and conditions.TrademarksToon Boom is a registered trademark. Harmony and the Toon Boom logo are trademarks of Toon BoomAnimation Inc. All other trademarks of the property of their respective owners.Publication Date10-27-2020Copyright 2020 Toon Boom Animation Inc., a Corus Entertainment Inc. company. All rights reserved.1
Table of ContentsTable of ContentsTable of Contents2Introduction6Chapter 1: Creating a Scene8Chapter 2: Introduction to the Harmony User InterfaceViews1013Camera view13Drawing view13Tool Properties view14Colour view15Timeline view15Xsheet view16Library view17Interface Navigation18Touch Interface20Chapter 3: How to Add Layers24Types of Drawing Layers24Art Layers25Renaming Layers27Adding Layers27Deleting Layers28Reordering Layers29Grouping Layers30Hiding and Showing Layers31Locking and Unlocking Layers31Chapter 4: How to Draw34Adjusting Artwork36About Art Styles, Drawing Tools and Layer Types42Chapter 5: How to Paint46Colour Palettes472
Harmony 17 Advanced Getting Started GuidePainting49Closing Gaps50Chapter 6: How to Create Paperless Traditional Animation52Creating a Rough Animation52Reviewing your Animation57Cleaning Up59Chapter 7: How to Morph Drawings64Adjusting the Morphing Velocity66Adding Morph Hints67Chapter 8: How to Import Images70Vectorizing Images75Chapter 9: How to Position and Animate Layers82Positioning Layers82Repositioning the Pivot84Animating a Layer85Chapter 10: How to Position and Animate the Camera90Adding a Camera90Adding a Parent Peg90Positioning the Camera91Animating the Camera93Chapter 11: How to Rig a Cut-out Character96Drawing the Pieces96Adding Pegs99Creating a Layer Hierarchy101Master Peg103Chapter 12: How to Animate a Cut-out Character106Navigating Layers111Chapter 13: How to Use Deformers116Bone Deformer116Game Bone Deformer1173
Table of ContentsCreating Deformers117Displaying Deformers119Animating With Deformers121Chapter 14: How to Import Sound and Add Lip-Sync126Importing Sound126Automatic Lip-Sync Detection127Animating Lip-Sync Manually130Chapter 15: How to Add Effects to a Scene132About Effects132Adding an Effect133Adding an Effect with a Matte135Animating an Effect138Creating an Effect Based on an Animated Character148Chapter 16: How to Use Drawing Guides152Chapter 17: How to Create a Multiplane162Chapter 18: How to Create and Use Templates166Creating a Template166Importing a Template167Chapter 19: How to Export a Movie170Glossary1744
Harmony 17 Advanced Getting Started Guide5
IntroductionIntroductionHarmony is a complete animation software allowing you to create all kinds of creative animation projects. Itcomes with a very wide variety of tools and features.In this Getting Started Guide, you will learn the basics of how to use the main features in Harmony Advanced,which will quickly bring you up to speed. Refer to the complete Toon Boom Harmony Advanced documentationavailable online at docs.toonboom.com to learn about all the tools and options, as well as more advancedtechniques.6
Harmony 17 Advanced Getting Started Guide7
Chapter 1: Creating a SceneChapter 1: Creating a SceneAs soon as you launch Harmony, you are greeted with the Welcome screen, from which you can:lCreate sceneslChoose your new scene's resolutionlManage your scene resolution presetslQuickly open recently opened sceneslBrowse for and open a scene you already created.lWatch Harmony video tutorials on the web.lAccess the support web page.NOTEIf you are using Harmony Server, you must use theControl Center application to create yourscenes before you can open them in Harmony. Harmony Server scenes cannot be created directlyin Harmony.8
Harmony 17 Advanced Getting Started GuideHow to create a scene from the Welcome screen1. In the Name field, type the scene’s name.NOTEThe scene name should not exceed 23 characters and cannot contain specialcharacters, such as *& %!.2. To decide in which directory the scene will be created, click the Browse button next to the Locationfield.3. From the Camera Size menu, select a scene resolution.4. Click on Create Scene.A new scene is created. The main application window will appear with your new scene opened in it.9
Chapter 2: Introduction to the Harmony User InterfaceChapter 2: Introduction to the Harmony User InterfaceUsing Toon Boom Harmony Advanced will be significantly easier if you first become familiar with its userinterface. This chapter gives you a basic introduction to the most important elements of the user interface. Asyou go through the ensuing chapters, you will learn more detailed information about each of these elements.When you start Toon Boom Harmony Advanced for the first time, the default workspace is displayed. Theworkspace is comprised of toolbars and panels, referred to as views, which allows you to create and edit yourscene. The default workspace contains the most commonly used toolbars and views for digital animation.How to add a view to your workspace as a tab1. In the top-right corner of an existing view, click the10Add View button
Harmony 17 Advanced Getting Started Guide2. Select the desired view from the list.The view appears as a new tab, in the section of your workspace where you added it.11
Chapter 2: Introduction to the Harmony User InterfaceNOTESome views, such as the Camera, Perspective, Library and Model views, can be opened inmultiple instances. For example, this can be useful if you want to have two instances of theCamera views open, each focused on different areas of your scene, to quickly switch betweenworking on these two areas.How to add a view to your workspace as a window1. Open the Windows menu.2. In the Windows menu, select the view you wish to add.The view will appear as a new window over Harmony's main application window.How to dock a view window to your workspace1. Click and drag the floating view by its tab and do one of the following:lDrop the window over another tab to add it to that set of tabs.lDrop the window above, below or beside an existing view. When you get close to theedge of a view, a cyan rectangle appears, indicating where the view will be docked.12
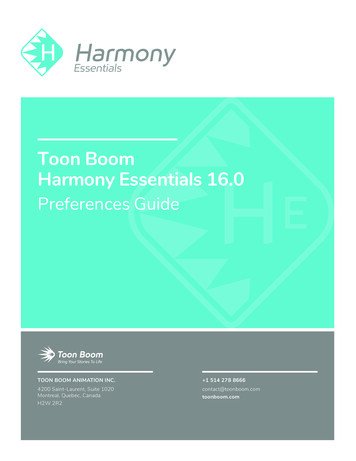
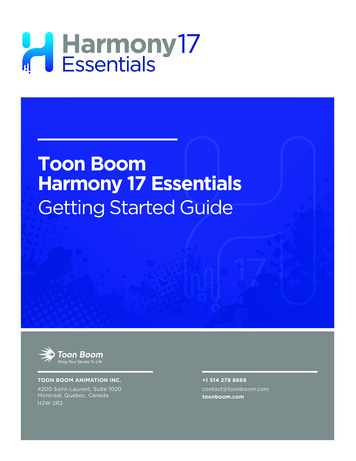
Harmony 17 Advanced Getting Started GuideViewsHere is a short introduction to each of the most commonly used views in Harmony.Camera viewThe Camera view is the centre of operations in Harmony. In this view, you can draw, paint, animate, set up yourscene, manipulate objects, open symbols and preview your animation.The Camera view also has a top and bottom toolbar that you can use to navigate in the view, change thedisplay mode or go up your symbol hierarchy.Drawing viewIn Harmony, you can draw in both the Drawing or Camera views. Although the two views are similar, there aresome differences when it comes to drawing.Only the selected drawing is displayed by default in the Drawing view. You can use features, such as the lighttable to display the current drawing of all the enabled layers of your scene in washed-out colours, or the OnionSkin to display the previous and next drawings of the currently selected drawing layer.13
Chapter 2: Introduction to the Harmony User InterfaceTool Properties viewThe Tool Properties view contains the most common options and operations related to the currently selectedtool. When you select a tool from the Tools toolbar, the Tool Properties view updates.For example, if you choose the Select tool, the Tool Properties view will display the options and operationsrelated to it, such as Snap to Contour, Apply to All Drawings, Flip Horizontal, and Flatten.14
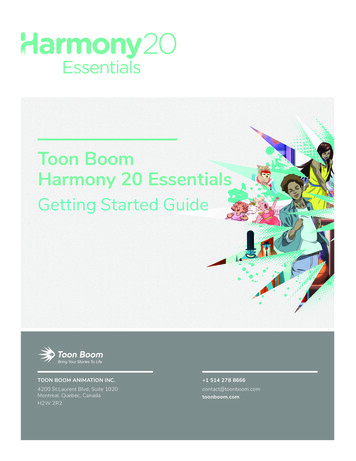
Harmony 17 Advanced Getting Started GuideColour viewThe Colour view is where you create colours and palettes and import existing palettes into your project. TheColour view is also necessary for drawing, painting and creating colour styling.Timeline viewTo set your animation timing, you will mostly work with the Timeline and Xsheet views. It's extremely useful tobecome familiar with the Timeline view, how it works, and its interface.The Timeline view is the main view used when adjusting the timing of drawings, adding keyframes andordering layers. The Timeline view displays layers, effects, sounds, keyframe values, scene length, layer names,drawings, keyframes, timing, and frames.15
Chapter 2: Introduction to the Harmony User InterfaceThe Timeline view allows you to read your timing from left to right. It represents the scene’s elements in theirsimplest form. You can also see the layers and their names, as well as the drawing’s exposure. The drawingname is displayed when you place your pointer over the drawing’s exposure.Xsheet viewThe Xsheet view lets you read the timing vertically by displaying it in a grid, with each drawing layerrepresented by a column, each frame of your scene represented by a row, and each exposed drawing displayedby its name in the cells. It is meant to work like a traditional animation exposure sheet.Using the functions panel, you can also view the functions and keyframes of the motion paths for the selectedcolumn, with the value of those functions for each frame listed in the cells.Contrary to the Timeline view, the Xsheet view does not display pegs, effects or layer hierarchy. Hence, it isoptimized for traditional and paperless animation, whereas the Timeline view is optimized for digital or cut-outanimation.16
Harmony 17 Advanced Getting Started GuideLibrary viewThe Library view is used to store elements such as animation, drawings, backgrounds and character models soas to reuse in different scenes and projects. You can also use the Library view to create and store symbols, aswell as to store and import images and sound files.To reuse elements from a scene in other scenes, you must create a template so that you can import it intodifferent scenes. Templates can contain anything from a single drawing to a whole scene structure. You cancreate a template by creating it in a scene, then copying the elements you want in your template into a library.The resulting template is structured like a mini-scene that contains only the elements you copied into it. Atemplate does not have any dependencies on the scene it was originally created in. Hence, it can safely beimported in any other scene.Additionally, the Library view's Drawing Substitution panel allows you to quickly change the current frame'sexposure to one of the existing drawings in a layer. This is especially useful for animating a cut-out character'smouths, hands, eyelids and other such body parts which typically contain several drawings to choose from.17
Chapter 2: Introduction to the Harmony User InterfaceInterface NavigationToon Boom Harmony Advanced lets you zoom in, zoom out, rotate, pan and reset views for easy navigation ofthe interface.The navigation commands in the table below can be used in the following views, with some heetlFunctionlSide and ToplModelCommandActionAccess MethodsView Zoom InZoom InPress 2Zooms in the view.Roll the mouse wheel up (except in theTimeline and Xsheet views)Zoom OutZooms out the view.View Zoom Out18
Harmony 17 Advanced Getting Started GuideCommandActionAccess MethodsPress 1Roll the mouse wheel down (except inthe Timeline and Xsheet views)Roll the middle mouse button up ordown.Zoom In or OutZooms in or out of the view.PanMoves the view horizontally or vertically.Reset PanResets the view’s pan to its default position.Reset ViewResets the view to its default position.Reset RotationResets the view’s rotation to its defaultposition.View Reset RotationReset ZoomResets the view’s zoom to its default position.View Reset ZoomRotate ViewRotates the view left or right.While holding Ctrl Alt(Windows/Linux) or Ctrl (macOS),click and drag the rotating disc to rotateit clockwise or counterclockwise.3D Rotate ViewRotates the view in any direction. This is onlyavailable in the Perspective view.While holding Ctrl Shift(Windows/Linux) or Shift(macOS), click and drag the stage torotate it in any direction.Rotate 30 CWRotates the Camera view 30 degreesclockwise, like an animation table.View Rotate View CWHold down the Spacebar and themiddle mouse button while draggingthe mouse up or down.19Hold down the Spacebar and drag inthe direction you want to pan the view.View Reset PanPress Shift NView Reset ViewPress Shift MPress Shift X
Chapter 2: Introduction to the Harmony User InterfaceCommandActionAccess MethodsRotate 30 CCWRotates the Camera view 30 degrees counterclockwise, like an animation table.View Rotate View CCWMirror ViewTemporarily flips the Camera or Drawing viewhorizontally, allowing you to view and edityour artwork as if it was being mirrored.Toggle QuickClose-upInstantly multiplies the view's Zoom Factor by4. For example, if the Camera View's ZoomFactor is at 100%, this will make it togglebetween 400% and 100%.View Mirror ViewIn the Camera or Drawing toolbar, clickon theMirror View button.Shift ZCycles through the following display modes:lToggle Full ScreenllNormal Full-Screen: The mainapplication window becomes fullscreen.View Full-Screen: The selected viewbecomes full screen and all otherviews are collapsed.View Toggle Full ScreenPress Ctrl F (Windows/Linux) or F (macOS)Normal: The main application windowis restored to its original size andcollapsed views are expanded.TIPKeyboard shortcuts can be customized. To change your keyboard shortcuts, in the top menu, selectEdit (Windows/Linux) or Harmony Advanced (macOS) Keyboard Shortcuts.Touch InterfaceIf you are working with a touch screen, a trackpad or a tablet that supports touch input, you can also usestandard two-finger gestures to zoom, rotate and pan the Camera and Drawing Views. To be able to do this,you must first enable the Support Gestures preference.How to enable gesture support1. From the top menu, go to Edit Preferences (Windows/Linux) or Harmony Preferences (Mac OS20
Harmony 17 Advanced Getting Started GuideX).2. Open the General tab.3. In the Touch Interface section, check the Support Gestures check box.4. Click on OK.5. Restart Harmony.You can now manipulate the Camera and Drawing views by dragging two fingers on your touchinterface.How to use gestures1. In the Camera or Drawing view, press two fingers a short distance from each other.2. Do one of the following:lTo pan the view, drag your two fingers in any direction, keeping both fingers at the samedistance from each other.lTo zoom in, drag your two fingers away from each other.lTo zoom out, drag your two fingers closer to each other.21
Chapter 2: Introduction to the Harmony User InterfacelTo rotate, drag your two fingers in a curve so that they revolve in the same direction.22
Harmony 17 Advanced Getting Started Guide23
Chapter 3: How to Add LayersChapter 3: How to Add LayersJust like with traditional animation, Harmony uses layers to keep elements such as characters, backgrounds andprops separate from each other, allowing you to animate them independently.When you create a new scene, your scene will have a default layer named Drawing, in which you canimmediately start drawing.Layers can be selected and managed in the Timeline view. A scene can have as many layers as needed. Whenyour scene has several layers, layers higher in the list appear over lower layers.Types of Drawing LayersHarmony supports two types of drawing layers, each with their own advantages and limitations:lVector Layers: Vector drawings are made of points and curves that compose the contours of the shapesof the artwork, along with the colour or textures these shapes are filled with. Hence, the artwork invector layers can be scaled up and zoomed in without losing quality, unless they contain a texture.24
Harmony 17 Advanced Getting Started GuideWhen drawing on a vector layer, each drawing stroke and pencil line is a separate object which can bemanipulated individually. You can select single drawing strokes, then move them around and transformthem, even if drawing strokes were applied over them. Additionally, because drawing strokes are madeof points and curves, it is possible to edit their shape, making it easy to make corrections and changes toyour artwork.lBitmap Layers: Bitmap drawings are composed of a grid of pixels, which are small points that each havea single solid colour. Bitmap drawing tools allow you to lay on brush strokes onto a single flat canvas, andto tweak your artwork by the pixel if needed.When you draw on a bitmap layer, each brush or pencil stroke is composited into the canvas, so itremains a single drawing that can only be painted or erased upon, but which does not allow you totweak individual parts of it.Bitmap artwork can only be scaled up or zoomed in on as much as their pixel density allows withoutlosing picture quality. By default, bitmap artwork has a pixel density of 100%, which is only enough todisplay the artwork without zooming in on it or scaling it up, otherwise Harmony must generate newpixels within the artwork, which is liable to make it look blurry or pixelated.Hence, you might want to set the required pixel density for your bitmap artwork, based on whetheryou'll need to zoom on it or scale it up, before you start drawing on a bitmap layer.NOTESince vector layers are editable and scalable, it is recommended to start off using vector layerswhile getting familiarized with Harmony. The default drawing layer in a new scene is a vector layer.Art LayersBy default, each drawing layer actually has two art layers: The Line Art layer and the Colour Art layer. You canuse these layers to keep the line art and colours in your drawings separate.25
Chapter 3: How to Add LayersAt the right of the Camera and Drawing view, you can control which art layer you are working on and whetheronly the current art layer or both art layers are displayed.By default, the Line Art layer is selected. So if you start drawing right away, you will be drawing in yourdrawing layer's Line Art layer, unless you select the Colour Art layer first.Using different art layers for your line art and colour art is entirely optional. If you like, you can use the Line Artlayer for both your line art and colour art.NOTEYou can also enable extra Art Layers: The Overlay and Underlay Art layers. The Overlay Art layer istypically used for annotations and the Underlay Art layer is typically used for rough sketches. Toenable them, check the Support Overlay and Underlay Arts option in the Advanced tab of thePreferences dialog, which can be accessed by selecting Edit (Windows/Linux) or HarmonyAdvanced (macOS) Preferences in the top menu.26
Harmony 17 Advanced Getting Started GuideRenaming LayersIn a new scene, there is only one layer created by default, named Drawing. In traditional animation, it iscommon to name animation layers with single letters (A, B, C, etc.) and layout layers with acronyms (BG forbackground, OL for overlay, etc). So you can start off your scene by giving your first layer an appropriate name.How to rename a layer in the Timeline view1. In the Timeline view, double-click on the name of the layer to rename.A text-input field appears over the name.2. Type in the new name for your layer and press Enter/Return.The layer now has the new name.Adding LayersHow to add a drawing element from the Timeline view1. Do one of the following:lIn the Timeline view, click theAdd Drawing Layer button.lIn the top menu, select Insert Drawing.lPress Ctrl R (Windows/Linux) or R (macOS).The Add Drawing Layer dialog appears.27
Chapter 3: How to Add Layers2. In the Name field, type in the name for your new layer.2. Select whether you want the Line Art layer should be Vector or Bitmap.3. Select whether you want the Colour Art layer should be Vector or Bitmap.4. Do one of the following:lClick Add to create this layer, but leave the dialog open so you can create more layers.lClick Add and Close to create this layer and close the dialog.A new drawing layer is added to the Timeline view.Deleting LayersHow to delete layers in the Timeline view1. In the Timeline view, select the layers to delete.28
Harmony 17 Advanced Getting Started GuideNOTEYou can select several contiguous layers by holding down the Shift key, clicking on thefirst layer you want to select, then on the last layer you want to select. You can alsoselect several layers by holding the Ctrl (Windows/Linux) or (macOS) key andclicking on each layer you want to select.2. Do one of the following:lIn the Timeline’s Layer toolbar, click theDelete Layers button.lRight-click on the selection and select Delete.The selected layers are removed from the Timeline view.Reordering LayersHow to reorder layers in the Timeline view1. In the Timeline view, select the layers to move.2. Click and drag the selection, then do one of the following:lDrop the selection between two layers to move it between those layers. A cyan line willappear between the layers where the selection will be moved.29
Chapter 3: How to Add LayerslDrop the selection onto a layer to rig the selected layers as children over that layer.Grouping LayersGrouping layers allows you to keep your scene structure organized.Additionally, you can put several layers inside a group, then add an effect on this group to apply that effect onall the layers inside the group.How to group layers in the Timeline view1. In the Timeline view, select the elements you want to group.NOTEAny layer between the selected layers will be grouped with the selected layers.2. Do one of the following:lRight-click on the highlighted layers and select Group Selection.lPress Ctrl Shift G (Windows/Linux) or Shift G (macOS).A new Group layer is added to the Timeline view.If you click on theExpand Group button, you will find the grouped layers rigged as children ofthe group layer.30
Harmony 17 Advanced Getting Started GuideHiding and Showing LayersYou can temporarily hide layers so that they do not clutter the Camera view while you are working on otherlayers.How to hide a layer in the Timeline view1. In the Timeline view, left of the layer you want to hide, click on theDisable Layer button.The layer will become invisible in the Camera view.2. When you want to unhide the layer, click on theEnable Layer button to display it again.Locking and Unlocking LayersYou can temporarily lock layers. Locked layers can still be edited in the Timeline or Xsheet view, but you cannotselect them, draw them or manipulate them in the Camera view. This can be useful to avoid accidentallyselecting or drawing over your backgrounds, overlays, props or characters you are not currently working on.How to lock a layer in the Timeline view1. In the Timeline view, left of the layer you want to lock, click on the31Lock button.
Chapter 3: How to Add LayersThe layer will become impossible to select or draw on in the Camera view. The name of the layer willappear in red in the Timeline view.2. When you want to unlock the layer, click on the32Unlock Layer button to display it again.
Harmony 17 Advanced Getting Started Guide33
Chapter 4: How to DrawChapter 4: How to DrawWhen you create a scene, your scene comes with a default Drawing layer in which you can immediately startdrawing.NOTEDepending on your drawing style and what you are comfortable with, you may prefer to draw withthe Brush tool or the Pencil tool. For more information on the difference between those tools, seeWhen you create a scene, your scene comes with a default Drawing layer in which you canimmediately start drawing. on page 34.How to draw with the Brush tool1. In the Timeline or Xsheet view, click in the first cell of the drawing layer.2. If you want to try drawing with the Brush tool, do one of the following:lIn the Tools toolbar, select theBrush tool.lIn the top menu, select Tools Brush.lPress Alt B.If you want to try drawing with the Pencil too, do one of the following:lIn the Tools toolbar, select thePencil tool.lIn the top menu, select Tools Pencil.lPress Alt /.3. In the Presets list of the Tool Properties view, select a brush or pencil preset to use.4. Use the Maximum Size slider to select the desired size for your brush or pencil.34
Harmony 17 Advanced Getting Started Guide5. To select a colour, click on the colour you wish to use in the Colour view. For more information on howto create and edit colours, see How to create or edit colour swatches on page 48.6. In the Drawing or Camera view, start drawing.7. If you want to make changes to your brush or pencil, in the Tool Properties view, click on the arrowbutton to open the Brush Properties or Pencil Properties dialog. In the Brush Properties dialog, youcan customize the size, shape, texture, feathering and smoothing of your brush. In the PencilProperties dialog, you can customize the size, smoothing, texture and line ends of your pencil.35
Chapter 4: How to DrawTIPSlIf you press and hold the Shift key before or while drawing, you will draw a straight line.lIf you press and hold the Spacebar key while drawing a straight line, the angle of your linewill lock. If you are using a pressure-sensitive tablet, you can draw over your line to adjust itsthickness.If you press and hold the Shift and Alt keys before or while drawing, you will draw alstraight horizontal or vertical line.If you press and hold the Ctrl (Windows/Linux) or (macOS) key while drawing, yourldrawing stroke will turn into a closed shape.If you press and hold Alt before drawing a stroke, and start drawing near existing artwork,lthe start of your drawing stroke will connect to that artwork.If you press and hold Alt while drawing a stroke, and end your drawing stroke near existinglartwork, the end of that drawing stroke will connect to that artwork.Adjusting ArtworkHarmony offers multiple ways to adjust drawings. You can undo your last drawing stroke, erase parts of adrawing, move, transform or delete drawing strokes, and tweak the points and curves of your drawing strokes.NOTEYou cannot manipulate or tweak individual drawing strokes when drawing on a bitmap layer—seeHow to Add Layers on page 24.How to undo your last drawing stroke1. Do one of the following:lFrom the top menu, select Edit Undo.lPress Ctrl Z (Windows/Linux) or Z (macOS).How to erase1. In the Tools toolbar, select theEraser tool or press Alt E.2. In the Drawing or Camera view, draw an eraser stroke over the parts of your drawing you want toerase.36
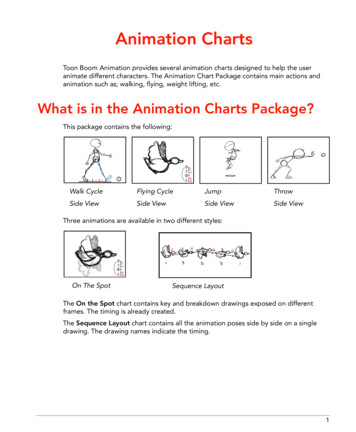
Harmony 17 Advanced Getting Started GuideHow to manipulate drawing strokes1. In the Tools toolbar, select theSelect tool or press Alt S.2. In the Camera or Drawing view, select the drawing strokes you want to edit by doing one of thefollowing:lClick on a drawing stroke to select it.lHold Shift while clicking on a drawing stroke to add it to your selection.lDraw a lasso around drawing strokes to select them simultaneously.3. Do one of the following to edit your selection:lTo reposition the selected artwork, click on it and drag where you want to position it.NOTEYou can also nudge your selection using the arrow keys, and fast-nudge yourselection by holding Shift and pressing the arrow keys.lTo rotate the selected artwork, click and grab just outside one of the handles at the corners ofthe control box and rotate it.37
Chapter 4: How to DrawlTo scale the selected artwork, click and drag on one of the control points at the corners or themiddle of the edges of the control box.TIPWhile scaling artwork, you can preserve its proportions by pressing and holdingthe Shift key.lTo skew, drag sideways or up and down the sides or top and bottom segments, between thecontrol points.38
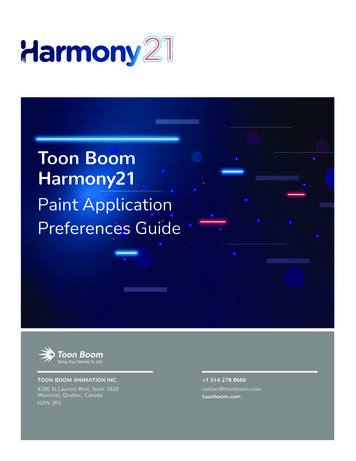
Harmony 17 Advanced Getting Started GuidelTo delete, press Del (Windows/Linux) or Backspace (macOS).How to edit lines1. Do one of the following:lIf you drew with the Brush tool, in the Tools toolbar, double-click onselect thelContour Editor andCenterline Editor in the pop-up menu, or press Alt W.If you drew with the Pencil tool, in the Tools toolbar, select theContour Editor tool orpress Alt Q.2. In the Drawing or Camera view, click the shape, contour or pencil line you want to edit near the areayou wish to change.The shape or line's control points appear.3. Click on one of the points to select it.The point's Bezier handles appears, as well as Bezier handles for the surrounding points.TIPYou can select several points by drawing a lasso around the points, or by holding Shiftwhile clicking on points to add them to your selection. You can use the Contour Editor toscale and rotate a selection of multiple points by enabling theControl option in the Tool Properties view.39Show Contour Editor
Chapter 4: How to Draw4. Do one of the following:lTo move a point or a selection of multiple points, click and drag it.lTo change the curve on both sides of a point, drag one of its Bezier handles.lTo change the curve on only one side of a point, press and hold the Alt key, then drag one ofits Bezier handles.lTo deform the contour, drag a part of the contour between two points.40
Harmony 17 Advanced Getting Started GuidelTo deform the curve between two points, hold the Shift key and drag
In this Getting Started Guide, you will learn the basics of how to use the main features in Harmony Advanced, which will quickly bring you up to speed. Refer to the complete Toon Boom Harmony Advanced documentation available online at docs.toonboom.com to learn about all the tools and options, as well as more advanced techniques. 6