Transcription
Sun City Summerlin Computer ClubSeminarImage Editing WithGIMPTom Burt12-29-2021
Where to Find the Materials Sun City Summer Computer Club Website: http://www.scscc.club/smnrDirect Hyperlink fImage Editing With GIMP
Seminar Agenda IntroductionGetting and Installing GIMPThe GIMP Main WindowThe GIMP Tool PaletteBasic Image Editing ActionsThe GIMP Color WindowThe GIMP Menu BarUsing GIMP LayersUsing GIMP Special ToolsFour Image ProjectsSaving in Various FormatsPrintingImage Editing With GIMP
Introduction GIMP GNU Image Manipulation Program GIMP is a FREE “open source” image editor. Versions for Windows, MacOS, Linux, Unix, Android Has many nice features. Can be as simple as MS Paint or almost as complex asPhotoshop. This seminar will focus on most useful features for “meremortals”. Ask questions as we go. We’ll work on several interesting photo projects.Image Editing With GIMP
Getting and Installing GIMP Go to the GIMP Website’s Download page: Click to go to the gimper.net mirror and choose the “stable” folder wnloads/pub/gimp/stable/Click the download link for the Windows installer.The file will download as a gimp- xxx -setup.exe file to yourdesignated “Downloads” folder.Make a new folder named: GIMPCopy / move the downloaded gimp- xxx -setup.exe file to that folder.Navigate to that folder.Finally, double-click the gimp- xxx -setup.exe file to run the setup.Online documentation (You will need it!) https://docs.gimp.org/en/Transparency: https://www.youtube.com/watch?v AC5vdKuwTp0Image Editing With GIMP
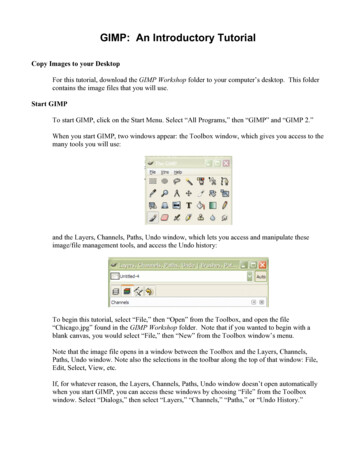
The GIMP Main WindowImage Editing With GIMP
GIMP Tool Palette Pane Hover over each tool to get a tool-tip nameThe various tools let you select or act on areasof the image or current layer.The tools that paint or edit pixels interactclosely with the color window.You can access all tools via the Tools menu.Many tools have keyboard shortcuts.In GIMP 2.10.30, the tools are grouped intorelated sets. You can configure thesegroupings via Edit Preferences ToolboxNow we’ll run through a demo of the mostcommonly used tools Image Editing With GIMP
GIMP Color Pane Reworked in V 2.10.30You can set a primary and asecondary color.You can work in RGB, LCH orHSV.You will often set the colorby using the eyedropper tool.You can enter HTML (web)color names.You can save a palette offrequently used colorsLet’s demo the color window.Image Editing With GIMP
Exploring the GIMP Menu Bar The photo editing capability of GIMP is in the menu bar. Very plain, Windows 95-style – no toolbar. The Image menu provides cropping, resizing and rotation. The Colors menu provides brightness/contrast, hue /saturation, black / white, levels and other adjustments. The Filters menu provides a rich array of special effects,plus some common actions like red-eye removal. Let’s explore some of the menu bar actions.Image Editing With GIMP
Using GIMP Special Tools All GIMP tools can be reached from the Tools menu Scale ToolShear ToolPerspective ToolInk – Calligraphy ToolHealing BrushClone ToolImage Editing With GIMP
GIMP Layers A GIMP “image” is comprised of one or more layers,stacked vertically. The image you see is the composite ofviewing through all the layers, top to bottom. The background layer is usually the base image,sometimes a background pattern or image. Each layer applies its modifications to the layers below it. You can reorder the layers to change how they affect thecomposite image. You can also merge or flatten layers when you have thedesired effects. Let’s look at some simple layer actions.Image Editing With GIMP
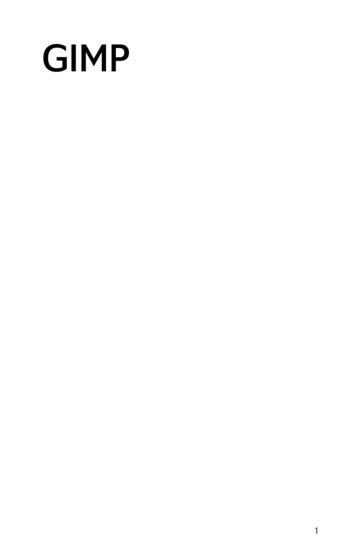
Example Project 1 – Outdoor Retouch (1) Outdoor wedding photo on a golf course Much visual clutter in background Subject not emphasizedImage Editing With GIMP
Example Project 1 – Outdoor Retouch (2) Crop the photo Use the rectangle select, then crop image to selection. Eliminating “undesired” elements Use the paint brush, pencil and clone stamp tool to get rid of people,poles, power lines, cars, etc. Created background trees. Adjusting brightness, contrast and light / dark levels, hue /saturation Use Colors menu as needed. Use the Filters menu to fix red-eye, if needed. Resize the photo (as appropriate). Export the final result to an image file and print or publish.Image Editing With GIMP
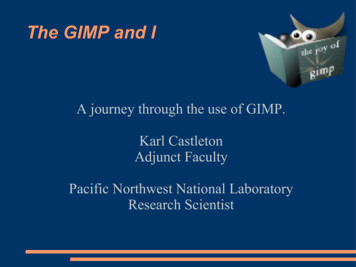
Example Project 2 – Portrait Retouch (1) Original image shot against a wall – same color as hair, brastrap showing, shadows under eyes Reworked to composite with a different background.Image Editing With GIMP
Example Project 2 – Portrait Retouch (2) ing-Gimp Take an existing portrait (head shot) and re-do thebackground color. Add an alpha channel to the original image.Retouch the subject using the clone stamp and heal tools and theDodge tool.Also adjust the overall contrast, brightness & saturation of the image.May want to first paint out the background in a single color. Use thecolor window, use the Paint Bucket tool or the paint brush.Use the Fuzzy Select or Color Select tool.Then delete the selected background (makes it transparent)Add a new layer and move to the bottom. Hide the foreground layer.Put a color, gradient or other image on the background layer.Unhide the foreground layer to see the combine effect.Image Editing With GIMP
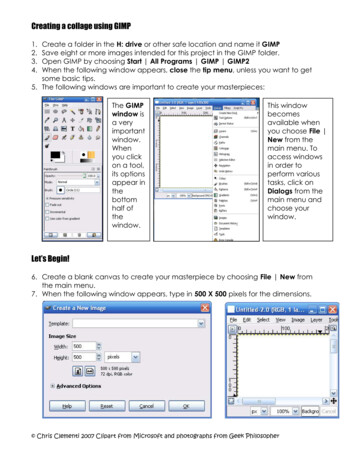
Example Project 3 – Restore an Old Photo (1) Original photo was faded, had some cracks, spots andloss of detail. Also was small.Image Editing With GIMP
Example Project 3 – Restore an Old Photo (2) Rotate or Straighten as needed. Crop as needed using rectangle select or crop tool. May need to fill in corners after rotation. Also adjust the overall contrast of the image. Try the desaturate adjustment.Adjust contrast & brightness.Experiment with the Levels tool. Then repair blemishes (spots, cracks) Caution – easy to overdo it.Use the clone tool or healing brush tool.Use the pencil & paintbrush. May be possible to resize larger if small.Image Editing With GIMP
Example Project 4 – Straightening a Photo (1) Working with a photo of a painting. Suffers from perspective distortion and skew. Also slightly over-exposed.Image Editing With GIMP
Example Project 4 – Straightening a Photo (2) Rotate as needed. Crop as needed using rectangle select or crop tool. May need to fill in corners after rotation. Correct Skew distortion using Perspective tool Crop again afterward. Also adjust the overall contrast of the image. Adjust contrast & brightness.Experiment with the Levels tool. Repair any blemishes (spots, cracks) Caution – easy to overdo it.Use the clone tool or healing brush tool.Use the pencil & paintbrush. Add a border Filters Décor Add BorderImage Editing With GIMP
Saving / Exporting in Various Image Formats Click the File menu. A list of action choices will appear in the menu. Click “Export As”. This will open a classic “Save As” dialog.You can choose the file name, folder and file type.“Flattened” file types include: .BMP, .PNG, .GIF, .JPG, .TIFF and .TGAYou can also Save the file as a .XCF (GIMP) file, which retains all theseparate layers and actions. Use this if you are saving in the middle ofworking on a complex image project. When you have the Export settings defined, click the“Export” button. GIMP will display a second dialog that is dependent on the file type,asking for more specifics. Choose the desired settings and then clickOK. Let’s explore Exporting further (demo).Image Editing With GIMP
Printing GIMP Images Click File Print to get to the Print dialog.You can select the printer, paper size, quality and copy count.You can also specify a variety of settings for how the image willbe rendered to the printed page.When you’ve made your selections, just click the “Print”button.Image Editing With GIMP
Final Q and AFinalQuestionsandAnswersImage Editing With GIMP
The file will download as a gimp- xxx -setup.exe file to your designated "Downloads" folder. Make a new folder named: GIMP Copy / move the downloaded gimp- xxx -setup.exe file to that folder. Navigate to that folder. Finally, double-click the gimp- xxx -setup.exe file to run the setup. Online documentation (You will need it!)