Transcription
CONNECTSetup Guide
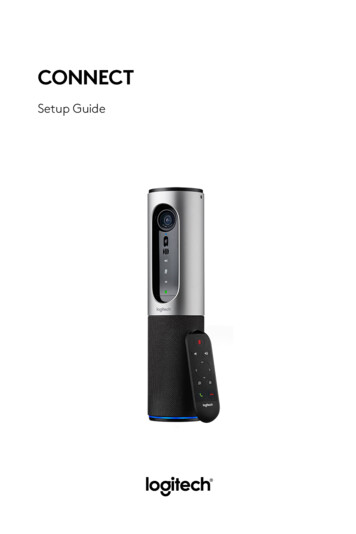
English. . . . . . . . . . . . . . 3Česká verze . . . . . . . . . 123Deutsch . . . . . . . . . . . . 18Slovenčina . . . . . . . . . . 131Français . . . . . . . . . . . . 19Українська . . . . . . . . . . . 139Italiano . . . . . . . . . . . . 27Eesti . . . . . . . . . . . . . . 147Español . . . . . . . . . . . . 35Latviski . . . . . . . . . . . . 155Português . . . . . . . . . . .43Lietuvių . . . . . . . . . . . . 163Nederlands . . . . . . . . . . 51Български . . . . . . . . . . . 171Svenska . . . . . . . . . . . . 59Hrvatski . . . . . . . . . . . 179Dansk . . . . . . . . . . . . . 67Srpski . . . . . . . . . . . . . 187Norsk . . . . . . . . . . . . . 75Slovenščina . . . . . . . . . . 195Suomi . . . . . . . . . . . . . 83Română . . . . . . . . . . . 203Ελληνικά . . . . . . . . . . . . 91Türkçe . . . . . . . . . . . . . 211По-русски . . . . . . . . . . . 99219 . . . . . . . . . . . . . العربية Po polsku . . . . . . . . . . . 107227. . . . . . . . . . . . . עברית 12345Magyar . . . . . . . . . . . . nnect1. Main unit withcamera andspeakerphone2. Remote control3. Power cable andregional plugs4. USB Cable5. User documentationEnglish 3
KNOW YOUR PRODUCT135246781. Camera, 1080p and90-degree FOV2. Camera LED3. Tilt wheel for tiltingcamera lens4. Microphones5. Volume Up6. Mute7. Volume down8. Battery indicator197111310MicrophoneNFCKensington LockUSB connectorPower2651.2.3.4.5.1512143459. Speakerphone10. Speakerphone/BatteryLED11. Pan and Tilt12. Zoom In13. Zoom Out14. End Call15. Make/Answer Call4 EnglishEnglish 5
SETUP YOUR PRODUCT11. Plug Connect to external power.Although Connect comes withrechargeable battery, it must firstbe plugged into external powerand charged till the green batterylight displays. Note: The devicecan also be charged through USBon your PC or Mac (charging timesmay vary.)12341.2.3.4.Video Conferencing modePower On/Off buttonBluetooth modeMute22. Press and hold power On/Offbutton to turn on the device. Asound will play and the deviceLEDs will light for 2-3 seconds,with the last used mode LEDstaying lit when on.On / Off3Bluetooth modeVideo ConferencingMode3. Select the following modes andfollow the instructions to getstarted.Mute6 EnglishEnglish 7
1. Video Conferencing Mode:1. Connect the USB cable to the device and to your USBport.2. To start a call from your PC or Mac application, selectVideo Conferencing Mode on Connect. The camera andspeakerphone LEDs will flash to show that connection istaking place, and when completed, the camera LED willlight steady for a few seconds and the speakerphonewill play a sound. If these activities do not take place,try again and then consult Troubleshooting or calltechnical support.3. Ensure that Connect is selected as the default videoand audio device in your OS settings and in yourconferencing application. Start your video or audio callfrom your application. The LEDs on the camera andspeakerphone will alight when streaming.2. Bluetooth ModeTo pair Connect speakerphone to your mobile device:1. Select Bluetooth mode on the Connect.2. If your device is NFC enabled, touch the mobile deviceto the NFC icon on the speakerphone, which shouldenable Bluetooth acceptance on the mobile device, orhold down the Bluetooth button until the LED on thespeakerphone starts blinking blue rapidly.3. On your mobile device, go to settings and turn onBluetooth to connect. The Connect will also play asound to acknowledge connection.8 EnglishUSE YOUR PRODUCTVideo– Starting the video: The video is controlled by theapplication and will start once the camera is selected andthe video is started in the application. Camera LED will lightwhen the video is streaming.– Pan, tilt and zoom the camera using the controls on theremote control. Press once for incremental or press andhold for continuous pan or tilt. You can also pan and tilt thecamera image – first zoom in, and then pan the image ortilt the image. You may also tilt the actual camera with thetilt wheel on the unit. Do not manually try to tilt cameraitself. Doing so may damage unit.– Saving pan, tilt and zoom settings: An optional applicationis available which includes a software interface to controlcamera settings. These can be saved so your camerasettings remain next time you turn on the unit. You maydownload the software fromwww.logitech.com/support/connectAudio– Volume: Volume Up and Down adjusts volume.– Mute: Mute audio with Mute button.– Calling: Run video conferencing software. Answer picks upcall. Hang up ends call. For call waiting, select hang up toreject second call or answer button to toggle between callsNote: Answer and Hang up buttons may not work in someapplications. Use video conferencing software to answerand end call.– SpeakerPhone Activity light indicationsEnglish 9
Blue: Connect is in active call. Blinking Blue: Call is beingreceived or Bluetooth is in pairing mode.Bluetooth: to pair Connect speakerphone to your mobiledevice for speakerphone broadcast of call:– If your device is NFC enabled, touch the mobile device tothe NFC icon on the speakerphone, which should enableBluetooth acceptance on the mobile deviceOR– Press the Bluetooth button on the speakerphone untilconnection is made to the mobile device13Battery Light Indicator– When the battery is fully charged, the battery light turnsgreen. The green turns off when the power dips below 75%.– When the battery has 25% power left, a red battery lightwill alight continuously steady, indicating that the deviceneeds to be plugged into external power very soon.– When the battery has 10% power left, the red batterylight will blink, indicating that the device will no longeroperate unless plugged into external power immediately,and a sound will also play once.– The Connect battery indicator will blink green when theunit is being charged.– When the device is completely charged, the LED will turnoff until the device is unplugged from external power andrunning on battery.– When the remote is docked the speakerphone indicatorwill represent the same sequence.451. Haupteinheitmit Kamera undFreisprecheinrichtung2. Fernbedienung3. Netzkabel und10 English2ImportantInformationregionale Stecker4. USB-Kabel5. BedienungsanleitungDeutsch 11
PRODUKT AUF EINEN BLICK135246781. Kamera, 1080p und90-Grad-Sichtfeld2. Kamera-LED3. Scrollrad zum Kippen desKameraobjektivs4. Mikrofone5. Lautstärke höher6. Stummschaltung7. Lautstärke niedriger8. 3459. Freisprecheinrichtung10. LED fürFreisprecheinrichtung/Akku11. Schwenken und neigen12. Vergrößern13. Verkleinern14. Anruf beenden15. Anruf tätigen/annehmen12 DeutschDeutsch 13
EINRICHTUNG DES PRODUKTS1. Verbinden Sie die ConnectKamera mit einer Stromquelle.Die Connect Kamera ist zwar miteinem Akku ausgestattet, mussjedoch zunächst an eine externeStromquelle angeschlossenund aufgeladen werden, bis dieAkkustand-Anzeige grün leuchtet.Hinweis: Das Gerät kann auchper USB auf Ihrem PC oder Macaufgeladen werden (die Ladezeitenkönnen dabei s-TasteBluetooth -ModusStummschaltung22. Drücken und halten Sie zumEinschalten des Geräts die Ein/AusTaste. Es ertönt ein Audiosignal,und die LEDs des Geräts leuchten2–3 Sekunden lang auf, wobei dieLED für den zuletzt verwendetenModus in eingeschaltetemZustand dauerhaft leuchtet.On / Off3Bluetooth modeVideo ConferencingMode3. Wählen Sie die folgenden Modi ausund folgen Sie den Anweisungen,um zu beginnen.Mute14 DeutschDeutsch 15
1. Videokonferenz-Modus:1. Verbinden Sie das USB-Kabel mit dem Gerät und IhremUSB-Anschluss.2. Wählen Sie zum Starten eines Anrufs von Ihrer PC- oderMac-App aus den Videokonferenz-Modus in Connect.Die LEDs von Kamera und Freisprecheinrichtungblinken, während die Verbindung aufgebaut wird.Nach Abschluss des Vorgangs leuchtet die KameraLED mehrere Sekunden lang durchgehend und dieFreisprecheinrichtung gibt ein Audiosignal aus. Wenndiese Signale ausbleiben, starten Sie einen neuenVersuch und suchen Sie ggf. anschließend unter„Fehlerbehebung“ nach weiteren Informationen oderwenden Sie sich an den technischen Support.3. Stellen Sie sicher, dass die Connect Kamera imBetriebssystem und in der Konferenzanwendung alsstandardmäßig ausgewähltes Video- und Audio-Geräteingestellt ist. Starten Sie den Video- oder Audioanrufaus der Anwendung heraus. Die LEDs an Kamera undFreisprecheinrichtung leuchten während des StreamingVorgangs auf.2. Bluetooth-ModusSo funktioniert das Verbinden der Freisprecheinrichtung vonder Connect Kamera mit einem Mobilgerät:1. Wählen Sie den Bluetooth-Modus auf der ConnectKamera aus.2. Wenn das Gerät NFC-fähig ist, berühren Sie mit demGerät das NFC-Symbol auf der Freisprecheinrichtung.Daraufhin sollte der Aufbau einer Bluetooth-Verbindungauf Ihrem Mobilgerät akzeptiert werden. Alternativhalten Sie die Bluetooth-Taste so lange gedrückt, bis dieblaue LED an der Freisprecheinrichtung schnell blinkt.3. Öffnen Sie auf Ihrem Mobilgerät die Einstellungenund schalten Sie Bluetooth ein, um eine Verbindungherzustellen. Die Connect Kamera gibt außerdem einAudiosignal aus, um die Verbindung zu bestätigen.16 DeutschVERWENDUNG DES PRODUKTSVideo– Video starten: Das Video wird durch die Anwendunggesteuert. Es startet, sobald in der Anwendung die Kameraausgewählt und das Video gestartet wird. Während derlaufenden Übertragung des Videos leuchtet die Kamera-LED.– Schwenken und neigen Sie die Kamera und zoomen Siemit der Fernbedienung. Drücken Sie zur schrittweisenAnpassung die entsprechende Taste einmal und halten Siezur stufenlosen Anpassung die Taste gedrückt. Sie könnenauch das Kamerabild schwenken und neigen: Zoomen Siezunächst heran und schwenken oder neigen Sie dann das Bild.Außerdem besteht die Möglichkeit, die Kamera selbst mit demScrollrad an der Einheit zu neigen. Versuchen Sie nicht, dieKamera selbst von Hand zu neigen. Dadurch könnte das Gerätbeschädigt werden.– So funktioniert das Speichern der Schwenk-, Neige- undZoom-Einstellungen: Eine optionale App mit einer SoftwareBenutzeroberfläche zur Steuerung der Kamera-Einstellungenist verfügbar. Sie können die Kamera-Einstellungen speichern,damit sie beim nächsten Einschalten des Geräts verfügbarsind. Die Software ist zum Download verfügbar unterwww.logitech.com/support/connectAudio– Lautstärke: Die Lautstärkeregelung erfolgt über die„Lautstärke höher“- und „Lautstärke niedriger“-Tasten.– Stummschaltung: Mit der Stummschalttaste wird der Tonausgeschaltet.– Anruf: Starten Sie die Videokonferenzsoftware. Mit„Annehmen“ werden Gespräche angenommen. Mit„Auflegen“ werden Anrufe beendet. Ertönt ein Anklopfton,wählen Sie entweder „Auflegen“, um den zweiten Anrufabzulehnen, oder betätigen Sie die Antworttaste, umzwischen den Anrufen umzuschalten.Hinweis: Die Tasten „Annehmen“ und „Auflegen“funktionieren nicht in allen Anwendungen. Verwenden Sie dieVideokonferenzsoftware zum Annehmen und Beenden vonGesprächen.– Aktivitätsanzeige der FreisprecheinrichtungDeutsch 17
Blau: Die Connect wird in einem Gespräch aktiv verwendet.Blinkt blau: Ein Anruf geht ein oder Bluetooth befindet sichim Pairing-Modus.Bluetooth zum Verbinden der Connect Freisprecheinrichtungmit einem Mobilgerät zum Anrufen über dieFreisprecheinrichtung:– Wenn das Gerät NFC-fähig ist, berühren Sie mit demGerät das NFC-Symbol auf der Freisprecheinrichtung.Daraufhin sollte der Aufbau einer Bluetooth-Verbindungauf Ihrem Mobilgerät akzeptiert werden.ODER– Drücken Sie die Bluetooth-Taste auf derFreisprecheinrichtung, bis eine Verbindung mit demMobilgerät aufgebaut wurdeAkkustand-Anzeige– Wenn der Akku vollständig geladen ist, leuchtet dieStatusanzeige grün. Das grüne Licht erlischt, wenn derAkkustand unter 75 % fällt.– Wenn der Akkustand nur noch 25 % beträgt, leuchteteine rote Akku-LED durchgehend, um anzuzeigen,dass das Gerät sehr bald an eine externe Stromquelleangeschlossen werden muss.– Wenn der Akkustand nur noch 10 % beträgt, blinkt dierote Akku-LED, um anzuzeigen, dass das Gerät nichtmehr funktionieren wird, sofern es nicht umgehend aneine externe Stromquelle angeschlossen wird. Außerdemertönt ein Audiosignal.– Die Connect Akkustand-Anzeige blinkt grün, währenddas Gerät aufgeladen wird.– Wenn das Gerät vollständig aufgeladen ist, erlischt dieLED, bis das Gerät von der externen Stromversorgunggetrennt wird und im Akkubetrieb läuft.– Wenn die Fernbedienung angedockt ist, zeigt die LED fürdie Freisprecheinrichtung dieselbe Sequenz an.18 Deutsch123451. Unité principale dotéed'une caméra et d'unmodule mains libres2. Télécommande3. Câble d'alimentationet prises régionalesImportantInformation4. Câble USB5. DocumentationutilisateurFrançais 19
PRÉSENTATION DU PRODUIT135246781. Caméra 1080p et champde vision de 90 degrés2. Témoin lumineux de lacaméra3. Roulettemultidirectionnelle pourrégler l'inclinaison del'objectif de la caméra4. Microphones5. Volume 6. Sourdine1.2.3.4.5.1MicrophoneNFCKensington LockConnecteur 7. Volume 8. Témoin de niveau decharge de la batterie9. Module mains libres10. Module mains libres /Témoin de niveau decharge de la batterie11. Panoramique et inclinaison12. Zoom avant13. Zoom arrière14. Fin d'appel15. Appel/prise d'appel345Français 21
INSTALLATION DU PRODUIT121. Branchez-le à une alimentationexterne. Bien que le dispositifConnect soit fourni avec unebatterie rechargeable, il doitd'abord être branché à unealimentation externe et chargéjusqu'à ce que le témoin lumineuxvert de batterie s'allume.Remarque: le dispositif peutégalement être chargé parconnexion USB sur votre PC ouMac (les temps de charge peuventvarier).1341.2.3.4.Mode de visioconférenceBouton Marche/ArrêtMode Bluetooth Sourdine22. Appuyez longuement sur lebouton Marche/Arrêt pour mettrele dispositif sous tension. Ledispositif émet un signal sonore etles témoins lumineux s'allumentpendant 2 à 3 secondes. Le témoinlumin
Select Bluetoothmode on the Connect. 2. If your device is NFC enabled, touch the mobile device to the NFC icon on the speakerphone, which should enable Bluetooth acceptance on the mobile device, or hold down the Bluetoothbutton until the LED on the speakerphone starts blinking blue rapidly. 3.