Transcription
DriveCam Event RecorderInstallation and Testing InstructionsInstallation of the event recorder is not complicated, but care must be taken to avoid specific problems.Some vehicles require additional consideration to determine the optimum position for your particularneeds. In all cases, selecting and testing the mounting location on a single installation is imperative toprevent replicating an error across 10’s or 100’s of vehicles. Follow the instructions carefully and reviewthe test events to ensure proper orientation and operation of the components.BEFORE YOU BEGINNOTE: HindSight software must be installed before you can perform the test procedure.CAUTION: Do not cut the DriveCam power cord. It has an inline fuse near the end.VEHICLE CONSIDERATIONSBefore you get started, consider the following points regarding your vehicle type. These will help youidentify the best mounting location for the Event Recorder and may save you the trouble of having toremove and remount the unit.The event recorder needs to be mounted in a location that provides an unobstructed view of the interiorand exterior (front) of the vehicle. The rear-facing camera should capture an internal view from theoutside shoulder of the driver to the outside shoulder of a front seat passenger. The forward-facingcamera should capture a broad view of everything in front of the vehicle, beginning as close to the front ofthe vehicle without cutting off the horizon.Sedans, Pickups, and Light-Duty TrucksSmaller vehicles such as these typically have a traditional rear view mirror. The event recorder should bemounted so that it is visible just below the rear view mirror when the mirror is adjusted to its lowestposition (see figure on the following page). Keep in mind that the mirror typically pivots on two points,one on the glass and one on the back of the mirror.PHONE: 858-430-4000DRC201 2006-09-27WWW.DRIVECAM.COMPage 1SUPPORT@DRIVECAM.COMInstalling and Testing the DriveCam Event Recorder
Buses and Large TrucksLarger vehicles often have non-standard windshields and mirrors. In these cases, the event recorder isusually mounted as low on the windshield as possible but just above a horizontal line drawn from the topof the head of the tallest drivers when seated behind the wheel. A common mistake is to mount units toohigh on the windshield, which keeps the driver out of view, causes a loss of vision in the front of thevehicle, and pushes the DriveCam’s accelerometers farther away from the vehicle’s center of mass.NOTE: This equipment has been tested and found to comply with the limits for a Class B digital device,pursuant to Part 15 of the FCC Rules. These limits are designed to provide reasonable protection againstharmful interference in a residential installation. This equipment generates, uses, and can radiate radiofrequency energy and, if not installed and used in accordance with the instructions, may cause harmfulinterference to radio communications. However, there is no guarantee that interference will not occur in aparticular installation. If this equipment does cause harmful interference to radio or television reception,which can be determined by turning the equipment off and on, the user is encouraged to try and correctthe interference by one or more of the following measures: Reorient or locate the receiving antenna. Increase the separation between the equipment and receiver. Connect the equipment into an outlet on a circuit different from that to which the receiver isconnected. Consult the dealer or an experienced radio/TV technician for help.INSTALLATION PROCEDURESWe recommend that you carefully plan and test the installation before making final connections in thevehicle. Read the instructions carefully to ensure proper function of the event recorder.NOTE: The following installation procedures apply directly to most sedans, pickups, andlight-duty trucks. However, they are similar enough to be used for all vehicleinstallations. Be sure to follow the guidelines outlined on the previous page.PHONE: 858-430-4000DRC201 2006-09-27WWW.DRIVECAM.COMPage 2SUPPORT@DRIVECAM.COMInstalling and Testing the DriveCam Event Recorder
INSTALLING THE BRACKETThe air temperature must be greater than 50 F for the bracket adhesive to bond securely to thewindshield. A large towel soaked with very warm water and placed on the exterior of the windshield overthe mounting position can be used for cold weather installations. Using the vehicle’s defroster can alsobe effective. Otherwise, perform the installation in a heated garage.Step 1 Park the vehicle on a flat, level surface.Step 2 Temporarily place the Event Recorder inside the mounting bracket.Step 3 Using the alcohol wipe (provided), THOROUGHLY CLEAN AND DRY the areawhere you plan to mount the unit.CAUTION: This step is critical to prevent the unit from falling off at a later date.Step 4 Temporarily position the assembly (bracket and unit) behind the rearview mirror.CAUTION: Do not peel the backing from the adhesive strip until instructed to do so.Important Things to Consider Make sure the unit does not interfere with the driver’s primary field of vision. Make sure the lens has a clear view of the interior and exterior of the vehicle. Be aware ofpotential obstructions such as windshield wipers, window tint, sun visors, circulation fans, and therear-view mirror when it is adjusted to its lowest position. Make sure the driver has a clear view of the status lights on the unit. Position the unit so the lens is as close to the centerline of the vehicle while still leaving room(about 1¼ inch on the left side of the bracket) to insert the Torx wrench in the mounting screwaround the rearview mirror mounting post (failure to do so will require removing the entire bracketin order to adjust or service the camera). If you are performing multiple installations, test the first one before installing the others. Thisinvolves triggering the unit to record an event and then reviewing the event in HindSight software.Look for potential obstructions to the forward and rear-facing cameras. Once you are certain thatthe correct mounting location has been selected, you can continue installing the remainder ofyour event recorders.PHONE: 858-430-4000DRC201 2006-09-27WWW.DRIVECAM.COMPage 3SUPPORT@DRIVECAM.COMInstalling and Testing the DriveCam Event Recorder
Step 5 Mark the position of the assembly on the glass with a felt-tip marker.Step 6 Remove the unit from the mounting bracket.Step 7 Make sure the guide marks on the glass are level before proceeding.Step 8 Check the fit of the mounting bracket against the windshield.If the windshield is curved, you may have to gently shape (bend) the bracket so it will lie flushagainst the windshield.CAUTION: The adhesive is very sticky. Once it is on, it will not easily come off.Step 9 Remove the backing from the adhesive side of the mounting bracket.CAUTION: Verify the orientation of the mounting bracket. The bracket has a plastic diskon each side. The larger disk must be on the left as seen from inside thevehicle looking out.PHONE: 858-430-4000DRC201 2006-09-27WWW.DRIVECAM.COMPage 4SUPPORT@DRIVECAM.COMInstalling and Testing the DriveCam Event Recorder
Step 10 Place only the top edge of the mounting bracket against the windshield and make sure itis level before proceeding.Step 11 When you are sure that the mounting bracket is positioned correctly, press it firmlyagainst the windshield starting at the top and pressing the sides downward.CAUTION: Do not apply excessive pressure as the windshield may break.Step 12 Check from outside the vehicle to make sure there are no large air bubbles under themounting bracket.If necessary, use a screwdriver handle to (carefully) apply additional pressure to the mountingbracket and remove any large air bubbles. Use a small pin to create an escape path for the air ifthe problem is persistent.PHONE: 858-430-4000DRC201 2006-09-27WWW.DRIVECAM.COMPage 5SUPPORT@DRIVECAM.COMInstalling and Testing the DriveCam Event Recorder
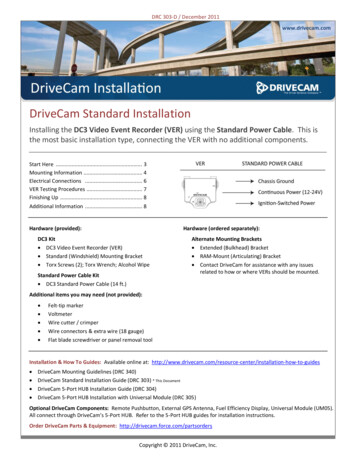
ELECTRICAL CONNECTIONSThe event recorder provides uninterrupted service when connected to a continuous 12-volt power sourcefrom the vehicle. This allows the unit to capture events when the vehicle is parked (hit and run accidents,vandalism, etc.) and when the vehicle loses ignition-switched power for any reason. You will need todetermine the best power source for your installation. A few suggestions are listed below.The event recorder MUST be connected toa power source that is ALWAYS on.Do not cut the power cord. It has an inline fuse near the end.Step 1 Leaving enough length to connect to the camera, route the DriveCam power cable acrossand down the window trim to a suitable location under the dashboard.Step 2 Connect the DriveCam power cord to a continuous 12 volt or 24 volt power source.Wire Splice OptionThe wire splice clips (provided) allow you to easily tap into existing wiring. Use a voltmeter orwiring diagram to locate suitable power and ground wires. Route the wiring through the clips,press the metal connector into the wires, snap the clip closed, and wrap in electrical tape.Fuse Tap OptionConnect the unit’s red lead to the positive (continuous) power source and the black lead tonegative (or to a clean ground) using the appropriate fuse taps (available at most auto partsstores). This option is similar to how after market accessories are powered in most vehicles but itdoes not provide evidence of tampering – a driver could disconnect and re-connect the DriveCamand then claim that the device was faulty.Custom Wiring OptionsConnect power and ground via methods that best fit your requirements. Customers occasionallysolder connections, use crimp connectors, etc. Power connections in motor coaches are usuallymade using crimped ring terminals to the power posts in the vehicle’s maintenance panel.If your vehicle has interior lights near the rearview mirror or visors, you can connect to that powersource as long as it is continuous (confirm that power is continuous with doors closed, key out ofthe ignition and after 5 minutes have elapsed).Step 3 Coil any excess cord and secure it with plastic ties or tape in a safe location under thedashboard, headliner, maintenance panel, etc.PHONE: 858-430-4000DRC201 2006-09-27WWW.DRIVECAM.COMPage 6SUPPORT@DRIVECAM.COMInstalling and Testing the DriveCam Event Recorder
CONNECTING THE EVENT RECORDERStep 1 Plug the power cable into the event recorder.Step 2 Place the unit in the mounting bracket so that it hangs vertically.Step 3 Fasten the unit using the two Torx screws and the Torx wrench (provided).Step 4 Check that the unit has continuous power by making sure the top LED status light on theunit is lit (red or green) when the vehicle’s engine is off, the key is removed from theignition, and the vehicle’s doors are closed (dome light is off).If not, recheck the wiring connections, polarity, and fuses to make sure continuous power is beingsupplied to the unit.PHONE: 858-430-4000DRC201 2006-09-27WWW.DRIVECAM.COMPage 7SUPPORT@DRIVECAM.COMInstalling and Testing the DriveCam Event Recorder
RECORD AND REVIEW A TEST EVENTWe highly recommend that you download the newly installed event recorder and review a test eventbefore sending the vehicle out on the road. This requires access to HindSight software. Refer to theHindSight 20/20 User’s Guide for detailed information.Step 1 Press one of the buttons on the bottom of the unit to record a test event.The upper status light on the event recorder will begin to flash (green) slowly as the event isbeing recorded. The light will then alternate between green and red as the event is being storedto memory. When complete, the light will return to solid red.Step 2 Connect the unit to a USB Download Station – download will begin immediately.The status light on the event recorder will begin to flash (red) rapidly as the event is beingdownloaded to the database. When complete, the light will return to solid green.Step 3 Review the test event in HindSight software, looking for the following:Verify that the forward-facing camera captures an unobstructed view out the front windshield.oCan you see far into the distance (including enough height to see traffic signals)?oCan you see the area immediately in front of the vehicle?oAre the side views even?Verify that the rear-facing camera captures an unobstructed view of the interior of the vehicle.oCan you see from the outside shoulder of the driver to the outside shoulder of a person inthe passenger’s seat?oCan you see into the rear of the vehicle (if applicable)?oAre there any objects that might block the view of the camera (e.g. the rearview mirrorwhen it is pulled to its lowest position, sun visors, fans, lights, etc.)?Verify that you can hear audio in the recording.Installation and testing is complete for this vehicle. If you are performing multiple installations,we recommend that you test each installation using these steps before sending those vehicles outon the road.PHONE: 858-430-4000DRC201 2006-09-27WWW.DRIVECAM.COMPage 8SUPPORT@DRIVECAM.COMInstalling and Testing the DriveCam Event Recorder
REMOVING A EVENT RECORDERUse the following procedures to uninstall an event recorder from your vehicle. You’ll need the Torxwrench that was shipped with your first event recorder to remove the unit from the bracket and a 3M TapeRemoval Tool (or a thin putty knife) to remove the bracket from the windshield. These items can beordered directly through DriveCam.CAUTION: Do not try to pull or pry the bracket off the windshield. It will destroy thebracket and may break the windshield.To remove the event recorder:Step 1 Remove the left Torx screw completely.Step 2 Gently pull down on the left side of the unit (try not to trigger the unit) to access the powercable.Step 3 Unplug the power cable only when a solid red or solid green light is showing(i.e. wait for the status lights to stop flashing before disconnecting the power cable).NOTE: A warning file or log entry will be created when the unit is unplugged.This is a standard security feature.Step 4 Remove the right Torx screw and the unit.To remove the mounting bracket from the windshield:Step 5 Use the 3M Tape Removal Tool or a broad, very thin putty knife.Step 6 Apply a small amount of lubricant (e.g. WD-40) to both sides of the blade.Step 7 Slide the blade between the bracket and the window and gently rock the blade back andforth while pushing forward until the bracket is completely removed.PHONE: 858-430-4000DRC201 2006-09-27WWW.DRIVECAM.COMPage 9SUPPORT@DRIVECAM.COMInstalling and Testing the DriveCam Event Recorder
FEDERAL COMMUNICATIONS COMMISSION (FCC) NOTICE (U.S. ONLY)WARNING: This equipment has been tested and found to comply with the limits for a Class B digitaldevice, pursuant to Part 15 of the FCC Rules. These limits are designed to provide reasonable protectionagainst harmful interference in a residential installation. This equipment generates, uses, and can radiateradio frequency energy and, if not installed and used in accordance with the instructions, may causeharmful interference to radio communications. However, there is no guarantee that interference will notoccur in a particular installation. If this equipment does cause harmful interference to radio or televisionreception, which can be determined by turning the equipment off and on, the user is encouraged to try tocorrect the interference by one or more of the following measures: Reorient or relocate receiving antenna. Increase the separation between the equipment and receiver. Connect the equipment into an outlet on a circuit different from that to which the receiver isconnected. Consult the dealer or an experienced radio/TV technician for help.This device complies with Part 15 of the FCC rules. Operation is subject to the following two conditions: This device may not cause harmful interference. This device must accept any interference received including interference that may causeundesired operation.CAUTION: Changes or modifications not expressly approved by the party responsible for compliancecould void the user's authority to operate the equipment.The FCC with its action in ET Docket 96-8 has adopted a safety standard for human exposure to radiofrequency (RF) electromagnetic energy emitted by FCC certified equipment. This device meets theHuman Exposure limits found in OET Bulletin 65, 2001, and ANSI/IEEE C95.1, 1992. Proper operation ofthis radio according to the instructions found in this manual will result in exposure substantially below theFCC’s recommended limits.PHONE: 858-430-4000DRC201 2006-09-27WWW.DRIVECAM.COMPage 10SUPPORT@DRIVECAM.COMInstalling and Testing the DriveCam Event Recorder
To comply with the FCC and ANSI C95.1 RF exposure limits, this device has been evaluated forcompliance with FCC RF Exposure limits in the typical configuration. It is recommended that the antennamust not be co-located or operating in conjunction with any other antenna or radio transmitter. Duringoperation, the transmitter shall be separated at least 20cm (8 inches) from any human contact.NOTE - The radiated output power of this wireless device is far below the FCC radio frequency exposurelimits. Nevertheless, this device should be used in such a manner that the potential for human contactduring normal operation is minimizedCanadaThis Class B digital apparatus complies with Canadian ICES-003Cet appareil num′erique de la classe B est conforme ′a la norme NMB-003 du CanadaCE:Declaration of Conformity:EnglishHereby, DriveCam, Inc., declares that this DriveCamIII is in compliance with theessential requirements and other relevant provisions of Directive 1999/5/EC.FinnishDriveCam, Inc. vakuuttaa täten että DriveCamIII tyyppinen laite on direktiivin1999/5/EY oleellisten vaatimusten ja sitä koskevien direktiivin muiden ehtojenmukainen.DutchHierbij verklaart DriveCam, Inc. dat het toestel DriveCamIII in overeenstemming ismet de essentiële eisen en de andere relevante bepalingen van richtlijn 1999/5/EGBij deze verklaart DriveCam, Inc. dat deze DriveCamIII voldoet aan de essentiëleeisen en aan de overige relevante bepalingen van Richtlijn 1999/5/EC.FrenchPar la présente DriveCam, Inc. déclare que l'appareil DriveCamIII est conformeaux exigences essentielles et aux autres dispositions pertinentes de la directive1999/5/CEPHONE: 858-430-4000DRC201 2006-09-27WWW.DRIVECAM.COMPage 11SUPPORT@DRIVECAM.COMInstalling and Testing the DriveCam Event Recorder
Par la présente, DriveCam, Inc. déclare que ce DriveCamIII est conforme auxexigences essentielles et aux autres dispositions de la directive 1999/5/CE qui luisont applicablesSwedishHärmed intygar DriveCam, Inc. att denna DriveCamIII står I överensstämmelsemed de väsentliga egenskapskrav och övriga relevanta bestämmelser som framgårav direktiv 1999/5/EG.DanishUndertegnede DriveCam, Inc. erklærer herved, at følgende udstyr DriveCamIIIoverholder de væsentlige krav og øvrige relevante krav i direktiv 1999/5/EFGermanHiermit erklärt DriveCam, Inc., dass sich dieser/diese/dieses DriveCamIII inÜbereinstimmung mit den grundlegenden Anforderungen und den anderenrelevanten Vorschriften der Richtlinie 1999/5/EG befindet". (BMWi)Hiermit erklärt DriveCam, Inc. die Übereinstimmung des Gerätes DriveCamIII mitden grundlegenden Anforderungen und den anderen relevanten Festlegungen derRichtlinie 1999/5/EG. (Wien)GreekΜΕ ΤΗΝ ΠΑΡΟΥΣΑ DriveCam, Inc. ΔΗΛΩΝΕΙ ΟΤΙ DriveCamIIIΣΥΜΜΟΡΦΩΝΕΤΑΙ ΠΡΟΣ ΤΙΣ ΟΥΣΙΩΔΕΙΣ ΑΠΑΙΤΗΣΕΙΣ ΚΑΙ ΤΙΣ ΛΟΙΠΕΣΣΧΕΤΙΚΕΣ ΔΙΑΤΑΞΕΙΣ ΤΗΣ ΟΔΗΓΙΑΣ 1999/5/ΕΚItalianCon la presente DriveCam, Inc. dichiara che questo DriveCamIII è conforme airequisiti essenziali ed alle altre disposizioni pertinenti stabilite dalla direttiva1999/5/CE.SpanishPor medio de la presente DriveCam, Inc. declara que el DriveCamIII cumple conlos requisitos esenciales y cualesquiera otras disposiciones aplicables o exigibles dela Directiva 1999/5/CEPortuguese DriveCam, Inc. declara que este DriveCamIII está conforme com os requisitosessenciais e outras disposições da Directiva 1999/5/CE.PHONE: 858-430-4000DRC201 2006-09-27WWW.DRIVECAM.COMPage 12SUPPORT@DRIVECAM.COMInstalling and Testing the DriveCam Event Recorder
PHONE: 858-430-4000 WWW.DRIVECAM.COM SUPPORT@DRIVECAM.COM DRC201 2006-09-27 Page 2 Installing and Testing the DriveCam Event Recorder Buses and Large Trucks Larger vehicles often have non-standard windshields and mirrors. In these cases, the event recorder is . the user is encouraged to try and correct