Transcription
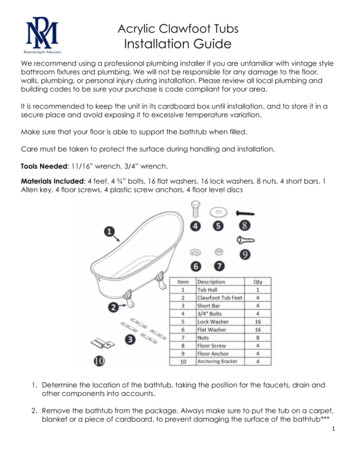
CAST IRON CLAWFOOT TUBBEFORE YOU BEGINPLANNINGWe recommend consulting a professional ifyou are unfamiliar with installing bathroomfixtures and plumbing. Signature Hardwareaccepts no liability for any damage to thefloor, walls, plumbing, or personal injuryduring installation.Use the tub’s PDF specification sheet as areference when planning your layout. Thespecification sheet can be found anddownloaded from the product page on ourwebsite.Unpack and inspect the tub for damage. Ifany damage is found, contact ourCustomer Relations team at1-866-855-2284.Because the tub specificationmeasurements are approximate and slightvariations may occur, we highly recommendperforming any rough-in procedures withthe tub on site. For on-site rough-ininformation, go to the appropriate draininstallation section.GETTING STARTEDTOOLS AND MATERIALS:Observe all local plumbing and buildingcodes.Ensure that you have gathered all of therequired materials that are needed forthe installation.Ensure that your bathroom floor isadequately supported, and the finishedfloor is level.Keep the plumbing connections aroundthe tub easily accessible for any futuremaintenance that may be necessary.Pencil*Tape Measure*Hacksaw*AdjustableWrench*Level*Straight Edge*Plumber’sTape*Thread Sealant*Neutral CureSilicone Sealant*DampCloth*Plumb Line**not includedCast Iron Clawfoot Tub Installation Instructions1
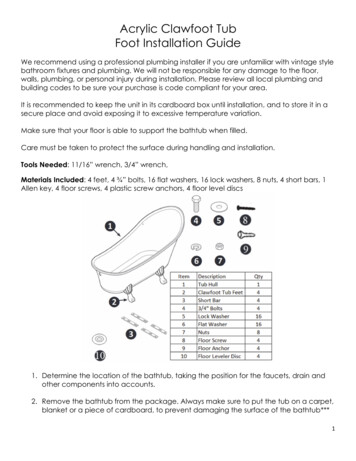
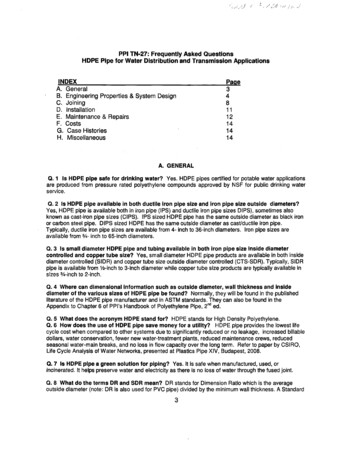
CAST IRON CLAWFOOT TUBINSTALLATIONSTEP 1: ATTACHING THE FEET1. Carefully lay the tub upside down on towels or otherpadding so that the bottom of the tub is facing up.3. Match each tub foot with its corresponding pod, asshown below. If the letters on your tub and feet do notmatch, lay the feet out on the floor and check to see ifall feet are the same size. If one pair of feet are slightlyshorter than the second pair, then the shorter pair aremeant to mount on the side of the tub containing thedrain hole.Important: If the feet are not installed in their correctlocations, the tub will not properly drain. Use a level toensure that the inside of the tub is sloped towards thedrain before moving on to tub installation.D2. Each dovetail bolt will slide into one of the fourslotted mounting pods as shown.D4. Slide the foot down over the dovetail bolt. Thread aflat washer, locking washer and nut onto the bolt (in thatorder).MountingPodCast Iron Clawfoot Tub Installation Instructions2
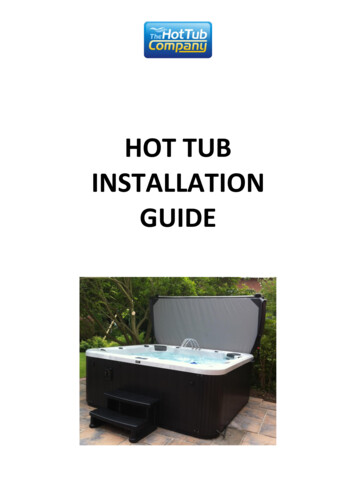
CAST IRON CLAWFOOT TUB5. After all feet are attached, flip the tub over and allowit to rest on the floor.Important: Do not lift the tub by the feet. Be sure tolift the tub by the rim and body only.6. If the tub feet do not sit flush on the floor, shims mayneed to be added to the feet. To add shims, removethe foot and install the shim between the foot and thefoot bolt. When the foot is alligned properly, secure itback to the tub.ShimCast Iron Clawfoot Tub Installation Instructions3
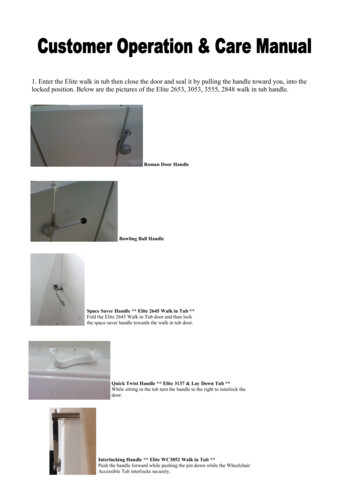
CAST IRON CLAWFOOT TUBSTEP 2: TUB INSTALLATION1. Set the tub in the desired installation location anddrop a plumb line from the center of the overflow holeto the floor. This will determine your drain location.Mark the drain hole location on the floor.3. Carefully set the tub back into position and adjustthe feet adjusters as necessary. Once level, apply agenerous bead of silicone on the bottom of the feet.This will prevent the tub from shifting after installation.2. Move the tub away from the installation location sothat the floor plumbing can be installed. Place the drainpipe at the appropriate height for the waste andoverflow piping. To determine this, you will need totemporarily fit your drain pipe into the tub and measurefrom the floor to the center of the drain pipe.4. Next you will need to trim your drain and overflowpipes to the appropriate sizes. Steps 5-8 will walk youthrough.5. To trim the drain and overflow pipes appropriately,you will need to temporarily fit the overflow and drainassemblies to the tub.Cast Iron Clawfoot Tub Installation Instructions4
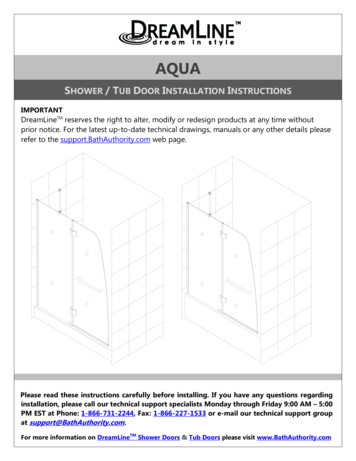
CAST IRON CLAWFOOT TUB6. The overflow tee (A) will be attached at the pointswhere the drain pipes intersect (B).8. Remove the drain and overflow assembly from the tub,and trim the pipes at the marked locations with a hacksaw.Make sure that the blade is suitable for cutting metal.AB7. Measure and mark each pipe so that the end of thepipe reaches a little over halfway into the overflow tee.9. Apply thread sealant or plumber’s tape to thethreaded ends of all pipes prior to assembly. If two pipesarrive attached, be sure to take them apart and do thesame. Do not apply any tape or sealant to anycompression fittings. Follow steps 10-13 for drainassembly instructions.10. Apply 100% neutral cure silicone sealant to theunderside of the drain flange and thread it through thetub and into the drain pipe. Apply thread sealant orplumber’s tape to the threaded connection to ensure awater-tight seal. Tighten by hand. Wipe away any excesssealant using a damp cloth.Cast Iron Clawfoot Tub Installation Instructions5
CAST IRON CLAWFOOT TUB11. Install the overflow assembly with the beveledwasher, overflow plate, mounting screw (provided) andany other washers or rubber sealing gaskets included.12. Attach the waste and overflow tee to the overflowassembly and shoe assembly with sealing washersand slip nuts. The beveled end of the sealing washershould face the tee.13. Attach the drain tube and flange to the waste andoverflow tee with the sealing washer and slip nut. Thebeveled end of the sealing washer should face the tee.14. When your tub is in place and all connections havebeen made, fill the tub with water to check for any leaksfrom the connections. Verify that the drain and overfloware working properly.Cast Iron Clawfoot Tub Installation Instructions6
CAST IRON CLAWFOOT TUBCLEANING AND MAINTENANCECast iron tubs have a porcelain enamel surface that is fused to the cast iron under high temperatures and is one of thebest heat-resistant coatings available. Porcelain enamel is a hard, glass-like surface that is not easily scratched and isextremely durable.A thorough rinsing and wipe down with a soft cloth is recommended after each use. For a more extensive cleaning, cleanwith a gentle soap, such as a dish washing liquid or an all-purpose cleaner. Avoid abrasive cleaners which can damageyour tub. The exterior of the tub is coated with oil-based paint that should be cleaned with soap and water. Mineral spiritsshould be avoided.Porcelain enamel can be chipped if it sustains a very hard impact. Repairing chipped porcelain requires a strong repairmaterial with a trusting bonding agent. If this occurs, we recommend the services of a professional to repair thedamaged area.Cast Iron Clawfoot Tub Installation Instructions7
Cast iron tubs have a porcelain enamel surface that is fused to the cast iron under high temperatures and is one of the best heat-resistant coatings available. Porcelain enamel is a hard, glass-like surface that is not easily scratched and is . Cast Iron Clawfoot Tub Installation Instructions. Title: cast-iron-clawfoot-tub-install Created Date: