Transcription
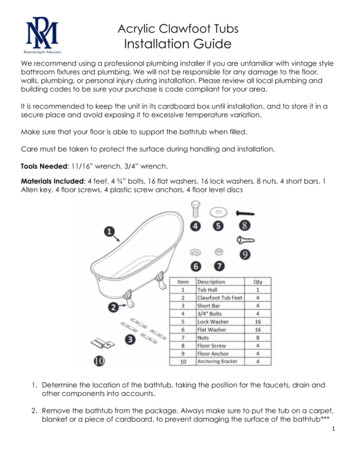
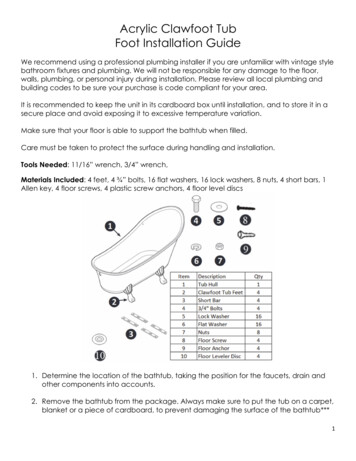
Acrylic Clawfoot TubFoot Installation GuideWe recommend using a professional plumbing installer if you are unfamiliar with vintage stylebathroom fixtures and plumbing. We will not be responsible for any damage to the floor,walls, plumbing, or personal injury during installation. Please review all local plumbing andbuilding codes to be sure your purchase is code compliant for your area.It is recommended to keep the unit in its cardboard box until installation, and to store it in asecure place and avoid exposing it to excessive temperature variation.Make sure that your floor is able to support the bathtub when filled.Care must be taken to protect the surface during handling and installation.Tools Needed: 11/16” wrench, 3/4” wrench,Materials Included: 4 feet, 4 ¾” bolts, 16 flat washers, 16 lock washers, 8 nuts, 4 short bars, 1Allen key, 4 floor screws, 4 plastic screw anchors, 4 floor level discs1. Determine the location of the bathtub, taking the position for the faucets, drain andother components into accounts.2. Remove the bathtub from the package. Always make sure to put the tub on a carpet,blanket or a piece of cardboard, to prevent damaging the surface of the bathtub***1
Acrylic Clawfoot TubFoot Installation Guidethe tub will now be resting upside down so that the tub bottom should be pointing atthe ceiling***NOTICE: If you have purchased a roll top tub or double end tub, be sure to placesome form of blocking (for example a book) under the rim so that you will be able toget your hands under the tub to flip it back over when finished3. Take a short bar and place it over the bolts on the bottom of the tub & use the 11/16”washer, lock washer, and nut (In that order) on the bolt coming through the bar on thetub.***CAUTION: the foot can scratch the side of the tub if it is not placed gently over the bolt! ***4. Hand tighten the nut so the bar can still slide back and forth in case you have tocenter it after the feet are installed.Take the foot and place it over the predrilled hole.*The feet can go on any side of the tub because they are universal.2
Acrylic Clawfoot TubFoot Installation Guide5. Take ¾” washer, lock washer and place the washer so it is resting on the tongue of thefoot.6. Slide the ¾” bolt through all pieces and thread into predrilled hole till hand tight.7. Once flush (there may be a gap of 2mm or less) tighten the nuts holding the bar inplace.8. Repeat process for all other sides.***When tightening these nuts, the acrylic will start to make a cracking sound. When youhear that, stop tightening. Otherwise you pull the bolt out of the tub. ****9. Use a ¾” wrench and tighten the feet. You can tighten these till the bolt does not turnany more.3
Acrylic Clawfoot TubFoot Installation Guide***Note: If the bolt tightens to the point where it goes through the bar and looks like it willtouch the tub hull, just loosen the bolt back up and place more flat washers on top of theexisting flat washer to take up space. ***10. Repeat steps 9 through 17 for all other sides.11. Place the bathtub in its position and proceed with securing the bathtub in placebefore the installation is finalize12. Find the center of all 4 leveling pads and mark the location. Remove the tub and drilla hole and secure the 4 plastic screw anchors.***Note. Please take the appropriate caution to not damage your floor while drillingthe holes13. Secure the 4-floor leveler disc to the floor with the screws.14. Place the bathtub in its position and tighten the set screws on the 4 leveling pads tothe floor leveler disc using the allen key4
Acrylic Clawfoot TubFoot Installation Guide15. Place a level inside the tub. Make sure the bathtub is stable and that all legs restperfectly on the floor, if not, ad-just the levelling pads.5
Acrylic Clawfoot Tub Foot Installation Guide 3 5. Take ¾" washer, lock washer and place the washer so it is resting on the tongue of the foot. 6. Slide the ¾" bolt through all pieces and thread into predrilled hole till hand tight. 7. Once flush (there may be a gap of 2mm or less) tighten the nuts holding the bar in place. 8.