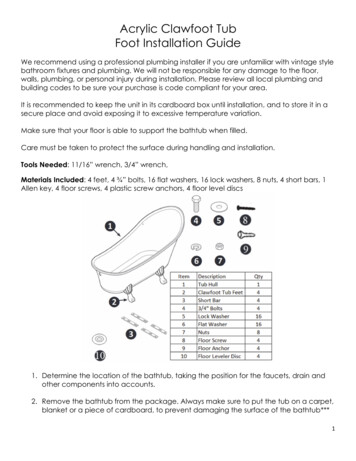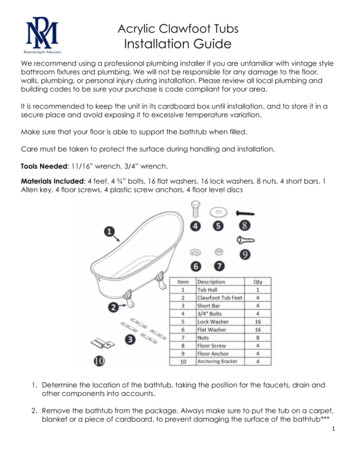
Transcription
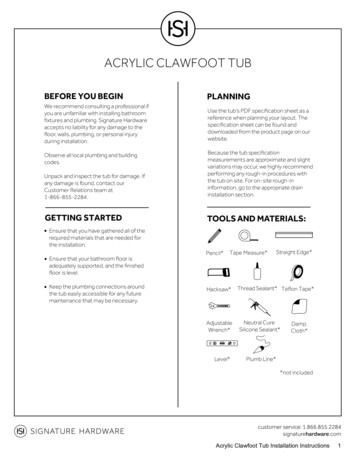
ACRYLIC CLAWFOOT TUBBEFORE YOU BEGINPLANNINGWe recommend consulting a professional ifyou are unfamiliar with installing bathroomfixtures and plumbing. Signature Hardwareaccepts no liability for any damage to thefloor, walls, plumbing, or personal injuryduring installation.Use the tub’s PDF specification sheet as areference when planning your layout. Thespecification sheet can be found anddownloaded from the product page on ourwebsite.Unpack and inspect the tub for damage. Ifany damage is found, contact ourCustomer Relations team at1-866-855-2284.Because the tub specificationmeasurements are approximate and slightvariations may occur, we highly recommendperforming any rough-in procedures withthe tub on site. For on-site rough-ininformation, go to the appropriate draininstallation section.GETTING STARTEDTOOLS AND MATERIALS:Observe all local plumbing and buildingcodes.Ensure that you have gathered all of therequired materials that are needed forthe installation.Ensure that your bathroom floor isadequately supported, and the finishedfloor is level.Keep the plumbing connections aroundthe tub easily accessible for any futuremaintenance that may be necessary.Pencil*Tape Measure*Hacksaw*AdjustableWrench*Level*Straight Edge*Thread Sealant* Teflon Tape*Neutral CureSilicone Sealant*DampCloth*Plumb Line**not includedAcrylic Clawfoot Tub Installation Instructions1
ACRYLIC CLAWFOOT TUBINSTALLATIONSTEP 1: ATTACHING THE FEET3. Thread a washer and nut onto each stud. Do not fullytighten the nuts; the bar needs to be able to slide backand forth to allow adjustment until the foot is attached.PROCEED TO THE APPROPRIATE FOOT INSTALLATIONMETHOD FOR YOUR TUB.FEET WITH MOUNTING BAR1. Carefully lay the tub upside down on towels or otherpadding so that the bottom of the tub is facing up.Remove the washers and nuts from the threaded studson the bottom of the tub.2. Place the provided metal bars over the threadedstuds.4. Fit the foot to the metal bar and tub. Secure the footto the end of the bar with the flat washer, lockingwasher, and bolt.5. Once the feet are in position and adjusted appropriately, tighten the nuts that were used to secure the barto the bottom of the tub.Important: Do not to over-tighten. Overtighteningcould strip the bolt and/or crack the tub body.Acrylic Clawfoot Tub Installation Instructions2
ACRYLIC CLAWFOOT TUBFEET WITHOUT MOUNTING BAR1. Carefully lay the tub upside down on towels or otherpadding so that the bottom of the tub is facing up.3. Use the provided hardware to attach each foot to thetub. Thread the lock nut onto each mounting bolt,followed by the metal washer. Tighten each bolt firmlywith an adjustable wrench.Important: Do not to over-tighten. Overtighteningcould strip the bolt and/or crack the tub body.2. On the tub body, locate each of the mounting holesfor the feet. If the feet contain letters, match the lettersto the corresponding mounting location on the tub.4. Small gaps between the feet and tub are normal,however, plastic or wood shims can be insertedbetween the tub and the foot’s mounting hardware toaccommodate. Adjust the shim and locknut until youreach the desired look.Acrylic Clawfoot Tub Installation Instructions3
ACRYLIC CLAWFOOT TUBSTEP 2: TUB INSTALLATIONProceed to the appropriate drain configuration tocomplete rough-in and installation.TUB AND DRAIN WITHOUT OVERFLOW1. Set the tub in the desired installation location andmark the drain hole location on the floor.2. Move the tub away from the installation location sothat the plumbing can be installed. The drain pipeshould extend approximately 6” above the finishedfloor.3. When the floor is finished, measure and cut the drainpipe to the appropriate length depending on the typeof drain being used, and the distance from the floor tothe drain hole.4. Carefully set the tub back into position and adjustthe feet adjusters as necessary. Once level, apply agenerous bead of silicone on the bottom of the feet.This will prevent the tub from shifting after installation.6 inchesAcrylic Clawfoot Tub Installation Instructions4
ACRYLIC CLAWFOOT TUB5. Apply 100% neutral cure silicone sealant to theunderside of the drain flange and thread it through thetub and into the drain pipe. Apply thread sealant orplumber’s tape to the threaded connection to ensurea water-tight seal. Tighten by hand. Wipe away anyexcess sealant using a damp cloth.6. Fill the tub with water to check for any leaks from theconnections. Verify that the drain is working properly.TUB AND DRAIN WITH OVERFLOW1. Set the tub in the desired installation location anddrop a plumb line from the center of the overflow holeto the floor. This will determine your drain location.Mark the drain hole location on the floor.2. Move the tub away from the installation location sothat the floor plumbing can be installed. Place the drainpipe at the appropriate height for the waste andoverflow piping. To determine this, you will need totemporarily fit your drain pipe into the tub and measurefrom the floor to the center of the drain pipe.Acrylic Clawfoot Tub Installation Instructions5
ACRYLIC CLAWFOOT TUB3. Carefully set the tub back into position and adjustthe feet adjusters as necessary. Once level, apply agenerous bead of silicone on the bottom of the feet.This will prevent the tub from shifting after installation.6. The overflow tee (A) will be attached at the pointswhere the drain pipes intersect (B).AB4. Next you will need to trim your drain and overflowpipes to the appropriate sizes. Steps 5-8 will walk youthrough.7. Measure and mark each pipe so that the end ofthe pipe reaches at least a little bit over halfway intothe overflow tee.5. To trim the drain and overflow pipes appropriately,you will need to temporarily fit the overflow and drainassemblies to the tub.Acrylic Clawfoot Tub Installation Instructions6
ACRYLIC CLAWFOOT TUB8. Remove the drain and overflow assembly from the tub,and trim the pipes at the marked locations with a hacksaw.Make sure that the blade is suitable for cutting metal.9. Apply thread sealant or plumber’s tape to thethreaded ends of all pipes prior to assembly. If twopipes arrive attached, be sure to take them apart anddo the same. Do not apply any tape or sealant to anycompression fittings. Follow steps 10-13 for drainassembly instructions.10. Apply 100% neutral cure silicone sealant to theunderside of the drain flange and thread it through thetub and into the drain pipe. Apply thread sealant orplumber’s tape to the threaded connection to ensure awater-tight seal. Tighten by hand. Wipe away any excesssealant using a damp cloth.11. Install the overflow assembly with the beveledwasher, overflow plate, mounting screw (provided) andany other washers or rubber sealing gaskets included.Apply a bead of silicone sealant to the underside of theflange. If your tub came with a ‘Press and Seal’ overflow,the pop-up flange will be used in place of the overflowplate and screw.Acrylic Clawfoot Tub Installation Instructions7
ACRYLIC CLAWFOOT TUB12. Attach the waste and overflow tee to the overflowassembly and shoe assembly with sealing washersand slip nuts. The beveled end of the sealing washershould face the tee.14. When your tub is in place and all connections havebeen made, fill the tub with water to check for any leaksfrom the connections. Verify that the drain and overfloware working properly.13. Attach the drain tube and flange to the waste andoverflow tee with the sealing washer and slip nut. Thebeveled end of the sealing washer should face thetee.Acrylic Clawfoot Tub Installation Instructions8
ACRYLIC CLAWFOOT TUBCLEANING AND MAINTENANCEWash your tub using a gentle soap, such as dishwashing liquid, and warm water. Do not use any abrasive cleaning pads ormaterials. We recommend the use of a soft sponge or microfiber washcloth. Vinegar can be used to remove hard waterbuildup and mildew. Rinse with warm water and dry with a clean, soft cloth. To maintain the glossy tub finish, werecommend buffing your tub every three months with white polishing compound.SCRATCH REMOVAL1. Using a damp sponge, wash the area with warm water and dish washing liquid. Rinse thoroughly with warm water.2. Do not use any type of abrasive cleaning pads or chemicals. Read the labels on your cleaners to be sure they aregentle enough to be used on your acrylic tub.3. Apply circular, even strokes to the scratched area using dampened 800 and 1200 grit sandpaper.4. Wipe the area clean with a damp sponge and rinse thoroughly.5. Apply an acrylic polishing compound and water with a soft, clean cloth. Rub in a circular motion to polish and buff thearea.6. Wipe off any excess residue and rinse the tub with warm water. Dry the surface with a clean, soft cloth.Acrylic Clawfoot Tub Installation Instructions9
Acrylic Clawfoot Tub Installation Instructions 2 ACRYLIC CLAWFOOT TUB INSTALLATION STEP 1: ATTACHING THE FEET 1. Carefully lay the tub upside down on towels or other padding so that the bottom of the tub is facing up. Remove the washers and nuts from the threaded studs on the bottom of the tub. 2. Place the provided metal bars over the threaded .