Transcription
QuantStudio 5 Real-Time PCR Instrument(for Human Identification)USER GUIDEInstallation, maintenance, and administrationfor use with:HID Real‑Time PCR Analysis Software v1.3Publication Number MAN0017162Revision A.0For Research, Forensic, or Paternity Use Only. For licensing and limited use restrictionsvisit thermofisher.com/HIDlicensing.
Manufacturer: Life Technologies Holdings Pte Ltd Block 33 Marsiling Industrial Estate Road 3 #07-06, Singapore 739256The information in this guide is subject to change without notice.DISCLAIMER: TO THE EXTENT ALLOWED BY LAW, LIFE TECHNOLOGIES AND/OR ITS AFFILIATE(S) WILL NOT BE LIABLE FOR SPECIAL, INCIDENTAL,INDIRECT, PUNITIVE, MULTIPLE, OR CONSEQUENTIAL DAMAGES IN CONNECTION WITH OR ARISING FROM THIS DOCUMENT, INCLUDING YOURUSE OF IT.Revision history: Pub. No. MAN0017162RevisionDateA.015 June 2017DescriptionNew document for Human Identification workflows using instrument firmware v1.3.1.Important Licensing Information: This product may be covered by one or more Limited Use Label Licenses. By use of this product, you accept theterms and conditions of all applicable Limited Use Label Licenses.Trademarks: All trademarks are the property of Thermo Fisher Scientific and its subsidiaries unless otherwise specified. Microsoft and Windows aretrademarks of Microsoft Corporation. Pentium is a trademark of Intel Corporation. 2017 Thermo Fisher Scientific Inc. All rights reserved.
Contents CHAPTER 1 Product information . . . . . . . . . . . . . . . . . . . . . . . . . . . . . . . . . . . . . . . 7Instrument overview . . . . . . . . . . . . . . . . . . . . . . . . . . . . . . . . . . . . . . . . . . . . . . . . . . . . . . . . . . . . . 7Installation, verification, and calibration . . . . . . . . . . . . . . . . . . . . . . . . . . . . . . . . . . . . . . . . . . . 8Instrument filters and supported dyes . . . . . . . . . . . . . . . . . . . . . . . . . . . . . . . . . . . . . . . . . . . . . 9System dyes . . . . . . . . . . . . . . . . . . . . . . . . . . . . . . . . . . . . . . . . . . . . . . . . . . . . . . . . . . . . . . . 9Custom dyes . . . . . . . . . . . . . . . . . . . . . . . . . . . . . . . . . . . . . . . . . . . . . . . . . . . . . . . . . . . . . . 10Parts of the instrument . . . . . . . . . . . . . . . . . . . . . . . . . . . . . . . . . . . . . . . . . . . . . . . . . . . . . . . . . 10Parts of the home screen . . . . . . . . . . . . . . . . . . . . . . . . . . . . . . . . . . . . . . . . . . . . . . . . . . . . . . . 11Comparison of features in desktop software and the instrument . . . . . . . . . . . . . . . . . . . . . 13 CHAPTER 2 Install the instrument . . . . . . . . . . . . . . . . . . . . . . . . . . . . . . . . . . . . 14Workflow: Install the instrument . . . . . . . . . . . . . . . . . . . . . . . . . . . . . . . . . . . . . . . . . . . . . . . . . 14Before you begin installation . . . . . . . . . . . . . . . . . . . . . . . . . . . . . . . . . . . . . . . . . . . . . . . . . . . . 14Unpack and install the instrument . . . . . . . . . . . . . . . . . . . . . . . . . . . . . . . . . . . . . . . . . . . . . . . 15Power on and follow the startup wizard . . . . . . . . . . . . . . . . . . . . . . . . . . . . . . . . . . . . . . . . . . . 15Instrument and computer connections . . . . . . . . . . . . . . . . . . . . . . . . . . . . . . . . . . . . . . . . . . . . 16Computer-to-instrument configuration . . . . . . . . . . . . . . . . . . . . . . . . . . . . . . . . . . . . . . . . . . . 17Firewall ports that must be open . . . . . . . . . . . . . . . . . . . . . . . . . . . . . . . . . . . . . . . . . . . . 17 CHAPTER 3 General procedures to use the instrument . . . . . . . . . . . . . 18Precautions for use . . . . . . . . . . . . . . . . . . . . . . . . . . . . . . . . . . . . . . . . . . . . . . . . . . . . . . . . . . . . 18Power on the instrument . . . . . . . . . . . . . . . . . . . . . . . . . . . . . . . . . . . . . . . . . . . . . . . . . . . . . . . . 19Power off the instrument . . . . . . . . . . . . . . . . . . . . . . . . . . . . . . . . . . . . . . . . . . . . . . . . . . . . . . . 19Sign in . . . . . . . . . . . . . . . . . . . . . . . . . . . . . . . . . . . . . . . . . . . . . . . . . . . . . . . . . . . . . . . . . . . . . . . . 20Sign out . . . . . . . . . . . . . . . . . . . . . . . . . . . . . . . . . . . . . . . . . . . . . . . . . . . . . . . . . . . . . . . . . . . . . . . 20Load and unload plate in the instrument . . . . . . . . . . . . . . . . . . . . . . . . . . . . . . . . . . . . . . . . . . 21View real-time data and plots on the instrument touchscreen . . . . . . . . . . . . . . . . . . . . . . . . 22Adjust the display of real-time plots on the instrument touchscreen . . . . . . . . . . . . . . 22Transfer EDS files from the instrument home screen . . . . . . . . . . . . . . . . . . . . . . . . . . . . . . . 22QuantStudio 5 Real-Time PCR Instrument User Guide (for Human Identification) MAN0017162 A.03
Contents CHAPTER 4 Configure the instrument and manageinstrument profiles . . . . . . . . . . . . . . . . . . . . . . . . . . . . . . . . . . . . . . . . . . . . . . . . . . . . . . . 23Initial start up . . . . . . . . . . . . . . . . . . . . . . . . . . . . . . . . . . . . . . . . . . . . . . . . . . . . . . . . . . . . . . . . . 23Overview of instrument settings (Administrator) . . . . . . . . . . . . . . . . . . . . . . . . . . . . . . . . . . . 24Overview of instrument settings (Standard or Guest) . . . . . . . . . . . . . . . . . . . . . . . . . . . . . . . 26Manage instrument profiles . . . . . . . . . . . . . . . . . . . . . . . . . . . . . . . . . . . . . . . . . . . . . . . . . . . . .Instrument profiles and signed-in users . . . . . . . . . . . . . . . . . . . . . . . . . . . . . . . . . . . . . .Create an administrator instrument profile during initial start-up . . . . . . . . . . . . . . . .Create a new instrument profile . . . . . . . . . . . . . . . . . . . . . . . . . . . . . . . . . . . . . . . . . . . . .Edit an instrument profile . . . . . . . . . . . . . . . . . . . . . . . . . . . . . . . . . . . . . . . . . . . . . . . . . . .Manage all instrument profiles . . . . . . . . . . . . . . . . . . . . . . . . . . . . . . . . . . . . . . . . . . . . . .272727282828Require instrument profile sign-in . . . . . . . . . . . . . . . . . . . . . . . . . . . . . . . . . . . . . . . . . . . . . . . 29Manage the sign out timer . . . . . . . . . . . . . . . . . . . . . . . . . . . . . . . . . . . . . . . . . . . . . . . . . . . . . . 29Manage the instrument name . . . . . . . . . . . . . . . . . . . . . . . . . . . . . . . . . . . . . . . . . . . . . . . . . . . . 29Enable sleep mode . . . . . . . . . . . . . . . . . . . . . . . . . . . . . . . . . . . . . . . . . . . . . . . . . . . . . . . . . . . . . 30Set the idling temperature for the heated cover . . . . . . . . . . . . . . . . . . . . . . . . . . . . . . . . . . . . 30Set the date and time . . . . . . . . . . . . . . . . . . . . . . . . . . . . . . . . . . . . . . . . . . . . . . . . . . . . . . . . . . . 30Restore factory defaults . . . . . . . . . . . . . . . . . . . . . . . . . . . . . . . . . . . . . . . . . . . . . . . . . . . . . . . . 31Enable Remote Monitoring Service . . . . . . . . . . . . . . . . . . . . . . . . . . . . . . . . . . . . . . . . . . . . . . . 31Update instrument software . . . . . . . . . . . . . . . . . . . . . . . . . . . . . . . . . . . . . . . . . . . . . . . . . . . . . 32 CHAPTER 5 Calibrate and verify instrument performance . . . . . . . . . 33Calibration and verification schedule . . . . . . . . . . . . . . . . . . . . . . . . . . . . . . . . . . . . . . . . . . . . . 34Calibration descriptions . . . . . . . . . . . . . . . . . . . . . . . . . . . . . . . . . . . . . . . . . . . . . . . . . . . . . . . . 35View calibration status and set reminders in the instrument . . . . . . . . . . . . . . . . . . . . . . . . . 36Perform ROI/uniformity, background, and dye calibrations . . . . . . . . . . . . . . . . . . . . . . . . . .Workflow: Calibration . . . . . . . . . . . . . . . . . . . . . . . . . . . . . . . . . . . . . . . . . . . . . . . . . . . . . .Prepare a calibration plate . . . . . . . . . . . . . . . . . . . . . . . . . . . . . . . . . . . . . . . . . . . . . . . . . .Perform calibrations . . . . . . . . . . . . . . . . . . . . . . . . . . . . . . . . . . . . . . . . . . . . . . . . . . . . . . .View calibration images . . . . . . . . . . . . . . . . . . . . . . . . . . . . . . . . . . . . . . . . . . . . . . . . . . . .Identify contamination . . . . . . . . . . . . . . . . . . . . . . . . . . . . . . . . . . . . . . . . . . . . . . . . . . . . . .Create a background plate (optional) . . . . . . . . . . . . . . . . . . . . . . . . . . . . . . . . . . . . . . . . .436363738394040QuantStudio 5 Real-Time PCR Instrument User Guide (for Human Identification) MAN0017162 A.0
Contents Calibrate dyes for HID‑validated workflows . . . . . . . . . . . . . . . . . . . . . . . . . . . . . . . . . . . . . . . .Workflow: Calibrate dyes for HID‑validated workflows . . . . . . . . . . . . . . . . . . . . . . . . . .Prepare a calibration plate for HID‑validated workflows . . . . . . . . . . . . . . . . . . . . . . . .Add custom dyes to the instrument for HID‑validated workflows . . . . . . . . . . . . . . . . .Perform a custom dye calibration for HID‑validated workflows . . . . . . . . . . . . . . . . . .4141414242Perform instrument verification using RNase P plates . . . . . . . . . . . . . . . . . . . . . . . . . . . . . .Instrument verification description . . . . . . . . . . . . . . . . . . . . . . . . . . . . . . . . . . . . . . . . . .RNase P instrument verification plate . . . . . . . . . . . . . . . . . . . . . . . . . . . . . . . . . . . . . . . .Performance specifications pass criteria . . . . . . . . . . . . . . . . . . . . . . . . . . . . . . . . . . . . .Prepare an RNase P plate . . . . . . . . . . . . . . . . . . . . . . . . . . . . . . . . . . . . . . . . . . . . . . . . . . .Perform RNase P verification . . . . . . . . . . . . . . . . . . . . . . . . . . . . . . . . . . . . . . . . . . . . . . .444445454647CHAPTER 6 Maintain the instrument . . . . . . . . . . . . . . . . . . . . . . . . . . . . . . . . . 48Backup or restore the instrument . . . . . . . . . . . . . . . . . . . . . . . . . . . . . . . . . . . . . . . . . . . . . . . . 48Decontaminate the sample block . . . . . . . . . . . . . . . . . . . . . . . . . . . . . . . . . . . . . . . . . . . . . . . . .Materials required . . . . . . . . . . . . . . . . . . . . . . . . . . . . . . . . . . . . . . . . . . . . . . . . . . . . . . . . .Clean the sample block . . . . . . . . . . . . . . . . . . . . . . . . . . . . . . . . . . . . . . . . . . . . . . . . . . . . .Detailed procedures for cleaning the sample block . . . . . . . . . . . . . . . . . . . . . . . . . . . . .49494951Replace the instrument fuses . . . . . . . . . . . . . . . . . . . . . . . . . . . . . . . . . . . . . . . . . . . . . . . . . . . . 52Materials required . . . . . . . . . . . . . . . . . . . . . . . . . . . . . . . . . . . . . . . . . . . . . . . . . . . . . . . . . 52Replace the fuses . . . . . . . . . . . . . . . . . . . . . . . . . . . . . . . . . . . . . . . . . . . . . . . . . . . . . . . . . . 52Store, move, or ship the instrument . . . . . . . . . . . . . . . . . . . . . . . . . . . . . . . . . . . . . . . . . . . . . .Prepare the instrument to store, move, or ship . . . . . . . . . . . . . . . . . . . . . . . . . . . . . . . .Move the instrument . . . . . . . . . . . . . . . . . . . . . . . . . . . . . . . . . . . . . . . . . . . . . . . . . . . . . . .Return the instrument for service . . . . . . . . . . . . . . . . . . . . . . . . . . . . . . . . . . . . . . . . . . . . 53535354APPENDIX A Troubleshooting . . . . . . . . . . . . . . . . . . . . . . . . . . . . . . . . . . . . . . . . . 55Instrument troubleshooting . . . . . . . . . . . . . . . . . . . . . . . . . . . . . . . . . . . . . . . . . . . . . . . . . . . . . 55Troubleshoot calibration failure . . . . . . . . . . . . . . . . . . . . . . . . . . . . . . . . . . . . . . . . . . . . . . . . . . 56Troubleshoot verification failure . . . . . . . . . . . . . . . . . . . . . . . . . . . . . . . . . . . . . . . . . . . . . . . . . 57 APPENDIX B Parts and materials . . . . . . . . . . . . . . . . . . . . . . . . . . . . . . . . . . . . . 58Kits, consumables, accessories, and reagents . . . . . . . . . . . . . . . . . . . . . . . . . . . . . . . . . . . . . 58Consumables (96‑well, 0.2‑mL format) . . . . . . . . . . . . . . . . . . . . . . . . . . . . . . . . . . . . . . . . . . . . 59Accessories . . . . . . . . . . . . . . . . . . . . . . . . . . . . . . . . . . . . . . . . . . . . . . . . . . . . . . . . . . . . . . . . . . . 60General-use materials and consumables . . . . . . . . . . . . . . . . . . . . . . . . . . . . . . . . . . . . . . . . . 60QuantStudio 5 Real-Time PCR Instrument User Guide (for Human Identification) MAN0017162 A.05
Contents APPENDIX C Instrument specification and layout . . . . . . . . . . . . . . . . . . . 61Configured system dimensions . . . . . . . . . . . . . . . . . . . . . . . . . . . . . . . . . . . . . . . . . . . . . . . . . . 62Instrument and computer connections . . . . . . . . . . . . . . . . . . . . . . . . . . . . . . . . . . . . . . . . . . . . 63Instrument clearances . . . . . . . . . . . . . . . . . . . . . . . . . . . . . . . . . . . . . . . . . . . . . . . . . . . . . . . . . . 64Electrical requirements . . . . . . . . . . . . . . . . . . . . . . . . . . . . . . . . . . . . . . . . . . . . . . . . . . . . . . . . . 64Environmental requirements . . . . . . . . . . . . . . . . . . . . . . . . . . . . . . . . . . . . . . . . . . . . . . . . . . . . 65 APPENDIX D Safety . . . . . . . . . . . . . . . . . . . . . . . . . . . . . . . . . . . . . . . . . . . . . . . . . . . . . 66Symbols on this instrument . . . . . . . . . . . . . . . . . . . . . . . . . . . . . . . . . . . . . . . . . . . . . . . . . . . . . 67Conformity symbols . . . . . . . . . . . . . . . . . . . . . . . . . . . . . . . . . . . . . . . . . . . . . . . . . . . . . . . . 68Safety alerts on this instrument . . . . . . . . . . . . . . . . . . . . . . . . . . . . . . . . . . . . . . . . . . . . . . . . . . 69Location of safety labels on the instrument . . . . . . . . . . . . . . . . . . . . . . . . . . . . . . . . . . . 69Safety information for instruments not manufactured by Thermo Fisher Scientific . . . . . 70Instrument safety . . . . . . . . . . . . . . . . . . . . . . . . . . . . . . . . . . . . . . . . . . . . . . . . . . . . . . . . . . . . . .General . . . . . . . . . . . . . . . . . . . . . . . . . . . . . . . . . . . . . . . . . . . . . . . . . . . . . . . . . . . . . . . . . .Physical injury . . . . . . . . . . . . . . . . . . . . . . . . . . . . . . . . . . . . . . . . . . . . . . . . . . . . . . . . . . . .Electrical . . . . . . . . . . . . . . . . . . . . . . . . . . . . . . . . . . . . . . . . . . . . . . . . . . . . . . . . . . . . . . . . .Cleaning and decontamination . . . . . . . . . . . . . . . . . . . . . . . . . . . . . . . . . . . . . . . . . . . . . . .7070717272Safety and electromagnetic compatibility (EMC) standards . . . . . . . . . . . . . . . . . . . . . . . . . .Safety compliance . . . . . . . . . . . . . . . . . . . . . . . . . . . . . . . . . . . . . . . . . . . . . . . . . . . . . . . . .EMC . . . . . . . . . . . . . . . . . . . . . . . . . . . . . . . . . . . . . . . . . . . . . . . . . . . . . . . . . . . . . . . . . . . . . .Environmental design . . . . . . . . . . . . . . . . . . . . . . . . . . . . . . . . . . . . . . . . . . . . . . . . . . . . . .72737374Chemical safety . . . . . . . . . . . . . . . . . . . . . . . . . . . . . . . . . . . . . . . . . . . . . . . . . . . . . . . . . . . . . . . . 74Biological hazard safety . . . . . . . . . . . . . . . . . . . . . . . . . . . . . . . . . . . . . . . . . . . . . . . . . . . . . . . . . 75 Documentation and support . . . . . . . . . . . . . . . . . . . . . . . . . . . . . . . . . . . . . . . . . . . . . 76Related documentation . . . . . . . . . . . . . . . . . . . . . . . . . . . . . . . . . . . . . . . . . . . . . . . . . . . . . . . . . 76Obtain information from the Help system . . . . . . . . . . . . . . . . . . . . . . . . . . . . . . . . . . . . . . . . . 76Customer and technical support . . . . . . . . . . . . . . . . . . . . . . . . . . . . . . . . . . . . . . . . . . . . . . . . . 76Limited product warranty . . . . . . . . . . . . . . . . . . . . . . . . . . . . . . . . . . . . . . . . . . . . . . . . . . . . . . . 76Index . . . . . . . . . . . . . . . . . . . . . . . . . . . . . . . . . . . . . . . . . . . . . . . . . . . . . . . . . . . . . . . . . . . . . . . 776QuantStudio 5 Real-Time PCR Instrument User Guide (for Human Identification) MAN0017162 A.0
1Product information Instrument overview . . . . . . . . . . . . . . . . . . . . . . . . . . . . . . . . . . . . . . . . . . . . . . . . . . 7Installation, verification, and calibration . . . . . . . . . . . . . . . . . . . . . . . . . . . . . . . . . . 8Instrument filters and supported dyes . . . . . . . . . . . . . . . . . . . . . . . . . . . . . . . . . . . . 9Parts of the instrument . . . . . . . . . . . . . . . . . . . . . . . . . . . . . . . . . . . . . . . . . . . . . . . . 10Parts of the home screen . . . . . . . . . . . . . . . . . . . . . . . . . . . . . . . . . . . . . . . . . . . . . . . 11Comparison of features in desktop software and the instrument . . . . . . . . . . . . 13Instrument overviewThe QuantStudio 5 Real-Time PCR Instrument uses fluorescence-based polymerasechain reaction (PCR) reagents to perform: Quantitative detection of target nucleic acid sequences (targets). Qualitative detection of targets (endpoint analysis, genotyping, andpresence/absence).The instrument is configured with a 96-well 0.2-mL fixed block (6 color de-coupled).To run experiments using HID assays, the instrument must be integrated with theHID Real-Time PCR Analysis Software v1.3.QuantStudio 5 Real-Time PCR Instrument User Guide (for Human Identification) MAN0017162 A.07
1Chapter 1 Product informationInstallation, verification, and calibrationInstallation, verification, and calibrationYour HID Support Representative will contact you to schedule the installation. Duringinstrument installation, the service representative will perform the initial instrumentverification using an RNase P plate and calibrate the instrument for the versions ofABY and JUN dye used by HID-validated workflows.Instruments are factory calibrated, so ROI, uniformity, background, and system dyecalibrations are not necessary at installation.You do have the option to install the instrument yourself. Before first use of theinstrument, complete the following tasks: Install the instrument (see page 14). Verify instrument performance (see page 44). Perform custom dye calibrations for ABY and JUN dyes (see page 41).After installation, perform regular calibration and verification according to the“Calibration and verification schedule“ on page 34.8QuantStudio 5 Real-Time PCR Instrument User Guide (for Human Identification) MAN0017162 A.0
Chapter 1 Product informationInstrument filters and supported dyes1Instrument filters and supported dyesSystem dyesThe instrument uses a de-coupled six-color optical filter set that supports the dyesshown in the following table and figure. For more information about the spectral dyecalibration kits available for the instrument, contact your HID 1-m1Filter om dyesExcitationEmissionBlue470 15520 15FAM ,SYBR GreenSYT09x2-m2Green520 10558 12VIC JOE ,HEX , TET [2]x3-m3Yellow550 10587 10NED , TAMRA ,ABY [3]Cy 3x4-m4Orange580 10623 14ROX , JUN [3]Texas Red x5-m5Red640 10682 14MUSTANGPURPLE , Cy 5LIZ x6-m6DeepRed662 10711 12None [4]Cy 5.5 The central wavelengths are the optimized wavelengths.The HEX and TET dyes from Thermo Fisher Scientific fall within the emission wavelength range of thesystem, therefore they can be added and adapted for use on the instrument.HID-validated workflows use versions of ABY and JUN dyes that are considered custom dyes.This filter set currently does not support any dyes supplied by Thermo Fisher Scientific.Wavelength(nm)EmissionSpectrax1-m1 x2-m2 x3-m3 x4-m4 x5-m5 x6-m61234x1-m1 — FAM , SYBR Green2 x2-m2 — VIC 3 x3-m3 — ABY , NED , Cy 3, TAMRA 1Filters5x4-m4 — JUN , ROX , Texas Red 5 x5-m5 — Cy 5, MUSTANG PURPLE 4QuantStudio 5 Real-Time PCR Instrument User Guide (for Human Identification) MAN0017162 A.09
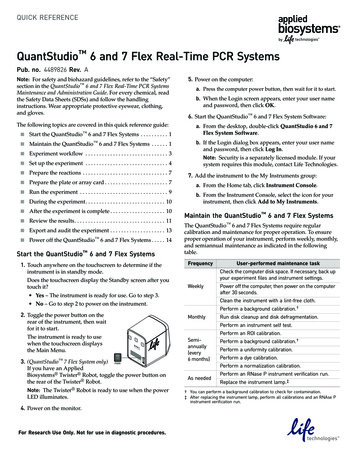
1Chapter 1 Product informationParts of the instrumentCustom dyesThe instrument can run assays designed with custom dyes. Custom dyes include: Dyes that are not supplied by Thermo Fisher Scientific. Dyes or versions of dyes that are not factory-calibrated on the instrument.Note: HID-validated workflows use versions of ABY and JUN dyes that areconsidered custom dyes for the instrument. To calibrate these ABY and JUN dyes, see page 41. To calibrate any other custom dye, contact your HID SupportRepresentative.Parts of the instrument1231Touchscreen – Controls the instrument.2USB port – For connection to an external network drive or external data storage device.3Instrument drawer – Contains sample plate.The instrument includes three additional USB ports on the back of the instrument.Note: The instrument recognizes only one external storage device at a time for datatransfer.10QuantStudio 5 Real-Time PCR Instrument User Guide (for Human Identification) MAN0017162 A.0
Chapter 1 Product informationParts of the home screen1Parts of the home screen123459687Avatar and Instrument nameEject instrument drawer icon3 Help system icon4 Status dial5 Instrument profile name;instrument block typeSettings buttonAccess templates buttons (not applicablefor HID‑validated workflows)8 Connectivity icons9 Sign In (or My Profile) button1627Table 1 Parts of the home screenElement of the home screenFunctionAvatar and Instrument nameSet by the administrator to uniquely identify the instrument.Eject instrument drawer iconTouchHelp iconTouchto launch the touchscreen Help system to access step-by-stepinstructions.Status dialWhen the instrument is not in use – Displays Set up run.to open or close the instrument drawer.Note: Instrument runs must be set up and started from the desktop software.When the instrument is in use – Displays the sample block temperature, theelapsed run time, and the run status.Note: Swipe the dial to the left or touchInstrument profile usernameand block typeto access real-time views of the run.Displays the username of a signed-in user and the instrument block type.Note: If no user is signed in, the instrument defaults to the Guest profile.QuantStudio 5 Real-Time PCR Instrument User Guide (for Human Identification) MAN0017162 A.011
1Chapter 1 Product informationParts of the home screenElement of the home screenSettings buttonFunctionTouchConnectivity iconsSettings to configure, calibrate, or learn about the instrument. – The instrument is connected via a wired configuration. – A USB drive is plugged into the instrument.Sign In button TouchSign In to sign into an instrument profile.(My Profile button when a useris signed in) TouchMy Profile to change instrument profile settings.12QuantStudio 5 Real-Time PCR Instrument User Guide (for Human Identification) MAN0017162 A.0
Chapter 1 Product informationComparison of features in desktop software and the instrument1Comparison of features in desktop software and the instrumentTo run experiments using HID assays, the instrument must be integrated with theHID Real-Time PCR Analysis Software v1.3.ActionsDesktop softwareInstrumentEdit experiment name; enter user name —Select instrument, experiment type, chemistry, run mode — —Define samples —Assign samples to wells —Define targets —Assign targets to wells —Start an instrument run [1] —Monitor a run in progress View time remaining View real-time plots— Review run results (analyzed run data) —Configure analysis settings —Select export options for run data and run results (analyzed run data) —Export run data Export template settings —Enter or edit properties [1]Edit method [1]Edit the thermal protocol, reaction volume, optical filter selectionSet up plate and well details [1]Instrument runRun resultsExport[1]Feature is available in the instrument touchscreen, but it is not validated for the HID assay workflow.QuantStudio 5 Real-Time PCR Instrument User Guide (for Human Identification) MAN0017162 A.013
2Install the instrument Workflow: Install the instrument . . . . . . . . . . . . . . . . . . . . . . . . . . . . . . . . . . . . . . . 14Before you begin installation . . . . . . . . . . . . . . . . . . . . . . . . . . . . . . . . . . . . . . . . . . . 14Unpack and install the instrument . . . . . . . . . . . . . . . . . . . . . . . . . . . . . . . . . . . . . . 15Power on and follow the startup wizard . . . . . . . . . . . . . . . . . . . . . . . . . . . . . . . . . 15Instrument and computer connections . . . . . . . . . . . . . . . . . . . . . . . . . . . . . . . . . . 16Computer-to-instrument configuration . . . . . . . . . . . . . . . . . . . . . . . . . . . . . . . . . . 17Workflow: Install the instrumentPerform all steps in “Before you begin installation“ on page 14 “Unpack and install the instrument“ on page 15 “Power on and follow the startup wizard“ on page 15 “Perform instrument verification using RNase P plates“ on page 44 “Calibrate dyes for HID‑validated workflows“ on page 41Before you begin installationA Thermo Fisher Scientific service representative will contact you to schedule aninstallation. However, you do have the option to install the instrument yourself.Before starting the installation: Review the site requirements in the QuantStudio 5 Real-Time PCR Instrument SitePreparation Guide (for Human Identification) (Pub. No. MAN0016701). Review the HID-validated computer-to-instrument configuration (page 16).14QuantStudio 5 Real-Time PCR Instrument User Guide (for Human Identification) MAN0017162 A.0
Chapter 2 Install the instrumentUnpack and install the instrument2Unpack and install the instrument1. Prepare the installation site as described in the QuantStudio 5 Real-Time PCRInstrument Site Preparation Guide (for Human Identification) (Pub.No. MAN0016701).2. Follow the pre-printed instructions on the instrument box to unpack theinstrument, accessories, and reference documentation. Save the packing materialfor future use or recycle it.The instrument box contains: Reference documentation: Welcome note, unpacking and set up instructionscard, system documentation insert One instrument Accessories: power cable, Ethernet cable, USB drive, reaction tube retainer Shipping plateNote: Save the shipping plate but do not use it to operate the instrument. Spectral calibration plates for HID-validated workflows.Note: Store these plates at –20 C (–15 C to –25 C).3. Place the instrument on the bench.4. Plug the power cable into the power port on the back panel of the instrument,then plug the cable into an electrical receptacle.5. Connect an Ethernet cable to the Ethernet port on the back panel of theinstrument, then connect the cable to the computer.Power on and follow the startup wizard1. Power on the instrument.2. Follow the startup wizard through the following tasks: Accept the license agreement Configure the instrument date and time. Create an administrator instrument profileNote: You can perform any of the steps above at a later time if you do not havethe information needed to complete the startup screens. See page 23.IMPORTANT! Before using the instrument for the first time, we recommend that you“Perform instrument verification using RNase P plates“ on page 44.QuantStudio 5 Real-Time PCR Instrument User Guide (for Human Identification) MAN0017162 A.015
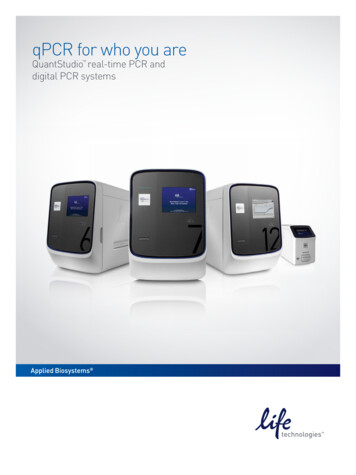
2Chapter 2 Install the instrumentInstrument and computer connectionsInstrument and computer connections1234567Figure 1 Instrument back panel1USB ports4RS232 Port—For service use only2WiFi USB port—Not applicable5Fuse Cover3Ethernet Port—RJ45 port for100/1,000 Mbps Ethernet communicationwith the instrument6Power Switch7Power Port—100 to 240 VAC32114Figure 2 Instrument‑to‑computer connections (minitower configuration)161Detachable power supply cord compatible with local power supply receptacle.2Connection between the computer and the instrument.3Connection between the computer and the monitor, keyboard, and mouse.4Connection between the computer and the (optional) handheld barcode scanner.QuantStudio 5 Real-Time PCR Instrument User Guide (for Human Identification) MAN0017162 A.0
Chapter 2 Install the instrumentComputer-to-instrument configuration2Computer-to-instrument configurationIMPORTANT! For HID use, the QuantStudio 5 Real-Time PCR System has beenvalidated for a direct (computer-to-instrument) configuration. During installation, aThermo Fisher Scientific service representative can set up only a direct configuration.Direct configuration A computer provided by Thermo Fisher Scientific with the HID Real‑Time PCR Analysis Software v1.3 Computer‑to‑instrument connection:– Direct, wired connection between the computer and the instrumentusing an Ethernet cableFirewall ports thatmust be openPortsConditionmDNS, 7000Instrument-to-computer connectionmDNS, 5353Instrument discoveryQuantStudio 5 Real-Time PCR Instrument User Guide (for Human Identification) MAN0017162 A.017
3General proceduresto use the instrument Precautions for use . . . . . . . . . . . . . . . . . . . . . . . . . . . . . . . . . . . . . . . . . . . . . . . . . . . 18Power on the instrument . . . . . . . . . . . . . . .
Manufacturer: Life Technologies Holdings Pte Ltd Block 33 Marsiling Industrial Estate Road 3 #07-06, Singapore 739256 The information in this guide is subject to change without notice. DISCLAIMER: TO THE EXTENT ALLOWED BY LAW, LIFE TECHNOLOGIES AND/OR ITS AFFILIATE(S) WILL NOT BE LIABLE FOR SPECIAL, INCIDENTAL,