Transcription
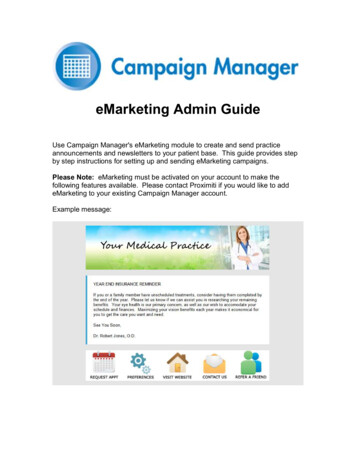
eMarketing Admin GuideUse Campaign Manager's eMarketing module to create and send practiceannouncements and newsletters to your patient base. This guide provides stepby step instructions for setting up and sending eMarketing campaigns.Please Note: eMarketing must be activated on your account to make thefollowing features available. Please contact Proximiti if you would like to addeMarketing to your existing Campaign Manager account.Example message:
Step 1: Update Email settings for your practiceNavigate to the User Information page in Campaign Manager. You will noticeand Email Settings section on the right hand side of the page. You will want toadd a Pracitce Website and default Practice Image.Practice Website: In this field enter your website address in the following formathttp://www.yourwebsite.com including the http:// prefix. This will allow patientsreceiving eMarketing messages to click through to your website from themessage itself.Practice Image: This will normally be your practice's banner image, which will beused when building the eMarketing message. Our recommendation is to resizethe image to 600 pixels in width. Contact Proximiti if you need assistance withthis step. First, click the Upload button and navigate to the image location onyour machine and click OK. Once the image has been added to the list, highlightthe image name and click Select. That will move the image into the PracticeImage field and act as your default image for eMarketing.Once complete with this step click on the Save Practice Settings button.
Step 2: Create new eMarketing messageNavigate to the Message Templates page in Campaign Manager and click Newto add a new message. Click into the name field highlighted below and give themessage a meaningful name (ex. April Newsletter).Then click on the Data Queries dropdown list and select "Newsletters" from thelist.
A new format will display on the right side of the screen to allow for eMarketingmessage setup. You will see a Message Subject field, HTML Email Body Editorbutton, and attachment box.Message Subject: Give your message a Subject, which patients will see as thesubject when receiving your message (ex. April Newsletter from Your MedicalPractice Name).HTML Email Body Editor: The body of the message will use a separate Editorwindow to set up the message contents. This is covered in the next Step.Attachments: Optionally include attachments with your message (ex. flyeradvertising a special offer or invitation to open house). To add an attachment,first add it to your file list by clicking Upload button and selecting the attachmentfile from your PC. Then select the attachment from the bottom list and click AddFile, which will populate the filename in the Attachment window. Most practiceswill skip the attachments and include the message to be delivered in the contentssection. You can take either approach. or include both message body andattachment(s).At this point click Save to save the message template.
Step 3: Create message bodyNow click on the HTML Email Body Editor button from your message template.A new window will appear as seen below. Now it's time to customize yourmessageAdding ImagesNotice the File list in the right hand bar of the editor window. You'll want to addall images you'll be including in the message to this list. Click the Upload buttonand select each image from your PC and add them to the list of images. Again,Proximiti recommends all images have width of 600 pixels, height is up to you.There is a blue placeholder image at the top of the message. Typically you willwant to replace this with your practice banner image. To do so, first click on theblue image itself and it will become highlighted. Then from the file list, highlightthe image to replace it and click Attach button. You should see your image takethe place of the placeholder in the display.Add Image Section: There is a button called Add Image Section in the right handside of the page. By default you will start with one image/banner section, andone content section. To add another image placeholder to your message clickthis button. The new image will show up at the bottom of your message body.Use the same steps as above to replace this image with another one in your list.
Adding ContentBelow the top image is a single content section with placeholder text "AddContent Here". Replace this text with your message contents either by typing orcopy/paste into the content section.You can add additional content blocks to your message using the Add ContentSection button on the right side of the editor.Formatting ContentThe editor has a powerful formatting bar at the bottom of the editor screen. Usethis bar to do things like changing font size, style, color and bold, underline, anditalicize text.You can also adjust text positioning and alignment using options in the formattingbar, and insert numbered or bulleted lists, and horizontal lines to your content.
Inserting LinksYou may want to include links in your message which patients can use to reachyour website, third party articles, etc. On the far right side of the formatting bar isan Insert Link button. First, highlight the text you want to make into a link andthen click the Insert Link button. You'll see a dialog similar to below:The Text field should include the highlighted text that will become linkable. In theHref field, you'll want to enter your destination web address. Please include thehttp:// followed by the website address you'd like to include. Then click on InsertHref button and your link will be created.Saving Your ChangesWhen you've completed your message contents, click the large Save and Closebutton on the right side of the editor window to save and close the editor window.You can always return to the content and make adjustments by clicking theHTML Email Body Editor button from your message template.
You may have noticed the footer menu included in each eMarketing message.See below for an explanation of these powerful features:Request Appt: Patients are given the ability to request an appointment withyour practice by date and timeframe. When they submit this request, yourpractice will receive an email with the patient's info and requested appointmentdate and time.Preferences: Allows patients to maintain their own communication preferences,which will be reflected in Campaign Manager, and used in all future campaigns.They will also have the option of opting out of future newsletters.Visit Website: Drive traffic to your practice website by allowing patients to selectthis option and going directly to your website. The destination website address istaken from the User Information page you have provided.Contact Us: Provides a simple form that patients can contact you with questionsor concerns. When they submit this request, your practice will receive an emailwith the patient's info and their message.Refer a Friend: This option allows patients to refer Friends and Family to yourpractice. You will receive referral information via email when the patient submitsthis option.
Step 4: Create a Campaign TemplateWhen your message has been created, it's time to create a campaign template.Navigate to the Campaign Templates page and click New and give it ameaningful name. Then in the message dropdown in the upper right corner,select your newly created eMarketing message.The main difference with eMarketing campaigns is in the Parameters listprovided. You'll have the ability to target a specific set of your patient base bysetting criteria in the various parameter fields.For example, if you wanted to send out a communication based on age group,City, State, or Zip Code, enter the desired values in the parameter fields. Youcan even target based on a past Procedure Code or Diagnostic Code. Asalways, if you leave the parameter value blank, it will consider all patients in theresults.At this point it's a good idea to send yourself a test message to verify the contentlooks good prior to sending. Enter your email address in the Test Message fieldat the bottom, then click Send Test and Approve Campaign. You will receive anexample of your message shortly.
Step 5: Sending your eMarketing messageFinally, navigate to the Schedule page and decide when you'd like your messageto be delivered. Add the eMarketing campaign to your schedule in the same wayas all other campaigns by choosing date and timeframe.Return to the User Console and put Campaign Manager back in Run mode.Your eMarketing message will go out as scheduled.If you have any issues or questions, please contact Proximiti Customer Care.
eMarketing Admin Guide Use Campaign Manager's eMarketing module to create and send practice announcements and newsletters to your patient base. This guide provides step by step instructions for setting up and sending eMarketing campaigns. Please Note: eMarketing must be activated on your account to make the following features available.