Transcription
The TELUS Business ConnectMobile solutionAdmin guide
Table of contents.Part 1 – Getting started4Introduction5Admin homepage555Main functionsAdmin PortalMy Extension6Do Not Disturb7RingOutPart 2 – Admin Portal9Phone System10Company Info11Company Caller ID12Phone numbers13Assigned Extensions14Auto-Receptionist settings1516Company HoursCompany Call Handling (IVR Settings)16 Set an extra Direct Extension to be aCompany Number17Company Greeting and Menu17Set a Company Greeting18Groups34Users19Call Queues19202021212223232425Add a Call Queue GroupConfigure Call QueuesCall Queue InfoCall Queue GreetingsSet a Call Queue GreetingCall HandlingMessages & NotificationsSet a Voicemail GreetingMessage RecipientNotifications35353636373738User DetailsSuper adminPhones & NumbersScreening, Greeting & Hold MusicCall Handling & ForwardingMessages & NotificationsOutbound Caller ID26Message-only Extensions26272728282930Add a Message-Only ExtensionConfigure a Message-Only ExtensionExtension InfoMessages & NotificationsSet a Voicemail GreetingMessage RecipientNotifications31Announcements-Only Extensions313233Add an Announcements-Only ExtensionExtension InfoSet an announcement39Manage Roles and Permissions39Predefined roles40Call Log41International Calling42Tools43AppearanceAppendix A: Multi-account Access45Accounts Management Portal464647Manage Linked AccountsAccess accountsView Service Status
Part 1Getting started
TELUS Business Connect Mobile Admin guide Part 1 – Getting startedIntroductionThe TELUS Business Connect Mobile solution is a simple powerfulcommunication solution allowing businesses to answer the call,grow the business and make the sale.The TELUS Business Connect Mobile solution is an integrated, fully featuredmobile communication solution that helps increase the business’ productivity,collaboration, and professional image.This guide will help the system administrator and end-users set up and accessthe following TELUS Business Connect Mobile features:Auto-ReceptionistCompany NumbersCall FlipCall GroupsMessagingCall QueuesCall Handling and Forwarding4
TELUS Business Connect Mobile Admin guide Part 1 – Getting startedAdmin homepageWhen you log in as an administrator, you will be taken to the Admin Portalwhich allows you access to admin-only tools and configure account-widephone system settings. You can access your individual account overviewand settings from the My Extension page. At the top of the screen, hoverover Admin Portal and click My Extension to switch to your individual userhomepage.Main functionsThere are a few main functions that administrators can access from any onlinepage. These functions are Edit Company Business Hours, Change CompanyGreeting and Set Company Caller ID.Admin PortalFrom the Admin Portal, admins see admin-only tools. The Phone System tab isthe main tab and landing page that houses all of the main settings for the entirephone system. Here, you have Company Numbers and Info, Auto-Receptionist,and Groups. The Users tab allows you to assign users and their roles, the CallLog, and International Calling tab display information about your phone system.The Tools tab has the setup option named Appearance.My ExtensionWhen you switch to the My Extension page, you will see the standard usersettings view of Overview, Messages, Call Log, Contacts, Settings, and Tools.Click on settings to access your individual settings. The My Extension tabhouses the same settings as a regular user has.5
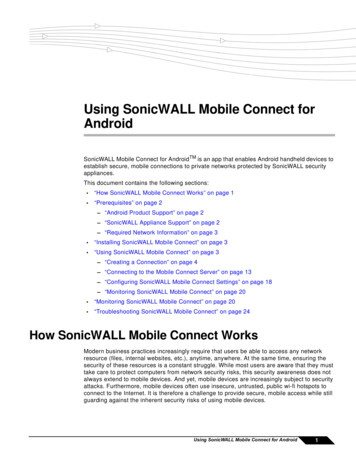
TELUS Business Connect Mobile Admin guide Part 1 – Getting startedDo Not DisturbIn the upper right of every page of your onlineaccount is a small coloured icon next to yourname. This icon displays your Do Not Disturbstatus. Click the icon to toggle between statuses:“ Do Not Disturb Off” – Green means that youare available to take incoming calls“ Do Not Disturb On” – Red means “Donot accept any calls.” All callers are sent tovoicemail.6
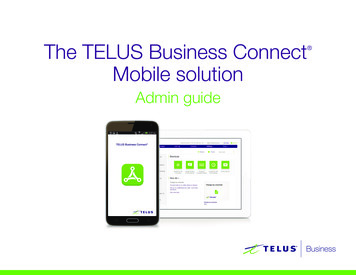
TELUS Business Connect Mobile Admin guide Part 1 – Getting startedRingOutRingOut enables one-touch calling from any phone, allowing you to make callsusing your business caller ID from any location, where you have high qualitycellular signal or Wifi connectivity. The RingOut icon appears near the top ofevery online account page.11. Click on the RingOut icon on any account page to open this menu pop-up.2. In the number field, enter or select the number you wish to call. You canalso choose from among recent calls, or from your contact list.3. Current Location should list your TELUS Business Connect number. Or youcan choose Custom phone number from the drop-down menu and enterthe desired number in the Custom Number field below.4. Enter the Custom Number to call here.5. Prompt me to press 1 before connecting the call is pre-checked:When the system calls you, you will hear, “Please press 1 to connect.” Thisprotects you in case you mistyped your own number, or if your voicemailpicks up too quickly.6. Now click Call. The system first calls you. When you answer (and press 1as instructed), it then calls the other number and connects you.263457
Part 2Admin Portal
TELUS Business Connect Mobile Admin guide Part 2 – Admin PortalPhone SystemThe Phone System tab is the main tab of the AdminPortal. It houses all of the main settings for your entirephone system. Here you will find settings for:Company InfoPhone NumbersAuto-ReceptionistGroupsOn your Phone System page, you have Shortcuts thatallow you to quickly access commonly used functionssuch as:Edit Company Business HoursChange Company GreetingSet Company Caller IDHow do I If you need help setting up your phone system,check out the How do I section for helpful articles.9
TELUS Business Connect Mobile Admin guide Part 2 – Admin PortalCompany InfoThe Company Info page allows you to see thecompany address and to set the CompanyCaller ID.10
TELUS Business Connect Mobile Admin guide Part 2 – Admin PortalCompany Caller IDSet your Company Caller ID to your company’sname so that your customers will know who iscalling when you call them.1. From the Admin Portal, select the PhoneSystem tab.2. Click Company Info.3. Click Caller ID Name.4. Enter your company name exactly the wayyou want it to appear on Caller ID displays,for local calls made from your main companyphone number. You can enter up to15 characters.5. Click Save (at the bottom right).1234511
TELUS Business Connect Mobile Admin guide Part 2 – Admin PortalPhone numbersThe Phone numbers settings gives you the optionto assign and unassign company and user phonenumbers and to transfer phone numbers.1. From Admin Portal, select thePhone System tab2. Click Phone Numbers3. Click Company to see company number andadditional information4. Click Assigned to see assigned phonenumbers and additional information5. Click Unassigned to see unassigned phonenumbers and additional information6. Click Transferred and Vanity to submit andreview transfer orders14563212
TELUS Business Connect Mobile Admin guide Part 2 – Admin PortalAssigned ExtensionsUnder Assigned Extensions, you will see the all ofthe Extension Numbers that have been set foryour phone system.1. From the Admin Portal, select thePhone System tab.2. Click Phone Numbers3. Click the Assigned. Click any numbernumbers to see more details.a. Users without phones – View the Number,edit whether Calls to this number will beconnected to: either Auto-Receptionistor select an Extension. If you havemade any changes, click Save.When your account is initially set up, all numbersexcept the Super Admin are unassigned. You canassign users to numbers during Express Setup.Any users that are not assigned during expresssetup can be assigned using this flow:To assign an extension to a user:4. From the Admin Portal, select the Users tab5. Click the Unassigned Extensions tab6. Click a phone number7. Enter the user’s information including FirstName, Last Name, Department, emailaddress. You can change the extensionnumber if desired.8. Click Save & Enable.9. The number will move to Users withExtensions tab.1323a4567813
TELUS Business Connect Mobile Admin guide Part 2 – Admin PortalAuto-Receptionistsettings.Create your own Auto-Receptionist for yourphone system. Customize your options foreffective call management. Choose yourCompany Hours, set your Company Greeting,define rules for Call Handling and more.14
TELUS Business Connect Mobile Admin guide Part 2 – Admin PortalCompany HoursCustomize your company’s business hours.You can specify the opening and closing time foreach day of the week or select 24 hours. Thisestablishes the settings for the Business Hoursand After Hours tabs in other settings areas(such as call queue settings and user settings).1. From the Admin Portal, select the PhoneSystem tab.2. Click Auto-Receptionist.3. Select Company Hours.4. Set your Company Hours to:a. 24 hours to have incoming calls handledthe same way all the time.b. Specify hours for each day of the week.This lets you set separate call-handlingrules and greetings for Business Hoursand After Hours.5. Click Save.1324a4b515
TELUS Business Connect Mobile Admin guide Part 2 – Admin PortalCompany Call Handling (IVR Settings).The Auto-Receptionist greets callers with arecorded message when they call your companyusing the main company number or any numberassigned as a company number.Your Auto-Receptionist is initially set to playa default greeting with your company nameusing text-to-speech technology. You can seta custom greeting by recording through yourphone or computer or by uploading a sound file.Alternatively, the Auto-Receptionist can connectcalls directly to an extension of your choice.Set an extra Direct Extension to be aCompany Number.1. From the Admin Portal, select the PhoneNumbers tab.2. Click the Assigned tab.3. Select a phone number to receive all calls.4. Select the radio button next to set the numberto Auto-Receptionist.5. Click Save.6. The number will move to the Company tab.21346516
TELUS Business Connect Mobile Admin guide Part 2 – Admin PortalCompany Greeting and Menu.The Company Greeting and Menu bar provides additional call handling options,including hearing the default greeting and recording a custom greeting.Set a Company Greeting.1. From the Admin Portal, select the Phone System tab.2. Click Auto-Receptionist.3. Select IVR Settings. The Company Greeting menu will appear4. Click Edit. A pop-up will appear with the current settings.5. Choose your preferred type of greeting.a. Default – Select the radio button next to Default.b. Custom – Select the radio button next to Custom and select howyou’d like to set your custom recording. If custom, another popupappears with the options Record over the PhoneNext to Call me at, choose a phone number from the dropdownmenu if you have saved numbers or type a phone number in thetext field. Click the Call Now button, and TELUS Business Connectwill call you to record your message. Record Using Computer MicrophoneClick Allow on the Adobe Flash Player Settings pop-up. ClickAllow if TELUS Business Connect asks to record through yourcomputer. The Microphone Test and Record settings will appear.When ready, click the red Record button to record your companygreeting through your computer microphone. Stop the recordingand listen to the playback. Click the up arrow to import. Browsefor a WAV or MP3 file you want to use. Click Attach. Click the Playbutton to listen to your greeting. If you’ve set a Custom Greeting,click the Record button to set a different company greeting.6. Under If caller enters no action, choose whether you’d like the use toConnect to an operator or Disconnect.7. Click Done.NOTE: If you have set custom company hours, follow these steps for both the Company Hours andAfter Hours tabs.13245a5b6717
TELUS Business Connect Mobile Admin guide Part 2 – Admin PortalGroupsThe TELUS Business Connect Mobile solution offers different types of groupsfor your phone system needs.Call Queues are different from extensions. Call queues increase the efficiencyof your company by directing the calls to the right employees. Call queues cansupport up to 25 calls waiting in a call queue.Message-Only Extensions allow you to create a dedicated extension specificallyfor receiving voice messages. All calls routed to this extension will beautomatically directed to the extension’s voicemail box.Announcements-Only Extensions allow you to create a dedicated extensionspecifically for playing an announcement. All callers routed to this extension willonly hear a recorded announcement/greeting.18
TELUS Business Connect Mobile Admin guide Part 2 – Admin PortalCall QueuesCreate a call queue when you want a specificgroup of users (such as Sales or Support) toshare incoming calls. Each call queue can havean extension or direct (local or toll-free) number ofits own. You can define specific business hoursfor each call queue and set up email notificationsof any missed calls or voicemails.Add a Call Queue Group.1. From the Admin Portal, select the PhoneSystem tab.2. Click Groups.3. Click New Call Queue at the top right.4. Select the radio button next to Call Queue.5. Click Next.6. Enter an Extension Number, ExtensionName, and Manager Email.7. Click Save.8. Select the users you’d like to add tothe group.9. Click Save.13264758919
TELUS Business Connect Mobile Admin guide Part 2 – Admin PortalConfigure Call Queues.After you create a call queue, you can configurethe Call Queue Info, Direct Numbers, Greeting,Call Handling, and Messages & Notifications.Call Queue Info.1. From the Admin Portal, select the PhoneSystem tab.2. Click Groups.3. Select the Call Queues tab.4. Select an existing Call Queue (CustomerSupport in this example). If you don’t have anyexisting call queues, go to the previous pageto learn how to create one.5. Click the name of the Call Queue to edit yourcall queue settings.6. Edit your settings:a. Extension Numberb. Group Namec. Record Call Queue Named. Company Namee. Contact Phonef. Manager Emailg. Addressh. Call Queue Hoursi. Call Queue Membersj. Voice Manager Password and ServiceLevel Settingsk. Regional Settingsl. Delete Call Queue7. Click Save.134256720
TELUS Business Connect Mobile Admin guide Part 2 – Admin PortalCall Queue Greetings.If you would like your callers to hear a recorded greeting before beingconnected to a call group, turn on the call queue greeting.Set a Call Queue Greeting.1. From the Admin Portal, select the Phone System tab.2. Click Groups.3. Select an existing Call Queue (Customer Support in this example).4. Click Greeting.5. Click Set Greeting.6. A pop-up window will appear displaying the current Greeting. Choose yourpreferred type of greeting.a. Default – Select the radio button next to Default.b. Custom – Select the radio button next to Custom and select how you’dlike to set your custom recording: Record Over the PhoneNext to Call me at, choose a phone number from the dropdown menuif you have saved numbers or type a phone number in the text field.Click the Call Now button, and TELUS Business Connect will call youto record your message. Record Using Computer MicrophoneClick Allow on the Adobe Flash Player Settings pop-up. Click Allow ifTELUS Business Connect asks to record through your computer. TheMicrophone Test and Record settings will appear. When ready, clickthe red Record button to record your greeting through your computermicrophone. Stop the recording and listen to the playback. ImportBrowse for a .WAV or .MP3 file you want to use. Click Attach.7. Click Save.546a6bNOTE: If you have set custom Call Queue Hours, follow these steps for both the Call Queue Hoursand After Hours tabs.721
TELUS Business Connect Mobile Admin guide Part 2 – Admin PortalCall HandlingChoose how you’d like each call queue to handle incoming calls. Set the orderin which the calls will be transferred to the members of the call queue, choosethe audio while connecting, hold music, and hold time here.1. From the Admin Portal, select the Phone System tab.2. Click Groups.3. Click the Call Queues tab.4. Click the name of the Call Queue you’d like to configure (CustomerSupport in this example).5. Select Call Handling to edit your call handling settings.6. Select the order in which calls will be transferred to department members:a. Rotating – in order by extension numberb. Simultaneous – on all department extensionsc. In fixed order – choose order7. Under Audio while connecting, click Set Audio to select the audiocallers will hear during business hours while waiting for a connection. ClickInterrupt Audio to choose how often the audio will be interrupted by aprompt. If you choose an interrupt time, you can then choose a standardInterrupt Prompt, such as “Thank you for holding. Please continue to stayon the line,” or record or upload your own custom prompt.8. Under Hold Music, click Set Hold Music to choose the audio callers willhear while on hold.9. You can also choose how to handle callers who are on hold in the Memberavailability and hold times menu.10. Click Save.NOTE: If you have set custom call queue hours, follow these steps for both the Call Queue Hoursand After Hours tabs.1342675891022
TELUS Business Connect Mobile Admin guide Part 2 – Admin PortalMessages & Notifications.In this section, set your Message Recipient, Voicemail Greeting, andNotifications. The TELUS Business Connect Mobile solution allows each callqueue to have separate voicemails to greet unanswered calls, as well as allowsyou to set a recipient for these voicemails.Set a Voicemail Greeting.1. From the Admin Portal, select the Phone System tab.2. Click Groups.3. Click the Call Queues tab.4. Select a Call Queue (Customer Support in this example).5. Click Messages & Notifications.6. Click Voicemail Greeting.7. A pop-up will appear displaying the current Voicemail Greeting.Choose your preferred type of greeting.a. Default – Select the radio button next to Default.b. Custom – Select the radio button next to Custom and select howyou’d like to set your custom recording: Record Over the Phone Next to Call me at, choose a phone number from the dropdown menuif you have saved numbers or type a phone number in the text field.Click the Call Now button, and TELUS Business Connect will call youto record your message. Record Using Computer MicrophoneClick Allow on the Adobe Flash Player Settings pop-up. Click Allow ifTELUS Business Connect asks to record through your computer. TheMicrophone Test and Record settings will appear. When ready, clickthe red Record button to record your greeting through your computermicrophone. Stop the recording and listen to the playback. ImportBrowse for a .WAV or .MP3 file you want to use. Click Attach.8. Click Save.NOTE: If you have set custom company hours, follow these steps for both the Company Hours andAfter Hours tabs.134267a57b823
TELUS Business Connect Mobile Admin guide Part 2 – Admin PortalMessage RecipientAfter you have set your voicemail greeting, youcan set which users or call queues are to receivethe messages.1. From the Admin Portal, select the PhoneSystem tab.2. Click Groups.3. Click the Call Queues tab.4. Select a Call Queue (Customer Support inthis example).5. Click Messages & Notifications.6. Click Message Recipient.7. A pop-up will appear with a list of membersto receive messages left for this call queue.8. Select the radio button next to the recipient.9. Click Done.13426758924
TELUS Business Connect Mobile Admin guide Part 2 – Admin PortalNotificationsAs an administrator, you can set up notificationsto be sent to your phone or email whenvoicemails, faxes and missed calls are receivedfor each call queue.1. From the Admin Portal, select the PhoneSystem tab.2. Click Groups.3. Click the Call Queues tab.4. Select a Call Queue (Customer Servicein this example).5. Click Messages & Notifications.6. Click Notificatio
TELUS Business Connect Mobile Admin guide Part 1 – Getting started Admin homepage When you log in as an administrator, you will be taken to the Admin Portal which allows you access to admin-only tools and configure account-wide phone system settings. You can access your individual