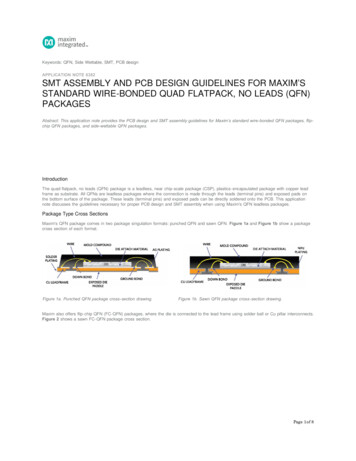
Transcription
UsingYourTerminalMoneris iWL255Long-Range Mobile(09/13)
Need help?Call 1-866-319-7450Record your Moneris merchant number here:2
ContentsMoneris iWL255 Long-Range Mobile. . . . . . . . . . . . . . .2Wireless communication. . . . . . . . . . . . . . . . . . . . . . . .4Battery use . . . . . . . . . . . . . . . . . . . . . . . . . . . . . . . . . . . . . .5Card entry options. . . . . . . . . . . . . . . . . . . . . . . . . . . . . . 6Transactions. . . . . . . . . . . . . . . . . . . . . . . . . . . . . . . . . . . .8Receipts . . . . . . . . . . . . . . . . . . . . . . . . . . . . . . . . . . . . . . . . 19Reporting. . . . . . . . . . . . . . . . . . . . . . . . . . . . . . . . . . . . . . . 21Administrative transactions. . . . . . . . . . . . . . . . . . . . . 24End-of-day process. . . . . . . . . . . . . . . . . . . . . . . . . . . . . . . 25Troubleshooting . . . . . . . . . . . . . . . . . . . . . . . . . . . . . . . . 271
Moneris iWL255Long-Range MobileUse this wireless, all-in-one terminal to processtransactions at the point of sale (POS).When prompted, you (and sometimes your customer)will key in information on the terminal. If yourcustomer is required to key in information, pass theterminal to the customer. When the customer hasfinished keying in the information, retrieve the terminaland complete the transaction.Cards accepted Magnetic stripe cards Chip cards Contactless cardsbfa1cd234526e7
Terminal keys1 Function keys Move through the menu items on the display. Select the option displayed above the key: e.g. if YESdisplays above the key, press that key to select YES.If displays above the key, press that key to scroll up. To select an item, scroll through the list until theitem is highlighted (e.g. LOGON vs. LOGON ), andthen press thekey.Power Off key Press only at the READY screen displaying a 0.00amount. When “POWER OFF TERMINAL?” appears,select YES to power off.2Alpha-numeric keys Key in numbers, letters and punctuation (with theAdmin key).34 Admin key Go to the MAIN MENU from the READY screen. Select letters and punctuation (with the alpha-numerickeys).5 Cancel key Cancel a transaction. Move back one screen at a time.6 Correct key / Paper Feed Clear displayed data one character at a time. Press and hold down to advance the receipt paperfrom the printer when the terminal is powered on.OK/Enter Accept displayed data. Submit data. Select highlighted menu item.7Terminal hardwareaDirect-to-Terminal Charge Cable Port (lift flap)bPrinter (to advance receipt paper, see labelcKeypaddMagnetic Stripe ReadereChip ReaderfDisplay screen / Contactless reader6above)Note: If the backlight goes off (i.e., buttons lose theirglow), press any key. The keys function even if light is off.3
Wireless communicationThe iWL255 Long-Range Mobile terminal uses long-rangewireless communications to send and receive informationto and from the Moneris Host. The communicationsindicators (described below) display in the terminal’son-screen info header:3G status indicatorsIconDescriptionTerminal is configured to connect to the authorizedcarrier’s 3G wireless network.Connection to wireless network established.To test 3G wireless communication:1. While the terminal is powered on, confirm that the3G status icons listed above are displayed.Note: Periodically the two icons maybe coloured grey and display like this:You may still process transactions if this happens.2. Confirm that there is sufficient signal strength(see Signal strength indicator table below).Signal strength indicatorIconDescription5 bars: Terminal is receiving a very strong signalfrom the network and can process transactions.4 bars: Terminal is receiving a strong signalfrom the network and can process transactions.3 bars: Terminal is receiving a good signal from thenetwork and can process transactions.2 bars: Terminal is receiving a signal from thenetwork and can process transactions but may takelonger to complete them.1 bar: The terminal is receiving a weak signal andmay not be able to process transactions and/or printreceipts.0 bars: The terminal is not receiving any signal andCANNOT process transactions.4
Battery useTo maintain battery charge, use any method below: Direct-to-terminal charge cable: Connect this cableto the side port (see page 3), and plug the other endinto a working power outlet. Charge base: Dock the terminal on a powered base.Helpful hints: Check the battery charge level before use. Power off the terminal if not in use or charging.Battery status indicatorsThe battery icon displays in the info header. The iconreflects the battery charge status/charge level.Terminal connected to external power sourceThe “plug” portion of the battery icon appearsonly when the terminal is connected to anexternal power source.Battery charge status/ levelThe coloured bars blink (one level at a time) when thebattery is charging.100%chargeor less80%chargeor less60%chargeor less40%chargeor less20%chargeor less10%charge2Recharge the battery as soon as possible. The terminal may power off.(Data will not be lost if this happens.)2The terminal will power off unless connected to a power source.(Data will not be lost if the terminal powers off.)1Stand-By modeThe terminal goes into Stand-By mode (i.e., the whitebacklight turns off) when it has not been used for aset time period. To exit Stand-By mode, press any key.Power on Press thekey. If the terminal does not power on,connect it to a power source.Power off1. Ensure that the terminal is not connected to apower source.2. From the READY screen, press thekey twice,key in 49, and press thekey. When “POWER OFFTERMINAL?” appears, press the key (YES).5
Card entry optionsInsert: Chip cards1. “SWIPE OR INSERTCARD” or“SWIPE/INSERT/TAPCARD” displays on theterminal.2. Either you or thecustomer inserts thecard into the device’schip reader.Note: Unless the terminal prompts otherwise, do notswipe a chip card even if the card has a magnetic stripe.3. The customer may be prompted to key in a PIN.4. The chip card must remain inserted until the“REMOVE CARD” prompt displays.Swipe: Magnetic stripe cards1. “SWIPE CARD” or“SWIPE OR INSERTCARD” or “SWIPE/INSERT/TAP CARD” displayson the terminal.2. Swipe the card on theterminal’s magneticstripe reader.Note: If the card has a chip and the terminal isenabled to read chip cards, the card must be insertedinto the chip reader.Manual card entryIf all available card entry methods fail, you maymanually enter the card number for credit cardsand some chip debit cards.1. “SWIPE CARD” or “SWIPE OR INSERT CARD” or“SWIPE/INSERT/TAP CARD” displays on the terminal.2. Key in the card number on the terminal, and pressthekey.3. Key in the card’s expiry date (MMYY) on the terminal,and press thekey. If “SWIPE ADMIN CARD” appears, swipe your POSAdmin card on the terminal. If “TAKE MANUAL IMPRINT OF CARD AND PRESSOK” appears, take a manual imprint of the card,and then press thekey.6
Wave/Tap: Contactless cards1. “SWIPE/INSERT/TAPCARD” displays onthe terminal.2. The customer tapstheir card over thedisplay screen wheretheicon appears.3. Note the following: Your merchant account and terminal must beconfigured for contactless functionality. The cardholder will not be prompted to enter a PIN. Only Purchases and Refunds are allowed. The transaction amount must be equal to or lessthan the maximum Contactless Dollar Value(see below) set for the card.Maximum Contactless Dollar Value (CDV) C redit Cards: To determine the maximum CDV fora card, print a Configuration report (see page 20).Look for the DOMESTIC TXN LIMIT found near theend of the report in the CVM LIMITS section underthe card type (see Transaction Limits on the ConfigReport on page 20).Note: If a card is tapped for an amount thatexceeds its maximum CDV, the terminal will display“CONTACTLESS TRANSACTION LIMIT EXCEEDED”or“NO SUPPORTED APPLICATIONS” (see messages onpages 28 and 29 respectively). Debit Cards: The maximum CDV is determined bythe card and does not appear on any report.Note: If a card is tapped for an amount that exceedsits maximum CDV, the terminal will display“TAP FAILED PLEASE INSERT OR SWIPE CARD”(see message on page 29).IMPORTANT: The card must have one of these labels:Visa payWave or MasterCard PayPass orAmex ExpressPay or Interac Flash. The card must be within 0.5 in. (1.3 cm) of theterminal screen, but it does not have to touch it. The card must be tapped or waved by itself(the customer cannot leave the card in their walletand wave it in front of the screen).7
TransactionsAll instructions in this guide begin at the READYscreen. To access the READY screen from any otherscreen, press thekey repeatedly until the READYscreen appears.Financial transactionsGeneral guidelines1. Before processing transactions, ensure that thewireless signal strength (see Signal strengthindicator on page 4) is at a sufficient level.2. Determine the transaction to be processed(e.g. Purchase or Refund).3. Establish the means of payment (credit or debit).4. Enter the card data on the terminal (see pages 6-7).5. Follow the terminal prompts* (see pages 9-18).6. Process receipts (see page 19).* Prompts may vary depending on variables suchas terminal setup, merchant setup and card type.Note: Some debit cards may display Cashbackand/or Account Selection and PIN prompts afterthe terminal has been returned to you; hand theterminal back to the customer to respond to theseprompts.Admin code shortcutsTo bypass scrolling through menus to select atransaction, use the Admin codes to jump directlyto a transaction. Admin codes can be found in thisguide in square brackets beside the transaction name(e.g. Logon [02] means the Admin code for loggingon is 02).To use an Admin code:1. Press thekey until “ENTER ADMIN CODE”appears.2. Key in the Admin code, and press thekey.The transaction appears.To print a list of all Admin codes:1. Press thekey until “ENTER ADMIN CODE”appears.2. Key in 40, and press thekey.8
Purchase [100]Credit or debit purchase of goods or services.1. If PURCHASE is the default, key in a Purchaseamount. (If PURCHASE is not the default: Press thekey, select TRANSACTIONS, select PURCHASE,and then key in a Purchase amount.)2. Press thekey.3. Follow the merchant prompts table on page 12.Refund [101]VOID–Purchase [106] / VOID–Refund [107]A Refund credits a customer’s account. A Void cancelsthe original Purchase or Refund.Note: Credit card Voids must be processed in the samebatch as the original transaction.1. Press thekey, select TRANSACTIONS, and thenselect the transaction (REFUND or VOID-PURCHASEor VOID-REFUND). If “SWIPE ADMIN CARD” appears, swipe your POSAdmin card.2. Key in the transaction amount, and press thekey.3. Follow the merchant prompts table on page 12.Pre-Authorization [102]Authorization if the final Purchase amount isunknown (e.g. hotel or car rental).1. If PRE-AUTH is the default, key in a Pre-Auth amount.(If PRE-AUTH is not the default: Press thekey,select TRANSACTIONS, select PRE-AUTH, and then keyin a Pre-Auth amount.)2. Press thekey.3. Follow the merchant prompts table on page 12.Note: When the final Purchase amount is known,you must perform an Advice for the final amountusing the same card number (see Advice optionson pages 10 and 11).9
Cheque Authorization [105]1. Press thekey, select TRANSACTIONS, and selectCHEQUE AUTH.2. Do one of the following: T o do the authorization by credit card, selectCREDIT CARD. T o do the authorization by driver’s licence, selectDRIVERS LICNCE.3. Key in the cheque amount, and press thekey.4. Follow the merchant prompts table on page 14.5. On the cheque, record the 8-digit “APPROVED”number, and then press thekey.Note: Receipts are not printed. ID types and province/state codes are provided by the auth service.Advice using Sequence Number [103] /Force Post [103]An Advice transaction completes or cancels aPre-Auth. A Force Post transaction completes a voiceauthorized purchase.Note: The Advice transaction must be processed on thesame terminal as the original Pre-Auth.1. Press thekey, select TRANSACTIONS, and thenselect P-A ADVICE.2. Follow the merchant prompts table on page 15.10
Advice List [109]Completes or cancels a Pre-Auth from a list.Note: The Advice List (P-A ADV LIST) option will appearonly if Tip Reporting is enabled. The Advice must beprocessed on the same terminal as the original Pre-Auth.1. Press thekey, select TRANSACTIONS, and thenselect P-A ADV LIST.2. When “SWIPE ADMIN CARD” appears, swipe yourPOS Admin card to display unmasked card numbers.Otherwise, simply press thekey to mask thenumbers. I f “ENTER CLERK ID” appears: To narrow the searchby Clerk ID, key in a clerk ID, and press thekey.Otherwise, press thekey for retrievalregardless of Clerk ID.3. When “ENTER AMOUNT” or “DATE” or “BATCHNUMBER” appears: To narrow the scope of yoursearch, key in the required data, and then pressthekey. Otherwise, for retrieval regardlessof the specified prompt, simply press thekeywithout entering the requested data.4. Scroll to the Pre-Auth that you want to complete orcancel (e.g., “PA1234 #.##”), and press thekey.5. Press the key (COMPL), and follow the merchantprompts table on page 15.11
Merchant prompts:Purchases/Pre-Auths/Refunds/VoidsThis table lists in order of appearance the prompts(and the actions to take for each) that you might seeon the terminal during a Purchase, Pre-Auth, Refund,or Void.Note: Only some of the prompts listed below willappear for any one transaction.Merchant promptMerchant action(s)ENTERCLERK IDKey in your Clerk ID, and press thekey.ENTER INVOICE NOKey in an alpha/numeric identifier, andpress thekey, or simply press thekey to bypass.ENTER ORIGINALAUTHORIZATION #Key in the 6-digit AUTH# from theoriginal transaction receipt (see page 19),and press thekey.SWIPE CARDorSWIPE OR INSERTCARDorSWIPE/INSERT/TAPCARDEnter the card on the terminal(see pages 6-7 for options).ENTER LAST4 DIGITSKey in the last four digits of the cardnumber, and press thekey.ENTER EXPIRYDATEKey in the card’s expiry date (MMYY),and press thekey.SWIPE ADMIN CARD Swipe your POS Admin card.REGULARMAIL/TELIf cardholder is present: Press thekey to select REGULAR.If cardholder is not present: Scroll toMAIL/TEL, and press thekey.SINGLERECURRINGINSTALLMENTOTHERScroll to the option that best describesthe transaction, and press thekey.TAKE MANUALIMPRINT OF CARDAND PRESS OKTake a manual imprint of the card, andpress thekey.This table continues on the next page.12
Merchant promptMerchant action(s)SELECTTo select the displayed application: Application name Press thekey (YES). To view the nextYESNO available application on the card: Pressthekey (NO). Application name To use the displayed application, pressthekey (YES).-OK?YESNOENTER ORIGINALKey in the 6-digit AUTH# found on theAUTHORIZATION # original transaction receipt (see page 19),and press thekey.CUSTOMERPRESS OKTO CONTINUEPass the terminal to the cardholder(see Customer prompts on page 17).RETURN TO CLERKPress theAPPROVED########Press thekey, and process anyreceipt that prints (see page 19).key to continue.13
Merchant prompts: Cheque AuthorizationsThis table lists in order of appearance the prompts(and the action to take for each) for this transaction.Merchant promptMerchant action(s)ENTER DRIVERSLICENCE NUMBERKey in the cheque-holder’s driver’slicence number, and press thekey.ENTER PROVINCEOR STATE CODEKey in the cheque-holder’s 2-digitprovince/state code, and press thekey.ENTER BIRTH DATEKey in the cheque-holder’s birth date(YYMMDD), and press thekey.SWIPE CARDEnter the card on the terminal(see page 6 for options).ENTER LAST4 DIGITSKey in the last four digits of the cardnumber, and press thekey.ENTER EXPIRYDATEKey in the card’s expiry date (MMYY),and press thekey.SWIPE ADMIN CARD Swipe your POS Admin card.APPROVED########14Go back to Cheque Authorization onpage 10, and continue at step 5 of thatprocedure.
Merchant prompts: Advices/Force PostsThis table lists in order of appearance the prompts(and the actions to take for each) that you might seeon the terminal during an Advice or Force Post.Note: Only some of the prompts listed below willappear for any one transaction.Merchant promptMerchant action(s)FIND ORIGINALTo do an Advice: Press thekey (YES).TRANSACTION?To do a Force Post: Press thekey (NO).YESNOENTER ORIGINALKey in the required 6-digit portion ofSEQUENCE NUMBER the RECEIPT NUMBER found on thePre-Auth receipt (to locate the required6 digits, see Pre-Auth Receipt on page 19),and press thekey.1234567890123456PRESS [OK]Press thekey to confirm thedisplayed card number.ENTER AMOUNTAdvice: #.## To complete the Pre-Auth: Key in theamount written on the Total line(sum of the printed Pre-Auth amountplus written Tip amount if any, seePre-Auth Receipt on page 19), and pressthekey. To cancel the Pre-Auth: Press thekey (this enters 0.00), and press thekey.Voice Auth: Key in the authorized transactionamount, and press thekey.ENTER ORIGINALAdvice:AMOUNT To complete the Pre-Auth: Key in the #.##printed Pre-Auth amount found onthe receipt (see Pre-Auth Receipt onpage 19), and press thekey. To cancel the Pre-Auth: Press thekey (this enters 0.00), and press thekey.Voice Auth: Key in the authorized transactionamount, and press thekey.ENTER TIP AMOUNT For Advice: Key in the amount written 0.00 on the Tip line (see Pre-Auth Receipt onpage 19), and press thekey.For Voice Auth: Key in the authorized Tipamount, and press thekey.This table continues on the next page.15
Merchant promptMerchant action(s)ENTERCLERK IDKey in your Clerk ID, and press thekey, or simply press thekey toaccept the displayed ID.ENTER INVOICE NOKey in an alpha/numeric identifier, andpress thekey, or simply press thekey to bypass.ENTER ORIGINALAUTHORIZATION #Key in the (voice) Auth # written on yourpaper sales draft, and press thekey.ENTER CARDNUMBERKey in the card number, and press thekey.ENTER EXPIRYDATEKey in the card’s expiry date (MMYY),and press thekey.Press theFINAL AMOUNT #.##-OK?key to continue.SWIPE ADMIN CARD Swipe your POS Admin card.REGULARMAIL/TELIf cardholder is present: Press thekey to select REGULAR.If cardholder is not present: Scroll toMAIL/TEL, and press thekey.SINGLERECURRINGINSTALLMENTOTHERScroll to the option that best describesthe transaction, and press thekey.ENTER INVOICE NOKey in an alpha/numeric identifier, andpress thekey, or simply press thekey to bypass.APPROVED#########Press thekey, and process anyreceipts that print (see page 19).FIND ORIGINALTRANSACTION?YESNOTo process next Advice: Press thekey(YES). To return to READY screen: Press thekey (NO), then press thekey.TRANSACTIONNOT FOUNDPress thekey to return to the READYscreen. (There are no other Pre-Authsstored in the terminal’s memory.)16
Customer promptsThis table lists in order of appearance the prompts(and the actions to take for each) that your customersmight see on the terminal during a transaction.Note: Only some of the prompts listed below willappear for any one transaction.Customer promptCustomer action(s)CUSTOMERPRESS OKTO CONTINUEPresses theSELECT LANGUAGEENGLISH FRANCAISFor English prompts: Presses thekey(ENGLISH). For French prompts: Pressesthekey (FRANCAIS).key.SELECTTo select the displayed application: Application name Presses thekey (YES). To view theYESNO next available application on the card:Presses thekey (NO). Application name - Presses thekey (YES) to confirmOK?that they wish to use the displayedYESNO application.CASH BACK?YESTo receive Cashback: Presses the key (YES).NO For no Cashback: Presses thekey (NO).SELECT CASH BACK AA BB CCPresses theororkey to selecta displayed Cashback amount.SELECT CASH BACK AA BB OTHERTo select a displayed amount: Pressesthe( AA) key or the( BB) key.To select a different amount: Pressesthekey (OTHER), keys in an amount,then presses thekey.PURCHASE #.##-OK?Presses thekey to confirm thedisplayed amount.ENTER TIP ORPRESS OKAA%OTHERTo select the preset %: Presses the(AA%) key.To enter a different amount: Pressesthe(OTHER) key. To bypass enteringTip: Presses thekey.ENTER TIP ORTo enter Tip: Presses thekey (%) orPRESS OKthekey ( ). To bypass entering Tip:PERCENT AMOUNT Presses thekey.% ENTER TIPPERCENTAGEAA%Keys in a percentage (or nothing at all),then presses thekey.This table continues on the next page.17
Customer promptCustomer action(s)ENTER TIP AMOUNT Keys in a dollar amount (or nothing 0.00 at all), then presses thekey. TRANSACTIONNAME #.##-OK?Presses thekey to confirm thedisplayed amount.SELECT ACCOUNTFor chequing account: Presses theCHEQUING SAVINGS (CHEQUING). For savings account:Presses thekeykey (SAVINGS).ENTER PIN & OKKeys in their PIN (Personal IdentificationNumber) and presses thekey.RETURN TO CLERKReturns the terminal to you (see RETURNTO CLERK prompt on page 13).APPROVED########Returns the terminal to you(see APPROVED ######## prompton page 13).REMOVE CARDRemoves their card from the chip reader,and returns the terminal to you(see APPROVED ######## prompt onpage 13).18
ReceiptsSigning credit card receiptsMerchant copyAlways retain this copy for your records, but note: If a signature line is printed, obtain the cardholder’ssignature. If VERIFIED BY PIN is printed, do not obtain a signature. If NO SIGNATURE REQUIRED is printed, do not obtaina signature.Pre-Auth ReceiptSix-digit Sequence #for AdvicesOriginal ReceiptSix-digit Auth#for Refundsand VoidsCardholder copyGive this copy to the customer, but note: If a merchant signature line is printed, sign this copy.Reprint last customer receipt or last report [29]Prints a duplicate of the last printout.1. Press thekey, select ADMIN, and select REPRINT.The receipt or report prints.Reprint Merchant receiptSee Reprint Merchant receipt on page 21.19
Card maskingTo reduce the risk of fraudulent card use, maskingand truncation are applied to card numbers printedon receipts. Masking replaces a card’s numbers(except for the last 4) with “*”s. Truncation prints onlythe last 4 digits of a card. The expiry date is not onany copy of a receipt.Contactless debit transactionsReceipts are always printed for tapped debit transactions.Signatureless transactions (credit cards)A customer signature is not required for swiped ortapped credit Purchase transactions if the total is ator below the maximum Signatureless Dollar Value(SDV) (see below). Receipts may not be printed forsignatureless transactions. If a receipt is printed, thestatement “NO SIGNATURE REQUIRED” appears on it.Maximum Signatureless Dollar Values (SDV)To determine the maximum SDV for a card, print aConfiguration report (see below) and locate the card’sCVM LIMIT parameter, which is found in the CVM LIMITSsection near the bottom of the report. (A value of 9999means there is no maximum limit.)Transaction Limits on the Config Reportmax. SDVmax. CDVmax. SDVmax. CDVmax. SDVmax. CDVcard swiped*card tapped*card tapped*card swiped*card tapped**card tapped*card tapped*card tapped** Purchase, including tax, must be equal to or less than the value.** Purchase, including tax, must be less than the value.Configuration Report [16]This report lists terminal parameters and values.key twice,1. From the READY screen, press thekey in 16, and press thekey.2. When “PRINT TRAILER MESSAGES?” appears, pressthe key (NO).The report prints, and the READY screen appears.20
ReportingMasking on reportsTo reduce the risk of fraudulent card use, maskingand/or truncation are applied to card numbers, andexpiry dates are not printed on reports. Card numbersprint unmasked on reports only if you swipe yourPOS Admin card at the “SWIPE ADMIN CARD” prompt.Otherwise, press thekey at this prompt to printmasked numbers on reports.Card types on reportsFlash transactions are included in Interac totals.Reprint Merchant receipt [66]Prints a duplicate of the Merchant Copy receipt.1. Press thekey, select REPORTS, and selectTRANS INQUIRY. If “SWIPE ADMIN CARD” appears, swipe your POSAdmin card. If “ENTER CLERK ID” appears, key in your Clerk ID,and press thekey.2. Identify the transaction (follow the prompts). When “PRINT OR DISPLAY?” appears, press thekey (DISPLAY), scroll to the transaction, and pressthekey. Then press the key (REPRINT).Clerk Subtotals Report [82]Prints transactions by Clerk ID for one, a group, or allclerks. Transactions are grouped by type and itemizedunder card type. Grand total amount(s) also appearfor each Clerk ID.Note: Clerk Subtotalling must be enabled.1. Press thekey, select REPORTS, and selectCLERK INQUIRY. If “SWIPE ADMIN CARD” appears, swipe your POSAdmin card.2. Select the number of clerks to include in the report: For one clerk, press the key (SINGLE). When“ENTER CLERK ID” appears, key in a Clerk ID andpress thekey. For a specific group of clerks, press the key(MULTIPLE) then select GROUP. When “ENTERGROUP ID TO BE PROCESSED” appears, key inthe Group ID and press thekey, then selectPROCESS LIST.21
For all clerks, press the key (MULTIPLE) thenselect ALL CLERKS.The report prints, and the READY screen appears.Current Batch Totals Report [99]Prints a report listing transactions by card type forthe current batch (terminal) without closing thebatch. Grand totals by transaction type are alsoincluded in the report.1. Press thekey, select REPORTS, and selectCLOSE BATCH. If “SWIPE ADMIN CARD” appears, swipe your POSAdmin card. If “ENTER CLERK ID” appears, key in your Clerk ID,and press thekey.“CLOSE BATCH” appears, and then the report prints.2. When “CLOSE BATCH?” appears, press the key (NO)to finish printing without closing the batch.The report prints, and the READY screen appears.Merchant Subtotals Report [95]Prints a list of transaction type totals by card typefor the current batch from the Moneris Host. Grandtotals by transaction type are also included.1. Press thekey, select REPORTS, and selectMERCH SUBTOTAL. If “SWIPE ADMIN CARD” appears, swipe your POSAdmin card. If “ENTER CLERK ID” appears, key in your Clerk ID,and press thekey.The report prints, and the READY screen appears.Pre-Auth List [62]Prints a list of Pre-Auths and identifies open Pre-Authsthat need to be completed or cancelled.1. Press thekey, select REPORTS, then selectPRE-AUTH LIST.2. When “SWIPE ADMIN CARD” appears, swipe yourPOS Admin card to print unmasked card numbers.Otherwise, simply press thekey to mask thenumbers. If “ENTER CLERK ID” appears, key in your Clerk ID,and press thekey.3. Select OPEN or CLOSED (for completed or cancelledPre-Auths) or BOTH (for both types).“PRINT DATE OR BATCH?” appears.22
Reporting4. To print the report by date, press the key (DATE).To print the report by batch, press the key (BATCH).5. To print the current date or batch, press thekey. To select a specific date or batch, key in a date(YYMMDD) or batch number, and press thekey.The report prints, and the READY screen appears.Tip Totals Report [96]Prints a summary of Tip amounts entered on theterminal for transactions in a specified batch ora specified date range.Note: If Clerk Subtotalling is enabled, Tip amounts aresummarized by Clerk ID.1. Press thekey, select REPORTS, then selectTIP TOTALS. If “SWIPE ADMIN CARD” appears, swipe your POSAdmin card. If “ENTER CLERK ID” appears, key in a Clerk ID toprint the Tip total for a specific clerk; otherwise,press thekey to print Tip totals for all clerks.“PRINT DATE OR BATCH?” appears.2. For totals by date, press the key (DATE); for totalsby batch, press the key (BATCH). If DATE is selected:a. When “START DATE” appears, key in the startdate (YYMMDD), and press thekey.b. When “START TIME” appears, key in the starttime (HHMM, 24-hour clock), and press thekey.c. When “END DATE” appears, key in the end date(YYMMDD), and press thekey.d. When “END TIME” appears, key in the end time(HHMM, 24-hour clock), and press thekey. If BATCH is selected, key in the batch number, andpress thekey.The report prints, and the READY screen appears.23
AdministrativetransactionsLogon [02]If “PLEASE LOGON” appears, you are required to log on.1. Press thekey, select ADMIN, then select LOGON. If “SWIPE ADMIN CARD” appears, swipe your POSAdmin card.The READY screen appears within 60 seconds.Logoff [03]To ensure unauthorized transactions cannot beprocessed, log off your terminal at the end of eachbusiness day.1. Press thekey, select ADMIN, then select LOGOFF.The “PLEASE LOGON” prompt appears within60 seconds.Re-Initialization [01]The Moneris Merchant Service Centre may ask you tore-initialize your terminal if changes have been madeto it or your merchant account.1. Press thekey, select CONFIGURATION, thenselect INITIALIZATION. If “SWIPE ADMIN CARD” appears, swipe your POSAdmin card.2. When “MERCHANT ID” appears, simply press thekey.3. When “PHONE NUMBER” appears, simply press thekey.4. When “CLEAR TERMINAL STORAGE?” appears, pressthe key (NO) to keep all stored transactions. If “PLEASE LOGON” appears, follow the Logonprocedure above.24
End-of-day processMerchant closeIf your merchant account is set up for Merchant Closesettlement, you must process a Batch Close transactionin order to have the funds from your POS transactionsdeposited to your business account. Here’s how:Step 1: Print a Stored Transactions Report [60]Note: Flash transactions are included in Interac totals.1. Press thekey, select REPORTS, and selectTRANS LIST.2. When “SWIPE ADMIN CARD” appears, swipe yourPOS Admin card to print unmasked card numbers.Otherwise, simply press thekey to mask thenumbers. If “ENTER CLERK ID” appears, key in a Clerk ID andpress thekey to print totals for that Clerk ID,or simply press thekey to print totals forall Clerk IDs.“PRINT DATE OR BATCH?” appears.3. Press the key (BATCH) to print the report byBatch.4. Press thekey to print the report for the currentbatch. “PRINT TOTALS ONLY?” appears.5. Press the key (YES) to print only the TerminalBatch Totals (including the Cashback total).The report prin
(e.g. Logon [02] means the Admin code for logging on is 02). To use an Admin code: 1. Press the key until "ENTER ADMIN CODE" appears. 2. Key in the Admin code, and press the key. The transaction appears. To print a list of all Admin codes: 1. Press the key until "ENTER ADMIN CODE" appears. 2. Key in 40, and press the key. Transactions