Transcription
Exercises and guides for image editingand PDFAdobe Photoshop CS5Adobe Acrobat 9 Pro.
Table of ContentsExercise 1 – Scanning and simple image editing . 3Exercise 2 – Colour change, image extraction and merging of images . 4Exercise 3 – Smoothening of sharp edges . 6Exercise 4 – Text on images . 7Exercise 5 – Remove red eyes . 7Exercise 6 – Working with layers . 8Exercise 7 – Filters and layers . 10Exercise 8 – Pop Art . 10Adobe Acrobat Pro 9 – PDF . 11Create a PDF-document from MS-Office-programs . 11Create a PDF-document other programs. 12Exercise 9 – Create a PDF-document from multiple files . 12!!! Evaluation of the course . 12 Margit GrønborgAMG, ASB MediaAarhus School of Business, Aarhus University
Exercise 1 – Simple image editing1. Start Photoshop and open the image from your personal drive and try out thedifferent tools in PS e.g. the different options in the lower part of the menuFilter.2. Try out the functions indicated below. If the last mentioned functions areirrelevant for your image, then try out the functions on the example picturesopposite the function.RotateImage – Image Rotation – try out the different options.ResizeChoose in the menu Image – Image Size – e.g. under Pixel Dimensions (e.g.percentage-wise alteration) or Document Size (cm).You can change the resolution of the image in the Resolution field. If a pictureis small when you print it, even though it looks fine on the screen, it s possiblebecause that the resolution is very high, in contrast to the pictures psychicalsize of the picture.This applies to the following ”rule of thumb” for image resolution:Images for screen useImages for use in print in a newspaperImages for printing on a laser printerImages for printing on a inkjet printerImages for use in print (offset-) printing companyBetween 72 and 96 ppi (pixel per inch)Between 85 and 150 ppi150 ppiBetween 180 and 225 ppi300 ppi or moreCropSelect the Crop Toolfrom the Tool-palette.Click and drag diagonally with the mouse over the image, and double-clickin the marked area, when you have the segment you wish to keep.ZoomSelect the Zoom Toolfrom the Tool-paletteZoom doesn’t change the actual size. Hold down the ALT-key to zoom outagain (- in the magnifying glass).Brightness/Contrast (e.g.: chris)If the scanned image is a little too dark, you can adjust the brightness andcontrast under, Adjustments in the menu Image, Brightness and Contrast orShadow/Highlight.Right the scene (e.g.: chris)If a scene is oblique you can right it by selecting the entire image Select - All.Next choose Edit – Free Transform and right the scene by moving the mouseout of the selection square, till the mouse changes it’s appearance to abended arrow: Margit GrønborgAMG, ASB MediaAarhus School of Business, Aarhus University
You can also hold down the CRTL/CMD-key and drag the corner markings toright the image. Finish by cropping the image (Crop Tool).FilterThere are many different ways to transform pictures into artworks I Photoshop.Try one of the many filters on a picture of yourself or Tiger.jpg, e.g. Filter –Liquify.3. When you are satisfied with the result, save in jpg-format and insert the imagein a Word-document or PowerPoint-presentation.Exercise 2 – Colour change, image extraction and merging of imagesOpen the images water and rubberduck from the exercise folder.If your experience difficulties with seeing both images, then select from the menuWindow – Arrange – Float All in Windows.Zoom to 100% to better judge the dimensions between the two images. You can getthe same zoom value on both images, by clicking on one of the images and thenselecting from the menu Window – Arrange – Match Zoom.An alternative is double-clicking the Zoom Tool1. Start by changing the colour of the rubber duck to e.g. green:a. Select in the menu Image – Adjustments – Replace Colour.b. Mark the button Image under the motif.c. With the pipette (Eyedropper Tool) collect the most dominant yellowhue on the rubber duck.d. Under the headline Replace you can select a substitute colour, bydragging the sliding bar in Hue, Saturation and Lightness.e. Then select(pipette with a ) and select the additional yellowshades, so all of the rubber duck turns green. Click OK.2. Next you have to extract the rubber duck from the background:a. Select the Magic Wand Toolfrom the Tool-palette and set theTolerance to 30 – a higher value, will select a larger colour area.b. Click in the white area. Adjoining areas can be included in themarking by holding down the SHIFT-key and simultaneously clicking Margit GrønborgAMG, ASB MediaAarhus School of Business, Aarhus University
with the Magic Wand in the area. If a too large area has been marked,you can exclude an area by holding down the ALT-key - e.g. if thewhite area in the rubber ducks eye has been marked.c. Select the Background Eraser Tooland adjust the thickness andshape of the eraser. Erase the background – pay attention to missedspots in the check pattern that appears.An alternative could be to select the Quick Selection Toolor theMagic Eraser Tool3. Reduce the size of the image:Image – Image Size – use the adjustments of the width in % of the original. Isthe size not as wanted, select Undo from the Edit menu and try again.4. Copy the rubber duck to another image:a. Select the Rectangular Marquee Toolfrom the Tool-palette.b. Draw a square around the motif.c. Select in the menu Edit – Copy.d. Click the image named water and select Edit – Paste. The rubber duckis now placed in a new layer.e. Select the Move Toolin the Tool-palette and move the rubberduck onto the person’s right hand.5. Click on the original rubber duck image and rotate it 180 .6. Place the mirrored rubber duck onto the person’s other hand in the waterimage, by repeating bullet point 4.7. Alternatively you can paste the duck from bullet point 4 again (Edit – Paste),by which another layer with a duck is created. With the new layer selectedchoose Edit – Transform – Flip Horizontal. Move the duck with the Move Tool.8. Use the Clone Stamp Tool from the Tool-palette to remove the shadowunderneath the person’s arm:a. Click on the background layer in the Layer-palette and select theClone Stamp Toolb. Hold down the ALT-key and click on the area of the sea, which shouldbe cloned.c. Adjust the tools size and shape in the Properties-palette and paint theshade with the left-mouse-key held down – pay attention to thecontour of the person. Margit GrønborgAMG, ASB MediaAarhus School of Business, Aarhus University
It can be necessary to choose new cloning areas once in a while toremove all of the shadow.9. Save the image in jpg-format.Exercise 3 – Smoothening of sharp edgesDo a similar merging of images with the images water and dune:1. Crop the water image till the background is only visible around the motif.2. Mark the background with the Magic Wand Toolor with the QuickSelection Tool. Adjust the Tolerance and Brush Diameter. (If you are usingthe Quick Selection Tool, then click the Refine Edge button). Erase thebackground.3. Select in the menu Select – Inverse, to mark the person instead of thebackground.4. Thin out the marking, so that there are no sharp edges around the motif, whenthe image is placed onto the dune image.Select – still with the motif marked – in the menu Select – Modify – Feather and set it to 5 pixels. (This could also be done in bullet point 2 – in thebrackets).5. Copy the selection and paste the motif onto the image dune. Select undo onboth images if the thin out is too significant and try with other settings.6. Place a tick in the box Anti-alias (Magic Wand Tool). Regarding the markings,you can in some situations, do the same smoothening of sharp edges.7. Move the motif with the Move Tool to the desired position and copy it byholding down the ALT-key, while you are dragging. Place a number ofidentical persons in the dunes – notice that a new layer is created for eachcopy in the Layer-palette.8. Save the image. Margit GrønborgAMG, ASB MediaAarhus School of Business, Aarhus University
Exercise 4 – Text on imagesIt is possible to type text and applying different text effects on an image in PS. Thetext consists of pixels and will have the same dimensions as the image – when youzoom in you can see the letters pointed edges of the letters. Photoshop saves avector based text outline, which is used when the image is scaled.1. Open the desired image.2. Select the Horizontal Type Tool from the Tool-palette and try the different textattributes on the Properties-palette.Text ColourText OrientationWarped Text3. Click (or drag to create a textbox) where you want the text to be placed, andtype the desired text. Save the image.Exercise 5 – Remove red eyes1. Find an image on the Internet, where the people have red eyes (keywordredeye).2. Open the image in Photoshop and zoom in onone of eyes of the person.3. Select the Red Eye Toolin the Tool-palette.4. Click in the centre of the red pupil and PS will replace the red hue with amore natural black colour. If the result isn’t as wanted, then you can adjust thepupil size and darkness degree in the Properties-palette.5. Correct the other eye as well and save the image. Margit GrønborgAMG, ASB MediaAarhus School of Business, Aarhus University
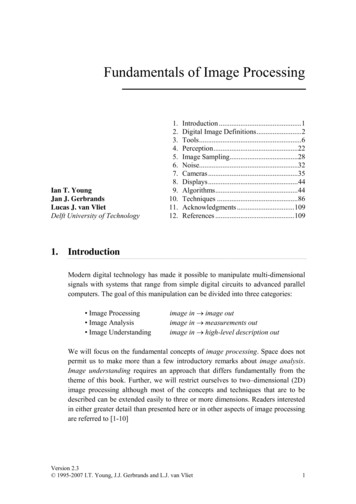
Exercise 6 – Working with layersIn this exercise you have to make a banner, that can be used for a website like theones below.You are going to be working with multiple layers in the image: a background layer, amotif layer, a “thinning” layer and a text layer. Use the Layer-palette, which should bevisible in the PS-desktop.Approach (e.g.: The Victory banner):1. Create a new image in PS where you are going to be working with thebanner (File – New).The size of the banner should be e.g. 700 x 120 pixels and choose a whitebackground colour. Choose an appropriate dimension for use on the Internet.2. Next open the image that should be placed on the banner e.g. troy from theexercise folder or find another image on the Internet.3. Now you have to select a new colour instead of the white in the banner. Clickon the white image and select the Eyedropper Toolin the Tool-paletteand collect the desired colour from the other image (troy). The colour is nowvisible as the foreground-colour in the Tool-palette. You can also collect abackground-colour, by clicking on the background-colour-field andcollecting another colour from the motif image.Later you will be able to switch between the two colours as a filling byholding down the CRTL/CMD-key Backspace.4. Fill the white image with the collected colour by selecting the Paint BucketTooland clicking on the image or by using the method mentioned above.5. Click on the image with the motif that should be a part of the banner (troy)and crop and reduce the size of the image.6. Now the edges has to be erased around the part of the motif you want toplace on the banner: Margit GrønborgAMG, ASB MediaAarhus School of Business, Aarhus University
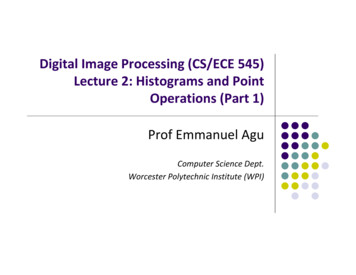
a. Select the Rectangular Marquee Tool5 pixels on the Properties-palette.and set the Feather value tob. Draw a square around the part of the motif that is going to be placedon the banner.c. Choose in the menu Select – Inverse.d. On the Layer-palette select the icon for a new layer (see the arrow).The new layer will be named Layer 1.e. Press – while Layer 1 is marked – theCTRL/CMD-key Backspace or ALT Backspace to choose the same transitioncolour as you collected on the bannerimage. This can be done a multiple numberof times to get more colour/a bettertransition of the edges.f.Remove the marking (Select – Deselect).g. Select both layers on the Layer-palette and drag with the mouse theunmarked layers to the banner image, so that the motif and transitionis copied to the banner.h. Select the Move Tooland move the motif to the desired position.7. Select the Type Tooland draw a textbox. Choose a text font type, sizeand colour (in the troy example the font type Trajan Pro, 60 pt. and thebackground colour from the Tool-palette) and write the desired text. The textis placed in a new layer.8. When you are done, save the banner in both Photoshop-format (.psd), whichsaves your layers. Save another copy as jpg, so that the image can be usedfor websites. Margit GrønborgAMG, ASB MediaAarhus School of Business, Aarhus University
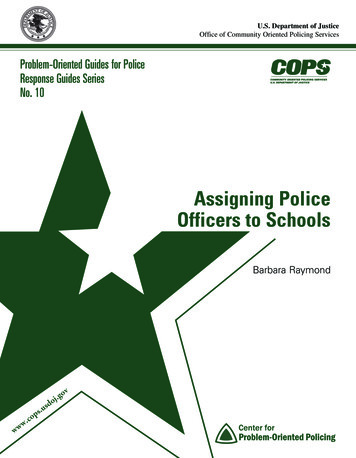
Exercise 7 – Filters and layersContinue working with the banner from “Exercise6–Workingwithlayers”, inPhotoshop-format. Try some different filters (e.g. Craquelure or something else).Remember to select the layer that is going to have the filter applied, e.g. the motiflayer or the background layer.Save the image with a different name.Exercise 8 – Pop ArtBy using the colour-change-method from ingofimages”, you can create a “Warhol-like” portrait – etc byrepeating it a few times. Underneath is a copy of Warhol’s portrait of Marilyn Monroe,and another from a catalogue (www.prada.com).Find a portrait and experiment with changing the colours of the face, hair, clothes etc. Margit GrønborgAMG, ASB MediaAarhus School of Business, Aarhus University
Adobe Acrobat Pro 9 – PDFAdobe Acrobat is a useful, comprehensive and large program. Besides makingcreation of PDF- files (Portable Document Format) possible, you can run a spell-check,open textiles like html, gif, bmp etc as PDF, provide your documents with a DigitalSignature, passwords, saving your publications for printing and create presentationsetc.All kinds of documents can be converted into PDF in Acrobat, which makes sure thatyour documents keep their original appearance and content - that includes graphics,font types, formatting, hyperlinks etc. The PDF format is suitable for distribution viamail, www, on cd-r, and can be used on any platform (pc, mac, unix).Many different files in all kinds of formats can be merged into one PDF-file, which youcan perform a search in, edit and print – e.g. an InDesign-publication, Excel-files,diagrams – and only the printer will limit the sizes of paper that can be printed on.Furthermore Adobe offers a free Reader, which can be used to reading the PDFdocuments on the computer and in the browser. That enables the PDF format to beused by everyone, as apposed to other file formats that demands that the personreading the documents, need to buy or get access to that specific programme, thatthe file has been saved by.If you don’t have Adobe Reader on your computer, you can download it from:www.adobe.comCreate a PDF-document from MS-Office-programsWith Adobe Acrobat 9 installed on your computer, it’s easy to convert e.g. a Worddocument to PDF:1. Create and save the Word-document (docx).2. Select the tab Acrobat, the button Create PDF in the group Create Adobe PDF.3. Click Yes in the dialog box to save the PDF-document.4. Name the document and choose where to save it and click Save.Now the document is converted and opened in Acrobat.The document now exists in both the original and PDF-format, which data-wise willthe size of the file will be a lot smaller. Margit GrønborgAMG, ASB MediaAarhus School of Business, Aarhus University
Create a PDF-document other programsConverting a document to PDF from other programs than MS Office-programs istypically done via the Print-function. Instead of printing a physical printer Acrobatsaves the document on a “virtual printer” Adobe PDF.The document is named and saved the same way as the method mentioned above.This method can also be used in Microsoft-programs.Exercise 9 – Create a PDF-document from multiple files1. Open Adobe Acrobat 9 Professional.2. Collect the three documents in the folder exercise 9 to a single PDF-file:a. InDesign-file (a DTP-document) gumlink.inddb. PowerPoint-file Gumlink-presentation.pptxc. Word-document Gum.docxSelect the button Create – Merge Files into a Single PDF and select Add Files in the dialog box that appears.Select the first file that should be included (e.g. gumlink.indd), click Add Filesand select the button Add Files again, until all three files appears in theoverview box.3. Inspect the PDF-document.4. Compare the two documents file size.5. If you wish to edit the PDF-document, this can be done in Adobe Acrobat 9 –not in the reader – by selecting Tools – Advanced Editing – TouchUp Text Tool.!!! Evaluation of the courseThank you for participating in the Image Processing (Photoshop CS5) workshop heldby the Advanced Multimedia Group (AMG) at ASB.In order to increase the quality of future AMG workshops, we kindly ask you to use 5minutes to answer this evaluation. The answers are anonymous and confidential, andwill only be used internally in AMG.http://www.surveymonkey.com/s/RJPWN2DThank you for your help! Margit GrønborgAMG, ASB MediaAarhus School of Business, Aarhus University
Start Photoshop and open the image from your personal drive and try out the different tools in PS e.g. the different options in the lower part of the menu Filter.