Transcription
Welcome to the Customer Relationship Management (CRM) training module. The CRMfeature will assist staff and partners to conduct, manage, and record employerrecruitment efforts.1
By the end of this training module, we hope that staff will be able to achieve thefollowing objectives: Identify the Benefits of CRMDefine and create a Marketing LeadReview the Contacts List and Marketing Leads ListUtilize Work Items and enter Employer Activity CodesUse Local Employer SitesConvert a Marketing LeadIdentify CRM Reports2
We will identify four benefits of using the CRM module.3
First, CRM makes it possible for employer outreach staff, business servicesrepresentatives, and other staff to enter potential business customers into CalJOBS asMarketing Leads for the purpose of providing assistance to these employers andtracking those services provided.4
Next, CRM allows business services staff to search for untapped employers that are notyet entered into the system and convert them to a Marketing Lead.5
Next, CRM provides a central location where staff can organize and manage theiremployer outreach work in progress.6
Finally, staff can use Work Items to track and document employer outreach tasks thatthey complete each day. In addition, services provided to Marketing Leads can bereported in the system, using the employer activity codes. Staff and management canrun reports on employer outreach work performed.7
8
Before we cover how to create a Marketing Lead, we will first define a Marketing Leadand compare it to the other type of employer account in CalJOBS, Recruiting Employer(formerly known as “Preferred Employer”).9
The system offers staff numerous ways to create a Marketing Lead.10
11
12
13
14
15
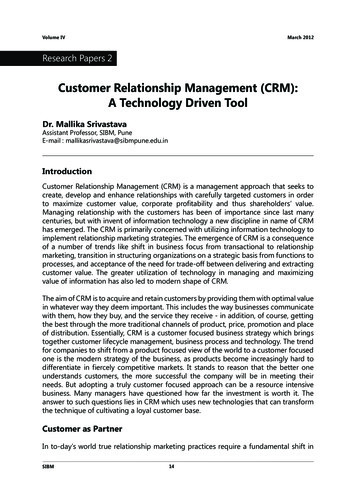
Let’s take a look at how to get started with the CRM module. To access the CRMmodule, log in to CalJOBS with a staff account. You’ll find the CRM menu abouthalfway down on the left. In the example shown here, the CRM menu has been movedup to the top, for convenience.In addition, you can access the CRM module via the CRM dashboard widget, outlined inthe purple box.16
We’ll begin by opening the first sub-menu of the CRM menu, Create a Marketing Lead.Ideally, a marketing lead should be created as soon as a staff member has madecontact with an employer or business customer.17
After selecting Create a Marketing Lead from the left menu, we can choose from thetwo methods shown here: Manually enter the information of an employer you’re working with, or plan to workwith, or, Select from a list of external employers -- those employers whose jobs are gatheredand “spidered” into CalJOBS by the system.First, let’s select Manual Entry.18
Which brings us to the Employer Identification screen.The EDD Account Number, also known as the employer tax ID #, are not required fieldsfor marketing lead employers. You may enter the EDD Account Number if you have it,or just select the “Continue” button.19
The next page is used to create the marketing lead. Select the appropriateLWIA/Region and Office location in the Staff Info section.Next, in the Employer Identification section, enter the Company Name.If you know the zip code of the employer’s main, or primary, location, enter the Zipcode first. Then you will be prompted to enter the Street Address. Continue bycompleting the Mailing Address and Contact Information sections not shown on thisslide.Select “Save” when complete.20
Now let’s go back and create a marketing lead for an External Employer, or, anyemployer whose job postings have been “spidered” into CalJOBS.Again, on the CRM menu we select Create a Marketing Lead. Then, select the ExternalEmployers link.21
Here you will see a list of all the spidered employers currently in CalJOBS. This list canbe sorted by Company Name, or by Active Job Orders. Or, we can expand the ShowFilter Criteria link and filter the search.You can filter by keyword, by industry code, or zip code of the employer location. Afterwe’ve chosen or identified an employer that we plan to contact, from the right handside, under the Action column, select the Convert to lead link.22
The next screen you will see is the same information entry screen that we saw whencompleting a Manual Entry. However, this time, most fields will be pre-filled with theprofile information that the system has retrieved.When the required fields are completed, select the “Save” button.23
After selecting “Save”, the external employer Marketing Lead is created.The system will automatically route you to the Staff’s Profile folder, ContactManagement Profile subfolder, Summary section.24
The Summary tab contains the following sections that are useful in the management ofthe Marketing Lead:Contact Information- Edit login informationCompany Information- Add Locations and Contacts, View Account TypeMarketing Information- View Marketing Lead Owner (The staff person who currentlymanages the employer’s needs)Professional Employer Organization- Select a Professional Employer Organization toassociate to the LeadActivities- View and add Work Items for the LeadAttachments- Upload and associate important documents, for example, businesslicense, with the account profileCase Notes- View existing and add new case notesSurveys- Not used by California25
26
Next, we will review the Contacts List within CRM. Navigating to the left menu for CRM,select the second sub-menu: Contacts List.The Contact List displays all primary and secondary contacts for a Marketing Lead.27
The Contact List will default to your name in the Lead Owner filter. With this filterapplied, this is a directory of contact names and company names of marketing leademployers that you created. In addition, employers that you created as marketingleads, but later converted to a Recruiting Employer will appear on this list as well.This directory is very useful when you are creating additional marketing leads, becauseit can be used to search for possible duplicate contacts. It’s important to avoid creatingduplicate marketing leads or contacts. If you reset the Lead Owner field to “All”, this listwill show all Marketing Leads and Recruiting Employers that were originally created asMarketing Leads by other CRM staff.This means that Marketing Leads created by CRM staff are accessible and available toall CalJOBS staff who use the CRM module.28
Back to the main menu for CRM, we’ll look at the third sub-menu: Marketing Leads.29
The Marketing Leads list is identical to the Contact List screen. The slight difference isthat the Marketing Leads list defaults to having the “Marketing Lead” box checked inthe Account Type filter. Because of this, the list defaults to only the Marketing Leadaccount types that you have created.30
31
The next sub-menu is Work Items. A work item is a task that staff must perform onbehalf of a Marketing Lead employer. Work items can be assigned, and re-assigned, tostaff and can be prioritized based on importance.Staff can use work items as a “to-do” list to organize and manage all of their theiremployer outreach activities. When used in this way, it also provides a record of theirdaily and weekly work activities for managers to view, as needed.32
The My Queue section on top shows the work items assigned to you,, if any.The Group Queue section shows all the work items assigned to the entire CRM workgroup. There is only one CRM work group in CalJOBS. Everyone who is using the WorkItems feature is in the same group.33
Below the Queues, there are three links. CalJOBS uses Add Work Item and SearchWork Items. The third one is not applicable to California. Let’s click on Add Work Item.34
On this screen, staff with appropriate privileges can add a new work item forthemselves, or assign a work item to another staff. First, select the Work Item Categoryfrom the drop-down.The Currently Assigned To dropdown will only show names of those staff who havebeen designated as part of the CRM staff workgroup. Contact your MIS Administratoror CalJOBS SPOC if your name does not appear on this list.Next, complete the Status, Due Date, Priority, and Description fields. Finally, click onthe Link to a CRM contact link shown at the bottom to link a Marketing Lead to thework item.35
After selecting Link to a CRM contact, use the simple search screen to link to theappropriate employer for this work item. This link ensures that the Work Item will beincluded in CRM Reports.Finally, select the “Add” button to finish creating the Work Item. After selecting “Add”,you will be directed to the Activities section of the Leads Summary tab, where yourwork item now populate.36
Now that we reviewed how to add a Work Item, let’s address how to manage a WorkItem.When you login to CalJOBS, a message notification may pop up and show any WorkItems that were created with a due date of today. To open the Work Item from thepop-up notification, simply click on the underlined number link.In addition, when staff log in, they will see the Work Items queue widget at the bottomof the staff dashboard. Finally, staff can also access their Work Items by using the CRMmenu. We will access Work Items using the CRM menu.37
To select a work item and it’s details from the queue, simply click on the Work Item IDin the first column. Or, you can edit or delete the work item from this screen in the farright “Action” column.38
On their own work items, staff can change the status from New to In Progress orClosed, and add Notes at the bottom.Select the “Save” button when you are done working on the Work Item. If you closedthe Work Item, it will be removed from your Queue.39
It is important that staff enter Employer Activity Codes (E-Codes) to track all servicesthey provide to Marketing Leads. Staff can refer to WSIN17-09, Attachment 2 forguidance and definitions for each E-Code.40
To add an activity for a service provided, while Currently Managing the Employer, underthe Employer Profile, find the Staff’s Profile folder, Case Management Profilesubfolder, select the Activities link.While in the Activities tab, select the Service Plan link.41
If applicable, here is where the existing activity codes will be listed for this employer. Inour example, no services have been added.To add a single service, select the Add Service link. To add multiple services, select theAdd Multiple Services link. Here, we will add a single service.42
In the next screen, select the appropriate activity code in the Service Type drop-downfield. Complete the remaining required fields and any optional fields as desired. If youenter a Completion Code, be sure to enter an Actual End Date.Once complete, select the “Save” button.43
44
One resource to find potential Marketing Leads is the use of the Local Employer Sitesfeature.The Local Employer Sites menu option opens the Employer Search screen. Staff can useany of the Employer Search tabs (Quick Search, Advanced Search or Search byOccupation) to find detailed information about employers, regardless of whether theemployers have current job openings. The system will search for employers listed in theInfoGroup database that are located within the selected geographic area.After staff enter the desired search criteria, select the “Search” button.45
After selecting the “Search” button, staff will be routed to the list of employers thatmatch their selected search criteria. If you do not receive any results, adjust yoursearch criteria.Select the Company Name of the employer you wish to review.46
To convert this employer into a Marketing Lead, select the Convert to Lead link at thebottom of the page. When creating the Marketing Lead, some information may beauto-filled. Complete the required fields and save the Lead.47
48
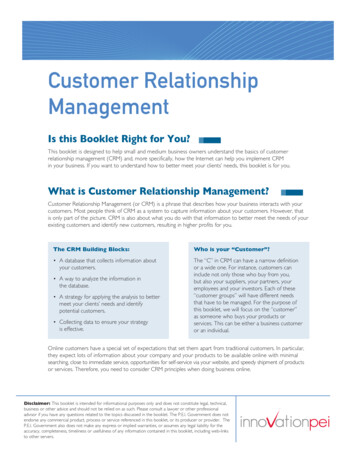
If an employer would like to become a Recruiting Employer, staff can easily convert theemployer’s Account Type from Marketing Lead to Recruiting Lead.To make this change, while assisting the employer, expand their Staff’s Profile folder.Next, expand the Contact Management Profile folder and select the Summary link.Here, scroll down to the Company Information section (seen in this screenshot).49
In the Account Type section, select the Recruiting box and deselect the Marketing Leadbox.50
Next, select the Update Account Type link.If you did not deselect the Marketing Lead box, you will receive a pop-up messageasking if you would like to remove the Marketing Lead registration. Select “Ok”, and theLead will be deselected and you will be directed to create the Recruiting Employer. Donot select “Cancel”, as both account types will be selected, which is not acceptable inthe CRM module.After completing the required fields to convert the Marketing Lead to a RecruitingEmployer, the additional information is reviewed through the CalJOBS vetting process.This includes entering the employer’s EDD Account number. If the additionalinformation does not match the information CalJOBS uses to vet the employer, theemployer’s account will be locked out and the employer will receive and email or callfrom the CalJOBS Employer Help Desk to attempt to resolve the discrepancy.51
52
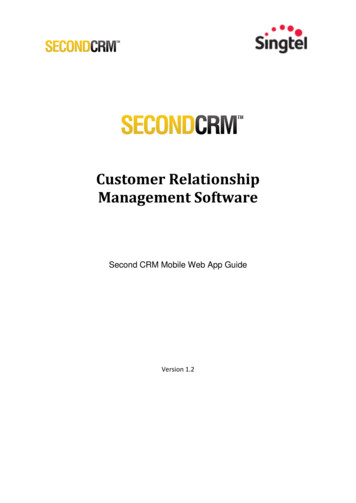
Detailed CRM Reports are available for the tracking of Work Items and activitiesprovided to Marketing Lead employers. These reports can be useful in tracking anddetermining the effectiveness of the employer recruitment efforts. You can see thefilters here by which you can determine what information will show in a report.In addition, the Services Provided Employer report can be used to track employeractivity codes entered for Marketing Leads.53
Here are some important points to know: Job referrals can still only be made to recruiting employers. When a Marketing Lead is converted to a Recruiting Employer, the employerinformation will be verified by the WSD staff, per standard 72- hour vettingprocedure. Desele
Welcome to the Customer Relationship Management (CRM) training module. The CRM feature will assist staff and partners to conduct, manage, and record employer recruitment efforts. 1. By the end of this training module, we hope that staff will be able to achieve the following objectives: Identify the Benefits of CRM Define and create a Marketing Lead Review the Contacts List and .