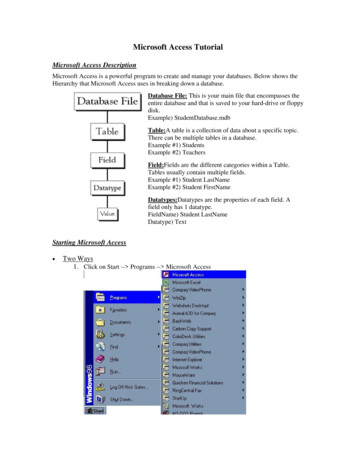
Transcription
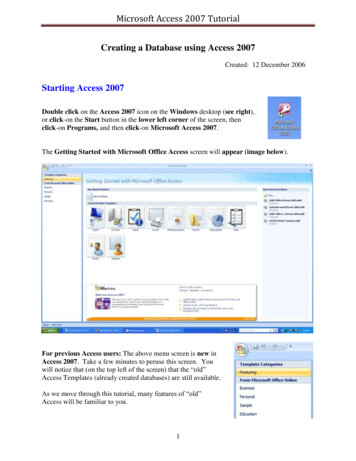
Microsoft Access 2007 TutorialCreating a Database using Access 2007Created: 12 December 2006Starting Access 2007Double click on the Access 2007 icon on the Windows desktop (see right),or click-on the Start button in the lower left corner of the screen, thenclick-on Programs, and then click-on Microsoft Access 2007.The Getting Started with Microsoft Office Access screen will appear (image below).For previous Access users: The above menu screen is new inAccess 2007. Take a few minutes to peruse this screen. Youwill notice that (on the top left of the screen) that the “old”Access Templates (already created databases) are still available.As we move through this tutorial, many features of “old”Access will be familiar to you.1
Microsoft Access 2007 TutorialLeft Mouse ButtonIn this tutorial, whenever we indicate that you need to click the mouse, it willmean to click the left mouse button – unless we indicate that you should clickthe RIGHT mouse button. So, always “click left” unless we tell you otherwise.Creating an Access 2007 DatabaseThis tutorial will assist you in creating a database that includes the features most often used indatabases. Once you gain skill with the database you create, you will be able to use andunderstand the already created Microsoft Access databases mentioned on the last page.We’ll begin with a Blank Database and increase our database knowledge with each step.Look at the center of your Access screen. Youwill see – Getting Started with MicrosoftOffice Access. Below the title you will see aBlank Database button.Click the Blank Database button.As soon as you click the Blank Databasebutton, the right side of your Access screenwill change and look like the image on the left.Saving your workOne of the unique things about Access databaseis that it requires you to save your database assoon as you enter the program.You can save your work on a floppy diskette inthe A: Drive, on a USB key/Flash Drive or onyour C: Hard Disk, or in some other drive.Please save to one of these areas and substituteyour Drive in the instructions.To choose the Drive, on which you will saveyour Access database, click the small folder tothe right of File Name:2
Microsoft Access 2007 TutorialA New File Database menu screen similar to the one below will appear when you click thefolder.In the upper left corner of the File New Database menu screen that appears, you will see aSave in: area (see upper left arrow above). Click-on the small down arrow on the right and itwill show you the various disk drives available on which you can save (see right upper arrowabove). Point to the drive on which you want to save your database, and click-on it. If youchoose the 3½ Floppy (A:), make sure you have a formatted disk in the A drive. If you choosethe C: drive, choose the folder in which you want to save by double clicking on the folder. Yourselection should now appear in the Save in: areaNext click-in the area to the right of File Name:. Delete any text that is entered in the area andthen type-in the word PERSON as shown at the bottom of the above image (see lower leftarrow).Now click-on the OK button or tap the Enter key (see lower right arrow on last page).You will now return to the Getting Started withMicrosoft Office Access screen. On the right sideof the screen you will see your database File Nameand below it, the Drive on which you will createyour database.Click the Create button.3
Microsoft Access 2007 TutorialCreating a TableWhen you click the Create button your Access 2007 screen will change to the image below.This is the “new look” in 2007 Office. You will now see Tabs and Ribbons that automaticallyappear for the area in Access on which you’re working. Instead of a Menu Bar and drop downselections, you’ll now see these new features.TabsRibbonGroupsWhen we clicked the Create button Access assumed we desired to create – within our Persondatabase – another database – which is called a Table. You’ll notice that at the top of the aboveimage that the Table Tools and Datasheet Tabs appeared to assist you. The Ribbon below theseTabs is composed of Groups of selections you’ll use to assist you as you create your Table.We’ll be working with these Tabs/Ribbons throughout this tutorial.In the lower portion of the above image you’ll see selections that indicate we arecreating a new Table.On the left of the Table Tools-Datasheet Tab/Ribbon you’ll see a View button.Click the View button.When you click the View button the image on the left will appear.Since we want to create or design a new Table, we’ll click theDesign View selection.A Save As menu screen will appear similar tothe image on the right. Type personnel in theTable Name: area and then click the OKbutton.4
Microsoft Access 2007 TutorialYour Access 2007 screen will now change again – to the image below.We’ve enlarged the upper left corner of this image below.Notice (in the image above) that our Table Tools Tab still appears. However, because we arenow in the Design process, the lower Tab/Ribbon has changed to Design – to assist us withdesigning our Table.5
Microsoft Access 2007 TutorialIn the image on the last page you willnotice that the Primary Key button is“orange” and, in our Personnel Table, thatit is also “orange” – with a little key to theleft of ID.In database language this is called“keying.”Keying, or indexing, is somewhat advanced. You can get a good description by searching inHelp for Keying or Primary Key.To “turn off” the Primary Key, click the Primary Key button. You’ll notice that they PrimaryKey button is no longer “orange” and the little key is gone from the left of ID.If the Personnel Table image does not “fill” the screen, click-onthe small square between the “minus and the X” in the upper righthand corner of the screen (see arrow and image on right). Thiswill Maximize the screen.Notice, under the Blue Bar at the top of the Design screen there are (3) things: Field name,Data Type, and DescriptionAnd, in the lower half of the window; Field Properties.We’ll be creating the Field Names that make up a database. This is similar to creating a blankpersonnel form (on paper) that will be "filled-in" for each employee (Name, Address, PhoneNumber, etc.). The areas that will be filled in are called Fields in a database. When you fill inall of the fields for a person, the individual "forms" are called records in a database. There willbe a record, or form, for each employee. All the forms, together, make up a Table (database).6
Microsoft Access 2007 TutorialSo let’s create a personnel database.Significant Note:When creating a database it is always best to “break down” a fieldinto its “smallest parts.” For example – Name would break down into First Name, and LastName (you could also have Middle Initial, Title, etc.) Address would break down into StreetAddress, City, State, and Zip (you could also have Apartment Number, etc). Because we areworking in Access 2007 it will be very simple to “put the fields back together” with a few mouseclicks when we need to do this. Trust us. This will save you a lot of time later on.Look at the image on the right. Clickin the area or space under Field Nameand type-in Last Name (to replaceID). Tap Enter or click-in the area tothe right under Data Type. The cursornow moves to the right under DataType. Click the down arrow underData Type on right (see arrow onright). Your design screen should looklike the one on the right.Now we’ll talk about Data Types.Data TypeTextYou may type in any alphabetical/numerical data that you desire - up to amaximum of 255 characters. As indicated, this is a text field, so you can't domathematical calculations. Examples of Text data are: names, addresses, stocknumbers, room numbers, zip codes, etc.MemoThis field is for lots of text. You can have up to 32,000 characters.NumberThis field is for numbers where you want to add, subtract, multiply, divide,average, and do numerical calculations. This field can be a very large size, sowhen we get to Field Properties, we'll talk about "sizing" this field so it doesn'ttake up to much "space" in storage.Date/TimeDates and Times. You may format these later, as you may desire.CurrencyDollars ( ). You may format these later, as you may desire.AutoNumberYes/NoThis field is an "automatic" counter that assigns a number each time youput data into a new field.This is a "True/False" or "Yes/No" type of field.7
Microsoft Access 2007 TutorialOLE Object This means "Object Link Embedding" which indicates you can insert a graphic,picture, sound, etc. Pretty neat to put a photograph in a personnel record or apicture of an inventory item in the stock record (advanced stuff).Since this is a simple, introductory Access tutorial, we won’t work with Hyperlinks,Attachments, or Lookup Wizards.We'll leave Last Name as a Text Data Type. To the right under Description you may makeany remarks you feel are appropriate to someone who may want to know how/why you designedthe field as you did.Now notice in the lower part of the screen, under Field Properties, that a box appeared whenyou selected the Text Data Type. This box is "tailored" to the Text Data Type that you selectedabove. Your Field Properties should look like the one below when you finish doing the stepsindicated below.Field PropertiesClick-in each area (to the right of the words) as you read about it belowField Size Is currently set to 255 characters. That's pretty large for a name. So, clickin this area and change the number to 25 (you can make this larger or smallerlater if you have to).FormatNow click-in the Format Area. Next tap the F1 function key to activate Help.Since you are in the Format area, Help will be "tailored to" this area. When theHelp Window appears, click Format Property.Now click Text and Memo Data Types. Notice that there are several choices to make yourcharacters upper or lower case. This gives you an idea of some formats. We'll use one later.Now click-on the “X” in the upper right corner of the Microsoft Access Help – FormatProperty Window to close it.8
Microsoft Access 2007 TutorialInput MaskWe'll come back to this feature later.CaptionLook at the Light Blue Help area to the right. It explains about Caption.Default ValueWe'll come back to this feature later.Validation RuleWe'll come back to this feature later.Validation TextWe'll come back to this feature later.RequiredLook at the Light Blue Help area to the right.Allow Zero LengthLook at the Light Blue Help area to the right.IndexedLook at the Light Blue Help area to the right.Unicode Compression Look at the Light Blue Help area to the right.IME ModeLook at the Light Blue Help area to the right.IME Sentence ModeLook at the Light Blue Help area to the right.Smart TagsLook at the Light Blue Help area to the right.Now we’ll repeat this process and create different Field Names and Data Types. Type-in theField Names as indicated below and set them to the Data Types and Sizes indicated. Starteach new Field Name and Data Type - below the previous field (see example below)Field NameLast nameFirst nameSocial Security #Data TypeSizeTextTextText2520159(Already Completed)
Microsoft Access 2007 TutorialWe'll use an Input Mask for our Social Security Number. Click-in the Input Mask area inthe Field Properties area at the bottom of the screen (see left arrow below).Notice the three "dots" (.) in a box on the right. Click-on the three dots (see right arrowabove). An Input Mask Wizard will appear: "Must Save Table First. Save Now?".Click-on Yes.A Save As Window may now appear. If itdoes, type-in Personnel in the area underTable Name:, and click-on OK.The Input Mask Wizard willshow you some Sample Masks(you may scroll up/down toview them). We'll use SocialSecurity Number, so click-onit. Your screen should looklike the one below.Now click-on Next at thebottom of the Input MaskWizard screen.You will now see a defaultnumber of 000-00-0000 usingdashes (-) between thenumbers. You can useanything you want.10
Microsoft Access 2007 TutorialWe'll leave it as is, so click-on Next again (at the bottom of the Input Mask Wizard screen).On this Input Mask Wizard screen you’ll see two choices. Click-in the little circle to the left ofWith symbols in the mask, like this:. Sometimes, when we use Access data as a part of mailmerges or in labels, if we don’t save the dashes, they won’t appear in our document. So, italways a good idea to save dashes.Click-on Next again.Now click-on Finish.You will see some “special” numbers written in the Input Mask area for Social Security #.When you begin to enter data in this field, you’ll see how this works. Your Field Properties areashould look like the image below.11
Microsoft Access 2007 TutorialNow continue entering the following information in the Field Name and Data Type areas as wedid above.Street addressCityStateTextTextText25202Here we'll use a Format. First make the Field Size 2 then click-in the area to the right ofFormat.A down pointing arrow, like the one above (see arrow), will appear on the right side of theFormat area. If you click-on the arrow, the area will appear blank (that's because we haven'tentered a Format). Tap the F1 key in the row of Function Keys at the top of the keyboard. AHelp menu screen “tailored” to Format will appear )like the one below).Since you are in the Format area, Help will be "tailored to" this area. When the Help Windowappears, click Format Property.Since we are working with a Text DataType, click-on Text and Memo Data Types(see arrow below).12
Microsoft Access 2007 TutorialNotice that a will change any alphabetic character you type into all upper case letters.Now point and click the “X” in the upper right hand corner of the Format Help Screen(notice that the Help Window closes "automatically").Now type a in the Format area. Your Field Properties area should look like the one below.Continue entering the following information in the Field Name and Data Type areas as we didabove.ZipGenderTextText51Insert a in the Format area to make all gender entries become upper case (capitals- like you just did for State).Favorite NumberNumber(Note: this is the first Number field)Here we'll learn about Numbers, the Validation Rule and Validation Text. We'll limitthe person's favorite number to a number between 1 and 999. Leave the Field Size set toLong Integer.Now click-in the area to the right of Decimal Places. It currently indicates Auto. When youclick, you will see a little down arrow on the right side of the area. Click-on the little arrow.Select “0.” This indicates that decimal places are not allowed in the Favorite Number.13
Microsoft Access 2007 TutorialNext, click-in the Validation Rule area. We'll "build" a mathematical expression that willonly allow numbers from 1 to 999. Type in the following expression (in the area to the rightof Validation Rule): 0 and 1000This tells Access that the number entered must be between 1 and 999.You’ll notice that when you click-in the Validation Rule area that three periods ( ) appearjust like they did in Input Mask. If you want to click-on the three periods they will bring up anExpression Builder which you can use to create the mathematical formula above. Please notethat frequently, if you are really not great at math, the Expression Builder can cause problems.Sometimes, the Expression Builder will “insert” an expr in the formula. If it does this,delete the expr . This will confuse Access, and will frequently cause the program to “stop”until you remove expr . So, if you want to look at Expression Builder, please do so. But –be careful.If someone does not enter a number correctly, an error message will appear. Now we'll createan appropriate error message. Click-in the Validation Text area and type-in:Favorite Number must be between 1 and 999.14
Microsoft Access 2007 TutorialWhen you finish all of the above, your Field Properties should look like the one below.Continue entering the following information in the Field Name and Data Type areas as we didabove.Date hiredDate/TimeIn Format area click the small down arrow on the right side of the Formatarea and choose Short Date. In the Input Mask area click the three dots(.), Save the table, and choose Short Date again, click Next , click Next again, thenclick Finish. (This will insert a / between the day, month, year).Your Field Properties should look like the image below.SalaryCurrencyIn the Decimal Places Field Properties area click-on the small down arrow onthe right side and select 0 – this indicates “no cents.” Type a 0 (zero) in thearea to the right of Default Value. This will indicate 0 income if no Salary figure isentered. Your Field Properties screen should look like the image below.15
Microsoft Access 2007 TutorialApplication ReceivedYes/NoWe’ll make this a “Yes/No” or “check box” field. When we begin entering data in thedatabase, you’ll see how this “box” works.Now that we have created our Person Database and Personnel Table it would be a good time toSave the last few changes.Microsoft Office ButtonThe Microsoft Office Button hasreplaced File in the Menu Bar. In theupper left corner of your Access 2007screen you will see a button similar tothe image on the right. This is theMicrosoft Office Button.Click the Microsoft Office Button.You will now see the Access 2007Microsoft Office Button selections.First, notice that many of the “old” FileMenu Bar choices are included in thismenu (they are all here – we’ll showyou).Since we Saved our database at thebeginning of the tutorial, we only have toclick the Save choice.16
Microsoft Access 2007 TutorialQuick Access ToolbarYou could also click the small diskette in the QuickAccess Toolbar in the upper left corner of your Accessscreen.Entering data in the databaseAt this point you will still be in the Design view. To enter data into yourTable you will need to be in a Datasheet View. In the upper leftcorner of your screen (under the Home Tab) you will see that the firstbutton on the left that has a small sheet of paper (see arrow on theright) – the View button. Point to this button with the mouse and pause,you will see a "Tool Tip" that indicates that this button is the ViewButton. This is logical because you have been designing your tableand now want to view the data that you will enter in your Table(database). If you are familiar with spreadsheets it looks like a tiny versionspreadsheet. Click the View button.When you click the View button, the top of your Access screen will look like the image below.Notice that all of the Fields you created are – in the order you created them – along the top ofthe Table.Some of the Field Names may be “cut off” a bit. We’ll widen our fields in a moment.You can enter data in each Field. But let’s widen some of our columns a bit so we can see thetitles.Widening Columns in Datasheet ViewTo widen columns so you can seethe Field Names in the DatasheetView you will need to move yourcursor over the “line” betweentwo Field Names (like we did inthe image above). When our cursor was over the line between Street Address and City, itturned to a line with two arrows pointing left and right. When you see this line with thearrows, click and hold down the left mouse button and move your cursor to the right a bit.You will see the column get larger as you move your cursor. When you have the column aswide as you desire, take your finger off the mouse button. You may desire to widen othercolumns so you can see all of your data – like First Name, Last Name, Street Address, etc. Youwiden as you desire.17
Microsoft Access 2007 TutorialOne note – since we have a Validation Rule in one of our Fields, if we try to widen a columnwe will get the Validation Rule error message. So, it’s best to only widen columns whenyou are not entering data.Entering DataUnder Last Name you will see a flashing cursor; this means that you are ready to beginentering data. You may type the data and tap Enter, or click with the mouse in each field.If you make a mistake you may retype the data. If you see a mistake later you can come back atany time and correct it.Under each field, type the following in the area below the Field Name:Field Name1. Last Name2. First Name3. Social Security #4. Street address5. City6. State7. Zip8. Gender9. Favorite Number10. Date Hired11. Salary12. Application ReceivedTo be typedSmithFred123-45-6789100 Main StreetLynchburgva24501m or f (your choice)200707/01/199340000Point the mouse to the little square and click the left mousebutton. You will see a check mark appear in the square. A clickin the square indicates that the application has been received. Ifyou do not click, then that will mean the application has not beenreceived.As you are entering this data you will notice several things.Social Security Number and Date Hired – You’ll “see” your Input Mask work.State and Gender – you typed in small letters – notice how the Format ( ) forced theletter(s) to be capitals.Favorite Number – since the Favorite Number is “too big” you will see your error messageappear. Click-on OK in the message screen and then create a Favoritenumber that will work.Salary -notice how your Currency formatting created a , commas and periods.18
Microsoft Access 2007 TutorialWhen you have completed typing the information, tap Enter so the cursor will move down tothe next record. You are now ready to insert your second entry.Note: When you tapped Enter, Access automatically saved your first record. This can beconfirmed by the display of the hourglass.Also note: As you began typing your first record a small pencil appeared in the left margin.This indicates that you are "writing to" this record (editing). Below the pencil an * (asterisk)also appeared. This indicates that your next record will go below the first.There are (2) methods for entering data into the database:1. The method you just used is called Datasheet View method.or2. You can use the Form View method (we’ll create a Form in a bit later in the tutorial).Exiting and SavingAnytime you need to leave your database, click theMicrosoft Office Button in the upper left corner of yourAccess screen, then click Exit Access – in the lower rightcorner of the menu screen. If you have not saved yourspreadsheet, a reminder box will appear asking you to do so.Notice the Access Options button to the left of Exit Access. Earlier, we indicated that all of thechoices under File in the Menu Bar are still available using the Microsoft Office Button. Clickthe Access Options button. The Access Options menu screen (top of next page) will appear.As you can see, all of the choices available under File in the menu bar are here – as well as manymore.19
Microsoft Access 2007 TutorialIf you click the Resources selection in the Access Options menu, you will see some great online resources available to assist you with Access.After you have reviewed theAccess Microsoft Office buttonchoices, click the Exit Accessbutton.20
Microsoft Access 2007 TutorialIf Access asks: “Do you want to save?,” click. If Access shows you a Save file screen, give ita name of your choice and click on OK. You should then exit to the Windows Screen with noproblems.Since you have already named everything for this exercise, you should not have to name anyfiles as you exit.Opening Access Database - againIf you decide to Exit Access 2007, and then return to continue the tutorial, refer to theinstructions at the beginning of this tutorial (Page 1) to open Access again.A neat thing about Access 2007 is the OpenRecent Database area on the right side of thescreen. Once you have created a database, youwill see your database in the Open portion of thearea (see arrow and image to the right). You cansimply click-on the file, in this tutorial Person, andit will open.When Access 2007 opens, you will see that the bottom portion of your screen is blue and that thebelow message appears above the blue area. Access has long been a source for worms andviruses when e-mailed to other people, so Access 2007 has this additional feature to protect you.Click the Options button to the right of the Security Warning.When you Click the Options button to the right of the Security Warning, the Microsoft OfficeSecurity Options menu screen will appear. Take a few minutes to read this information. If youreceive an Access database from someone who you do not know, you can use the features in thisscreen to assist in protecting you. Since you are opening your own database, click the smallcircle to the left of Enable this content (see arrow below). Then click the OK button.21
Microsoft Access 2007 TutorialWhen you click the OK button you will see, on the leftside of your screen, that your Personnel:Table turnsorange. This means that it is OK and that you nowcan open it again to enter more data. You have twochoices to open your Table.1. You can move your cursor over the orange area and click the LEFT mouse buttontwice quickly – and your Table will open in the Datasheet View.2. You can move your cursor over theorange area and click the RIGHTmouse button. You will see adrop down menu appear. You canclick on OpenYou are now ready to continue entering the data in the Datasheet View.22
Microsoft Access 2007 TutorialForm View and Datasheet ViewAs indicated previously, you have a choice to enter your data. You can use the Datasheet View,like we have done so far, or you can use a Form. Both methods work well.Creating a Form in Access 2007 is really different than in previous versions of Access. We’llnow use the new Tabs and Ribbons to Create a Form for our Personnel Table.First, look at the topof your Access screenand click the CreateTab (we want toCreate a Form). Lookin the Create Ribbonin the forms Groupand you’ll see theForm button. Clickthe Form button.You’ll see your screen change significantly in many ways. The first thing you’ll notice is thatAccess 2007 – knowing you were entering data from the Personnel Table – created a Formwith all of the Fields in your Table! You’re all ready to enter data in this form.Your Personnel Form should look something like the image below.23
Microsoft Access 2007 TutorialAnother new feature of Access 2007 is theTab layout for what you’re working with.Look just above the Form and you will seetwo Tabs. Notice the small image on the leftof each Tab. The left Tab is your Personnel Datasheet and the right Tab is your PersonnelForm. You can click on whichever Tab you want to enter Data in your Table.You may enter data in Form View the same as in DatasheetView. To Save your new Form you can click on the SmallSave Diskette in the Quick Access Toolbar. Since yourform will be a part of your Person Database, it willautomatically save as the Tab Name.Or, you can move your cursor over the Personnel FormTab and click the RIGHT mouse button. When the dropdown menu appears, click the Save selection.The data entry form is now saved as Personnel, just like the Table. Notice, at the bottom of theForm screen, that there is a status area (see below) that tells you what record you are on. Youcan use the arrows to “move” from one record to another, or select a new record in which toenter data. Click-on each of the arrows to see how they work. Some will take you forward orback to the next or previous record, and some will take you to the beginning or end of yourrecords. The arrow with an asterisk will take you to a new blank record. Enter a few recordsto see how the Form View works.When you first “open” your Person Database,you may choose your favorite method to enterdata: The data Form or Datasheet. Look on theleft side of your screen and you will see AllTables. Under All Tables, you will see yourPersonnel Table with two selections below it:Personnel: Table and Personnel. Notice theimage on the left of each selection (like at the bottom of Page 23). You can switch back andforth from the Datasheet entry to the Form entry by clicking on your choice (as outlined onPage 22).24
Microsoft Access 2007 TutorialAt the lower left corner of the menu screen, you will see some text that indicates that youare either using Form or Datasheet View to enter your data.When you have opened your DatasheetView and Form View you can switch backand forth by clicking on the Tabs.The View buttons on the upperleft indicate what “view” you areusing: Design View, Form View,or Datasheet View. You canmove back-and-forth betweenviews by clicking-on the downtriangle (see arrows and images)and then choose the View youdesire.Note: When you are finished entering data and preparing to exit Microsoft Access, or Close theform, if you did not save before exiting, the program will ask if you want to Save theForm. This is up to you. You may save it with your choice of names and it will thenshow-up as a form when the Person Database Main Window appears. Or, you canindicate No, and re-create the form again with the Wizard.ImportantTo record enough information so that you can see the power of Access database does enter24 or more records now. You may use either Form View or Datasheet View.Querying the DatabaseThis is what a database is designed for: finding specific information about someof the data in the table(s) very quickly. A query is a search for general or specific data in afield or fields in your database (e.g. the first and last names and birth dates of all employees, justthe Jones’s, the people from CA, salaries 10,000, etc.). In order to do this, we need to clickon the fields we want to query. So, let’s start by finding just Last Names in our table.25
Microsoft Access 2007 TutorialIf you are not in the Database: PERSON screen which shows the Tables, Queries, etc., gothere by following the instructions on Pages 21-24 .If you have the Personnel Datasheet or Personnel Form open (to add data), closethem before you begin your queries. The Access program sometimes becomes logicallyconfused when you try to do queries when it “thinks” you also want to add d
Microsoft Access 2007 Tutorial 1 Creating a Database using Access 2007 Created: 12 December 2006 Starting Access 2007 Double click on the Access 2007 icon on the Windows desktop (see right), or click-on the Start button in the lower left corner of the screen, then click-on Programs, and then click-on Microsoft Access 2007. The Getting Started with Microsoft Office Access screen will appear .