Transcription
Chase Mobile Checkout-PLUSMerchant Portal User GuideGrow your business – whenever and wherever you want in Canada!Version 1.4July 10, 2020
ContentsWelcome to Chase Mobile Checkout-PLUS . 3Getting Started . 4Signing In . 5Reviewing Sales . 6Resending a Receipt. 8Downloading a Receipt . 9Viewing Reports . 10Detailed Transactions Report . 11Product Catalogue Sales Report . 11Exporting a Report to PDF or Excel . 11Updating Your Account Profile . 13Changing Your Language . 13Changing Your Mobile Number . 14Updating Your Security Settings . 15Changing Your Password . 15Changing Your Authorization PIN . 15Updating Your Verification Preference . 16Updating Your Merchant Settings . 18Viewing Your Card Readers . 18Updating a Card Reader’s Name . 19Replacing a Card Reader . 20Setting Up Tips. 21Configuring Your Manual Entry Card Settings . 21Receipt Settings . 22Managing Your Staff . 24Chase Mobile Checkout-PLUSMerchant Portal User Guide version 1.4Updated July 10, 20202 of 25
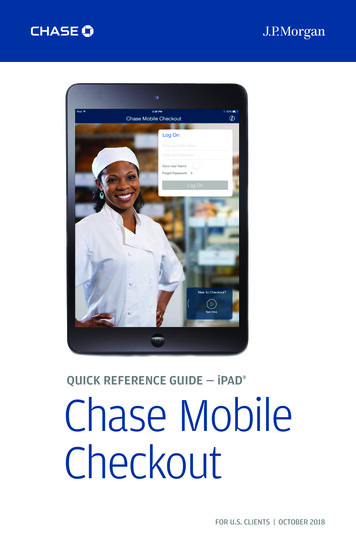
Welcome to Chase Mobile Checkout-PLUSChase Mobile Checkout-PLUS1 (CMC-PLUS) allows you to accept credit and debit cardpayments2 with your Apple smartphone or tablet wherever your business takes you inCanada.All you need is a Bluetooth enabled mobile device with the CMC-PLUS app, our supportedcard reader, and a merchant account with Chase Merchant Services to experience thebenefits of our newest mobile payment processing solution.This user guide will introduce you to the Merchant Portal, where you will be able tomanage your CMC-PLUS account to view reports and analytics, and track your sales.iDon’t have an account?If you do not have a CMC-PLUS account, please visithttps://merchantservices.chase.ca/en/support or call1-877-552-5533 to speak with a Sales Representative.Chase Mobile Checkout-PLUSMerchant Portal User Guide version 1.4Updated July 10, 20203 of 25
Getting StartedIn order to use CMC-PLUS, you will need to first set up an account with Chase MerchantServices. To speak with a sales representative, please call 1-877-552-5533.Once your account has been created, you will need to validate your email address byclicking on the link within the welcome email.You will be asked to set the following to protect your account:- PasswordYour password will be used anytime you sign in to the Merchant Portal or CMC-PLUS MobileApp.- Verification Preference (two-factor authentication)When signing in from a new device or web browser, you will be asked to enter a temporaryverification code. The verification code will be sent to your email address or mobile numberbased on your preference selection.Chase Mobile Checkout-PLUSMerchant Portal User Guide version 1.4Updated July 10, 20204 of 25
Signing InYour CMC-PLUS account is secured using your registered email address and password.When signing into the Merchant Portal or Mobile App, you may also be required to entera (two-factor authentication) code sent to your email address or mobile phone number.To access the Merchant Portal:1. Go to https://cmcplus.ca2. Click the SIGN IN button.3. Enter your Email Address andPassword and click Sign In.When the Remember me check box isselected, your email address is prepopulated the next time you sign in fromthe same device.Forgot your password?iYou can reset your password yourself on the CMC-PLUS Mobile App or callMerchant Support at 1-800-507-0782.Setting your PINIf this is your first time signing in, you will be prompted to set your 4 to 6digit Authorization PIN.Your Authorization PIN is used as an additional security check if yourpassword was incorrectly entered multiple times during sign in.Chase Mobile Checkout-PLUSMerchant Portal User Guide version 1.4Updated July 10, 20205 of 25
Reviewing SalesWith CMC-PLUS, you can track daily sales statistics performed by you or your staff.The Dashboard provides a real-time summary of your sales, including total sales, refunds,taxes and tips. You may view the information by payment type, date range or staffmember that conducted the transaction.To access the Dashboard:1. Click on the Dashboard menu button.Chase Mobile Checkout-PLUSMerchant Portal User Guide version 1.4Updated July 10, 20206 of 25
Need to find a past transaction? You can track your historical transactions from the past18 months.The Sales History allows you to review a list of your previous sales. You may click on theOrder # of a transaction to see more detail and resend a receipt.When you need to find a specific transaction, you are able to browse by payment type,date range or staff member that conducted that transaction.To access your Sales History:1. Click on the Sales History menu button.Details:Lists the products sold. Pressing the “ ” icon reveals all products.Total:Displays the total of the transaction including taxes and tips. Voids and refundsare displayed in red as a negative amount.Status:Indicates whether the payment has been accepted (Approved).Chase Mobile Checkout-PLUSMerchant Portal User Guide version 1.4Updated July 10, 20207 of 25
Resending a ReceiptOccasionally, a customer may request that you send them a receipt from a pasttransaction. You can find the customer’s receipt from the Sales History screen.You can resend the PDF receipt to a customer’s email address or mobile number. Thereceipt is attached when sending to an email address. A secure link is provided todownload the receipt when sending to a mobile number.To resend a receipt:1. Click on the Sales History menu button.2. Browse for the particular transaction you would like to send a receipt for.3. Click on the ORDER # of the transaction to view the details.4. Enter the customer’s email address and/or mobile number and click the Send Receiptbutton.TipiIf a receipt has previously been sent, the customer’s email and/or mobilenumber will be pre-populated for easier entry but masked for privacy.Chase Mobile Checkout-PLUSMerchant Portal User Guide version 1.4Updated July 10, 20208 of 25
Downloading a ReceiptIf you wish to save a copy of a transaction receipt, you can download a PDF copy on theSales Details screen.To download a receipt:1. Click on the Sales History menu button.2. Browse for the particular transaction you would like to download a receipt for.3. Click on the ORDER # of the transaction to view the details.4. Click on the English or French links at the bottom to view the receipts.Receipt languageiThe receipt is downloaded in the same language you set for the MerchantPortal (English or French). See Changing Your Language.Chase Mobile Checkout-PLUSMerchant Portal User Guide version 1.4Updated July 10, 20209 of 25
Viewing ReportsYou can download detailed analytics and reports for your business. These reports willallow you to accurately track your transactions, as well as products and services yourbusiness has sold.The reporting feature provides real-time reporting and analytics to track and analyze yoursales.To run a report:1. Click on the Reports menu button.2. Enter the From and To dates for the report you would like to run and click on the ViewReport button.Chase Mobile Checkout-PLUSMerchant Portal User Guide version 1.4Updated July 10, 202010 of 25
Detailed Transactions ReportThe Detailed Transactions Report provides a list of sales for a given time period. Thereport includes details of each transaction such as payment method, geolocation, taxes,tips and receipt delivery.Product Catalogue Sales ReportThe Product Catalogue Sales Report provides sales volume grouped by product for a giventime period.Exporting a Report to PDF or ExcelYou can export the data for any report to PDF or Excel.To export a report:1. Click on the Reports menu button.2. Enter the From and To dates for the report you would like to run and click on the ViewReport button.3. Click on the Export Data button in the top left to display the Export Report window.4. Choose either PDF or XLSX (Excel) from the Export Format dropdown and click the OKbutton.Chase Mobile Checkout-PLUSMerchant Portal User Guide version 1.4Updated July 10, 202011 of 25
Chase Mobile Checkout-PLUSMerchant Portal User Guide version 1.4Updated July 10, 202012 of 25
Updating Your Account ProfileTo change the name associated to your account, please call merchant support at 1-800507-0782.Changing Your LanguageThe Merchant Portal can be viewed in either English or French.To change your language:1. From any screen, select your preferred language from the dropdown next to yourname.NoteiThe language you select is saved for both the Merchant Portal and MobileApp.Chase Mobile Checkout-PLUSMerchant Portal User Guide version 1.4Updated July 10, 202013 of 25
Changing Your Mobile NumberYour mobile number can be used for two-factor authentication when signing in.To change your mobile number:1. Click on Settings Personal Profile menu button.2. Click on Change Mobile Number in the gear icon.3. Enter your new Mobile Number and click the Submit button.Chase Mobile Checkout-PLUSMerchant Portal User Guide version 1.4Updated July 10, 202014 of 25
Updating Your Security SettingsChanging Your PasswordYour password is required to sign in to the Merchant Portal or Mobile App.To change your password:1. Click on Settings Change Password menu button.2. Enter your Current Password and New Password and click the Submit button.Changing Your Authorization PINYour Authorization PIN (set up when you first signed in) is used as an additional securitycheck if your password was incorrectly entered multiple times during sign in.To change your authorization PIN:1. Click on Settings Change Authorization PIN menu button.2. Enter your Current Authorization PIN and New Authorization PIN and click the Submitbutton.Chase Mobile Checkout-PLUSMerchant Portal User Guide version 1.4Updated July 10, 202015 of 25
Updating Your Verification PreferenceTwo-factor authentication provides an extra layer of security to your account.As an additional security check, you will be asked to enter a temporary verification codewhen you sign in on a new device/browser or when you request your password orAuthorization PIN to be reset.The verification code will be sent to either your Email or your Mobile Number based onyour preference.To update your verification preference:1. Click on Settings Verification Preference menu button.2. Choose Email or Mobile Number and click the Save button.Chase Mobile Checkout-PLUSMerchant Portal User Guide version 1.4Updated July 10, 202016 of 25
Chase Mobile Checkout-PLUSMerchant Portal User Guide version 1.4Updated July 10, 202017 of 25
Updating Your Merchant SettingsTo change the name or address associated to your merchant profile, please call merchantsupport at 1-800-507-0782.Viewing Your Card ReadersCard Readers are used in conjunction with the Mobile App to process debit and creditpayments.The Card Readers screen lists the card readers associated to your merchant account,including information such as serial number, activation date, and status.To view your card readers:1. Click on Settings Card Readers menu button.Here, you will see a list of card readers associated to your account. The CMC-Plus servicesupports the Ingenico iCMP and Link2500 card readers.Chase Mobile Checkout-PLUSMerchant Portal User Guide version 1.4Updated July 10, 202018 of 25
Updating a Card Reader’s NameYou can assign a user-friendly alias name to each card reader for easier identification onMerchant Portal or Mobile App.To update a card reader’s name:1. Click on Settings Card Readers menu button.2. Click on the TID of the card reader you would like to change.3. Click on Edit in the gear icon.4. Enter the new Alias and click the Save button.Chase Mobile Checkout-PLUSMerchant Portal User Guide version 1.4Updated July 10, 202019 of 25
Replacing a Card ReaderBefore you can replace your card reader, you must remove the old one from yourmerchant profile.To remove a card reader:1. Click on Settings Card Readers menu button.2. Click on the TID of the card reader you would like to remove.3. Click on Deactivate in the gear icon and confirm the deactivation.NoteiThe TID (Terminal ID) for the card reader will show as Available afterdeactivation. Follow the steps in the Mobile App to activate your new cardreader.Chase Mobile Checkout-PLUSMerchant Portal User Guide version 1.4Updated July 10, 202020 of 25
Setting Up TipsDo you and your staff collect tips when you make a sale?You can configure your card reader to prompt the customer with the option to add a tipwhen processing a transaction.To enable tips:1. Click on Settings Transaction Settings menu button.2. Select On in the Enable Tips dropdown menu and click theSave button.Configuring Your Manual Entry Card SettingsThe Manual Card Entry feature allows you to manuallykey in card numbers on the card reader to performtransactions.To enable manual entry:1. Click on Settings Transaction Settings menubutton.2. Select On in the Enable Manual Entry dropdownmenu and click the Save button.NoteiIf the Manual Entry feature is enabled, you may choose to collect CVD (the 34 digit code on the back of the card) or AVS (the customer’s billing address)while performing a sale for additional fraud protection.Chase Mobile Checkout-PLUSMerchant Portal User Guide version 1.4Updated July 10, 202021 of 25
Receipt SettingsThe receipts can be sent manually:- right after the transaction is processed in the mobile app OR- by accessing the Sale History in the mobile app at a later point in time OR- by accessing the Sale History in the merchant portal at a later point in timeHowever, the receipts can be sent automatically as well. You can set up automatic sendingby going to Settings Receipt Settings.On the same settings page you may add a custom message to the bottom of receipts.Chase Mobile Checkout-PLUSMerchant Portal User Guide version 1.4Updated July 10, 202022 of 25
Automatic ReceiptsThe Receipt Settings page allows you to enable automatic sending of receipts. You can doso by selecting any combination of the four options provided:- Performed by (whoever is performing the particular transaction)- Manager- All Supervisors- All EmployeesYou can choose one option, two, three, or all four options. If you choose for example“Manager” and “All Supervisors” then after every transaction processed, a receipt will besent automatically to the manager and to all supervisors.If no option is selected, receipts will not be sent out automatically. This is also the defaultstate.Make sure you save your changes by clicking the Save button at the end.Custom Receipt MessageOn the Receipt Settings page you may also add a custom message that will be displayed inthe bottom half of your receipts. This is a great place to include a message for yourcustomers.After you type your custom message, a preview of the receipt with your custom messageis displayed on the right side of the Receipt Settings page.Make sure you save your changes by clicking the Save button at the end.TipiThe custom message is a good place to display your business tax number.Chase Mobile Checkout-PLUSMerchant Portal User Guide version 1.4Updated July 10, 202023 of 25
Managing Your StaffThe Staff User feature allows you to have additional user accounts for your staff to use withtheir own card reader or share multiple devices.To view the list of your staff:1. Click on Settings Staff Users menu button.NoteiTo add or make changes to your staff, please contact merchant support at 1800-507-0782.Chase Mobile Checkout-PLUSMerchant Portal User Guide version 1.4Updated July 10, 202024 of 25
Chase Mobile Checkout–PLUS is available to Canadian Merchants accepting transactions within Canada only. Chase Mobile Checkout–PLUS requires a compatible Apple smartphone or tablet with cellular or Wi-Fi network connection, the Chase Mobile Checkout–PLUSapplication, a merchant services account with Chase Merchant Services, and a Chase Mobile Checkout – PLUS supported PIN Pad.There is no charge to download the Chase Mobile Checkout – PLUS app, but there may be charges associated with the purchase andshipment of the PIN Pad. When using the app, message and data rates may apply. Such charges include, but are not limited to, thosefrom your communications service provider. In addition, all applicable processing fees outlined in the merchant services contract withChase Merchant Services will be assessed for all transactions initiated through the app.1Chase and the Octagon logo are registered trademarks of JPMorgan Chase Bank, N.A. All other trademarks, registered trademarks,product names and logos identified or mentioned herein are the property of JPMorgan Chase Bank, N.A., or their respective owners. 2018 JPMorgan Chase & Co. Apple and App Store are registered trademarks of Apple, Inc.All merchants are required to complete a more detailed application, and agree to terms and conditions, at the time of enrollment. Allmerchants are subject to credit approval.2Chase Mobile Checkout-PLUSMerchant Portal User Guide version 1.4Updated July 10, 202025 of 25
Chase Mobile Checkout-PLUS Merchant Portal User Guide version 1.4 14 of 25 Updated July 10, 2020 Changing Your Mobile Number Your mobile number can be used for two-factor authentication when signing in. To change your mobile number: 1. Click on Settings Personal Profile menu button. 2. Click on Change Mobile Number in the gear icon. 3.