Transcription
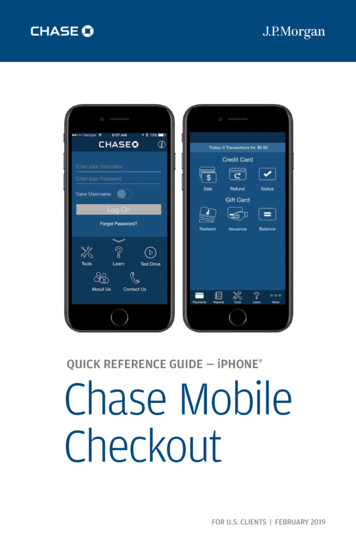
QUICK REFERENCE GUIDE — iPHONE Chase MobileCheckoutFOR U.S. CLIENTS FEBRUARY 2019
QUICK REFERENCE GUIDE — iPHONE CHASE MOBILE CHECKOUT U.S. 2CHASE MAKES NO WARRANTY OF ANY KIND, EITHER EXPRESSED OR IMPLIED, WITH REGARDTO THIS MATERIAL, INCLUDING, BUT NOT LIMITED TO, THE IMPLIED WARRANTIES OFMERCHANTABILITY AND FITNESS FOR ANY PARTICULAR PURPOSE.Chase shall not be liable for errors contained herein nor for incidental or consequential damagesin connection with the furnishing, performance or use of this material. The informationcontained in this document is subject to change without notice.Unless specifically noted, all company and/or product names, street addresses, telephonenumbers and persons referred to within this document, either as a whole or in part, arecompletely fictional and are designed solely as examples to illustrate the text.This document contains proprietary information, which is protected by copyright. All rights arereserved. No part of this document may be photocopied, reproduced or translated to anotherlanguage without the prior written consent of Chase.Copyright 2001-2019, Paymentech, LLC, “Chase”Chase8181 Communications PkwyPlano, TX 75024(800) 824-4313DISCLAIMER STATEMENTThe information described in this document is believed to be accurate and reliable. Much carehas been taken in its preparation, however, no responsibility, financial or otherwise, is acceptedfor any consequences arising out of the use or misuse of this material.
QUICK REFERENCE GUIDE — iPHONE CHASE MOBILE CHECKOUT U.S. 3CONTENTSOverview . . . . . . . . . . . . . . . . . . . . . . . . . . . . . . . . . . . . . . . . . . . . . . . . . . . . . . . . . . . . . . . . . . . . . . . . 4Features . . . . . . . . . . . . . . . . . . . . . . . . . . . . . . . . . . . . . . . . . . . . . . . . . . . . . . . . . . . . . . . . . . . . . . . . . 4Functions.4Supported Platforms and Devices . . . . . . . . . . . . . . . . . . . . . . . . . . . . . . . . . . . . . . . 4Get Additional Assistance . . . . . . . . . . . . . . . . . . . . . . . . . . . . . . . . . . . . . . . . . . . . . . . . . . 4Getting Started . . . . . . . . . . . . . . . . . . . . . . . . . . . . . . . . . . . . . . . . . . . . . . . . . . . . . . . . . . . . . . . . 5Pairing Your Mobile Device . . . . . . . . . . . . . . . . . . . . . . . . . . . . . . . . . . . . . . . . . . . . . . . . 6Understanding Your Account Credentials . . . . . . . . . . . . . . . . . . . . . . . . . . . . . 8Configuring User Preferences.8Manage Your Product Catalog . . . . . . . . . . . . . . . . . . . . . . . . . . . . . . . . . . . . . . . . . . . . 9Configuring Your Receipt.10Processing a Transaction.11Processing a Refund Or Void . . . . . . . . . . . . . . . . . . . . . . . . . . . . . . . . . . . . . . . . . . . . . 13Viewing Transaction Reports . . . . . . . . . . . . . . . . . . . . . . . . . . . . . . . . . . . . . . . . . . . . . 15Viewing Settlement Reports.16Resending a Receipt . . . . . . . . . . . . . . . . . . . . . . . . . . . . . . . . . . . . . . . . . . . . . . . . . . . . . . . . 18Using The eDynamo Card ReaderTroubleshooting.19.21Setting Up Users . . . . . . . . . . . . . . . . . . . . . . . . . . . . . . . . . . . . . . . . . . . . . . . . . . . . . . . . . . . . . 22Frequently Asked Questions.23
QUICK REFERENCE GUIDE — iPHONE CHASE MOBILE CHECKOUT U.S. 4OVERVIEWChase Mobile Checkout (CMC) is a mobile point of sale solution that helps business ownersincrease their sales by allowing them to process credit, signature debit and select third-partygift card transactions on a mobile device. In order to use the solution, you need our proprietarymobile app downloaded to your compatible device, a signed merchant agreement and aChase-issued card reader.FEATURES Point-to-point encryption for processing and password protection. major credit cards accepted (including EMV chip and magnetic stripe credit), plus signature Alldebit and select third-party gift cards. Mobile access to your Chase Merchant Services account. Bluetooth Smart (BLE) card reader.FUNCTIONS Manually add a per-order discount to accommodate special promotions or employee pricing. Send digital receipts to your customers via email or text message. Search for specific transactions, create reports, process voids and refunds — all from yourmobile device.SUPPORTED PLATFORMS AND DEVICESMinimum compatibility requirements to use Chase Mobile Checkout with the eDynamocard reader: iPhone using iOS 10.0 Bluetooth Low Energy 4.0GET ADDITIONAL ASSISTANCEFor additional support, please visit us at chase.com/MerchantServices or call 1-866-428-4967.
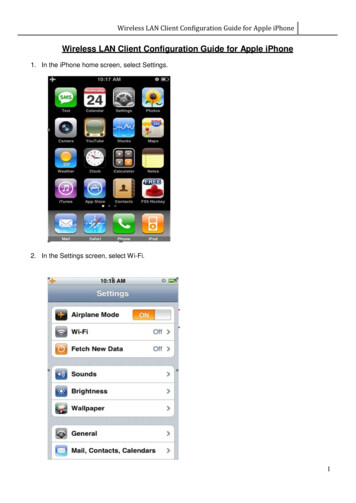
QUICK REFERENCE GUIDE — iPHONE CHASE MOBILE CHECKOUT U.S. 5GETTING STARTEDFollow these steps to get started with Chase Mobile Checkout:1. SET UP YOUR ACCOUNT:All clients are required to complete a detailed application, and agree to terms and conditions,at the time of enrollment. All clients are subject to credit approval. Contact us to establish amerchant account.Once approved, you will receive two emails: one with your username and one with yourtemporary password. Download the Chase Mobile Checkout app from the Apple App StoreSM.2. ACTIVATE YOUR ACCOUNT:When you launch the application for the first time, you will need to accept the End User LicenseAgreement (EULA). You will need to allow CMC to access location services for transaction purposes.a. Log on with your username and temporary password. We will send the username andpassword in two separate emails.b. You will be prompted to create a new password.c. Next, since this is the first time you have logged on from this device, you will beprompted to receive an identification code via your mobile phone or email address onfile. Enter the identification code and password on the log-on screen and tap Log On.3. PAIR YOUR READER:Once you receive the credit card reader from us:a. Charge the reader for three hours using the USB charging cable.b. Pair the reader with your mobile device.
QUICK REFERENCE GUIDE — iPHONE CHASE MOBILE CHECKOUT U.S. 6PAIRING YOUR MOBILE DEVICEMinimum compatibility requirements to use Chase Mobile Checkout with the eDynamo are aniPhone using iOS 10.0 and Bluetooth 4.0. The card reader comes with a USB cable, whichshould be plugged in to both the reader and a power source (such as a computer) to charge thebattery. The card reader’s battery requires approximately three hours to fully charge.The General Status LED light will blink green while charging, and then switch to solid greenwhen complete. Use the USB cable to recharge your card reader as needed.TO PAIR YOUR DEVICE:1. Make sure your iPhone has Bluetooth enabled in its Settings area.2. Once you’re logged on to the Chase Mobile Checkout app, tap More.3. Tap User Preferences.4. Near the bottom of the User Preferences screen, tap Card Readers.5. Locate the Pushbutton on the side of the eDynamo card reader. Once you begin the pairingprocess, you’ll have about three minutes to get your device paired successfully, or you’ll haveto start over again.6. Press and hold the Pushbutton for two seconds. If the Pushbutton is held too long (five to 10seconds), the eDynamo will enter Airplane mode. Momentarily hold the Pushbutton again toremove it from Airplane mode. Bluetooth Status LED will be a steady blue, and will quickly blink three times. Release the7. ThePushbutton. The eDynamo is now in pairing mode.8. On the bottom of the eDynamo card reader, look for the serial number. It starts with S/N. this same serial number from the list of devices in your Chase Mobile Checkout app.9. SelectYou may need to refresh your screen to display the reader list.
QUICK REFERENCE GUIDE — iPHONE CHASE MOBILE CHECKOUT U.S. 710. Inside the Bluetooth Pairing Request window, enter the default pairing code of six nines(9 9 9 9 9 9) and tap Pair.11. Once the status changes to Connected beneath the reader name, toggle on the Set AsCurrent Device switch.12. Tap the Back button.13. In the list of readers, you’ll see a green check mark next to the reader. The iPhone is nowpaired with the eDynamo card reader.CHIP CARDSLOT GENERAL STATUS LED BLUETOOTH STATUS LEDCARD SWIPE PATH PUSHBUTTON
QUICK REFERENCE GUIDE — iPHONE CHASE MOBILE CHECKOUT U.S. 8UNDERSTANDING YOUR ACCOUNT CREDENTIALSAs a Chase Mobile Checkout user, you may have access to other Chase Online tools. If so,you’ll receive emails for Online POS Terminal (OPT), Paymentech Online (PTO) or ResourceOnline (ROL) that provide more information about those solutions and how to access them.User access to each is determined by your merchant account administrator. Your log-oncredentials should be identical for all your user accounts. OPT allows you to use a computer to process payments through a browser-based application,using a supported PIN pad. Our online financial management tools, PTO and ROL, let you use your computer to accesspayment processing data and reports via a web browser. These tools work in conjunction withother Chase solutions so that all your transactions, statements and reports are in one place.Some small business users also get access to the Instant Dashboard; immediately view yourdaily sales and settlement figures with your electronic statement only a click away.CONFIGURING USER PREFERENCESChase Mobile Checkout’s User Preferences offers you several options to customize yourprocessing experience. Build or edit your product catalog. your transaction settings including adding reference numbers to your transactions, Customizeenabling card verification value (CVV), prompts and creating address verification service(AVS) options. Enable the signature prompt during transactions from an EMV-enabled reader. Set up customized tip percentages and tax rates. Enable the option to calculate discounts for your customers. Set threshold alerts for when transaction volumes are surpassed or transaction types occur. Enable your business to receive an electronic receipt via email or text. Set or change your business name. Establish a pairing relationship for up to nine Bluetooth card readers. Opt in or opt out of analytics participation.
QUICK REFERENCE GUIDE — iPHONE CHASE MOBILE CHECKOUT U.S. 9MANAGE YOUR PRODUCT CATALOGUsers can create a catalog of products to be stored on their iPhone . The limit to the number ofitems in the catalog is the iPhone’s available storage.1. Within User Preferences, tap to enable the Product Catalog.2. Tap Edit Product Catalog to view/edit the items.3. Create an item by selecting the “ ” button at the bottom of the screen. Enter the Item Name. Tap the Star icon to make it a favorite. Set the item’s Price, SKU (optional), Status and Category. If desired, add a product Description and a default Tax amount for the item. users can tap the Add Photo box to activate the iPhone’s camera to take a picture of4. Also,the item or use the device’s photo library.5. When complete, tap Save to store the item in your catalog.NOTE: The product catalog is not stored by Chase, and only exists on the mobile device for whichit was built. If CMC is uninstalled from the device, the product catalog will be deleted.
QUICK REFERENCE GUIDE — iPHONE CHASE MOBILE CHECKOUT U.S. 10CONFIGURING YOUR RECEIPTCMC users can now benefit from an added opportunity to market their business. Via the OPTinterface, you can upload a logo to further customize the receipts you email to your customers.1. Create a bookmarked link to the Online POS Terminal using chase.com/OnlinePosTerminaland use your CMC credentials to log on.2. Access OPT’s Administration page, and select Receipts.3. Browse to upload your logo. a. The logo must be PNG format, no larger than 75px high x 350px wide and mustnot exceed 80 KB.b. An error message will display if the logo uploaded doesn’t meet theserequirements.4. The Enable display of the receipt image on the receipt button will default to Yes oncelogo is inserted.5. The receipt’s Header and Footer fields can be edited independent of the logo feature.6. Click Update to confirm change.
QUICK REFERENCE GUIDE — iPHONE CHASE MOBILE CHECKOUT U.S. 11PROCESSING A TRANSACTIONChase Mobile Checkout allows you to accept payments on the go, virtually anywhere yourbusiness takes you.1. Tap Sale on the Payments home screen.2. If activated, Add Items from the product catalog or enter the amount of the sale. Done to close the keypad, then tap Continue. The eDynamo’s General Status LED will3. Taplight green indicating the need for the customer to insert, swipe or enter their card. a. I f making an EMV/chip card sale, the card should be left inserted momentarily.The application will prompt the user when it is appropriate to remove the card.b. I f swiping the card, remember to swipe slowly and firmly with the magneticstripe down. I f manually entering the card, touch the card entry field to bring up the keypadon the iPhone . card information will be recognized and will populate the card fields on the iPhone.4. TheManually enter other fields determined in User Preferences.a. If tip processing is enabled:I. Tap Continue.II. Present the iPhone to the customer to confirm the sale amount.III. Once the amount is confirmed, an Add Tip field will display.IV. T he customer can select a predefined tip percentage or key in a customamount and tap Authorize.b. If tip processing is disabled:I. Tap Authorize.II. I f Signature Settings is enabled in User Preferences, the customer should usetheir finger or stylus to sign and then tap Continue.5. Once the transaction is authorized, a confirmation screen appears. The customer canenter their email address or mobile phone number for the digital receipt, then tap Done.6. After the receipt has been sent, the final confirmation screen appears.7. Tap Home to return to the Payments home screen to continue processingadditional transactions.NOTE: CARD SWIPING — If swiping the card, remember you can swipe in any direction, thoughthe magnetic stripe should be in direct contact with the silver tab inside the reader.
QUICK REFERENCE GUIDE — iPHONE CHASE MOBILE CHECKOUT U.S. 12
QUICK REFERENCE GUIDE — iPHONE CHASE MOBILE CHECKOUT U.S. 13PROCESSING A REFUND OR VOIDThere are two ways to process a refund in ChaseMobile Checkout.TO PROCESS THE REFUND FROM THE PAYMENTSHOME SCREEN*:1. Tap Refund on the Payments home screen.2. Input refund amount, tap Done and Continue.3. Insert, swipe or enter the card information.4. Enter the reference number if required, tap Doneand Authorize. Signature Settings is enabled in User Preferences,5. Ifpresent the iPhone to the customer. The customer canuse a stylus or their finger to sign for the refund.6. After the customer has given you back the iPhone,tap Continue.7. Once the transaction is complete, a confirmationscreen appears.8. Enter the customer’s email address or mobile phonenumber to send a digital receipt of the refund.9. Tap Done, and remove the card (if it was inserted).10. Tap Home to return to the Payments home screen.* For refund transactions, users will need to re-enter their password for sessions lasting longerthan 15 minutes.
QUICK REFERENCE GUIDE — iPHONE CHASE MOBILE CHECKOUT U.S. 14TO PROCESS THE VOID OR REFUND FROM THE TRANSACTION SUMMARY SCREEN:1. Tap Reports.2. Under Transaction Reports, tap Transaction Summary.3. Locate the transaction in the listing, and tap to select or tap the Calendar icon and selecta date range to find the transaction.4. From this screen, you can tap to either Void or Refund the transaction. (If the transactionhas not been submitted for settlement and is still in your open batch, the Refund optionwill be a Void option instead.)5. When you select Refund, an Enter Refund Amount box appears. You can edit the amountor just tap Refund.6. Present the iPhone to the customer. The customer can use a stylus or their finger to signfor the refund.7. After the customer has given you back the iPhone, tap Continue.8. Once the transaction is complete, a confirmation screen appears.9. Enter the customer’s email address or mobile phone number to send a digital receipt ofthe refund.10. Tap Done.11. Tap Home to return to the Payments home screen.
QUICK REFERENCE GUIDE — iPHONE CHASE MOBILE CHECKOUT U.S. 15VIEWING TRANSACTION REPORTSChase Mobile Checkout allows you to review your account details on your iPhone . These detailsare accessed through various transaction reports.The Transaction Summary screen shows transaction details for both current and historicaltransaction data. From the Reports home screen, tap Transaction Summary. The current transactions in your open batch are listed with the most recent transaction at thetop. You can search historical transactions by tapping the Calendar icon and selecting a startand end date. You can select a specific transaction by tapping it in the listing. A Hierarchy icon will appear if your business has access to more than one account.The Sales Overview screen offers a glance into a day-to-day sales summary. From the Reports home screen, tap Sales Overview. The current sales for the specified time period are listed with the most recent transaction atthe top. You can see historical sales per day by tapping the Calendar icon and selecting astart and end date, and then tap Done. You can select a specific sale by tapping it in the listing. A Hierarchy icon will appear if your business has access to more than one account. To view the information in a graph, tap the Graph icon. – A graph can be toggled between bar and line graphs and is scrollable horizontally. Tapping on a specific data point will overlay the sales amount for that day.
QUICK REFERENCE GUIDE — iPHONE CHASE MOBILE CHECKOUT U.S. 16VIEWING SETTLEMENT REPORTSChase Mobile Checkout allows you to review various summaries of your account. These reportscan help you understand the overall activity of your account by keeping track of all batches inyour Merchant Services account.A settlement operation is used to close out the current batch of transactions and open a newbatch. You don’t need to settle your batch manually; Chase Mobile Checkout automaticallysettles for you at 11:30 p.m. EST every day.
QUICK REFERENCE GUIDE — iPHONE CHASE MOBILE CHECKOUT U.S. 17You can access these reports from the Reports home screen. The Settlement Overview provides deposit information for the last week with a grand total atthe top as the default view.– To change the date range, tap the Calendar icon.– To view the information in a graph, tap the Graph icon. The Funding Overview provides actual funded data based on deposits from Chase onbehalf of the merchant. The default view is the past week’s funded dollars with a grandtotal at the top.– To change the date range, tap the Calendar icon.– To view the information in a graph, tap the Graph icon. The Fees Overview will show all fees summarized by date for the last week as the default.– Selecting a date reveals the fees by card type, non-bankcard, authorizations andother fees broken down.– To change the date range, tap the Calendar icon. The Chargeback Summary gives individual chargeback listings. Change the date range bytapping the Calendar icon.
QUICK REFERENCE GUIDE — iPHONE CHASE MOBILE CHECKOUT U.S. 18RESENDING A RECEIPTReceipts can be configured to be automatically sent to merchants via email or SMS, or to thecustomer’s email or SMS (carrier fees may apply). They can also be resent from within
Chase Mobile Checkout (CMC) is a mobile point of sale solution that helps business owners . Point-to-point encryption for processing and password protection. All major credit cards accepted (including EMV chip and magnetic stripe credit), plus signature . prompted to receive an identification code via your mobile phone or email address on