Transcription
DIGIPASS Authentication forFortigateWith Vasco VACMAN Middleware 3.0DIGIPASS Authentication for Fortigate - Integration Guideline V1.0 2007IntegrationVASCO Data Security.All rights reserved.GuidelinePage 1 of 35
DisclaimerDisclaimer of Warranties and Limitations of LiabilitiesThis Report is provided on an 'as is' basis, without any other warranties, or conditions.No part of this publication may be reproduced, stored in a retrieval system, ortransmitted, in any form or by any means, electronic, mechanical, photocopying,recording, or otherwise, without the prior written permission of VASCO Data Security.TrademarksDIGIPASS & VACMAN are registered trademarks of VASCO Data Security. Alltrademarks or trade names are the property of their respective owners. VASCOreserves the right to make changes to specifications at any time and without notice.The information furnished by VASCO in this document is believed to be accurate andreliable. However, VASCO may not be held liable for its use, nor for infringement ofpatents or other rights of third parties resulting from its use.Copyright 2007 VASCO Data Security. All rights reserved.DIGIPASS Authentication for Fortigate - Integration Guideline V1.0 2007 VASCO Data Security. All rights reserved.Page 2 of 35
Table of ContentsDIGIPASS Authentication for Fortigate . 1Disclaimer . 2Table of Contents. 31Overview . 52Problem Description . 53Solution . 54Technical Concept . 65674.1General overview . 64.2Fortigate prerequisites . 64.3VACMAN Middleware Prerequisites . 6Fortigate Configuration . 75.1SSL/VPN configuration . 75.2RADIUS configuration . 95.3Group configuration .105.4Firewall configuration .11VACMAN Middleware . 136.1Policy configuration .136.2Component configuration .15User configuration . 167.1ODBC installation .167.1.1User creation .167.1.2Import DIGIPASS .187.1.3DIGIPASS Assignment .207.2Active Directory installation .227.2.1User creation .227.2.2Import DIGIPASS .24DIGIPASS Authentication for Fortigate - Integration Guideline V1.0 2007 VASCO Data Security. All rights reserved.Page 3 of 35
7.2.38DIGIPASS assignment .26Fortigate SSL/VPN test . 288.1Response Only .288.2Challenge / Response .299VACMAN Middleware features . 319.19.1.1Support for Windows 2000, 2003, IIS5 and IIS6 .319.1.2Support for ODBC databases and Active Directory .319.2Deployment .319.2.1Dynamic User Registration (DUR) .319.2.2Autolearn Passwords .319.2.3Stored Password Proxy .319.2.4Authentication Methods .319.2.5Policies .329.2.6DIGIPASS Self Assign .329.2.7DIGIPASS Auto Assign .329.2.8Grace Period .329.2.9Virtual DIGIPASS .329.310Installation .31Administration .339.3.1Active Directory Users and Computers Extensions .339.3.2Administration MMC Interface .339.3.3User Self Management Web Site .349.3.4Delegated administration .349.3.5Granular access rights .34About VASCO Data Security . 35DIGIPASS Authentication for Fortigate - Integration Guideline V1.0 2007 VASCO Data Security. All rights reserved.Page 4 of 35
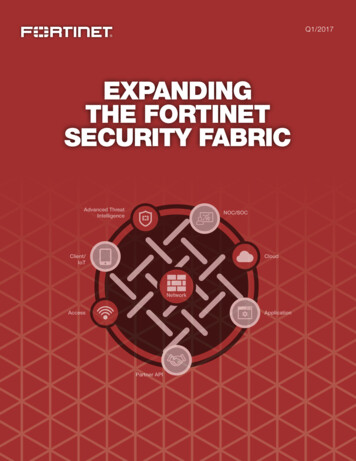
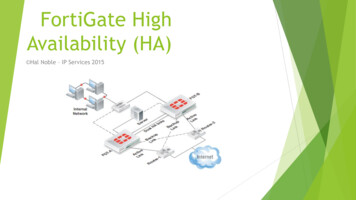
1 OverviewThe purpose of this document is to demonstrate how to configure VACMAN Middleware3.0 (VM) to work with a Fortigate device. Authentication is arranged on one centralplace where it can be used in a regular VPN or SSL/VPN connection.2 Problem DescriptionThe basic working of the Fortigate is based on authentication to an existing media(LDAP, RADIUS, local authentication ). To use the VACMAN Middleware withFortigate, the external authentication settings need to be changed or added manually.3 SolutionAfter configuring VACMAN Middleware and Fortigate in the right way, you eliminatethe weakest link in any security infrastructure – the use of static passwords – that areeasily stolen guessed, reused or shared.In this integration guide we will make use of a Fortigate 50A. This combines a firewall,an IPSec, PPTP or SSL/VPN and a UTM suite in one. For authentication, we focused onthe SSL/VPN part.Fortigate 50AExternal Host: fortigate.labs.vasco.comExternal IP: 62.58.226.10Internal Host: FortigateInternal IP: 10.0.10.15262.58.226.0/2410.0.10.0/24VACMAN MiddlewareIP:10.0.10.10Port: 1812Shared Secret: vascoInternal LANRange :10.0.10.0/24Figure 1: SolutionDIGIPASS Authentication for Fortigate - Integration Guideline V1.0 2007 VASCO Data Security. All rights reserved.Page 5 of 35
4 Technical Concept4.1General overviewThe main goal of the Fortigate is to perform authentication to secure all kind of VPNconnections. As the Fortigate can perform authentication to an external service usingthe RADIUS protocol, we will place the VM as back-end service, to secure theauthentication with our proven VACMAN Middleware software.4.2Fortigate prerequisitesPlease make sure you have a working setup of the Fortigate. It is very important thisis working correctly before you start implementing the authentication to the VM.Currently all Fortigate devices use the same web config and CLI interface.This means our integration guide is suited for the complete product range ofFortigate devices.4.3VACMAN Middleware PrerequisitesIn this guide we assume you already have VACMAN Middleware 3.0 (VM) installed andworking. If this is not the case, make sure you get VM working before installing anyother features.DIGIPASS Authentication for Fortigate - Integration Guideline V1.0 2007 VASCO Data Security. All rights reserved.Page 6 of 35
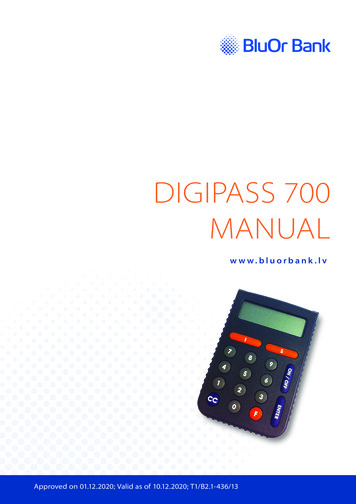
5 Fortigate ConfigurationThe Fortigate device is configured by web config or by CLI, there is even a CLI windowavailable in the web config screen.By default the web config is reachable by https:// IP OR NAME Fortigate .In our case this becomes: https://Fortigate5.1SSL/VPN configurationIn the web config menu, select the VPN main category.Figure 2: SSL/VPN configuration (1)DIGIPASS Authentication for Fortigate - Integration Guideline V1.0 2007 VASCO Data Security. All rights reserved.Page 7 of 35
Select the SSL sub category.Select the Enable SSL-VPN box.If necessary you can select another „Server Certificate‟ or a „Tunnel IP Range‟, if youwant to allow client to create a VPN-tunnel.Click Apply to continue.Figure 3: SSL/VPN configuration (3)DIGIPASS Authentication for Fortigate - Integration Guideline V1.0 2007 VASCO Data Security. All rights reserved.Page 8 of 35
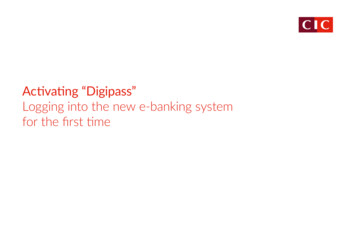
5.2RADIUS configurationGo to the User main category and select RADIUS as sub category.Click the Create New button to add a new RADIUS connection.Figure 4: RADIUS configuration (1)Fill in the Name and Primary Server Name/IP and Primary Server Secret.If you necessary you can add a secondary server as well, but this is not required tocontinue. Click OK to create the RADIUS server.Figure 5: RADIUS configuration (2)DIGIPASS Authentication for Fortigate - Integration Guideline V1.0 2007 VASCO Data Security. All rights reserved.Page 9 of 35
5.3Group configurationWe will now create a group to use in the firewall rules. Click on the User maincategory, select User Group as sub category and click the Create New button.Figure 6: Group configuration (1)Enter a Name and select SSL VPN as type. Select in the left column the RADIUSserver you created earlier and click on the button to get in the right column. Ifnecessary click on the SSL-VPN User Group Options for more options. Here you canenable tunneling options and enable web applications. Click OK to create this group.Figure 7: Group configuration (2)DIGIPASS Authentication for Fortigate - Integration Guideline V1.0 2007 VASCO Data Security. All rights reserved.Page 10 of 35
5.4Firewall configurationTo enable SSL-VPN we have to create also a firewall policy allowing connection fromthe VPN side to the internal network. To do so, click the Firewall main category andselect Policy as sub category. Click the Create New button.Figure 8: Firewall configuration (1)DIGIPASS Authentication for Fortigate - Integration Guideline V1.0 2007 VASCO Data Security. All rights reserved.Page 11 of 35
The following settings are used for an SSL-VPN connection: Source Interface/ZoneSource AddressDestination Interface/ZoneDestination lNetworkalwaysANYSSL-VPNFrom the „Available Groups‟ window, select the RADIUS group and click the buttonto transfer the group to the Allowed window.To finish, click on the OK button in the bottom of the screen.Figure 9: Firewall configuration (2)This concludes the configuration of the Fortigate device. The incoming request fromthe SSL-VPN service will now be handled by the VACMAN Middleware. In the nextchapters we will show how to configure VM and how to assign a DIGIPASS to a user.In the chapter after those we will test the Fortigate setup with a response only and achallenge/response DIGIPASS.DIGIPASS Authentication for Fortigate - Integration Guideline V1.0 2007 VASCO Data Security. All rights reserved.Page 12 of 35
6 VACMAN Middleware6.1Policy configurationSetting up the VM only requires you to set up a policy to go to the right back-end andto add an extra Radius component pointing to the ISA server.To add a new policy, right-click Policies and choose New Policy.Figure 10: VM configuration (1)There are a few policies available by default. You can also create new policies to suityour needs. Those can be independent policies, inherit or copy their settings fromdefault or other policies.Fill in a policy name and choose the option most suitable in your situation. If youwant the policy to inherit setting from another policy, choose the inherit option. If youwant to copy an existing policy, choose the copy option and if you want to make a newone, choose the create option.Figure 11: VM configuration (2)We chose to create a new policy and specify all details about the authentication policy.DIGIPASS Authentication for Fortigate - Integration Guideline V1.0 2007 VASCO Data Security. All rights reserved.Page 13 of 35
In the policy properties configure it to use the right back-end server. This could bethe local database, but also Windows (Active Directory) or another radius server(RADIUS).This could the same authentication service as you were previously using in the ISAserver. Main Settings tabo Local auth.:o Back-End Auth.:o Back-End Protocol:User Settings tabo Dynamic User Registration:o Password Autolearn:o Stored Password Proxy:o Windows Group Check:Challenge Settings tabo 2-Step Challenge Responseo Primary Virtual DIGIPASSDigipass/PasswordIf NeededWindowsYesYesYesNo CheckNoneNoneAfter configuring this Policy, the authentication will happen, if needed (when it doesnot know the user locally), in the back-end to Active Directory. User credentials arepassed through to the VM, it will check these credentials with the AD and will answerto the ISA server with an Access-Accept or Access-Reject RADIUS message.Figure 12: VMconfiguration (3)Figure 13: VMconfiguration (4)DIGIPASS Authentication for Fortigate - Integration Guideline V1.0 2007 VASCO Data Security. All rights reserved.Figure 14: VMconfiguration (5)Page 14 of 35
6.2Component configurationFor testing purposes you can change the existing RADIUS Client (default RADIUSclient that listens for all connections) by right-clicking and choose Properties.If you already use the default RADIUS client, it would be better to create a newRADIUS component.Figure 15: VM configuration (6)In the policy field you should find your newly created policy. Fill in the sharedsecret you entered also in the RADIUS server properties on the ISA server. ClickCreate.Figure 16: VM configuration (7)All configuration is done by now. The next chapter shows you how to add a usermanually. In our policy we enabled the Dynamic User Recognition (DUR). So userswho get verified through the Active Directory, and are not known in the localdatabase, are automatically added. It also shows how to assign a DIGIPASS to a user.DIGIPASS Authentication for Fortigate - Integration Guideline V1.0 2007 VASCO Data Security. All rights reserved.Page 15 of 35
7 User configurationThe user creation steps you will find in this chapter are optional when you didn‟tactivate the option Dynamic User Registration (DUR) and/or PasswordAutolearn in your policy settings.The assignment of a DIGIPASS can happen manually as explained in the steps below.The user creation and DIGIPASS assignment steps depend on which database backend you installed VACMAN Middleware. Either you installed it with an ODBC back-endor with an Active Directory back-end.7.17.1.1ODBC installationUser creationUser creation, while using an ODBC back-end, will happen in the DIGIPASSAdministration MMC. Right-click the Users folder and select New User .Figure 17: ODBC User Creation (1)DIGIPASS Authentication for Fortigate - Integration Guideline V1.0 2007 VASCO Data Security. All rights reserved.Page 16 of 35
Fill in the username and password fields. Optionally choose the right domain andOrganizational Unit and click the Create button.Figure 18: ODBC User Creation (2)The user will now show up in the Users list of you DIGIPASS Administration MMC. Atthis point it will be exactly the same as when Dynamic User Recognition (DUR) wasenabled.Figure 19: ODBC User Creation (3)DIGIPASS Authentication for Fortigate - Integration Guideline V1.0 2007 VASCO Data Security. All rights reserved.Page 17 of 35
7.1.2Import DIGIPASSRight-click the DIGIPASS folder and select Import DIGIPASS. .Figure 20: Import DIGIPASS (1)Browse for your *.DPX file, fill in the Transport Key and look at your availableapplications by pushing the Show Applications button. You can either import allapplications or only the ones you selected, by the Import buttons above and belowthe Show Applications button.Figure 21: Import DIGIPASS (2)DIGIPASS Authentication for Fortigate - Integration Guideline V1.0 2007 VASCO Data Security. All rights reserved.Page 18 of 35
When the DIGIPASS is imported successfully you will receive a confirmation message.Figure 22: Import DIGIPASS (3)DIGIPASS Authentication for Fortigate - Integration Guideline V1.0 2007 VASCO Data Security. All rights reserved.Page 19 of 35
7.1.3DIGIPASS AssignmentThere are two possible ways to assign a DIGIPASS to a user. You can search for aDIGIPASS and assign it to a user or you can search for a user and assign it to aDIGIPASS. You can see the difference in the following two figures.Right-click a user and select Assign DIGIPASS. or .Figure 23: DIGIPASS assignment (1) you can right-click a DIGIPASS and select Assign .Figure 24: DIGIPASS assignment (2)DIGIPASS Authentication for Fortigate - Integration Guideline V1.0 2007 VASCO Data Security. All rights reserved.Page 20 of 35
If you leave the User ID blank and press the Find button, you will get a list of all theavailable users in the same domain as the DIGIPASS. The usernames are partlysearchable too.Notice: If no users show up, make sure the domains of the DIGIPASS and the usermatch.Figure 25: DIGIPASS assignment (3)When assigning a DIGIPASS to a user the same procedure will be applicable. You caneither select the desired option to search for a DIGIPASS or search through serialnumber. Leaving all options blank will show all possibilities in the same domain.When the DIGIPASS gets successfully added to your user you will get a confirmationmessage.Figure 26: DIGIPASS assignment (4)DIGIPASS Authentication for Fortigate - Integration Guideline V1.0 2007 VASCO Data Security. All rights reserved.Page 21 of 35
7.27.2.1Active Directory installationUser creationUser creation, while using an Active Directory back-end, will happen in the ActiveDirectory Users and Computers MMC. Right-click a user and select Properties.This can happen automatically when the Dynamic User Registration (DUR) option inthe policy settings is active.Figure 27: Active Directory User Creation (1)DIGIPASS Authentication for Fortigate - Integration Guideline V1.0 2007 VASCO Data Security. All rights reserved.Page 22 of 35
In the DIGIPASS User Account tab you will see a field to manually add a password.This can also be automatically filled by enabling the Password Autolearn option in thepolicy settings.Figure 28: Active Directory User Creation (2)After clicking the Apply button you will see the Update History fields being filled withthe current date and time. When these fields are filled it means the DIGIPASS accountexists and can be used.Figure 29: Active Directory User Creation (3)DIGIPASS Authentication for Fortigate - Integration Guideline V1.0 2007 VASCO Data Security. All rights reserved.Page 23 of 35
7.2.2Import DIGIPASSTo make sure you can see the DIGIPASS folders in the MMC, go to View and selectthe Advanced Features. This way you will see the DIGIPASS folders.Figure 30: Import DIGIPASS (1)Right-click the DIGIPASS-Pool folder and select Import DIGIPASS .Figure 31: Import DIGIPASS (1)DIGIPASS Authentication for Fortigate - Integration Guideline V1.0 2007 VASCO Data Security. All rights reserved.Page 24 of 35
Browse for your *.DPX file, fill in the Transport Key and look at your availableapplications by pushing the Show Applications button. You can either import allapplications or only the ones you selected, by the Import buttons above and belowthe Show Applications button.Figure 32: Import DIGIPASS (1)When the DIGIPASS is imported successfully you will receive a confirmation message.Figure 33: Import DIGIPASS (1)DIGIPASS Authentication for Fortigate - Integration Guideline V1.0 2007 VASCO Data Security. All rights reserved.Page 25 of 35
7.2.3DIGIPASS assignmentThere are two possible ways to assign a user to a DIGIPASS. You can search for aDIGIPASS and assign it to a user or you can search for a user and assign it to aDIGIPASS. You can see the difference in the following two figures.Right-click a User and select Assign DIGIPASS. or .Figure 34: DIGIPASS Assignment (1) right-click a DIGIPASS and select Assign DIGIPASS .Figure 35: DIGIPASS Assignment (2)DIGIPASS Authentication for Fortigate - Integration Guideline V1.0 2007 VASCO Data Security. All rights reserved.Page 26 of 35
If you leave the User ID blank and press the Find button, you will get a list of all theavailable users in the same domain as the DIGIPASS. The usernames are partlysearchable too.Figure 36: DIGIPASS Assignment (4)When assigning a DIGIPASS to a user the same procedure will be applicable. You caneither select the desired option to search for a DIGIPASS or through serial number.Leaving all options blank will show you all possibilities. Remember to check the“Search upwards ” checkbox.DIGIPASS Authentication for Fortigate - Integration Guideline V1.0 2007 VASCO Data Security. All rights reserved.Page 27 of 35
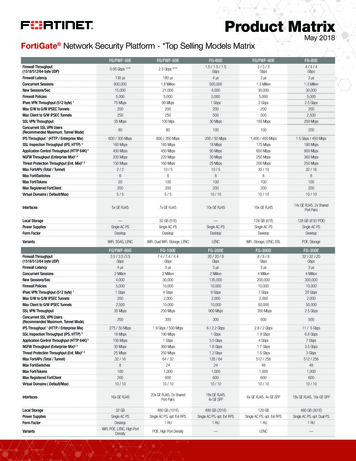
8 Fortigate SSL/VPN testBy default the Fortigate configures the SSL/VPN service on port 10443.8.1Response OnlyTo start the test, browse to the public IP address or hostname of the Fortigate device.In our example this is https://fortigate.labs.vasco.com:10443. Enter your Name andPassword (One Time Password) and click the Login button.Figure 37: Response Only (1)If all goes well, you will be authenticated and see the SSL/VPN portal page.Figure 38: Response Only (2)DIGIPASS Authentication for Fortigate - Integration Guideline V1.0 2007 VASCO Data Security. All rights reserved.Page 28 of 35
8.2Challenge / ResponseFor the challenge response test, enter your Name and Password (challenge/responsetrigger). Click the Login button.In our case the challenge/response trigger is the user‟s static password.Figure 39: Challenge / Response (1)You will be presented with a DP300 Challenge code. Enter the response in theAnswer field and click OK.Figure 40: Challenge / Response (2)DIGIPASS Authentication for Fortigate - Integration Guideline V1.0 2007 VASCO Data Security. All rights reserved.Page 29 of 35
And if everything goes well, you will be shown the SSL/VPN portal page.Figure 41: Challenge / Response (3)DIGIPASS Authentication for Fortigate - Integration Guideline V1.0 2007 VASCO Data Security. All rights reserved.Page 30 of 35
9 VACMAN Middlewarefeatures9.1 InstallationThe VACMAN Middleware (VM) installation is very easy and straightforward. VM runson Windows platforms, supports a variety of databases and uses an onlineregistration. Different authentication methods allow a seamless integration intoexisting environments.9.1.1Support for Windows 2000, 2003, IIS5 and IIS6VM can be installed on Windows 2000 and Windows 2003. Web modules exist for IIS5and IIS 6 to protect Citrix Web Interface, Citrix Secure Gateway, Citrix Secure AccessManager (Form-based authentication), Citrix Access Gateway and Microsoft OutlookWeb Access 2000 and 2003 (Basic Authentication and Form-Based Authentication).9.1.2Support for ODBC databases and Active DirectoryAny ODBC compliant database can be used instead of the default PostgreSQL database(MS SQL Server, Oracle). Since Version 2.3 of VACMAN Middleware, AD is not onlyintended for storage of DIGIPASS anymore, but configuration and management ofyour DIGIPASS infrastructure is now also full integrated into the AD managementtools. This option requires an AD schema update.9.2 DeploymentSeveral VACMAN Middleware features exist to facilitate deployment. Combining thesefeatures provides different deployment scenarios from manual to fully automatic.9.2.1Dynamic User Registration (DUR)This feature allows VM to check a username and password not in the database with aback-end RADIUS server or a Windows domain controller and, if username andpassword are valid, to create the username in the VM database.9.2.2Autolearn PasswordsSaves administrators time and effort by allowing them to change a user‟s password inone location only. If a user tries to log in with a password that does not match thepassword stored in the VM database, VM can verify it with the back-end RADIUSserver or the Windows domain controller and, if correct, store it for future use.9.2.3Stored Password ProxyAllows VM to save a user‟s RADIUS server password or Windows domain controllerpassword in the database (static password). User‟s can then log in with only usernameand dynamic one-time password (OTP). If this feature is disabled, users must log inwith username and static password immediately followed by the OTP.9.2.4Authentication MethodsDifferent authentication methods can be set on server level and on user level: localauthentication (VM only), Back-End authentication (Windows or RADIUS). On top ofthat a combination of local and back-end can be configured. The additional parameters„always‟, „if needed‟ and „never‟ offers you additional customization of the back-endauthentication process.DIGIPASS Authentication for Fortigate - Integration Guideline V1.0 2007 VASCO Data Security. All rights reserved.Page 31 of 35
The configuration of authentication methods is done within the policy (policies).9.2.5PoliciesPolicies specify various settings that affect the User authentication process. Eachauthentication request is handled according to a Policy that is identified by theapplicable Component record. Components can be radius clients, authenticationservers or Citrix web interfaces.9.2.6DIGIPASS Self AssignAllows users to assign DIGIPASS to themselves by providing the serial number of theDIGIPASS, the static password and the OTP.9.2.7DIGIPASS Auto AssignAllows automatic assignment of the first available DIGIPASS to a user on usercreation.9.2.8Grace PeriodSupplies a user with a certain amount of time (7 days by default) between assignmentof a DIGIPASS and the user being required to log in using the OTP. The Grace Periodwill expire automatically on first successful use of the DIGIPASS.9.2.9Virtual DIGIPASSVirtual DIGIPASS uses a text message to deliver a One Time Password to a User‟smobile phone. The User then logs in to the system using this One Time Password.Primary Virtual DIGIPASSA Primary Virtual DIGIPASS is handled similarly to a standard physical DIGIPASS. It isimported into the VACMAN Middleware database, assigned to a User, and treated bythe VACMAN Middleware database as any other kind of DIGIPASS.Backup Virtual DIGIPASSThe Backup Virtual DIGIPASS feature simply allows a User to request an OTP to besent to their mobile phone. It is not treated as a discrete object by VACMANMiddleware, and is not assigned to Users, only enabled or disabled. It can be enabledfor Users with another type of DIGIPASS already assigned, and used when the Userdoes not have their DIGIPASS available.DIGIPASS Authentication for Fortigate - Integration Guideline V1.0 2007 VASCO Data Security. All rights reserved.Page 32 of 35
9.39.3.1AdministrationActive Directory Users and Computers ExtensionsSince VACMAN Middleware version 2.3, Managing the users and DIGIPASS can bedone within the Active Directory Users and Computers section. Selecting theproperties of a user, offers complete User-DIGIPASS management.Figure 42: VM Features (1)9.3.2Administration MMC InterfaceA highly intuitive Microsoft Management Console (MMC) exists to administer theproduct. An Audit Console is available to give an instant view on all actions beingperformed on the VM. Both can be installed on the VM server itself or on a separatePC.Figure 43: VM Features (2)DIGIPASS Authentication for Fortigate - Integration Guideline V1.0 2007 VASCO Data Security. All rights reserved.Page 33 of 35
9.3.3User Self Management Web SiteA web site running on IIS has been developed to allow users to register themselves tothe VM with their username and back-end (RADIUS or Windows) password, to do aDIGIPASS self assign, to update their back-end password stored in the VM database,to do a change PIN (Go-1/Go-3 DIGIPASS), to do a DIGIPASS test.Figure 44: VM Features (3)9.3.4Delegated administrationAdministration can be delegated by appointing different administrators perorganizational unit (OU). These administrators can only see the DIGIPASS and usersthat were added to his OU.9.3.5Granular access rightsIt is possible in VACMAN Middleware to setup different permission per user. This canbe in function of a domain or an organizational unit. Administrators belonging to theMaster Domain may be assigned administration privileges for all domains in thedatabase, or just their own domain. Administrators belonging to any other Domain willhave the assigned administration privileges for that Domain only.It‟s possib
Page DIGIPASS Authentication for Fortigate - Integration Guideline V1.0 2007 VASCO Data Security. All rights reserved. 3of 35 Table of Contents