Transcription
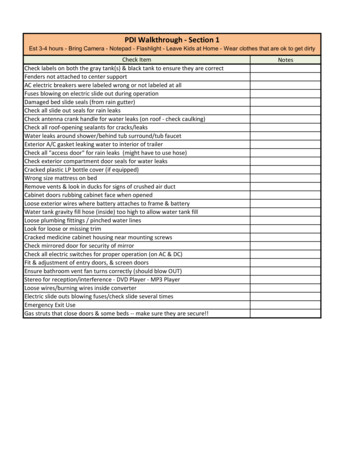
PDI Walkthrough - Section 1Est 3-4 hours - Bring Camera - Notepad - Flashlight - Leave Kids at Home - Wear clothes that are ok to get dirtyCheck ItemCheck labels on both the gray tank(s) & black tank to ensure they are correctFenders not attached to center supportAC electric breakers were labeled wrong or not labeled at allFuses blowing on electric slide out during operationDamaged bed slide seals (from rain gutter)Check all slide out seals for rain leaksCheck antenna crank handle for water leaks (on roof - check caulking)Check all roof-opening sealants for cracks/leaksWater leaks around shower/behind tub surround/tub faucetExterior A/C gasket leaking water to interior of trailerCheck all "access door" for rain leaks (might have to use hose)Check exterior compartment door seals for water leaksCracked plastic LP bottle cover (if equipped)Wrong size mattress on bedRemove vents & look in ducks for signs of crushed air ductCabinet doors rubbing cabinet face when openedLoose exterior wires where battery attaches to frame & batteryWater tank gravity fill hose (inside) too high to allow water tank fillLoose plumbing fittings / pinched water linesLook for loose or missing trimCracked medicine cabinet housing near mounting screwsCheck mirrored door for security of mirrorCheck all electric switches for proper operation (on AC & DC)Fit & adjustment of entry doors, & screen doorsEnsure bathroom vent fan turns correctly (should blow OUT)Stereo for reception/interference - DVD Player - MP3 PlayerLoose wires/burning wires inside converterElectric slide outs blowing fuses/check slide several timesEmergency Exit UseGas struts that close doors & some beds -- make sure they are secure!!Notes
PDI Walkthrough - Section 2This section should take around 1 hour. At this point, you're generally searching for anything thatdoesn't look right. My assumption for this PDI is that both (if fitted) propane tanks are full, shore poweris available, city water connected via hose & you are connected to a sewer connections. A fully chargedbattery must be connected as well.Check ItemRoof Sealing & Fixtures - You will need to get up on the roof now so round up aladder or carefully inspect the one on the back of the unit. Check that all the mountingpoints are solidly attached to the body & the rungs are firmly fixed to the frame. Climbon the roof & inspect all seams, gaskets & any other place that the roof material hasbeen cut or holes drilled. Check that all shrouds & covers are intact, unbroken &properly seated on the roof. Proper polyurethane caulking should have been used toseal all places where the roof has been penetrated. Check closely around airconditioners, vents, antennas, sewer vents, & side seams. Look for any signs ofbubbles (large & small), delamination, foreign objects or protruding screw or nail headsunder the membrane (if a rubber roof).** Take shoes off.best in your socks or barefoot.Windows - Check closely around each window, ensure it has been properly aligned &sealed.Entry Doors - check the gasket used on all doors for proper adhesive & coverage.Look closely at the door from the inside & confirm that it sits flush against the inside ofthe doorjamb. Confirm that each key works in the appropriate lock. The main doorshould open & close smoothly & lock without undue effort. Check that the screen dooropens smoothly alone & locks to the main door without any extra effort.Outside Compartments - open & close each door checking for alignment & gaskets.Confirm that each key works in the appropriate lock All hinges should be tight & secure& the latches should hold the door tightly closed & still be easy to open. Look for anysigns of moisture that might indicate rain leakage. Verify that compartment lighting (iffitted) works properly. Any gas cylinders used for keeping to door open should beproperly installed so as not to interfere with items stored in the compartment. If clamptype door hold-opens are used, make sure they are present & hold the door correctly.Sewer & Fresh Water Connections - Inspect this area on the trailer to make sure thatnothing is broken or deformed. If appropriate at this time, make sure you understandhow each valve or fitting works. understand the proper function of the black & graywater valves. If tank flushing is installed, understand how it operates. understand wherethe low point drains are for the fresh water system.Notes
PDI Walkthrough - Section 2 (cont)This section should take around 1 hour. At this point, you're generally searching for anything thatdoesn't look right. My assumption for this PDI is that both (if fitted) propane tanks are full, shore poweris available, city water connected via hose & you are connected to a sewer connections. A fully chargedbattery must be connected as well.Check ItemCable TV Connections- Find & understand the cable connections. Make sure aweather cap is present for each connector & that connectors are properly identified &mounting plates are properly sealed.Propane -If the tank(s) are contained in a compartment, here should be no possibleway for propane to enter into the RV or any other compartment. understand how theregulator works & how it switches between cylinders. Confirm that a leak test has beenperformed on both pigtails between the tanks & regulator & the rest of the system.Locate & understand the operation of the main shut off valve (if any).Battery - Check the battery box to verify that it is ventilated & that any compartmentslide mechanisms work properly. Verify that no battery cables are rubbing on any part ofthe frame because that will eventually end up with a short circuit & possible fire.understand the battery type provided & how to maintain them.Spare Tire - Check the condition & pressure of the spare tire & how to remove.Tires & Wheels - Closely inspect the tires & wheels & understand the proper inflationpressure. Verify the torque of the lug nuts or have the PDI person do it while you watch.Find out the proper jacking point for the trailer & what kind of jack to use. Determine ifyour tow vehicle lug nut wrench will fit the lug nuts on the trailer or if another size isnecessary.Notes
PDI Walkthrough - Section 3OUTSIDE WALK AROUND - The outside walk around should take around one hour. At this point,you're generally searching for anything that does not look right. My assumption for this PDI is that both(if fitted) propane tanks are full, shore power is available, city water & a hose are located close by &sewer connections, a drain or a dump station is available. A fully charged battery must be connected aswell.Check ItemPaint & Siding- Carefully check the paint finish on the RV. Any problems can beverified & corrected at this point with a lot less hassle. Site down the side of the unit tocheck for bumps or depressions in the siding. Divide each side of the unit into 2, 3 or 4sections & inspect for siding issues: color variations, dents or irregularities. Do thesame for the ends of the unit Look at places where vinyl film is used to make sure it isfree of any air bubbles. Check ends of any decals for uniformity or "mistakes" that mayhave gouged the siding. Look closely where masking tape was used for paint graphicsto make sure there is no over-spray. Carefully check for surface smoothness & anyplace when paint coverage is marginal or if there are bubbles.Awning(s) - Extend & retract each awning paying particular attention to how the awningis locked in the retracted position. Make sure all springs, locks & supports work well &are properly aligned. Wiggle the mounting points for the support arms to get a feelingfor how solidly they are mounted to the body.Slide Out Operation - If your RV includes a slide-out or slide-outs then spend the timeit takes to understand its operation. Start by checking the seals while the slide isretracted. You should not be able to find any places where you can see light or detectairflow. Use a flashlight to look into dark corners. understand the mechanism thatextends & retracts the slide. Operate it several times & understand any restrictions onoperation. understand the manual retraction process & actually perform the retractionas if the automatic mechanism had failed. Look for proper alignment of any wheels thatmay ride on carpet or other flooring, to insure proper clearance. understand any lockingmechanisms that are used to hold the top of the slide out tight against the top of the RV.Do your best to make sure the seals are properly installed & operational when the slideis retracted & also when it is extended.Chassis Inspection - Put on some old clothes or coveralls & get a good-sized piece ofcardboard or carpet to make it easier to lie on you back while checking around underthe trailer. If it's possible to do so without jacking up the rig, it's a lot easier, but do whatmakes sense to you. You want to be able to Inspect all air & / or hydraulic lines, wiring,shock absorber attachments, & in general every place that a wire or pipe could rubagainst something that could cause a problem later. All wiring & piping should beproperly fastened.Notes
PDI Walkthrough - Section 4INSIDE FIT & FINISH - Now its time to go inside. In general you are looking for things that are notfinished correctly since it is too late to inspect the design of anything.Check ItemCabinets - Inspect & open all of the cabinets to insure that the hinges & latches workwell. Pull each drawer out to its stop, return it closed & then try to open it like roadvibration might do. Makes sure that there have been no water leaks & that all the wiring& pipes are well fastened. Inspect the linings (if any), to insure they are fastenedsecurely. Run your h& along all edges, front & back to check for & delamination orloose edges on molding/vinyl wraps.Molding & Trim - Go over all the trim on walls, doors & furniture. Make sure thateverything is fastened on well & not loose or ready to come off.Lighting - Operate every light switch & observe its function. Use the monitor panel tocheck battery levels. understand & verify any battery disconnect switches. (at this point,only 12V lighting can be tested, as the unit is NOT connected to shore power yet)Closets -open & close all closet doors checking for free operation & proper alignment.Hanger rods should be properly fastened & secure. Check out the lighting that isprovided & any switches that are used.Furniture - Examine every piece of furniture to check for construction, upholstery,pattern & cloth matching. Check out the dinette by making it a bed with the appropriatecushions. Do the same with the couch or sofa.Blinds - Operate each blind & check for alignment. Look at all valances & trim to besure they are secured.Counter Tops - Inspect all counter tops for alignment & fastening. Make sure that anytrim pieces that should be there are in fact tight. Check for caulking quality everywherethere may be water, especially edges near a sink. Check the installation of sinks &faucets.Floor Coverings - Inspect carpet & other floor coverings in all corners to insure thatthey have been properly fastened down. Check areas that slide outs may roll over forpulled threads, cuts or other problems. Check closely for gouges or cuts in linoleum tile.Safe - If your unit has a built-in safe, make sure all the keys are included and youunderstand how to reset/set the combination.Missing Items - Dealers will often "cannibalize" units on their lot, taking off parts to puton other units. Then they sometimes forget to replace the parts. Keep this in mind asyou look through the unit. As an example, look for all the drawers and storage bins thatare supposed to be in the refrigerator and freezer.Wall Coverings - Check to make sure that all the wall coverings actually cover & joinproperly. Look for any discoloration or patch jobs that may cover hidden problems. Tryto find any places where it is not perfect since now is the time to get it fixed whilematching patterns are in stock. (Some folks suggest ordering extra fabric, carpet, &wallpaper now so that matching material is available to make small modifications orrepairs at a later date.)Notes
PDI Walkthrough - Section 5OPERATION TEST OF ALL SYSTEMS - You're now ready to test all of the house type systems.Check ItemShore Power System - Now is the time to connect up to shore power. Pull out all of theAC cord, confirm the length & inspect the plug for proper attachment. Inside the unit,check any 110V lighting & switches. (If you have a 110V receptacle tester, check alloutlets for proper wiring/polarity.) Find the GFI-protected outlet & test using the pushbutton. understand which receptacles "down stream" from the GFI are protected. Anyelectrical problems here should be corrected immediately.Converter - Confirm the operation of the converter/charger that is installed. Turn onseveral interior lights to create a load for the converter & confirm no excessiveconverter noise or vibration. Have the PDI person explain the operation of theconverter, the AC circuit breakers & the DC fuses. Make sure that there is a written listof the loads connected to each.Water Pump - Your PDI person should have filled the fresh water tank, so now you cantest the function of the water pump. After turning it on, you should hear it pump forseveral seconds, even up to a minute to create enough pressure in the system. If thepump does not shut off, then there is a problem. Run water in the kitchen & bathroomsink & notice that the pump will come back on until proper water pressure is restored.Now is the time to fix a noisy pump if it is vibrating or making any irritating soundsCity Water System - Turn off the pump, connect up to city water (use a regulator ifoverly high pressure is suspected) & confirm that the connection works correctly. Lookfor leaks under sinks & confirm the operation of all fixtures.Air Conditioners - Some air conditioners also have a heat strip or heat pump featureso now is the time to verify these functions. Turn on the air conditioner. After a couple ofminutes, cool air, 20 degrees cooler than ambient, should be coming out of theregisters. If you unit has ducting in the ceiling, make sure a good airflow comes out ofeach register. Learn how to clean the filters at this time.Propane & Carbon Monoxide Alarms & Smoke Detector- now is a good time tocheck the function of these alarms. The PDI person should have a small canister of gasthat can be sprayed at the alarm to test its operation. Have them perform this test whileyou watch & learn how the alarms work. Confirm that there is a new battery in theSmoke Detector (write the date on it for reference) Activate the test button to checkoperation of the smoke detector. understand how to turn it off.Notes
PDI Walkthrough - Section 5 (cont)OPERATION TEST OF ALL SYSTEMS - You should be about 3 hours into to the PDI.Check ItemTanks - Re-fill the fresh water tank if necessary & run water into the gray tank to verifythe gauge reading & that there are no leaks. Filling the gray tank until water comes upin the shower will make it easier to find leaks inside & out. Do the same thing to theblack water tank, including filling so that water comes up inside the toilet. Check forleaks (if the toilet is installed correctly, there will be no leaks!) You can fill the blackwater tank by using the tank flushing system (if fitted), by using a garden hose adapterfor the sewer connection (through a backflow preventer) or by bringing the water hoseinside & filling the tank through the toilet. This last method can be a little cumbersome,& I don't recommend unless you've done it before. Check the gauges for accuracy whileyou are filling Now is the time you want to find leaks if there are any. Drain the gray &black water tanks using the sewer hose or the garden hose adapter.Furnace - Now its time to understand the operation of the thermostat that controlsheating & sometimes the air conditioning. Turn the furnace on & set a temperature atleast 10 degrees hotter than ambient temperature. In about 30 seconds, you shouldhear the furnace fans come on. Shortly thereafter you should hear the click of the igniter& the sound of the burner. If not then there is a problem. It could also be taking a whilefor propane to get to the heater, so don't despair. Let the furnace blow & you should gethot air at about 110 degrees coming out of all vents. Check each one. Now turn thefurnace down & the hot air will gradually turn cooler & the fans will eventually stop afterthe furnace has cooled sufficiently. During this process have someone with a good nosechecking for any smell of material getting too hot, or exhaust coming out.TV's, Radio, DVD Player - If your RV is equiped with a DVD/Bluray player bring oneof each. Test them both to ensure the audio and video from each are working. Now,have the dealer connect you to their cable TV source and test you can scan forchannels and they appear. Next, raise the anntenta and scan for over the air channels.Make sure you understand all the functions of the radio.like how to control inside andoutside speakers. (your camping neighbors will appreciate this grin ) If you have 2TV's.test them both for cabe and over the air connections. Check remote works withTV.Water Heater - Try the water heater on propane first. A few seconds after you turn iton, you should hear the click of the igniter & the small pop when the burner lights. Thered light should stay on until that process happens. If it does not ignite, then there is aproblem. Turn the AC element in the water heater (if connected) & confirm operation.Make sure you know the location of the electrical switch at the water heater & thecorrect operation of the interior switch. If your unit is so equipped, understand theoperation of the bypass valves for winterizing. Confirm that hot (or warm waterdepending on how long the water heater has been on) comes out of the hot tap at thevarious sinks.Notes
PDI Walkthrough - Section 6 -- 5th Wheel FocusOPERATION TEST OF ALL 5th Wheel RV Items. - You should be about 4 hours into to the PDI bynow .almost there. :)Check ItemLanding Gear (Electric) - Ensure you fully understand how to operate the front landinglegs. They are adjustable and you will need to be shown how to raise/lower theadjustable section, BEFORE you start to lower/raise the actual extending legs. Ensurethe dealer/seller shows you the breaker for the landing gear. This is typically a 50ampbreaker and has a VERY VERY VERY tiny reset button. Make sure you know wherethis is located. If this breaker flips, you will no longer have power going to your batteryfrom the converter and therefore batteries will no longer charge. The back landing legsdo not have a variable height control, so you might consider purchasing blocks to putunder these legs, in case you camp in a location where the site might be uneven.Landing Gear (Hydraulic) - Ensure you fully understand how to operate the frontlanding legs first. Most RV's will have a remote switch outside the trailer, under the bedarea of the RV. Please locate this switch and ensure it operates the front legs both upand down. The legs in the back are controlled by a separate controller, which will belocated in the basement. Ensure the dealer has shown you have to operate the rearlegs.how to operate the controller (see next section for more details) Check to makesure all jacks are set to the same height on the frame.there a multiple height settings,so ensure they are the same.Landing Gear Controller - I have the LCI controller, so I will refer to this controller. Itis critical you understand the "Auto Level" function.how to operate the "return tounhitch height" mode and finally ask them to show you how to reset controller to"Zero Point". As with all electronic devices, they sometimes lose everything and youwill need to reset the controller to "zero point" (which is a fancy term for level). Thecontroller will use this new setting for all future "auto level" requests, so it is importantyou understand how to do this.Hydraulic Pump - Inspect the area around/under the pump to ensure there is noleaks. If equipped, have the dealer show you how to select specific slides to havecome out. Typical behavior is to have one (1) switch inside the RV, that will open allmajor slides. (bedroom is typically electric not hydraulic). Have dealer show you howto manually retract the slides, in case the hydraulic pump fails.write that informationdown.VERY important.Residential (electric) Refrigerator - Having one is nice.they are BIG. Have dealershow you how to winterize these, as the water line to them is tricky to fully winterize.You don't want water in that line and have it freeze as it will crack and then you will havea huge water mess. Have dealer show you the inverter that creates the AC to run therefrigerator. Ensure you understand how to turn this inverter on/off to save batterypower when not in use. Understand how to lock doors for travel.Notes
PDI Walkthrough - Section 6 (cont) -- 5th Wheel FocusOPERATION TEST OF ALL 5th Wheel RV Items. - You should be about 4 hours into to the PDI bynow .almost there. :)Check ItemWasher/Dryer - Have dealer connect you to power and water. Run 1-2 cycles in thewasher check for leaks. If there is no drip pan under washing machine GET ONE.Run dryer for 1 cycle to ensure heat is operational. Check both hot/cold connectionsfor possible leaks. These water lines should be turns off when washing machine is notin use. While they are running, listen for abnormal sounds or rattling. Ensure dryer isvented properly. If guying used, check vent line for built up lint from dryer.Basement - Have dealer show you how to access the area behind the basement wall(toward rear). In this closed off area, you will find the converter (creates DC powerfrom AC charges battery and powers 12v items when plugged in). Visually inspectthis area for possible damaged wire.left over debris during RV build.etc.Notes
General RV InformationPrint This and Keep in Truck/RVCheck ItemLength of RV - Tip to Rear BumperWidth of RV with Slides inLength when Towing (counting truck)Height of RV (including AC unit)Weight of RV (as shipped from factory)Gallons to Fill Fresh Water - Tank 1Gallons to Fill Fresh Water - Tank 2 (if equiped)Gray Water Capacity - Tank 1Gray Water Capacity - Tank 2 (if equiped)Gray Water Capacity - Tank 3 (if equiped)Black Water Capacity - Tank 1Black Water Capacity - Tank 2 (if equiped)Gallons to Fill Propane TankRecommended Tire PressureNotes
SummaryYou have now done a simple test of the major house systems & can shut everything off.By now, you will have a list of things that you feel need correcting, but it may be then the end of the day, so planon camping near the dealer for the night. This will give you a chance to further test the various functions.Prepare yourself for waiting until these things are corrected & don't be tempted by the PDI person to sign theacceptance paperwork just yet.For a really serious checkout of your new trailer, you should "dry camp" the first night & not be tempted to hookup to shore utilities just yet. Bring enough kitchen equipment & food so that you can prepare an evening meal.There is no better way to test the living facilities than to actually use them. Don't be tempted, since you've had atough day to go out to eatOh.bring some memory foam to place on top of the "mattress". You and your back will thank me in themorning.If you found this document helpful, please visit our web site and share on your favorite social media.Thanks,Jim Tannerwww.rvwiththetanners.comtanner@outlook.com
RV With The Tanners - PDI - May 2017 - Heartland Owners Forum . e }